


Models 110X, 210X, 310X, 360X, 410X
Safety and operating instructions
Insertion tool
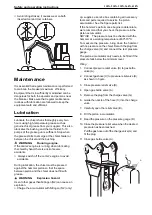
Selecting the right insertion tool
Conical moil point
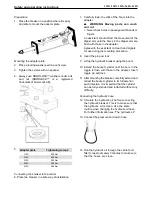
1. Drive out the spring pin by using a break pin
punch and a hammer. Press the retainer pin out
from the hole at the back upwards until you can
remove it through the hole on the front side.
Chisels and spades
>
Very good penetration
>
Regular spread of wedge
action
>
No torsion effect
>
Very good spread of wedge
action
>
Good penetration
>
Torsion effect
Blunt tool
>
Very good energy
application
>
Optimum breaking effect
>
No torsion effect
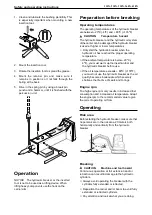
NOTICE
Dismount the insertion tool with a
lifting strap to reduce the risk of crushed body
parts. Some insertion tools are heavy, therefore
lift out the insertion tool in a safe way.
2. Check that the spring pin is not worn out or
damaged. Change if necessary.
Mounting and dismounting the insertion
tool
WARNING
Running engine
Changing the inserted tool or accessories while the
carrier's engine is running can cause serious injury.
►
Secure the carrier against involuntary activation.
Before you start mounting or dismounting the
insertion tool, do the following:
1. Place the hydraulic breaker on timber support
blocks. The boring on the back side of the
hydraulic breaker has to remain free.
2. Shut off the carrier's engine.
3. Remove two plugs from the hammer box, the
first at the split pin and the second at the retainer
pin.
Dismounting the insertion tool:
Mounting the insertion tool
Summary of Contents for 110X
Page 1: ...Safety and operating instructions Hydraulic breakers Models 110X 210X 310X 360X 410X ...
Page 4: ...110X 210X 310X 360X 410X Safety and operating instructions ...
Page 25: ...Models 110X 210X 310X 360X 410X ...
Page 27: ...NEW STYLE HYDRAULIC BREAKER PARTSINFORMATION ...
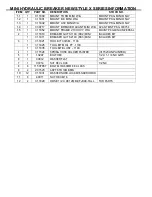
Page 29: ...MINI HYDRAULIC BREAKER NEW STYLE X SERIESINFORMATION ...
Page 30: ...NOTES ...
Page 31: ...NOTES ...
Page 32: ...2012 05 No 9800 1050 01b Copyright ERSKINE ATTACHMENTS LLC ...