background image


2


INSTALLATION AND OPERATION 


Mounting and detaching Luna  

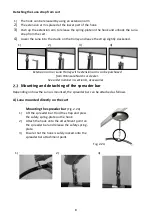
The Luna can be mounted in two different ways to meet specific needs. By choice from the 

buyer the Luna is prepared, delivered and ready to be mounted in one of the following, A or B. 


A) Luna mounted directly on the cart 

The Luna is mounted directly on a cart in the track system. 

(Fig. 2.1A). 

1)


Lift up the Luna and connect the bayonet on the cart 

into the Luna socket (when connecting you will feel 

easy resistance from spring). 

2)


Now turn the Luna clockwise 90˚ and await a little 

click - this indicates correct mounting. 


If the Luna is not mounted correctly an electronic safety device prevents to operate


Detaching the Luna from the cart 

1)


Push the Luna upwards toward the cart (feel easy resistance from the spring). 

2)


Turn the Luna 90˚ 

counter clockwise for detachment. 

B) Luna mounted by the strap 

Use the hook on the strap for mounting directly onto the cart 

(Fig. 2.1B)  

1)


Lift up the Luna and attach the hook to the cart by 

connecting the strap hook directly to the cart in the 

track. 


2)


Await click for correct attachment. Safety spring-

plate on the hook must be locked to prevent the Luna 

from detachment.


Always check that the hook is locked before using the Luna. 


Be aware that the Luna weighs 6,7 kg (14.8 Ibs) 


(1) 

( 2 )  

Fig. 2.1A 


(1) 

Fig. 2.1B 


Summary of Contents for LunaIPx4

Page 1: ...this user manual carefully before using the product This user manual is intended as a guide for caregivers and other users as well as technical personnel during servicing and maintenance of the produ...

Page 2: ...2...

Page 3: ...lifting slings ___________________________________________________14 Room to room transfer _______________________________________________15 Using Luna in a shower or bathing environment_____________...

Page 4: ...ts must be mounted correctly and according to this user manual There must be no indication of wear and tear on the Luna track system or lifting sling NEVER begin lifting if there is suspicion of any d...

Page 5: ...n environment containing chlorine or in other aggressive environments Safety checks Check lifting strap for wear and tear or damage If there is any sign of a defects the Luna must be taken out of use...

Page 6: ...ment to Winncare Nordic in case of repair or annual check Contents of the box Luna cassette User manual Hand control accessories Spreader bar accessories Charger accessories Transport The Luna is most...

Page 7: ...s indicates correct mounting If the Luna is not mounted correctly an electronic safety device prevents to operate Detaching the Luna from the cart 1 Push the Luna upwards toward the cart feel easy res...

Page 8: ...with extension arm can be purchased from Winncare Nordic or dealer See order number in section 8 Accessories Mounting and detaching of the spreader bar Depending on how the Luna is mounted the spreade...

Page 9: ...na when connecting you will feel a light resistance from spring 2 Now turn the Luna clockwise 90 and await a little click this indicates correct mounting see fig 2 2B If the spreader bar is not mounte...

Page 10: ...ary to lower a patient safely in case of a lift failure This button must be held constantly to lower the unit See section 2 5 8 STOP Press the emergency stop button to stop the Luna immediately This f...

Page 11: ...control The Emergency stop can be deactivated by pressing the Reset button on the handset for 5 seconds Emergency lowering button Emergency lowering is only to be used in an emergency where it is nec...

Page 12: ...hand control Fig 2 Remove the plug on the side of the Luna Fig 3 Take the key which is placed at the top of the charger Put the key into the Luna and turn the key counter clockwise to lower the user N...

Page 13: ...When charging starts the LED on the hand control and front panel will flash o After 2 minutes the flashing stops but the Luna continues charging To check the charging status simply remove and reinsert...

Page 14: ...accidents null and void Winncare Nordic can assist in choosing slings and the correct use of slings Attaching slings to the Winncare Nordic spreader bar Winncare Nordic accepts no responsibility if s...

Page 15: ...her as possible 2 The lifting strap from Luna b is extended and attached to the extra suspension point on the spreader bar 3 Now both Lunas are connected to the spreader bar Check that the hook from t...

Page 16: ...ore the Luna is mounted on the cart 1 In this lifting situation Luna a is moved as close as it is possible to the carts 2 Luna a with user is moved to the door and the transfer strap b from the other...

Page 17: ...proof IPx7 hand control which withstands to be immersed in water 4 MAINTENANCE Cleaning The Luna may be cleaned using a slightly damp cloth with a small quantity of standard household cleaning agents...

Page 18: ...Winncare com Troubleshooting Fault Possible cause Solution Luna does not react when the hand control UP DOWN are used no beep sound from the Luna unit Luna is not on or emergency stop is activated Tu...

Page 19: ...get a new one from the dealer or Winncare Nordic 6 TECHNICAL DATA AND DIMENSIONS Technical specifications Max capacity Length of lifting strap Weight Measurements Battery operation Charging Covering...

Page 20: ...0 mm 6 7 In D Min height from hook to track 430 mm 16 9 In E Lifting range from min height 1950 mm 76 7 In Measurements strap mounted A Width of Luna cassette 320 mm 12 6 In B Spreader bar see section...

Page 21: ...vironment if not handled in an environmentally responsible way Battery The Luna is equipped with batteries which may be returned either to the local recycling station or to Winncare Nordic at the end...

Page 22: ...cable 2 channels Standard spreader bar Luna 015 02108 015 02110 015 01968 015 02122 015 02124 015 01974 Spreader bar Strap 36 cm 14 In Spreader bar Strap 48 cm 19 In Spreader bar Strap 58 cm 23 In Sp...

Page 23: ...contact Up to 15kV air Suitable for use on wood concrete or ceramic floor materials Keep relative humidity below 30 when used on floors of syntenic materials e g carpets EN IEC61000 4 4 Electrical fas...

Page 24: ...ation for the transmission frequency Recommended safe distance d 1 17 P for 80 MHz to 800 MHz d 2 33 P for 800 MHz to 2 5 GHz with P as the maximum rated power of the transmitter in watts and d the re...

Reviews: