background image

Consumables

Ink Cartridge

Ink Cartridge Handling Precautions

Read the following instructions before replacing ink cartridges.

Handling Precautions

Store ink cartridges at normal room temperature and keep them away from direct sunlight.

Epson recommends using the ink cartridge before the date printed on the package.

For best results, store ink cartridge packages with their bottom down.

After bringing an ink cartridge inside from a cold storage site, allow it to warm up at room temperature for at
least 12 hours before using it.

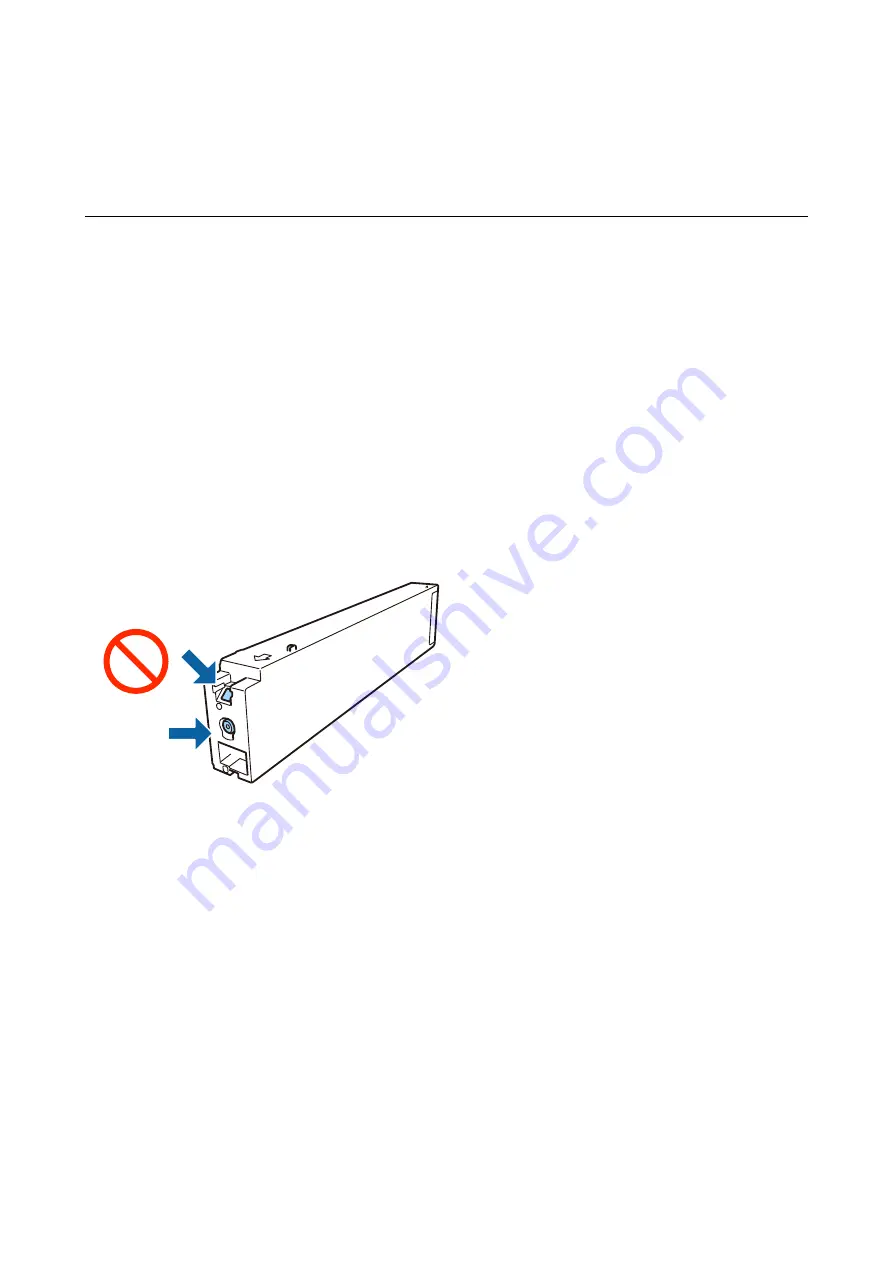
Do not touch the sections shown in the illustration. Doing so may prevent normal operation and printing.

Install all ink cartridges; otherwise you cannot print.

Do not turn off the printer during ink charging. If the ink charging is incomplete, you may not be able to print.

Do not leave the printer with the ink cartridge removed or do not turn off the printer during cartridge
replacement. Otherwise, ink remaining in the print head nozzles will dry out and you may not be able to print.

If you need to remove an ink cartridge temporarily, make sure you protect the ink supply area from dirt and
dust. Store the ink cartridge in the same environment as the printer, with the ink supply port facing sideways.
Because the ink supply port is equipped with a valve designed to contain the release of excess ink, there is no
need to supply your own covers or plugs.

Removed ink cartridges may have ink around the ink supply port, so be careful not to get any ink on the
surrounding area when removing the cartridges.

This printer uses ink cartridges equipped with a green chip that monitors information such as the amount of
remaining ink for each cartridge. This means that even if the cartridge is removed from the printer before it is
expended, you can still use the cartridge after reinserting it back into the printer.

To ensure you receive premium print quality and to help protect your print head, a variable ink safety reserve
remains in the cartridge when your printer indicates to replace the cartridge. The yields quoted for you do not
include this reserve.

User's Guide

Consumables

130

Summary of Contents for WorkForce Enterprise WF-M20590 Series

Page 1: ...WorkForce Enterprise User s Guide Provides information for general using of the printer maintenance solving problems and product specifications NPD6129 00 EN ...

Page 2: ...er Type 32 Placing Originals 32 Placing Originals on the ADF 33 Placing Originals on the Scanner Glass 34 Detecting the Original Size Automatically 35 Inserting an External USB Device 36 Inserting and Removing an External USB Device 36 Menu Options for Settings 36 Menu Options for Basic Settings in General Settings 36 Menu Options for Printer Settings in General Settings 38 Menu Options for Networ...

Page 3: ...g Clear Bar Codes 104 Canceling Printing 104 Menu Options for the Printer Driver 105 Printing from the PostScript Printer Driver on Windows 108 Using an Optional Device with a PostScript Printer Driver 109 Menu Options for the PostScript Printer Driver 110 Canceling Printing 112 Printing from the Printer Driver on Mac OS 112 Printing Basics 112 Printing on 2 Sides 114 Printing Several Pages on One...

Page 4: ...ge Problems 162 Cannot Save Scanned Images to the Shared Folder 165 Other Scanning Problems 169 Printing Problems 170 Cannot Print from a Computer 170 Cannot Print from an iPhone or iPad 171 Printing is Paused 171 Printout Problems 171 Other Printing Problems 173 PostScript Printer Driver Problems 174 Problems with Optional Items 175 The Finisher Unit and High Capacity Tray are not Recognized 175 ...

Page 5: ... PCL URW 189 List of Symbol Sets 191 Regulatory Information 194 Standards and Approvals 194 German Blue Angel 195 Restrictions on Copying 195 Where to Get Help 195 Technical Support Web Site 195 Contacting Epson Support 196 Copyright 202 Trademarks 203 User s Guide Contents 5 ...

Page 6: ...e are available from the site http epson sn The latest versions are also available from the following Paper manual Visit the Epson Europe support website at http www epson eu Support or the Epson worldwide support website at http support epson net Digital manual Start EPSON Software Updater on your computer EPSON Software Updater checks for available updates of Epson software applications and the ...

Page 7: ...rn to the previous page perform the following operation on your keyboard Windows Hold down Alt and then press Mac OS Hold down the command key and then press Printing only the pages you need You can extract and print only the pages you need Click Print in the File menu and then specify the pages you want to print in Pages in Pages to Print To specify a series of pages enter a hyphen between the st...

Page 8: ...such as Windows 10 Windows 8 1 Windows 8 Windows 7 Windows Vista Windows XP Windows Server 2019 Windows Server 2016 Windows Server 2012 R2 Windows Server 2012 Windows Server 2008 R2 Windows Server 2008 Windows Server 2003 R2 and Windows Server 2003 refer to the following operating systems Additionally Windows is used to refer to all versions Microsoft Windows 10 operating system Microsoft Windows ...

Page 9: ...ual is prohibited The contents of this manual is subject to change without notice The specifications and appearance of this product may vary in the future without prior notice for product improvement If you have any questions find any mistakes missing descriptions in the manuals please contact Epson support Epson cannot assume responsibility for any damage caused as a result of operations performe...

Page 10: ...d may result in fire or electric shock This product s power cord is for use with this product only Use with other equipment may result in fire or electric shock Use only the type of power source indicated on the printer s label Place the printer near a wall outlet where the plug can be easily unplugged Avoid using outlets on the same circuit as photocopiers or air control systems that regularly sw...

Page 11: ... a computer or other device with a cable ensure the correct orientation of the connectors Each connector has only one correct orientation Inserting a connector in the wrong orientation may damage both devices connected by the cable Do not insert objects through the slots in the printer Do not put your hand inside the printer during printing Do not use aerosol products that contain flammable gases ...

Page 12: ...PDL Font Macro and Working Area Disposing of European Printer Models There is a battery in the printer The crossed out wheeled bin label that can be found on your product indicates that this product and incorporated batteries should not be disposed of via the normal household waste stream To prevent possible harm to the environment or human health please separate this product and its batteries fro...

Page 13: ...the ADF Automatic Document Feeder C ADF Automatic Document Feeder Device that automatically loads documents D Face down tray Holds the print outs E MP tray Loads the paper You can load all types of paper thick paper and envelopes that can be used in this printer F Cover J Open when paper is jammed G Cover E Open when paper is jammed H Paper cassette 1 2 3 4 C1 C2 C3 C4 Loads the paper User s Guide...

Page 14: ...lace the document face down on the scanner glass B Cleaner This is a service part for cleaning the inside of the printer It can also be used as a substitute for a soft cloth when wiping the scanner glass surface C Maintenance box cover H Open when replacing the maintenance box You need to open the front cover L first D Face up tray Holds the print outs E Duplexing unit D1 Open when paper is jammed...

Page 15: ...n the right direction B LAN port Connects a LAN cable C AC inlet Connects the power cord D Circuit breaker If a short circuit occurs within the printer the power supply circuit shuts off automatically Do not operate the printer without performing periodic inspections Some printers do not have circuit breakers User s Guide Printer Basics 15 ...

Page 16: ...roduct D Finisher bridge unit Connects the main unit and the finisher E High capacity tray Loads the paper Turning the Power On and Off Turning the Power On Press the power button on the control panel to turn on the power Hold down the button until the LCD screen is displayed Make sure that the circuit breaker is on before turning on the power User s Guide Printer Basics 16 ...

Page 17: ... instructions to turn off the power cImportant Do not unplug the power cord directly or turn off the power using the circuit breaker When unplugging the power cord wait until the power light is off and the LCD screen has disappeared Related Information Control Panel Part Names on page 18 User s Guide Printer Basics 17 ...

Page 18: ...uch screen to turn on the display D N Mark Pass a smart device such as smartphone and tablet that support NFC over this mark to print or scan directly E Paper Clip holder F Power light Turns on or flashes when the printer is on Turns off when the printer turns off G Not available on this product H Error light Turns on or flashes when an error occurs I Data light Flashes when the printer is process...

Page 19: ...el Touch Screen Operations The touchscreen is compatible with the following operations Tap Press or select the items or the icons Flick Scroll the screen swiftly Slide Hold and move the items around User s Guide Printer Basics 19 ...

Page 20: ...nection Displays the volume setting screen Enters the printer into sleep mode Displays the help screen contains operating instructions and troubleshooting Tap to display the log in screen Tap the log out icon after using the printer This icon is displayed when users operations are restricted by the administrator C Menu selection screen Tap to display each menu screen You can change the position an...

Page 21: ...terrupt status Error status and current job Stop Pauses or cancels the job being processed Clock Displays the current time when there is no specific printer status to display Menu Screen Configuration A Switch the setting screen The contents of each tab differs depending on each menu B Displays the contents of each tab Tap on each item to change the setting C Displays the common operation buttons ...

Page 22: ...It is also displayed if the administrator has locked some functions Login method to the printer Tap to log in to the printer Select the user name and enter a password Contact your printer administrator for login information Note When you have finished using the printer tap to log out Related Information Menu Options for System Administration in General Settings on page 43 User s Guide Printer Basi...

Page 23: ...ord confirmation screen displays during performance contact your printer administrator Registering Contacts 1 Tap Settings on the home screen 2 Tap Contacts Manager Add Edit Delete 3 Tap Add New Add Contact 4 Select the type of contact that you want to register Email Register an email address to send a scanned image Network Folder FTP Register a network folder to save a scanned image 5 Make the ne...

Page 24: ...s Items that must be entered are displayed as XXXXX Required 6 Tap Contact s Added to the Group Required 7 Select the contacts that you want to register in the group and then tap Close To cancel the selection tap it again 8 Tap OK Related Information Menu Options for Contacts Manager on page 45 Registering Frequently Used Contacts 1 Tap Settings on the home screen 2 Tap Contacts Manager Frequent 3...

Page 25: ...etting You can register frequently used copy and scan settings as presets for up to 50 contacts You can easily select them from the preset list How to Register You can register presets from each menu screen such as Copy or the home screen Note If you cannot edit the presets they may have been locked by the administrator Contact your printer administrator for assistance Registering from Each Menu 1...

Page 26: ...reset to the home screen as shortcuts This allows you to easily start copying or scanning using the preset settings 1 Tap Presets on the home screen The Presets list is displayed 2 Tap next to the preset that you want to add as a shortcut and then tap Add Shortcut on Home Screen When you add Quick Copy as the shortcut for copying you can make a copy by simply tapping the preset on the home screen ...

Page 27: ...r 431 8 mm 4 A3 Tabloid B4 Legal Indian Legal 8 5 x 13 in Letter A4 B5 Executive A5 Half letter 16K 195 270 mm 8K 270 390 mm Up to the line indicated by the triangle symbol on the edge guide 80 g m2 550 B6 A6 User Defined mm Width 55 to 330 2 Length 127 to 1200 1 User Defined mm Width 139 7 to 297 Length 182 to 431 8 Up to the line indicated by the triangle symbol on the edge guide 80 g m2 550 1 T...

Page 28: ...ability of paper varies by location For the latest information on paper available in your area contact Epson support When printing on paper longer than 483 mm as the user defined size it is printed using the standard print quality regardless of the settings in the paper type and paper name Also the printer slows down the print speed for some types of paper such as plain paper Genuine Epson paper i...

Page 29: ...rs that have not dried after printing on one side Papers that are wadded and curled Papers that are torn cut folded Papers that are too thick too thin Preprinted papers that used other inkjet printers thermal transfer printers page printers or copiers Papers that are perforated Papers that have stickers Papers held together with tape staples paper clips perforated and so on Do not use envelopes wi...

Page 30: ...jams may occur depending on the environment Before using stored paper try printing a small amount of paper and check for paper jams or smears on the printout How to Load Papers See the printer s help for operating instructions Tap on the control panel then tap How To Load paper After loading paper in the MP tray set the paper size and type on the settings screen displayed on the control panel cImp...

Page 31: ...s in the same orientation as shown in the following illustration Envelopes If the flap is on the short edge make sure you include the flap when setting the user defined size Related Information Descriptions on the Screen on page 152 Available Paper Types and Capacities on page 26 Unavailable Paper Types on page 29 Paper Handling on page 29 Paper Storage on page 30 User s Guide Preparing the Printe...

Page 32: ...nk Jet Paper Plain paper 60 to 75 g m2 plain papers1 plain papers1 Plain1 plain papers1 Plain paper 76 to 90 g m2 plain papers2 plain papers2 Plain2 plain papers2 Thick paper 91 to 105 g m2 Thick Paper1 Thick Paper1 Thick Paper1 Thick Paper1 Thick paper 106 to 135 g m2 Thick Paper2 Thick Paper2 Thick Paper2 Thick Paper2 Thick paper 136 to 160 g m2 Thick Paper3 Thick Paper3 Thick Paper3 Thick Paper...

Page 33: ... may not feed from the ADF or the scan quality may decline depending on the paper properties or quality cImportant To prevent paper jams avoid placing the following originals in the ADF For these types use the scanner glass Originals that are torn folded wrinkled deteriorated or curled Originals with binder holes Originals held together with tape staples paper clips etc Originals that have sticker...

Page 34: ...e originals on the ADF in the direction of the arrow Placing the originals in the left direction Select Left Direction on the control panel as described below Copy Advanced Orientation Original Left Direction Place the originals on the ADF in the direction of the arrow Placing Originals on the Scanner Glass You can copy and scan irregular originals thick originals cardboard boxes and so on Availab...

Page 35: ...they may stick to the surface of the glass Placing Originals Tap on the control panel then select How To Place Originals Note A range of 1 5 mm from the edges of the scanner glass is not scanned When originals are placed in the ADF and on the scanner glass priority is given to the originals in the ADF Related Information Descriptions on the Screen on page 152 Detecting the Original Size Automatica...

Page 36: ...creen of the printer to make various settings Menu Options for Basic Settings in General Settings LCD Brightness Adjust the brightness of the LCD screen Sound Adjust the volume and select the type of the sound Detect Double Feed Select On to detect a double feed paper error when scanning with the ADF Sleep Timer Adjust the time period to enter a sleep mode energy saving mode when the printer has n...

Page 37: ...so add remove and move icons Wall Paper Change the background color of the LCD screen You can also select a background image from a memory device Only JPEG format is supported Operation Time Out Select On to return to the initial screen when no operations have been performed for the specified time When user restrictions have been applied and no operations are performed for the specified time you a...

Page 38: ...tomatically print on paper from any source containing paper that matches your paper settings Error Notice Select On to display an error message when the selected paper size or type does not match the loaded paper Paper Setup Auto Display Select On to display the Paper Setting screen when loading paper in the paper source User Defined Paper Size List You can change the user defined size setting Thi...

Page 39: ...et between jobs per sender when printing from a computer Slip sheets are inserted from the specified paper source PDL Print Configuration Select the PDL Print Configuration options you want to use for PCL or PostScript printing Common Settings Paper Size Select the default paper size for PCL or PostScript printing Paper Type Select the default paper type for PCL or PostScript printing Orientation ...

Page 40: ...ont number settings Symbol Set Select the default symbol set If the font that you selected in the font source and the font number setting is not available in the new symbol set setting the font source and the font number settings are automatically replaced with the default value IBM US Form Set the number of lines for the selected paper size and orientation This also causes a line spacing VMI chan...

Page 41: ...ta to the memory device with the printer This prevents confidential documents from being removed illegally Thick Paper Select On to prevent ink from smearing on your printouts however this may lower the print speed If you cannot prevent ink from smearing using this feature try reducing the print density and copy density Quiet Mode Select On to reduce noise during printing however this may lower th...

Page 42: ...vice on page 83 Menu Options for Network Settings in General Settings Wi Fi Setup Set up or change wireless network settings Choose the connection method from the following and then follow the instructions on the LCD panel Router Wi Fi Direct Wired LAN Setup Set up or change a network connection that uses a LAN cable and router When this is being used Wi Fi connections are disabled Network Status ...

Page 43: ...plays whether the printer is registered and connected to Google Cloud Print services When you have registered you can change the following settings Enable Disable Unregister For details on registering to Google Cloud Print services see the following web site https www epsonconnect com http www epsonconnect eu Europe only Related Information Printing Using a Network Service on page 145 Menu Options...

Page 44: ...ad Nozzle Check Select this feature to check if the print head nozzles are clogged The printer prints a nozzle check pattern Print Head Cleaning Select this feature to clean clogged nozzles in the print head Related Information Checking the Clogged Nozzles on page 150 Menu Option for Language Select the language used on the LCD screen Menu Options for Printer Status Print Print Status Sheet Config...

Page 45: ...the Scan to Computer Email and Scan to Network Folder FTP menus Frequent Register frequently used contacts to access them quickly You can also change the order of the list Print Contacts Print your contact list View Options Change the way the contact list is displayed Search Options Change the method for searching contacts Menu Options for User Settings You can change the default settings for your...

Page 46: ...uct s energy efficiency Please consider the environment before making any change Depending on the location of purchase the printer may have a feature that turns it off automatically if it is not connected to the network for 30 minutes Saving Power Control Panel 1 Tap Settings on the home screen 2 Tap General Settings Basic Settings 3 Do one of the following Select Sleep Timer or Power Off Settings...

Page 47: ...ginals or Image Quality and copy menus such as Book 2Pages or ID Card Copy If you tap you can register frequently used copy settings as presets If the combination of paper related settings you require is not available is displayed Tap the icon to check the details and then change the settings 4 Tap the value of the number of copies and then enter the number of copies using the on screen keypad 5 T...

Page 48: ...e other items as necessary 4 Tap x Related Information Copying Basics on page 47 Basic Settings Menu Options for Copying on page 50 Copying Multiple Originals onto One Sheet of Paper You can copy two or four originals onto a single sheet of paper 1 Tap Copy on the home screen 2 Tap Basic Settings Multi Page and select 2 up or 4 up You can also specify the layout order and orientation of the origin...

Page 49: ...wing settings when using this feature Two paper sources are used Load paper in the portrait orientation in one paper source and in the landscape orientation in the other paper source and then select Auto as the Paper Setting in Basic Settings On the home screen select Settings Output Copy and make sure that the Face Down Tray is selected Shift Sort When printing multiple copies each set of copies ...

Page 50: ...nification used to enlarge or reduce the original within a range of 25 to 400 Auto Detects the scan area and automatically enlarges or reduces the original to fit to the paper size you selected When there are white margins around the original the white margins from the corner mark of the scanner glass are detected as the scan area but the margins at the opposite side may be cropped Reduce to Fit P...

Page 51: ...orientation of your original and the binding position of the paper 2 1 Sided Copies both sides of a double sided original onto one side of two sheets of paper Select the orientation and the binding position of the original Multi Page Select the copy layout Single Page Copies a single sided original onto a single sheet 2 up Copies two single sided originals onto a single sheet in 2 up layout Select...

Page 52: ...elated Information Types and codes of Optional Items on page 126 Ejecting Paper and Stapling Using the Finisher Unit on page 126 Advanced Menu Options for Copying Note The items may not be available depending on other settings you made Mixed Size Originals You can place the following combination of sizes in the ADF at the same time A3 and A4 B4 and B5 When using these combinations originals are co...

Page 53: ...n Select the binding position margin and orientation of your original for 2 sided copy Reduce to Fit Paper Copies the scanned image at a smaller size than the Reduce Enlarge value to fit within the paper size If the Reduce Enlarge value is larger than the paper size data may be printed beyond the edges of the paper Remove Shadow Removes shadows that appear around copies when copying thick paper or...

Page 54: ...mber printing should begin You can also specify the starting page number in First Print Number Size Select the size of the number Background Select whether or not to make the page number s background white If you select White you can see the page number clearly when the background for the original is not white User s Guide Copying 54 ...

Page 55: ...l Document Capture Pro on your computer and create a job Memory Device You can save the scanned image to a memory device You need not set any settings before scanning Cloud You can send scanned images to cloud services Before scanning make settings on the Epson Connect Computer WSD You can save the scanned image to a computer connected to the printer using WSD feature If you are using the Windows ...

Page 56: ...he Printer on page 58 By registering a shared folder path on the printer s control panel you can specify the folder path by selecting from contacts Preparation 1 Check the Computer Name Check the computer name on which you want to create the shared folder Use alphanumerical characters for the computer name If other characters are used you cannot find the computer from the printer Note The method t...

Page 57: ... user account This is applied when the user accesses the folder over a network 4 Select the Sharing tab on the Properties window 5 Click Advanced Sharing on the Sharing tab 6 On the Advanced Sharing window enable Share this folder and then click Permissions 7 On the Share Permissions tab select Everyone from Group or user names allow the Change and then click OK 8 Click OK 9 Select Security tab 10...

Page 58: ...e the documentation of your computer for detailed information about setting a shared folder on your computer Related Information Registering from the Control Panel of the Printer on page 58 You can register contacts from the printer s control panel Registering from a Computer Using a Web Browser on page 59 You can register contacts from your computer by accessing the printer s configuration screen...

Page 59: ...le 1 Start Internet Explorer 2 Enter the printer s IP address in Internet Explorer s address bar and then press the Enter key 3 Click Continue to this website not recommended Note If you cannot access the Web Config contact your administrator 4 If an administrator password is set on the printer click Administrator Login and then log on as an administrator by entering the password If an administrat...

Page 60: ...enable Confirm Recipient 1 Place the originals Note If you want to scan multiple originals or make a 2 sided scan place all of the originals on the ADF 2 Tap Scan on the home screen 3 Tap Network Folder FTP 4 Specify the folder To select from frequently used addresses Select a contact from Frequent tab To enter the folder path directly Tap Keyboard Select Communication Mode enter the folder path a...

Page 61: ...port number B W Color Select whether to scan in color or in monochrome File Format File Format Select the format in which to save the scanned image Compression Ratio Select how much to compress the scanned image PDF Settings When you have selected PDF as the save format setting use these settings to protect PDF files To create a PDF file that requires a password when opening set Document Open Pass...

Page 62: ...of the scanned image Remove Background Select the darkness of the background Tap to lighten whiten the background and tap to darken blacken it If you select Auto the background colors of the originals are detected and they are removed or lightened automatically It is not applied correctly if the background color is too dark or not detected Remove Shadow Remove the shadows of the original that appe...

Page 63: ...Settings Basic Settings Date Time Settings By using the Document Capture Pro function on the control panel instead of this function you can send emails directly Before using this function make sure you have registered a job to send emails in Document Capture Pro and that the computer is turned on You can check destination before scanning Select Settings General Settings Scan Settings and then enab...

Page 64: ...ontacts on page 23 Scanning Using the Settings Registered on the Computer Document Capture Pro on page 66 Placing Originals on page 32 How to Use on page 26 Menu Options for Scanning to an Email Note The items may not be available depending on other settings you made Color Mode Select whether to scan in color or in monochrome File Format File Format Select the format in which to save the scanned i...

Page 65: ... of the originals as shown below Density Select the contrast of the scanned image Remove Background Select the darkness of the background Tap to lighten whiten the background and tap to darken blacken it If you select Auto the background colors of the originals are detected and they are removed or lightened automatically It is not applied correctly if the background color is too dark or not detect...

Page 66: ... Pro You can register a series of operations as a job using Document Capture Pro Registered jobs can be performed from the printer s control panel If you create the job to save the scanned image to the computer you can perform the job from the printer and save the scanned image to the computer Note Operations may vary depending on the operating system and the software version See the software help...

Page 67: ...to return to the Job List screen The created job is registered in the Job List 6 Click OK to return to the top screen Creating and Registering a Job Mac OS Note Operations may vary depending on the operating system and the software version See the software help for details on using the features 1 Start Document Capture 2 Click the icon on the main window The Job List window is displayed 3 Click th...

Page 68: ... the control panel to match the computer on which Document Capture Pro is installed 1 Select Settings from the home screen 2 Select General Settings Scan Settings Document Capture Pro 3 Select the operation mode Client Mode Select this if Document Capture Pro is installed on Windows or Mac OS Server Mode Select this if Document Capture Pro is installed on a Windows Server Next enter the server add...

Page 69: ...word If you have set only one job you do not need to select the job Proceed to the next step 6 Select the area in which the job content is displayed and then check the job details 7 Tap x Related Information Placing Originals on page 32 Scanning to a Memory Device You can save the scanned image to a memory device 1 Insert a memory device into the printer s external interface USB port 2 Place the o...

Page 70: ... protect PDF files To create a PDF file that requires a password when opening set Document Open Password To create a PDF file that requires a password when printing or editing set Permissions Password Resolution Select the scanning resolution 2 Sided Scan both sides of the original Orientation Original Select the orientation of the original Binding Original Select the binding direction of the orig...

Page 71: ... not detected Remove Shadow Remove the shadows of the original that appear in the scanned image Surround Remove the shadows at the edge of the original Center Remove the shadows of the binding margin of the booklet Remove Punch Holes Remove the punch holes that appear in the scanned image You can specify the area to erase the punch holes by entering a value in the box on the right Erasing Position...

Page 72: ...en 4 Tap Cloud 5 Tap on the top of the screen and then select a destination 6 Set items such as the save format 7 Check the other settings and change them if necessary Note Tap to save your settings as a preset Tap to restore settings to their defaults 8 Tap x Related Information Placing Originals on page 32 Menu Options for Scanning to the Cloud Note The items may not be available depending on ot...

Page 73: ... dark or not detected Remove Shadow Remove the shadows of the original that appear in the scanned image Surround Remove the shadows at the edge of the original Center Remove the shadows of the binding margin of the booklet Remove Punch Holes Remove the punch holes that appear in the scanned image You can specify the area to erase the punch holes by entering a value in the box on the right Erasing ...

Page 74: ...t up a WSD port for Windows 7 Windows Vista Note For Windows 10 Windows 8 1 Windows 8 the WSD port is set up automatically The following is necessary to set up a WSD port The printer and the computer are connected to the network The printer driver is installed on the computer 1 Turn the printer on 2 Click start and then click Network on the computer 3 Right click the printer and then click Install...

Page 75: ...he network screen You can check the printer s name set on the network from the printer s control panel or by printing a network status sheet 4 Click Your device is ready to use 5 Check the message and then click Close 6 Open the Devices and Printers screen Windows 7 Click start Control Panel Hardware and Sound or Hardware Devices and Printers User s Guide Scanning 75 ...

Page 76: ... your printer administrator 1 Start Epson Scan 2 2 On the Epson Scan 2 screen make sure that your printer is selected in the Scanner list 3 Select Settings from the Scanner list to open the Scanner Settings screen 4 Click Access Control 5 On the Access Control screen enter the User Name and the Password for an account that has permission to scan 6 Click OK Scanning Using Epson Scan 2 You can scan ...

Page 77: ...tation of the original you placed Depending on the size of the original this item may be set automatically and cannot be changed Image Type Select the color for saving the scanned image Resolution Select the resolution 4 Make other scan settings if necessary You can preview the scanned image by clicking the Preview button The preview window opens and the previewed image is displayed When you previ...

Page 78: ...r specified for the scanned image and then save it in grayscale or black and white Threshold You can adjust the border for monochrome binary black and white Unsharp Mask You can enhance and sharpen the outlines of the image Descreening You can remove moiré patterns web like shadows that appear when scanning printed papers such as a magazine Edge Fill You can remove the shadow created around the sc...

Page 79: ...tion Placing Originals on page 32 Application for Scanning Documents and Images Epson Scan 2 on page 137 Scanning from Smart Devices Epson iPrint is an application that allows you to scan photos and documents from a smart device such as a smartphone or tablet that is connected to the same wireless network as your printer You can save the scanned data on a smart device or to Cloud services send it ...

Page 80: ...nning screen E Displays the screen where you can make scan settings such as resolution F Displays scanned images G Starts scanning H Displays the screen where you can save scanned data to a smart device or Cloud services I Displays the screen where you can send scanned data by email J Displays the screen where you can print scanned data Scanning by Touching Smart Devices to the N Mark You can simp...

Page 81: ...rinter s N Mark to install it Enable the Wi Fi Direct on your printer 1 Place the originals in the printer 2 Touch your smart device to the printer s N Mark Note The printer may not be able to communicate with the smart device when there are obstacles such as metal between the printer s N Mark and the smart device Epson iPrint starts 3 Select the scan menu in Epson iPrint 4 Touch the smart device ...

Page 82: ...ake settings for Select All Images Cancel Image Selection and Select Group 4 Tap the files you want to print Selected images have check marks on them To preview one image tap Single View You can enlarge the image by tapping Tap or to preview the previous or next image 5 Set the paper source that you want to use on the Basic Settings tab 6 Set the other items on the Advanced tab as necessary For mo...

Page 83: ...Information Inserting and Removing an External USB Device on page 36 Basic Menu Options for PDF Settings on page 84 Advanced Menu Options for PDF Settings on page 85 Basic Menu Options for TIFF Settings on page 85 Advanced Menu Options for TIFF Settings on page 86 Menu Options for Memory Device Tap Memory Device on the printer s home screen to make various print settings for the file on the memory...

Page 84: ...layed when the finisher unit is installed Quality Select Best for higher quality printing but the printing speed may be slower Fix Photo Select this mode to improve the brightness contrast and saturation of the photo automatically To turn off automatic improvement select Enhance Off Fix Red Eye Select On to automatically fix the red eye effect in photos Corrections are not applied to the original ...

Page 85: ...aper source and the landscape orientation from another paper source Choose Auto as the Paper Setting when using this feature Select Shift Sort to offset each set of copies Staple Select the staple location Displayed when the finisher unit is installed Related Information Types and codes of Optional Items on page 126 Ejecting Paper and Stapling Using the Finisher Unit on page 126 Basic Menu Options...

Page 86: ...hift Sort to offset each set of copies Staple Select the staple location Displayed when the finisher unit is installed Quality Select Best for higher quality printing but the printing speed may be slower Print Order Select the order for printing multi page TIFF files Date Select the format of the date the photo was taken or saved The date is not printed for some layouts Related Information Types a...

Page 87: ... Windows XP Windows Server 2003 R2 Windows Server 2003 Click the start button and select Control Panel Printers and Other Hardware Printers and Faxes Right click on your printer and select Printing preferences Accessing the printer driver from the printer icon on the task bar The printer icon on the desktop task bar is a shortcut icon allowing you to quickly access the printer driver If you click ...

Page 88: ... select Print Preview you can see a preview of your document before printing 6 Click OK to close the printer driver window 7 Click Print Note When you select Print Preview a preview window is displayed To change the settings click Cancel and then repeat the procedure from step 2 Related Information Available Paper Types and Capacities on page 26 How to Load Papers on page 30 Setting the Paper Type...

Page 89: ...ng on the paper and the data ink may bleed through to the other side of the paper Related Information Available Paper Types and Capacities on page 26 Print Settings 1 On the printer driver s Main tab select Auto Long edge binding or Auto Short edge binding from 2 Sided Printing 2 Click Settings make the appropriate settings and then click OK To print a folded booklet select Booklet 3 Click Print R...

Page 90: ...g Basics on page 87 Main Tab on page 105 Printing and Stacking in Page Order Reverse Order Printing If you use this feature when you select the face up tray as the Output Tray setting on the Finishing tab you can print from the last page so that the documents are stacked in page order Print Settings On the printer driver s Main tab select Reverse Order Related Information Printing Basics on page 8...

Page 91: ...want to reduce or enlarge the document by a specific percentage select Zoom to and then enter the percentage Select Center to print the images in the center of the page Related Information Printing Basics on page 87 Main Tab on page 105 Stacking Each Set of Copies by Alternately Rotating 90 Degrees or by Offsetting You can sort the printouts by stacking them alternately in the portrait orientation...

Page 92: ...er Unit is installed 2 If the optional Finisher Unit is installed select the staple location as necessary 3 Set the other items and then click OK 4 Click Print Related Information Printing Basics on page 87 Finishing Tab on page 106 Inserting Separator Sheets You can insert separator sheets between copies or jobs Note When different users send print jobs from the computer you can also insert separ...

Page 93: ...shing tab select Verify Job as the Job Type setting 2 Click Settings enter the User Name and Job Name and then click OK You can identify the job by using the job name on the printer s control panel 3 Set other items and then click OK 4 Click Print Only one copy is printed and the print job is stored in the printer s memory The stored job is deleted when the printer is turned off Related Informatio...

Page 94: ...2x2 Poster 3x3 Poster or 4x4 Poster as the Multi Page setting If you click Settings you can select the panels that you do not want to print You can also select the cutting guide options Related Information Printing Basics on page 87 Main Tab on page 105 Making Posters Using Overlapping Alignment Marks Here is an example of how to make a poster when 2x2 Poster is selected and Overlapping Alignment ...

Page 95: ...ochrome but for this explanation they are shown as blue and red lines 1 Prepare Sheet 1 and Sheet 2 Cut off the margins of Sheet 1 along the vertical blue line through the center of the top and bottom cross marks User s Guide Printing 95 ...

Page 96: ...and align the cross marks then temporarily tape the two sheets together from the back 3 Cut the taped sheets in two along the vertical red line through the alignment markers this time the line to the left of the cross marks User s Guide Printing 96 ...

Page 97: ...rom the back 5 Repeat steps 1 to 4 to tape Sheet 3 and Sheet 4 together 6 Cut off the margins of Sheet 1 and Sheet 2 along the horizontal blue line through the center of the left and right side cross marks User s Guide Printing 97 ...

Page 98: ...7 Place the edge of Sheet 1 and Sheet 2 on top of Sheet 3 and Sheet 4 and align the cross marks and then temporarily tape them together from the back User s Guide Printing 98 ...

Page 99: ...8 Cut the taped sheets in two along the horizontal red line through the alignment markers this time the line above the cross marks 9 Tape the sheets together from the back User s Guide Printing 99 ...

Page 100: ...oter You can print information such as a user name and printing date in headers or footers Print Settings On the printer driver s More Options tab click Watermark Features and then select Header Footer Click Settings and the select the items you want to print User s Guide Printing 100 ...

Page 101: ...py paper Letterhead Recycled paper Colored paper Preprinted paper High quality plain paper Thick paper with 160g m thickness or less Quality Standard Automatic 2 sided printing Not selected Color Correction Automatic Note You can also add your own watermark or anti copy pattern Print Settings On the printer driver s More Options tab click Watermark Features and then select Anti Copy Pattern or Wat...

Page 102: ...elated Information Printing Basics on page 87 More Options Tab on page 107 Printing Multiple Files Together Job Arranger Lite allows you to combine several files created by different applications and print them as a single print job You can specify the print settings for combined files such as multi page layout and 2 sided printing Print Settings On the printer driver s Main tab select Job Arrange...

Page 103: ...ile menu to select the file Related Information Printing Basics on page 87 Main Tab on page 105 Adjusting the Print Tone You can adjust the tone used in the print job These adjustments are not applied to the original data Print Settings On the printer driver s More Options tab select Custom as the Tone Correction setting Click Advanced to open the Tone Correction window and then select the method ...

Page 104: ...tterhead Recycled Color Preprinted High quality plain paper Thick paper with 160g m thickness or less Envelope Quality Standard Note Deblurring may not always be possible depending on the circumstances Print Settings On the printer driver s Maintenance tab click Extended Settings and then select Barcode mode Related Information Printing Basics on page 87 Maintenance Tab on page 108 Canceling Print...

Page 105: ... printer Orientation Select the orientation you want to use to print Document Size Select the size of your document If you select User Defined enter the paper width and height Output Paper Select the paper size on which you want to print If the Output Paper differs from the Document Size Reduce Enlarge Document and Fit to Page are selected automatically If you want to reduce or enlarge the documen...

Page 106: ...on when printing If you use this feature the print data is stored in the printer and can only be printed after the authentication information has been entered using the printer s control panel This item is available only when Epson Print Admin Serverless printing is enabled Paper Source Select the paper source from which the paper is fed Select Auto Select to automatically select the paper source ...

Page 107: ...k Settings to change the settings Verify Job When printing multiple copies allows you to print one copy to check the content To print after making the second copy operate the printer s control panel Click Settings to set User Name and Job Name Re Print Job Allows you to store the print job in the printer s memory You can start printing by operating the printer s control panel Click Settings to set...

Page 108: ...ws you to register user accounts If access control is set on the printer you must register your account Language Changes the language used on the printer driver window To apply the settings close the printer driver and then open it again Software Update Starts EPSON Software Updater to check for the latest version of applications on the Internet Technical Support Allows you to access a technical s...

Page 109: ...t Tab on page 110 Paper Quality Tab on page 110 Using an Optional Device with a PostScript Printer Driver You need to make settings in the PostScript printer driver to use optional devices Settings Windows 10 Windows Server 2019 Windows Server 2016 Click on the start button and then select Windows System Control Panel View devices and printers in Hardware and Sound Right click on your printer or p...

Page 110: ...ters and Faxes Right click on your printer and select Properties On the Device Settings tab select the optional device in the Installable Options setting Menu Options for the PostScript Printer Driver Open the print window on an application select the printer and then access the printer driver window Note Menus vary depending on the option you selected Layout Tab Orientation Select the orientation...

Page 111: ...word Verify Job When printing multiple copies allows you to print one copy to check the content To print after the second copy operate the printer s control panel Re Print Job Allows you to store the print job in the printer s memory You can start printing by operating the printer s control panel Confidential Job Allows you to enter a password to the print job User Name Enter a user name Job Name ...

Page 112: ... from the computer However you cannot cancel a print job from the computer once it has been completely sent to the printer In this case cancel the print job by using the printer s control panel Canceling On your computer right click on your printer in Devices and Printers Printer or in Printers and Faxes Click See what s printing right click on the job you want to cancel and then select Cancel Pri...

Page 113: ...ry See the menu options for the printer driver for details 6 Click Print Related Information Available Paper Types and Capacities on page 26 How to Load Papers on page 30 Setting the Paper Type on page 32 Menu Options for the Printer Driver on page 105 User s Guide Printing 113 ...

Page 114: ...ccur Depending on the paper and the data ink may bleed through to the other side of the paper Related Information Available Paper Types and Capacities on page 26 Print Settings Select Two sided Printing Settings from the pop up menu and then select the binding location Related Information Printing Basics on page 112 Menu Options for Layout on page 118 User s Guide Printing 114 ...

Page 115: ... Printing Basics on page 112 Menu Options for Layout on page 118 Printing and Stacking in Page Order Reverse Order Printing If you use this feature when you select Finishing from the pop up menu and then select the face up tray as the Output Tray setting you can print from the last page so that the documents are stacked in page order Print Settings Select Paper Handling from the pop up menu Select...

Page 116: ...u and then select Scale to fit paper size Select the paper size you loaded in the printer in Destination Paper Size When reducing the size of the document select Scale down only When printing at a specific percentage select Print or Page Setup from the File menu of the application Select Printer Paper Size enter the percentage in Scale and then click OK Note Select the paper size you set in the ap...

Page 117: ...Basics on page 112 Menu Options for Finishing on page 119 Canceling Printing You can cancel a print job from the computer However you cannot cancel a print job from the computer once it has been completely sent to the printer In this case cancel the print job by using the printer s control panel Canceling Click the printer icon in the Dock Select the job you want to cancel and then do one of the f...

Page 118: ...ed in order and sorted into sets Pages to Print Select to print only odd pages or even pages Page Order Select to print from the top or the last page Scale to fit paper size Prints to fit to the paper size you loaded Destination Paper Size Select the paper size to print on Scale down only Select when reducing the size of the document Menu Options for Cover Page Print Cover Page Select whether or n...

Page 119: ...u can select this option only when you select Finisher Tray as the Output Tray setting Staple Select the staple location Available when the optional Finisher Unit is installed Menu Options for Paper Configuration Print Density Reduce the print density for finer printing when printing photos with dense data Menu Options for Two sided Printing Settings Two sided Printing Prints on both sides of the ...

Page 120: ...prove the printer s ability to staple and stack paper Using this feature decreases print speed Optional Paper Sources If the optional Paper Source is not installed select No Optional Paper Source If the optional Paper Source is installed select the name of Paper Source you installed You need to set this item when you install or remove the optional Paper Source Printing from the PostScript Printer ...

Page 121: ...nu Options for the PostScript Printer Driver Open the print window on an application select the printer and then access the printer driver window Note Menus vary depending on the option you selected Menu Options for Layout Pages per Sheet Select the number of pages to be printed on one sheet Layout Direction Specify the order in which the pages will be printed Border Prints a border around the pag...

Page 122: ...ct the paper source for page First Page From Remaining From Menu Options for Cover Page Print Cover Page Select whether or not to print a cover page When you want to add a back cover select After document Cover Page Type Select the contents of the cover page Menu Options for Printer Features Feature Sets Quality Media Type Select the type of paper on which you print Output Output Tray Select which...

Page 123: ...let You can use local print printing from a smart device that is connected to the same wireless network as your printer or remote print printing from a remote location over the Internet To use remote print register your printer in the Epson Connect service Related Information Printing Using a Network Service on page 145 Installing Epson iPrint You can install Epson iPrint on your smart device from...

Page 124: ... press it to display the paper settings currently set on the printer G Displays photos and documents you selected H Starts printing Note To print from the document menu using iPhone iPad and iPod touch running iOS start Epson iPrint after transferring the document you want to print using the file sharing function in iTunes Printing by Touching Smart Devices to the N Mark You can simply connect and...

Page 125: ...ay block this feature In this case smart devices only make a sound and do not start any applications even if you touch them to the printer s N Mark 3 Select the file you want to print in Epson iPrint 4 On the preview screen with the Print icon touch the smart device to the printer s N Mark Printing starts Canceling Ongoing or Queued Jobs Note You can also cancel the ongoing jobs by tapping y on th...

Page 126: ...inisher unit from the Output Tray menu on the printer driver Ejecting Paper and Stapling Using the Finisher Unit If you are using the optional finisher unit you can shift and eject your printouts or staple your printouts This feature is available for Copy Memory Device and printing using the printer driver Copy Tap Copy on the home screen and then tap Finishing on the Basic Settings tab to make se...

Page 127: ...ying on page 50 Menu Options for Memory Device on page 83 Finishing Tab on page 106 Menu Options for Finishing on page 119 Using the Manual Staple The optional Finisher Unit has a feature that allows you to staple manually This feature is useful when you forget to staple the printouts or want to staple the originals Number of sheets that can be manually stapled The available paper sizes are set an...

Page 128: ...staple position switching button before loading paper This button is not available when paper is loaded When paper is loaded correctly the staple button light turns on If the light is off load paper again 4 Staple Take your hands off the paper and then press the staple button To exit manual staple mode press the staple position switching button several times to turn the light off Note If an unexpe...

Page 129: ... in a safe place Note When you remove the Paper Cassette Lock from the paper cassette insert the key all the way into the lock Make sure you remove the key after the button appears in the middle of the slot Related Information Types and codes of Optional Items on page 126 User s Guide Options 129 ...

Page 130: ...ead nozzles will dry out and you may not be able to print If you need to remove an ink cartridge temporarily make sure you protect the ink supply area from dirt and dust Store the ink cartridge in the same environment as the printer with the ink supply port facing sideways Because the ink supply port is equipped with a valve designed to contain the release of excess ink there is no need to supply ...

Page 131: ...tly used during initial setup In order to produce high quality printouts the print head in your printer will be fully charged with ink This one off process consumes a quantity of ink and therefore this cartridge may print fewer pages compared to subsequent ink cartridges Ink Cartridge Codes The following are the codes for genuine Epson ink cartridges BK1 BK2 Black T04Q1 Epson recommends the use of...

Page 132: ...k levels Two black ink cartridges are installed in this printer Since ink cartridges switch automatically you can continue printing even if either one of them is low When using the printer driver you can also check from your computer Note You can continue printing while the ink low message is displayed Replace the ink cartridges when required Related Information Accessing the Printer Driver on pag...

Page 133: ...rint cycles a very small amount of surplus ink may be collected in the maintenance box To prevent ink leakage from the maintenance box the printer is designed to stop printing when the absorbing capacity of the maintenance box has reached its limit Whether and how often this is required will vary according to the number of pages you print the type of material that you print and the number of clean...

Page 134: ...he printer driver you can also check from your computer Related Information Accessing the Printer Driver on page 86 Accessing the Printer Driver on page 86 Staple Cartridge Epson recommends using genuine Epson staple cartridge Staple Cartridge Replacing Follow the steps below to replace the staple cartridge 1 Open the front cover of the finisher unit 2 Remove the staple cartrige holder User s Guid...

Page 135: ...3 Replace the staple cartrige Note The cartridge cannot be removed from the holder until it is empty 4 Install the staple cartrige holder User s Guide Consumables 135 ...

Page 136: ...5 Close the front cover User s Guide Consumables 136 ...

Page 137: ...ndows Server 2016 Click the start button and then select EPSON Epson Scan 2 Windows 8 1 Windows 8 Windows Server 2012 R2 Windows Server 2012 Enter the application name in the search charm and then select the displayed icon Windows 7 Windows Vista Windows XP Windows Server 2008 R2 Windows Server 2008 Windows Server 2003 R2 Windows Server 2003 Click the start button and then select All Programs or P...

Page 138: ... settings for scanned images sent from the printer to a computer over a network After checking the scanned image you can configure various scan settings on the computer such as the file saving format where to save the scanned image and the forwarding destination See the Document Capture Pro help for details on using the application The names are for Windows For Mac OS the name is Document Capture ...

Page 139: ...Chrome OS Default browser Use the latest version Running Web Config on a Web Browser 1 Check the printer s IP address Tap the network icon on the printer s home screen and then tap the active connection method to confirm the printer s IP address Note You can also check the IP address by printing the network connection report 2 Launch a Web browser from a computer or smart device and then enter the...

Page 140: ...Service tab and click the URL Running Web Config on Mac OS 1 Select System Preferences from the menu Printers Scanners or Print Scan Print Fax and then select the printer 2 Click Options Supplies Show Printer Webpage Software Update Tools Software Updater EPSON Software Updater is an application that checks for new or updated software on the internet and installs it You can also update the printer...

Page 141: ... EPSON Software Updater Related Information Installing the Latest Applications on page 141 Installing the Latest Applications Note When reinstalling an application you need to uninstall it first 1 Make sure the printer and the computer are available for communication and the printer is connected to the Internet 2 Start EPSON Software Updater The screenshot is an example on Windows 3 For Windows se...

Page 142: ... Use the software disc supplied with the printer Insert the software disc into the computer access the following folder path and then run SETUP64 EXE or SETUP EXE Driver PostScript WINX64 or WINX86 SETUP SETUP64 EXE or SETUP EXE Use the website Access your printer page from the following website download the PostScript3 printer driver and then run the execution file http www epson eu Support Europ...

Page 143: ...er adding the printer driver Installing the Epson Universal Printer Driver for Windows Only The Epson universal printer driver is the universal PCL6 compatible print driver Once you install this printer driver you can print from every Epson printer that supports this printer driver Since this is a generic printer driver printing features are limited compared to the printer driver specifically desi...

Page 144: ...s 8 Windows 7 Windows Vista Windows Server 2019 Windows Server 2016 Windows Server 2012 R2 Windows Server 2012 Windows Server 2008 R2 Windows Server 2008 Select Uninstall a program in Programs Windows XP Windows Server 2003 R2 Windows Server 2003 Click Add or Remove Programs 5 Select the application you want to uninstall You cannot uninstall the printer driver if there is any print jobs Delete or ...

Page 145: ... select Go Applications Epson Software select the application you want to uninstall and then drag it to the trash icon Related Information Software Update Tools Software Updater on page 140 Printing Using a Network Service By using Epson Connect service available on the Internet you can print from your smartphone tablet PC or laptop anytime and practically anywhere To use this service you need to ...

Page 146: ...in a remote location you can print by changing the printer on the usual applications window See the Epson Connect web portal for details https www epsonconnect com http www epsonconnect eu Europe only Related Information Using Epson iPrint on page 123 User s Guide Network Service and Software Information 146 ...

Page 147: ...ocument cover 2 Use a soft cloth to clean the surface and left side of the scanner glass cImportant Do not press too hard scratch or damage the surface of the glass A damaged glass surface can decrease the scan quality Note If the glass surface is stained with grease or some other hard to remove material use a small amount of glass cleaner and a soft cloth to remove it Wipe off all remaining liqui...

Page 148: ...curs within the printer Perform the following operation about once a month Even if the breaker notations or the position of the test button change the steps of the procedure are the same The breaker is subject to change or removal without prior notice 1 Press the P button to turn off the printer Keep the power plug connected to the outlet User s Guide Maintenance 148 ...

Page 149: ...ress the test button with a fine tipped object such as a ballpoint pen 3 The breaker switch moves automatically to the position between ON and OFF Make sure that the indicator is yellow 4 Slide the switch down to OFF User s Guide Maintenance 149 ...

Page 150: ... during head cleaning If the head cleaning is incomplete you may not be able to print Note Because print head cleaning uses some ink it may not be performed when ink is low Drying causes clogging To prevent the print head from drying out always turn the printer off by pressing the P button Do not unplug the printer or turn off the circuit breaker while the power is on 1 Tap Settings on the home sc...

Page 151: ... finished print the nozzle check pattern again to make sure that there is no clogging If nozzles are still clogged repeat head cleaning and run a nozzle check Related Information Turning the Power On and Off on page 16 Menu Options for Maintenance on page 44 User s Guide Maintenance 151 ...

Page 152: ...n to display a Help list and then select the desired item to check Guidance during Operation The error message and guidance button will be displayed if an error occurs during operation You can tap a guidance button to check the procedure for solving a problem User s Guide Solving Problems 152 ...

Page 153: ...ctions to check where the paper is jammed in order then remove the jammed paper Caution Never touch the protruding parts to avoid injury when removing the paper from inside the printer cImportant Remove the jammed paper carefully Removing the paper vigorously may cause damage to the printer Related Information Descriptions on the Screen on page 152 Available Paper Types and Capacities on page 26 U...

Page 154: ... the number of sheets Check the paper condition If paper absorbs moisture it becomes wavy or curls that may cause the trouble If papers are smeared or scuffed frequently try using newly opened papers Keep paper that you opened once sealed in a plastic bag Try Thick Paper mode Tap Settings General Settings Printer Settings Thick Paper See the printer s LCD screen for the setting options If paper is...

Page 155: ...an authorized Epson service provider xxxxxxx is at the end of its service life Replace it Contact Epson support or an authorized Epson service provider You need to replace the following ink cartridge s Confirm the procedure and then replace them To ensure you receive premium print quality and to help protect your print head it is designed to stop operation before the ink is completely out Replace ...

Page 156: ...ot want to lower the print quality try the following methods to reduce the size of the print job Change the format setting Reduce the number of images letters or fonts used in the print job 104 Reverse printing has failed due to a lack of available memory If you want to print in reverse try the following methods to reduce the size of the print job Lower the print quality and the resolution Change ...

Page 157: ...f available memory Try the methods below to reduce the size of the print data Change to a smaller paper size Simplify the data by reducing the number of images in the print data or reducing the number of font types 133 Cannot print on 2 sides due to a lack of available memory Only one side will be printed Try the methods below to reduce the size of the print data Change to a smaller paper size Sim...

Page 158: ...ion report to check if the printer is connected to the network Tap Settings General Settings Network Settings Advanced Email Server Server Settings to check the email server settings You can check the cause of the error by running connection check The authentication method of the settings and the email server may not match When you select Off as the authentication method make sure the authenticati...

Page 159: ...tination storage Reduce the number of documents 333 The destination could not be found because the destination information was uploaded to the server before sending the scanned image Select the destination again 334 An error occurred while sending the scanned image 341 A communication error has occurred Check the connections for the printer and the computer If you are connecting over a network pri...

Page 160: ... copy from the scanner glass When the paper is smeared lower the copy density setting on the control panel Related Information Cleaning the Printer on page 147 Menu Options for Copying on page 50 Moiré Cross Hatch Patterns Appear in the Copied Image Change the reduce and enlarge setting or place the original at a slightly different angle Related Information Menu Options for Copying on page 50 An I...

Page 161: ... closed Connect the USB cable securely to the printer and the computer If you are using a USB hub try to connect the printer directly to the computer If you connect the printer to a SuperSpeed USB port using a USB 2 0 cable a communication error may occur on some computers In this case re connect the printer using one of the following methods Use a USB 3 0 cable Connect to a Hi Speed USB port on t...

Page 162: ...lect Control Panel Printers and Other Hardware Scanner and Cameras and then check if the printer is displayed Related Information Uninstalling Applications on page 144 Installing the Latest Applications on page 141 Scanned Image Problems Uneven Colors Dirt Spots and so on Appear when Scanning from the Scanner Glass Clean the scanner glass Remove any trash or dirt that adheres to the original Do no...

Page 163: ...on Text Enhancement When scanning from the scanner glass place black paper or a desk pad over the original Related Information Scanning Using Epson Scan 2 on page 76 Placing Originals on page 32 Text is Blurred In Epson Scan 2 select the Advanced Settings tab and then Image Option Text Enhancement In Epson Scan 2 when Image Type on the Main Settings tab is set to Black White adjust the Threshold o...

Page 164: ...t correctly on the Text tab Check that the original is placed straight Use an original with clear text Text recognition may decline for the following types of originals Originals that have been copied a number of times Originals received by fax at low resolutions Originals on which the letter spacing or line spacing is too small Originals with ruled lines or underlining over the text Originals wit...

Page 165: ...s Server 2003 R2 Windows Server 2003 Click the start button and then select All Programs or Programs EPSON Epson Scan 2 Epson Scan 2 Utility Mac OS Select Go Applications Epson Software Epson Scan 2 Utility 2 Select the Other tab 3 Click Reset Note If initialization does not solve the problem uninstall and re install Epson Scan 2 Related Information Uninstalling Applications on page 144 Installing...

Page 166: ...rinter Also make sure that the password has not expired Communication error Check the Wi Fi network connection Make sure that Use Microsoft network sharing is enabled on the Web Config Select Network MS Network on the Web Config Make sure that the address in the contacts list on the printer and the address of the shared folder are the same Access rights for the user in the contacts list should be ...

Page 167: ...twork Home network or Work network to access the network in the home or the office To access public wireless LANs such as in an airport or a station use a Public network which is safer than a private network Use Private network Home Network or Work network to save the scanned images to the shared folder cImportant To change the network place contact your administrator Note Depending on the environ...

Page 168: ...ork Select Off public network when connecting to a public network Note You can check the network place in the Network and Sharing Center Changing the Network Place Windows 8 1 Note Sign in as an administrator 1 Display the charm by putting the mouse pointer on the bottom right of the screen and then click Settings 2 Click Change PC settings on the Settings window 3 Click Network on the PC settings...

Page 169: ...istrator 1 Click the start button and then select Control Panel 2 Open Network and Sharing Center Category view Select Network and Internet Network and Sharing Center Small icons view Click Network and Sharing Center 3 Click the network place in View your active networks 4 Set the network place Select Home network or Work network when connecting to a home or office network Select Public network wh...

Page 170: ... the connection Connect the USB cable securely to the printer and the computer If you are using a USB hub try to connect the printer directly to the computer If you connect the printer to a SuperSpeed USB port using a USB 2 0 cable a communication error may occur on some computers In this case re connect the printer using one of the following methods Use a USB 3 0 cable Connect to a Hi Speed USB p...

Page 171: ...m Preferences from the menu Printers Scanners or Print Scan Print Fax and then double click the printer If the printer is paused click Resume or Resume Printer Related Information Installing the Latest Applications on page 141 Cannot Print from an iPhone or iPad Install Epson iPrint on the smart device Connect the iPhone or iPad to the same network SSID as the printer Related Information Applicati...

Page 172: ...available Paper Types on page 29 Paper Storage on page 30 Ink Cartridge on page 130 Paper is Smeared or Scuffed Check if it can be used with this product Check how to load paper and the number of sheets Check the paper condition If paper absorbs moisture it becomes wavy or curls that may cause the trouble If papers are smeared or scuffed frequently try using newly opened papers Keep paper that you...

Page 173: ...u use the printer driver you had previously used printed characters may be garbled Make sure that the printer driver you are using is for this printer Check the printer name on the top of the printer driver window Mosaic Like Patterns in the Prints When printing images or photos print using high resolution data Images on websites are often low resolution although they look good enough on the displ...

Page 174: ...ter driver vary depending on your computer s environment Printer Does Not Print While Using PostScript Printer Driver Set the Printing Language setting to Auto or PS3 on the control panel In Windows if a large number of jobs are sent the printer may not print Select Print directly to the printer on the Advanced tab in the printer properties Related Information Menu Options for Printer Settings in ...

Page 175: ...r properties and then click the Optional Settings tab Windows 8 1 Windows 8 Windows Server 2012 R2 Windows Server 2012 Select Desktop Settings Control Panel View devices and printers in Hardware and Sound Right click on your printer or press and hold it select Printer properties and then click the Optional Settings tab Windows 7 Windows Server 2008 R2 Click the start button and select Control Pane...

Page 176: ...ed Epson service provider Related Information Technical Support Web Site on page 195 Other Printing Problems Describes the main troubles and solutions Banding Appears Print head nozzles may be clogged Tap Settings Maintenance Print Head Nozzle Check on the home screen Follow the on screen instructions to print the nozzle check pattern Power does not Turn On Off Make sure the power cord is securely...

Page 177: ...ngs in General Settings on page 38 The Date and Time Are Incorrect Set the date and time correctly on the control panel After a power failure caused by a lightning strike or if the power is left off for a long time the clock may show the wrong time Related Information Menu Options for Basic Settings in General Settings on page 36 External memory is not recognized Settings General Settings Printer ...

Page 178: ...hen the other side is printed Because the drying time differs depending on the environment such as temperature or humidity or the print data the printing speed may be slower Control Panel does not Respond Do not stick film to the touch panel Because it is an optical touch panel it will stop responding Turn the power off and then wipe the touch panel using a soft and dry cloth If there are any pape...

Page 179: ...les 8676 Printable Area Printable Area for Single Sheets A 3 0 mm 0 12 in B 3 0 mm 0 12 in Direction of paper being fed Printable Area for Envelopes A 3 0 mm 0 12 in B 5 0 mm 0 20 in Scanner Specifications Scanner Type Flatbed Photoelectric Device CIS Effective Pixels 7020 20400 pixels 7020 dpi User s Guide Appendix 179 ...

Page 180: ...ernal Grayscale 10 bits per pixel internal 8 bits per pixel external Black and white 10 bits per pixel internal 1 bits per pixel external Light Source LED Interface Specifications For Computer SuperSpeed USB For External USB Devices Hi Speed USB Network Function List Functions Supported Remarks Network Interfaces Ethernet Wi Fi Infrastructure Ad hoc Wi Fi Direct Simple AP Concurrent Connection Eth...

Page 181: ...ettings Network Printing EpsonNet Print Windows IPv4 Standard TCP IP Windows IPv4 IPv6 WSD Printing Windows IPv4 IPv6 Windows Vista or later Bonjour Printing Mac OS IPv4 IPv6 IPP Printing Windows Mac OS IPv4 IPv6 UPnP Printing IPv4 Information appliance PictBridge Printing Wi Fi IPv4 Digital camera Epson Connect Email Print IPv4 Google Cloud Print IPv4 IPv6 Network Scanning Epson Scan 2 IPv4 IPv6 ...

Page 182: ...or the HT20 3 Not supported for IEEE 802 11b 4 Complies with WPA2 standards with support for WPA WPA2 Personal Ethernet Specifications Standards IEEE802 3i 10BASE T 1 IEEE802 3u 100BASE TX 1 IEEE802 3ab 1000BASE T 1 IEEE802 3az Energy Efficient Ethernet 2 Communication Mode Auto 10 Mbps Full duplex 10 Mbps Half duplex 100 Mbps Full duplex 100 Mbps Half duplex Connector RJ 45 1 Use a category 5e or...

Page 183: ...y external USB devices with independent AC power sources You cannot use the following devices A device that requires a dedicated driver A device with security settings password encryption and so on A device with a built in USB hub Epson cannot guarantee all operations of externally connected devices Supported Data Specifications File Format JPEG taken by digital cameras DCF 1 version 1 0 or 2 0 2 ...

Page 184: ...ions will be printed Dimensions Only the printer Dimensions Storage Width 674 mm 26 5 in Depth 757 mm 29 8 in Height 1231 mm 48 5in Printing Width 1426 mm 56 1 in Depth 757 mm 29 8 in Height 1231 mm 48 5in Occupied dimensions 1 Width 1544 mm 60 8 in Depth 1225 mm 48 2 in Height 1603 mm 63 1 Weight 2 Approx 179 0 kg 394 6 lb 1 Dimensions when each cover output tray paper cassette and ADF are opened...

Page 185: ... 2 Without the ink cartridges maintenance box and the power cord Electrical Specifications Model 100 to 240 V Model Rated Frequency 50 and 60 Hz Rated Current 9 0 to 4 5 A Power Consumption With LAN Connection Standalone copying Approx 180 W ISO IEC24712 Ready mode Approx 77 W Sleep mode Approx 1 4 W Power off Approx 0 4 W Maximum Power Consumption Approx 320 W Note Check the label on the printer ...

Page 186: ...ely 12 hours at 25 C 77 F You can store for one month at 40 C 104 F System Requirements Windows 10 32 bit 64 bit Windows 8 1 32 bit 64 bit Windows 8 32 bit 64 bit Windows 7 32 bit 64 bit Windows Vista 32 bit 64 bit Windows XP SP3 or later 32 bit Windows XP Professional x64 Edition SP2 or later Windows Server 2019 Windows Server 2016 Windows Server 2012 R2 Windows Server 2012 Windows Server 2008 R2...

Page 187: ...sheets only Types A3 Ledger B4 Legal 8 5x13 8K Weight of Paper 60 to 90 g m2 30 sheets 91 to 105 g m2 20 sheets 106 to 160 g m2 2 sheets for cover sheets only Power Supplied from the printer Dimensions Storage Width 681 mm 26 8 in Depth 669 mm 26 3 in Height 1062 mm 41 8 in When the A4 tray is extended the width become 798 5 mm Weight Approx 41 6 kg These numbers are based on evaluation by Epson E...

Page 188: ...talled Font Information Available Fonts for PostScript Font Name Family HP Equivalent Nimbus Mono Medium Bold Italic Bold Italic Courier Letter Gothic Medium Bold Italic Letter Gothic Nimbus Mono PS Regular Bold Oblique Bold Oblique CourierPS Nimbus Roman No4 Medium Bold Italic Bold Italic CG Times URW Classico Medium Bold Italic Bold Italic CG Omega URW Coronet Coronet URW Clarendon Condensed Cla...

Page 189: ...man Medium Bold Italic Bold Italic Times URW Chancery Medium Italic ITC Zapf Chancery Italic Symbol Symbol URW Dingbats Wingdings Dingbats ITC Zapf Dingbats Standard Symbol SymbolPS Available Fonts for PCL URW Scalable Font Font Name Family HP Equivalent Symbol Set for PCL5 Nimbus Mono Medium Bold Italic Bold Italic Courier 1 Letter Gothic Medium Bold Italic Letter Gothic 1 Nimbus Mono PS Regular ...

Page 190: ...atino 3 URW Gothic Book Demi Book Oblique Demi Oblique ITC Avant Garde Gothic 3 URW Bookman Light Demi Light Italic Demi Italic ITC Bookman 3 URW Century Schoolbook Roman Bold Italic Bold Italic New Century Schoolbook 3 Nimbus Roman Medium Bold Italic Bold Italic Times 3 URW Chancery Medium Italic ITC Zapf Chancery Medium Italic 3 Symbol Symbol 4 URW Dingbats Wingdings 5 Dingbats ITC Zapf Dingbats...

Page 191: ...ific to each language When you are considering which font to use you should also consider which symbol set to combine with the font Note Since most software handles fonts and symbols automatically you will probably never need to adjust the printer s settings However if you are writing your own printer control programs or if you are using older software that cannot control fonts refer to the follow...

Page 192: ...ISO 5N WiTurkish 5T MsPublishin 6J VeMath 6M 8859 10ISO 6N DeskTop 7J Math 8 8M Roman 8 8U WiE Europe 9E Pc1004 9J 8859 15ISO 9N PcTk437 9T Windows 9U PsText 10J IBM US 10U IBM DN 11U McText 12J PcMultiling 12U VeInternati 13J PcEur858 13U VeUS 14J PiFont 15U PcE Europe 17U Unicode 3 0 18N WiBALT 19L WiAnsi 19U User s Guide Appendix 192 ...

Page 193: ...8G WinGrk 9G WinCyr 9R Pc851Grk 10G ISOCyr 10N Pc8Grk 12G ISOGrk 12N Pc866Ukr 14R Hebrew7 0H 8859 8 ISO 7H Hebrew8 8H Pc862Heb 15H PC 862 Hebrew 15Q Arabic8 8V HPWARA 9V Pc864Ara 10V Symbol 19M Wingdings 579L ZapfDigbats 14L OCR A 0O OCR B 1O OCR B Extension 3Q Code3 9 0Y EAN UPC 8Y User s Guide Appendix 193 ...

Page 194: ...ensing This equipment complies with FCC IC radiation exposure limits set forth for an uncontrolled environment and meets the FCC radio frequency RF Exposure Guidelines in Supplement C to OET65 and RSS 102 of the IC radio frequency RF Exposure rules This equipment should be installed and operated so that the radiator is kept at least 7 9 inches 20 cm or more away from a person s body excluding extr...

Page 195: ... postcards and other official postal items bearing valid postage Government issued revenue stamps and securities issued according to legal procedure Exercise caution when copying the following items Private marketable securities stock certificates negotiable notes checks etc monthly passes concession tickets etc Passports driver s licenses warrants of fitness road passes food stamps tickets etc No...

Page 196: ...milar button in the product software Brand and model of your computer Your computer operating system name and version Names and versions of the software applications you normally use with your product Note Depending on the product network settings may be stored in the product s memory Due to breakdown or repair of a product settings may be lost Epson shall not be responsible for the loss of any da...

Page 197: ...nfiguring and operating your Epson product Our Pre sales Helpdesk staff can provide literature on new Epson products and advise where the nearest dealer or service agent is located Many types of queries are answered here We encourage you to have all the relevant information on hand when you ring The more information you prepare the faster we can help solve the problem This information includes you...

Page 198: ...future transportation Help for Users in Singapore Sources of information support and services available from Epson Singapore are World Wide Web http www epson com sg Information on product specifications drivers for download Frequently Asked Questions FAQ Sales Enquiries and Technical Support via e mail are available Epson HelpDesk Toll Free 800 120 5564 Our HelpDesk team can help you with the fol...

Page 199: ...d Frequently Asked Questions FAQ Sales Enquiries questions through e mail Epson Hotline Phone 62 1500 766 Fax 62 21 808 66 799 Our Hotline team can help you with the following over the phone or fax Sales enquiries and product information Technical support Epson Service Center Province Company Name Address Phone E mail DKI JAKARTA ESS JAKARTA MANGGADUA Ruko Mall Mangga Dua No 48 Jl Arteri Mangga Du...

Page 200: ...son indonesia co id BANTEN ESS SERPONG Ruko Mall WTC Matahari No 953 Serpong Banten 6221 53167051 53167052 esstag epson indonesia co id CENTRAL JAWA ESS SEMARANG Komplek Ruko Metro Plaza Block C20 Jl MT Haryono No 970 Semarang JAWA TENGAH 6224 8313807 8417935 esssmg epson indonesia co id EAST KALIMANTAN ESC SAMARINDA Jl KH Wahid Hasyim M Yamin Kelurahan Sempaja Selatan Kecamatan Samarinda UTARA SA...

Page 201: ...ntacts for information support and services are World Wide Web http www epson com my Information on product specifications drivers for download Frequently Asked Questions FAQ Sales Enquiries questions through e mail Epson Call Centre Phone 60 1800 8 17349 Sales enquiries and product information Product usage questions or problems Enquiries on repair services and warranty Head Office Phone 603 5628...

Page 202: ...ww epson com ph contact E mail customercare epc epson som ph Accessible 9am to 6pm Monday through Saturday Except public holidays Our Customer Care team can help you with the following over the phone Sales enquiries and product information Product usage questions or problems Enquiries on repair service and warranty Epson Philippines Corporation Trunk Line 632 706 2609 Fax 632 706 2663 Copyright No...

Page 203: ... i the above copyright notices and this permission notice appear in all copies of the software and related documentation and ii the names of Sam Leffler and Silicon Graphics may not be used in any advertising or publicity relating to the software without the specific prior written permission of Sam Leffler and Silicon Graphics THE SOFTWARE IS PROVIDED AS IS AND WITHOUT WARRANTY OF ANY KIND EXPRESS...

Page 204: ...l Rights Reserved Redistribution and use in source and binary forms with or without modification are permitted provided that this copyright notice and disclaimer are retained THIS SOFTWARE IS PROVIDED BY KALLE KAUKONEN AND CONTRIBUTORS AS IS AND ANY EXPRESS OR IMPLIED WARRANTIES INCLUDING BUT NOT LIMITED TO THE IMPLIED WARRANTIES OF MERCHANTABILITY AND FITNESS FOR A PARTICULAR PURPOSE ARE DISCLAIM...

Reviews: