


123
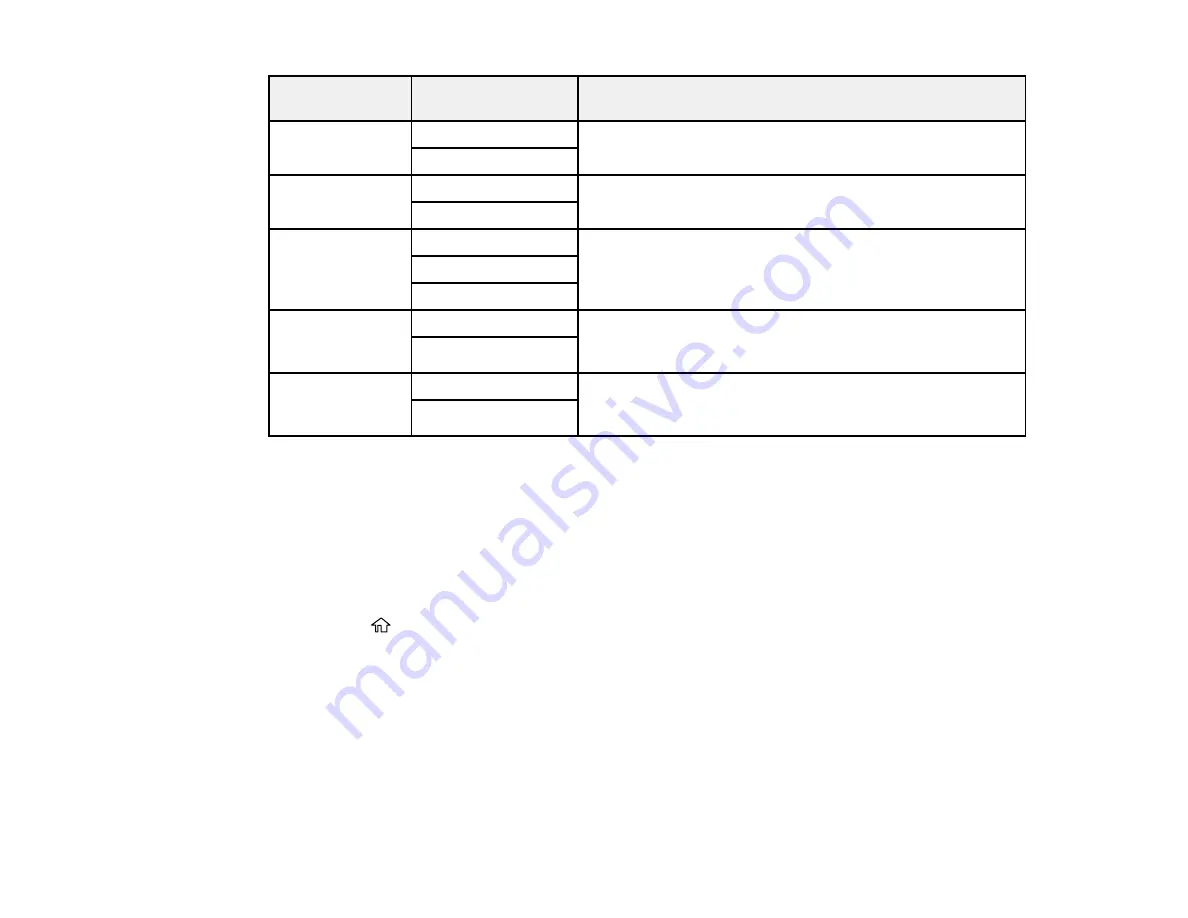
Paper Source
Settings option
Available settings
Description
Rear Paper Feed
Priority
On
Select
On
to give printing priority to paper loaded in the rear
paper feed slot
Off
A4/Letter Auto
Switching
On
Select
On
to switch the selected paper size to match the
loaded paper (Letter or A4) if the wrong size is selected
Off
Auto Select
Settings
Copy
Select
On
for any of these settings to automatically print on
paper from any source containing paper that matches your
paper settings
Fax
Other
Error Notice
Paper Size Notice
Select
On
for either of these settings to display an error
message when the selected paper type or size does not
match the loaded paper
Paper Type Notice
Paper Setup
Auto Display
On
Select
On
to automatically display a menu that lets you
select the paper size and type when you load paper in the
product
Off
Parent topic:
Selecting the Default Printer Settings
Selecting the Universal Print Settings
You can change the default universal print settings using the control panel on the product.
Note:
These settings can be locked by an administrator. If you cannot access these settings, contact
your administrator for assistance.
1.
Press the
home button, if necessary.
2.
Select
Settings
.
3.
Select
General Settings
.
Summary of Contents for WF-C869R
Page 1: ...WF C869R User s Guide ...
Page 2: ......
Page 20: ...20 8 Attach the front cover to the stands 9 Remove the output tray from the product ...
Page 25: ...25 5 Remove the output tray 6 Remove paper cassette 2 from the product ...
Page 56: ...56 8 Optional cabinet 1 Rear paper feed edge guides 2 Paper support and extension ...
Page 74: ...74 Parent topic Product Basics Related topics Wi Fi or Wired Networking ...
Page 223: ...223 You see an Epson Scan 2 window like this ...
Page 225: ...225 You see an Epson Scan 2 window like this ...
Page 230: ...230 You see this window ...
Page 246: ...246 DSL connection 1 Telephone wall jack 2 DSL filter 3 DSL modem ...
Page 247: ...247 ISDN connection 1 ISDN wall jack 2 Terminal adapter or ISDN router ...
Page 329: ...329 6 Pull out rear cover 2 D2 7 Remove the roller cover inside the printer ...
Page 334: ...334 5 Open the rear cover E that matches with the paper cassette you removed ...
Page 343: ...343 You see a window like this 4 Click Print ...
Page 354: ...354 Parent topic Adjusting Print Quality Related topics Loading Paper ...
Page 388: ...388 3 Carefully remove any jammed paper 4 Pull out rear cover 2 D2 ...
Page 390: ...390 2 Open rear cover E on the optional paper cassette unit with the jammed paper ...
Page 393: ...393 4 Carefully remove any jammed pages ...
Page 394: ...394 5 Close the ADF cover then raise the document cover ...
Page 395: ...395 6 Carefully remove any jammed pages 7 Lower the document cover ...


