178
Basic Settings - Fax
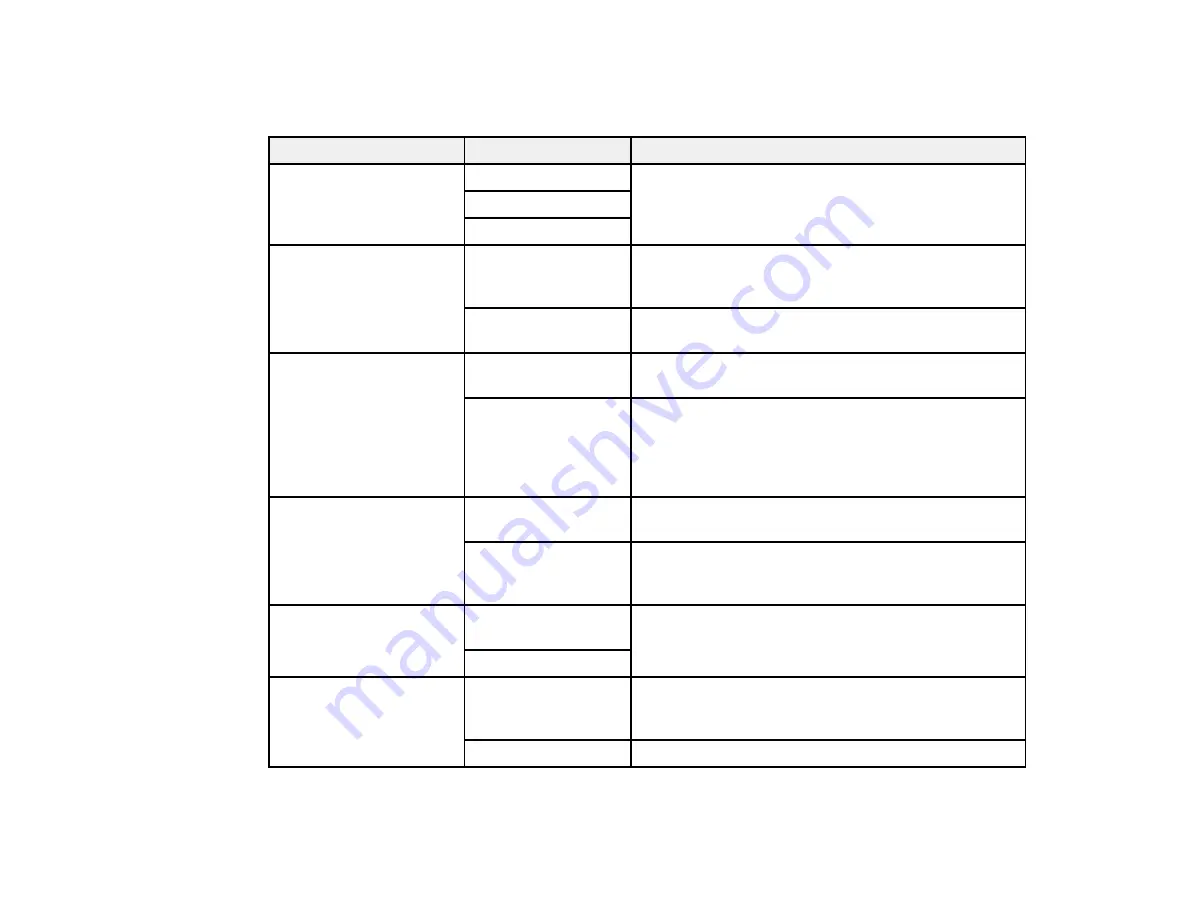
Select the basic options you want to use for incoming and outgoing faxes.
Setting
Options
Description
Fax Speed
Fast(33,600bps)
Sets the speed at which you send and receive faxes
Medium(14,400bps)
Slow(9,600bps)
ECM
On
Turns on Error Correction Mode (ECM) to
automatically correct errors in sent or received fax
data
Off
Turns off Error Correction Mode (ECM); color faxes
cannot be sent or received
Dial Tone Detection
On
Automatically dials the number you enter for faxing
when the product detects a dial tone
Off
Turns off automatic dial tone detection, which may
be necessary if the product is connected to a PBX
(Private Branch Exchange) or a TA (Terminal
Adapter). However, turning this setting off may cause
the product to drop the first digit of a fax number.
Line Type
PSTN
Selects a standard phone line (Public Switched
Telephone Network)
PBX
Selects Private Branch Exchange, the type of phone
line used in office environments where an access
code such as 9 must be used to call an outside line
Header
Your Phone
Number
Select to enter the header information and your
phone number for inclusion on outgoing faxes
Fax Header
Receive Mode
Manual
Lets you confirm whether an incoming fax should be
printed; a telephone must be connected to the
product
Auto
Automatically receives and prints faxes
Summary of Contents for WF-7710 series
Page 1: ...WF 7710 WF 7720 User s Guide ...
Page 2: ......
Page 67: ...67 3 Slide the edge guides outward 4 Slide the edge guide to your paper size ...
Page 76: ...76 3 Open the rear paper feed slot and push it back 4 Slide out the edge guides ...
Page 94: ...94 4 Slide the ADF edge guide against the originals but not too tightly ...
Page 152: ...152 You see an Epson Scan 2 window like this ...
Page 154: ...154 You see an Epson Scan 2 window like this ...
Page 156: ...156 1 Start Epson Scan 2 You see this window ...
Page 167: ...167 DSL connection 1 Telephone wall jack 2 DSL filter 3 DSL modem ...
Page 168: ...168 ISDN connection 1 ISDN wall jack 2 Terminal adapter or ISDN router ...
Page 248: ...248 You see a window like this 5 Click Print ...
Page 286: ...286 Front 6 Open the duplexer ...
Page 287: ...287 7 Carefully remove any jammed paper stuck inside 8 Reinstall the duplexer ...


