EPSON Stylus Pro 4400/4450/4800/4880/4880C
Revision C
Adjustment
Basic Adjustment
388
5.3.2 Head Rank ID
Sets/Inputs the information unique to each print head as the Head Rank ID for
the best driving voltage setup after replacing the print head. (It can be read
from and written to a file.)
Procedure for Writing
<When applying the Head Rank ID on the ID label stuck to the print head. >
1.
Turn the printer power on.
2.
Start up the adjusting program and select [Head Rank ID].
3.
Note down the Head Rank ID on the ID label attached to the print head
to be installed.
4.
Enter the Head Rank ID to the edit box on the screen in the similar
manner (21 digits in total) as the one printed on an ID label.
5.
Click the [Write] button.
6.
Click [Finish].
Procedure for Writing
<When applying the Head Rank ID information file (txt) of the print head to
be installed. >
1.
Turn the printer power on.
2.
Start up the adjusting program and select [Head Rank ID].
3.
Click the [File Open] button and select the Head Rank ID information
file (txt).
4.
Click the [Write] button.
5.
Click [Finish].
Procedure for saving the Head Rank ID information
1.
Turn the printer power on.
2.
Start up the adjusting program and select [Head Rank ID].
3.
Note down the Head Rank ID on the ID label attached to the print head
to be installed.
4.
Enter the Head Rank ID to the edit box on the screen in the similar
manner (21 digits in total) as the one printed on an ID label.
5.
Click [File Save], name the file with a suitable one, and save the
information as a text file.
6.
Click [Finish].
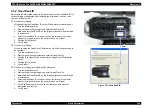
Figure 5-21. Head Rank ID
Enter
ID Label
Summary of Contents for Stylus Pro 4800 Portrait Edition
Page 9: ...C H A P T E R 1 PRODUCTDESCRIPTION ...
Page 113: ...C H A P T E R 2 OPERATINGPRINCIPLES ...
Page 156: ...C H A P T E R 3 TROUBLESHOOTING ...
Page 200: ...C H A P T E R 4 DISASSEMBLY ASSEMBLY ...
Page 366: ...C H A P T E R 5 ADJUSTMENT ...
Page 448: ...C H A P T E R 6 MAINTENANCE ...
Page 457: ...C H A P T E R 7 APPENDIX ...


