EPSON Stylus Pro 4400/4450/4800/4880/4880C
Revision C
Adjustment
Mechanical Adjustment
376
5.2 Mechanical Adjustment
5.2.1 CR Timing Belt Tension Adjustment
This adjustment applies to all operations that have resulted in removal or
replacement the CR Timing Belt or loosening of the belt, such as CR Motor
removal. This adjusts the belt tension to the correct tension after installation of
the CR Timing Belt.
Tools (Required)
Sonic Tension Meter U-505
A tool to pluck the timing belt (tweezers, etc.)
Utility Tools (Adjustment possible without these)
Code Type Microphone (U-505)
Standard Value
Standard: 16.6±1N
Procedure
1.
Install the CR Timing Belt. At this time, set the scale of the Pulley
Holder at the same position it had before removal.
2.
Manually move the Carriage Unit through a return and back 5 times.
3.
Set the Carriage Unit in the home position.
4.
Input the following belt information into the tension measurement tool.
z
Weight: 1.2
z
Width:
8.0
z
Spam:
635
5.
Bring the measurement microphone of the tension meter close to the
center of the Timing Belt.
6.
Press the "MEASURE" button on the tension measurement tool and
measure by plucking the timing belt with a tool such as tweezers.
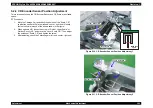
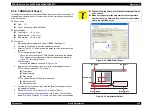
Figure 5-4. Setting the Tension Measurement Tool
C H E C K
P O I N T
Move the whole area of the Carriage Unit moving parts
through the returns.
Try to make the speed of the return motions such that it
takes 2 seconds for sending and 2 seconds for returning.
C H E C K
P O I N T
Set the tension meter fixed tool in a position so the distance
between the measurement microphone and timing belt is
within approximately 5mm but not touching the timing belt.
C A U T I O N
Pluck the belt as gently as possible so it can be
measured by the tension measurement tool.
Do not allow the measurement microphone and timing
belt to make contact when the belt is plucked.
within 5 mm
Tension Measurement Tool
Measurement
microphone
Summary of Contents for Stylus Pro 4800 Portrait Edition
Page 9: ...C H A P T E R 1 PRODUCTDESCRIPTION ...
Page 113: ...C H A P T E R 2 OPERATINGPRINCIPLES ...
Page 156: ...C H A P T E R 3 TROUBLESHOOTING ...
Page 200: ...C H A P T E R 4 DISASSEMBLY ASSEMBLY ...
Page 366: ...C H A P T E R 5 ADJUSTMENT ...
Page 448: ...C H A P T E R 6 MAINTENANCE ...
Page 457: ...C H A P T E R 7 APPENDIX ...


