background image

Printing in Windows

9

(If you see a 

Setup

Printer

, or 

Options

 button, click it. Then click 

Preferences

 or 

Properties

 on the next screen.) 

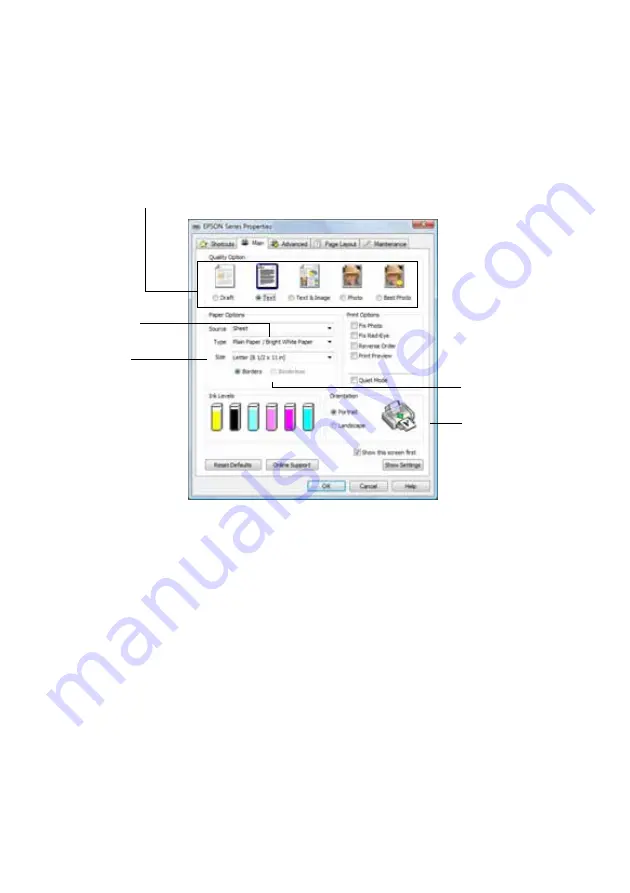
4. On the Main tab, select the basic print settings. Make sure you choose the 

correct paper 

Type

 setting for the paper you are using (see page 14 for 

details).

Tip: 

For quick access to the most common settings, click the 

Shortcuts

 tab and select 

one of the presets. You can create your own presets by clicking the 

Save Settings


button on the 

Advanced

 tab. For details, see your on-screen 

User’s Guide

.

5. To improve the color, contrast, and sharpness of photos, select 

Fix Photo

This feature automatically analyzes your photos and adjusts them if necessary.

6. To reduce or remove red-eye effects in photos, select 

Fix Red-Eye

.

7. To print more quietly on plain paper, select 

Quiet Mode

.

8. If you want to reduce or enlarge your printout, or print double-sided, click the 

Page Layout

 tab and select settings as necessary.

9. For more printing options, click the 

Advanced

 tab. 

Note: 

For more information about print settings, click 

Help

 or see your on-screen 

User’s 

Guide

.

Select your 
document 

Orientation

Select your 
paper 

Size

Select your 
paper 

Type


Click here for 
borderless photos

Select the type of document you’re printing 
(choose 

Photo

 or 

Best Photo

 for pictures)

Summary of Contents for Stylus Photo T50

Page 1: ...Epson Stylus Photo T50 Quick Guide Basic Printing Maintaining Your Printer Solving Problems Notices and Warranty ...

Page 2: ...Paper Type 14 Printing on CDs and DVDs 15 Maintaining Your Printer 17 Checking the Print Head Nozzles 17 Cleaning the Print Head 18 Checking the Ink Cartridge Status 19 Replacing Ink Cartridges 21 Solving Problems 25 Checking for Software Updates 25 Error Indicators 26 Problems and Solutions 27 Where To Get Help 29 Notices 31 Epson America Inc Limited Warranty 36 ...

Page 3: ...DVDs Perform routine maintenance Solve simple problems For additional instructions see the on screen User s Guide by double clicking the icon for it on your desktop Please follow these guidelines as you read your printer instructions Warning Warnings must be followed carefully to avoid bodily injury Caution Cautions must be observed to avoid damage to your equipment Note Notes contain important in...

Page 4: ... Paper You can print on a variety of paper types and sizes For details see page 6 1 Open the paper support then pull up the extension 2 Open the front cover and pull out the tray extensions 3 Slide the edge guide to the left ...

Page 5: ...ust printing text or a rough draft plain paper is fine However for the best results you ll want to use one of Epson s special ink jet papers designed for your printer See the next section for more information 5 Slide the edge guide against the paper but not too tightly Note For instructions on loading envelopes see your on screen User s Guide Always load paper short edge first even for landscape p...

Page 6: ...0 100 Letter 8 5 11 in 21 6 28 cm S041141 S041649 S041271 20 50 100 Epson Premium Photo Paper Glossy Borderless 4 6 in 10 2 15 2 cm S041808 S041727 40 100 Borderless 5 7 in 12 7 17 8 cm S041464 20 Borderless 8 10 in 20 3 25 4 cm S041465 20 Letter 8 5 11 in 21 6 28 cm S042183 S041667 25 50 Epson Ultra Premium Photo Paper Glossy Borderless 4 6 in 10 2 15 2 cm S042174 100 Borderless 5 7 in 12 7 17 8 ...

Page 7: ...041467 50 Letter 8 5 11 in 21 6 28 cm S041257 S042180 50 100 Epson Premium Presentation Paper Matte Double sided Letter 8 5 11 in 21 6 28 cm S041568 50 Epson Photo Quality Self adhesive Sheets A4 21 1 29 7 cm S041106 10 Epson Iron on Cool Peel Transfer Paper Letter 8 5 11 in 21 6 28 cm S041153 10 Paper type Size Part number Sheet count ...

Page 8: ...e you ve installed your printer software and connected the printer to your computer as described on the Start Here sheet Tip It s a good idea to check for updates to your printer software see page 25 for instructions Printing in Windows 1 Open a photo or document in an application 2 Open the File menu and select Print You see a window like this one 3 Make sure EPSON T50 Series is selected then cli...

Page 9: ...ve the color contrast and sharpness of photos select Fix Photo This feature automatically analyzes your photos and adjusts them if necessary 6 To reduce or remove red eye effects in photos select Fix Red Eye 7 To print more quietly on plain paper select Quiet Mode 8 If you want to reduce or enlarge your printout or print double sided click the Page Layout tab and select settings as necessary 9 For...

Page 10: ... job Printing With a Macintosh See one of the sections below for your Mac OS operating system Mac OS X 10 5 1 Open a photo or document in an application 2 Open the File menu and select Print 3 Select EPSON Stylus T50 as the Printer setting 4 Click d to expand the Print window if necessary Cancel printing Check ink cartridge status Click to expand ...

Page 11: ...m the pop up menu then select the following settings that appear on the bottom of the screen 7 Choose any other printing options you may need from the pop up menu See the on screen User s Guide for details Tip To automatically adjust the color contrast and sharpness of photos choose Color Management from the pop up menu and select Fix Photo To reduce or remove red eye effects in photos choose Exte...

Page 12: ... 1 Open a photo or document in an application 2 Select Page Setup from the File menu Select the following settings For borderless printing choose a Sheet Feeder Borderless option in the Paper Size list for your paper size 3 Click OK to close the Page Setup window Cancel printing Select the print job Pause or resume printing Select your printer Select your Paper Size Select your document or image o...

Page 13: ...an select Print Settings For more information about printer settings click the button 6 Click the Advanced button to change additional settings 7 Choose any other printing options you may need from the pop up menu See your on screen User s Guide for details 8 Click Print Select Print Settings Select your printer Select your paper type see page 14 Select Color or Black Grayscale Select higher quali...

Page 14: ...ain Paper Bright White Paper Epson Ultra Premium Photo Paper Glossy Ultra Premium Photo Paper Glossy Epson Premium Photo Paper Glossy Premium Photo Paper Glossy Epson Photo Paper Glossy Photo Paper Glossy Epson Premium Photo Paper Semi gloss Premium Photo Paper Semi Gloss Epson Presentation Paper Matte Presentation Paper Matte Epson Premium Presentation Paper Matte Epson Premium Presentation Paper...

Page 15: ...are makes it easy to import your own photos add text and modify your designs with a variety of special effects For detailed instructions on printing see the on screen User s Guide To prevent errors make sure the data music or video is burned on your CD DVD before you print 1 Turn on the printer then open the front cover 2 Lift the front tray up with both hands then pull it out of the paper positio...

Page 16: ...e of the front tray until the arrows on the CD DVD tray and the front tray are aligned Make sure both sides of the CD DVD tray slide into the brackets on the front tray 6 To design and print with Epson Print CD follow the detailed instructions in in the on screen User s Guide Caution Be sure to place the front tray in the paper lower position when you re done printing on CDs and DVDs 8 cm CD DVD 1...

Page 17: ...your printouts are faint or have gaps in them some of the nozzles in the print head may be clogged Follow the steps below to check the print head nozzles 1 Load a few sheets of plain paper in the sheet feeder 2 Windows Right click the printer icon in the bottom right corner of your screen the taskbar and select Nozzle Check Macintosh Open the Applications folder open EPSON Printer Utility3 select ...

Page 18: ...head cleaning uses ink so clean it only if necessary Note You cannot clean the print head if an ink cartridge is expended and you may not be able to clean it when a cartridge is low You must replace the cartridge first see page 21 1 Load a few sheets of plain paper in the sheet feeder 2 Windows Right click the printer icon in the bottom right corner of your screen the taskbar and select Head Clean...

Page 19: ...prove one of the ink cartridges may need to be replaced If that doesn t help contact Epson as described on page 29 If you do not use your printer often it is a good idea to print a few pages at least once a month to maintain good print quality Checking the Ink Cartridge Status When the H ink light starts flashing a cartridge is low on ink You can continue printing until a cartridge needs replaceme...

Page 20: ...cts may affect your print quality and could result in printer damage The printer ships with full cartridges and part of the ink from this first set of cartridges is used for priming the printer Yields vary considerably based on images printed print settings paper type frequency of use and temperature For print quality a small amount of ink remains in the cartridge after the replace cartridge indic...

Page 21: ...artridges are vacuum packed to maintain reliability Note Leave the expended cartridge installed until you have obtained a replacement or the ink remaining in the print head nozzles may dry out 1 Turn on the printer 2 Open the printer cover 3 Press the H ink button If you are replacing a low or expended cartridge the print head moves to the _ position to indicate which cartridge is low or expended ...

Page 22: ... another cartridge is low or expended it moves to the _ position Press the H ink button again to see if any more cartridges are low or expended If no other cartridges are low or expended the print head moves to the replacement position 5 Open the cartridge cover ...

Page 23: ...may damage it Warning If ink gets on your hands wash them thoroughly with soap and water If ink gets into your eyes flush them immediately with water Keep ink cartridges out of the reach of children 7 Remove the cartridge from the package but be careful not to touch the green chip on the cartridge 8 Remove the yellow tape from the bottom of the ink cartridge Caution Do not remove any other labels ...

Page 24: ...ss the H ink button to begin charging the ink This takes about two minutes When it s finished the P power light stops flashing and remains on and the H ink light goes out Caution Never turn off the printer while ink is charging or you ll waste ink If the H ink light flashes press the H ink button again and press down all the cartridges securely Note If you remove a low or expended ink cartridge yo...

Page 25: ...on screen User s Guide for more detailed help Checking for Software Updates Periodically it s a good idea to check Epson s support website at www latin epson com for free updates to your Epson Stylus Photo T50 software With Windows you can select Driver Update on the Maintenance tab in the printer settings window You can also click or Start select All Programs or Programs select EPSON select EPSON...

Page 26: ...r cannot be used with the printer If an ink cartridge is likely to be expended you must replace the cartridge to be able to print If you just replaced a cartridge and the light is still on the cartridge is not installed correctly Press the H button to move the cartridges to the replacement position Press down on all the installed cartridges then press the H button to continue H ink and I lights ar...

Page 27: ...w the image fits on the page Paper Feeding Problems If paper doesn t feed remove it from the sheet feeder Flip through the stack to separate the sheets a little Then reload the paper against the right side and slide the left edge guide against the paper but not too tightly Do not load too many sheets at once Load up to 20 sheets of photo paper 120 sheets of letter or A4 size plain paper 100 sheets...

Page 28: ...matches the paper size and paper type settings in your printer software see page 14 For the best print quality use Epson special paper see page 6 and genuine Epson ink cartridges see page 19 If you notice light or dark bands across your printouts or they are too faint you may need to clean the print head see page 18 This unclogs the nozzles so they can deliver ink properly Run a nozzle check see p...

Page 29: ...ou call Epson for support please have the following information ready Product name Epson Stylus Photo T50 Product serial number located on the back of product Proof of purchase such as a store receipt and date of purchase Computer configuration Description of the problem Then call Country Telephone Argentina 54 11 5167 0300 Brazil 55 11 3956 6868 Chile 56 2 230 9500 Colombia 57 1 523 5000 Costa Ri...

Page 30: ...long distance charges may apply Purchase Supplies and Accessories You can purchase genuine Epson ink and paper from an Epson Authorized reseller To find the nearest reseller call your nearest Epson sales office as described above ...

Page 31: ...d 1GB RAM for Windows Vista 450MB free hard disk space 550MB recommended 4 or faster CD ROM drive for installing the software A Windows compliant USB port and shielded USB AB cable up to 2 meters long Using an improperly shielded USB cable may cause the Epson Stylus Photo T50 to malfunction Macintosh Requirements An Apple Macintosh Mac OS X 10 3 9 10 4 11 or 10 5 x 256MB RAM 512MB recommended 450M...

Page 32: ...printer make sure the total ampere rating of the devices plugged into the extension cord does not exceed the cord s ampere rating Also make sure the total ampere rating of all devices plugged into the wall outlet does not exceed the wall outlet s ampere rating Avoid locations that are subject to rapid changes in heat or humidity shocks or vibrations or dust Leave enough room around the printer for...

Page 33: ... and do not drink the ink Be careful when you handle used ink cartridges there may be ink remaining around the ink supply port If ink gets on your skin wash it off with soap and water If it gets in your eyes flush them immediately with water Do not put your hand inside the printer or touch any cartridges during printing Install a new ink cartridge immediately after removing an expended one Leaving...

Page 34: ...tain circumstances may cause erratic printer behavior Do not use an ink cartridge if the date on the package has expired For best printing results use up a cartridge within six months of opening the package Mechanical Size Width 450 mm Depth 289 mm Height 187 mm Weight 5 5 kg without the ink cartridges Electrical 100 120 V Model 220 240 V Model Input voltage range 90 to 132 V 198 to 264 V Rated fr...

Page 35: ...ged to try to correct the interference by one or more of the following measures Reorient or relocate the receiving antenna Increase the separation between the equipment and receiver Connect the equipment into an outlet on a circuit different from that to which the receiver is connected Consult the dealer or an experienced radio TV technician for help WARNING The connection of a non shielded equipm...

Page 36: ...rt Way Long Beach CA 90806 Telephone 562 290 5254 Declare under sole responsibility that the product identified herein complies with 47CFR Part 2 and 15 of the FCC rules as a Class B digital device Each product marketed is identical to the representative unit tested and found to be compliant with the standards Records maintained continue to reflect the equipment being produced can be expected to b...

Page 37: ...intenance instructions Seiko Epson Corporation shall not be liable for any damages or problems arising from the use of any options or any consumable products other than those designated as Original Epson Products or Epson Approved Products by Seiko Epson Corporation Responsible Use of Copyrighted Materials Epson encourages each user to be responsible and respectful of the copyright laws when using...

Page 38: ...CPD XXXXXPrinted in XXXXXX ...

Reviews: