1-22
Paper Handling
Printing on roll paper
Once you have prepared your roll paper and loaded it into the
printer, you must make the printer driver settings before you can
print.
One of the first things you should decide is what width of roll
paper you will be using. This will determine what Paper Source
setting you will need to make. Select
Roll Paper
as the Paper
Source in the printer driver if you are printing on A4 or 329-mm
width roll paper. If you are using 89- or 100-mm width roll paper,
select
Roll Paper
or
Roll Paper [Zero Margins]
.
Refer to the table
below for details.
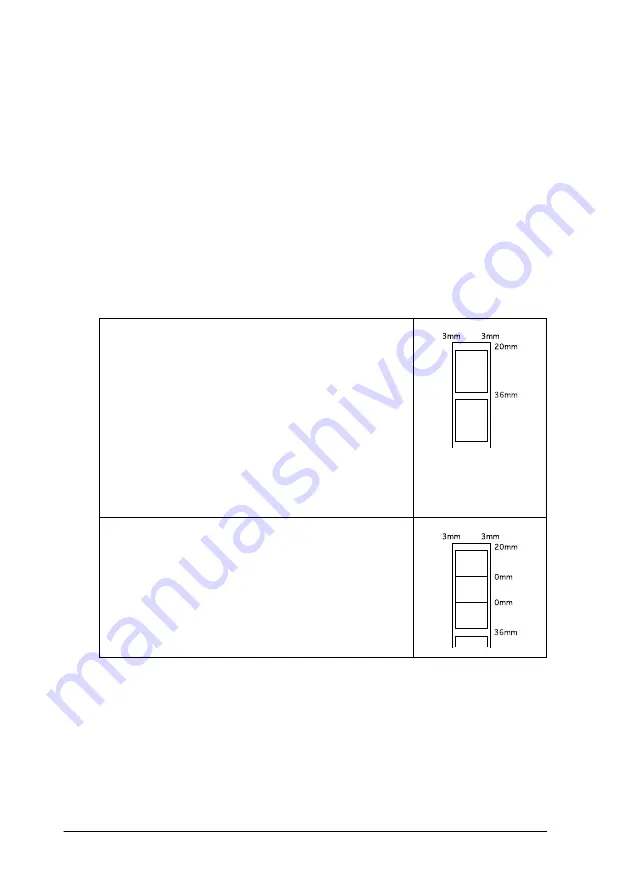
With Roll Paper selected as the Paper Source, a
3-mm margin will be left along both sides of the
paper. A 36-mm margin will be inserted between
print jobs.
In printing, the top margin above the print data
will be set to 20 mm.
When printing is done, press the
E
load/eject
button once to print a guide line for cutting about
12 mm from the bottom of the print data.
To print out the next page after pressing the
E
load/eject button again, the space between the
two blocks of print data will be about 36 mm.
With Roll Paper selected as the Paper Source,
when printing data which spans multiple pages in
your application, a 3-mm margin will be left along
both sides of the paper. The margin between
pages will be set to 0, but the margin between
print jobs will remain 36 mm
Summary of Contents for Stylus Photo 875 DC
Page 2: ... 2 ...
Page 12: ... 4 Printer Parts and Functions ...
Page 18: ... 10 Safety Instructions ...
Page 50: ...1 32 Paper Handling ...
Page 88: ...2 38 Using the Printer Software for Windows ...
Page 94: ...3 6 Checking Printer Status and Managing Print Jobs for Windows ...
Page 136: ...6 8 Setting Up Your Printer on a Network ...
Page 160: ...9 2 Troubleshooting Paper isn t ejected fully or is wrinkled 9 21 Where to Get Help 9 21 ...
Page 180: ...9 22 Troubleshooting ...
Page 184: ...10 4 Options and Consumable Products ...
Page 212: ... 6 Glossary ...


