background image

12

Printing from a Memory Card

Printing from a Memory Card

You can print photos directly from your digital 
camera's memory card. Just insert it into the memory 
card slot and you are ready to print.

Handling a Memory Card

Compatible cards

Make sure your memory card meets the following 
requirements.

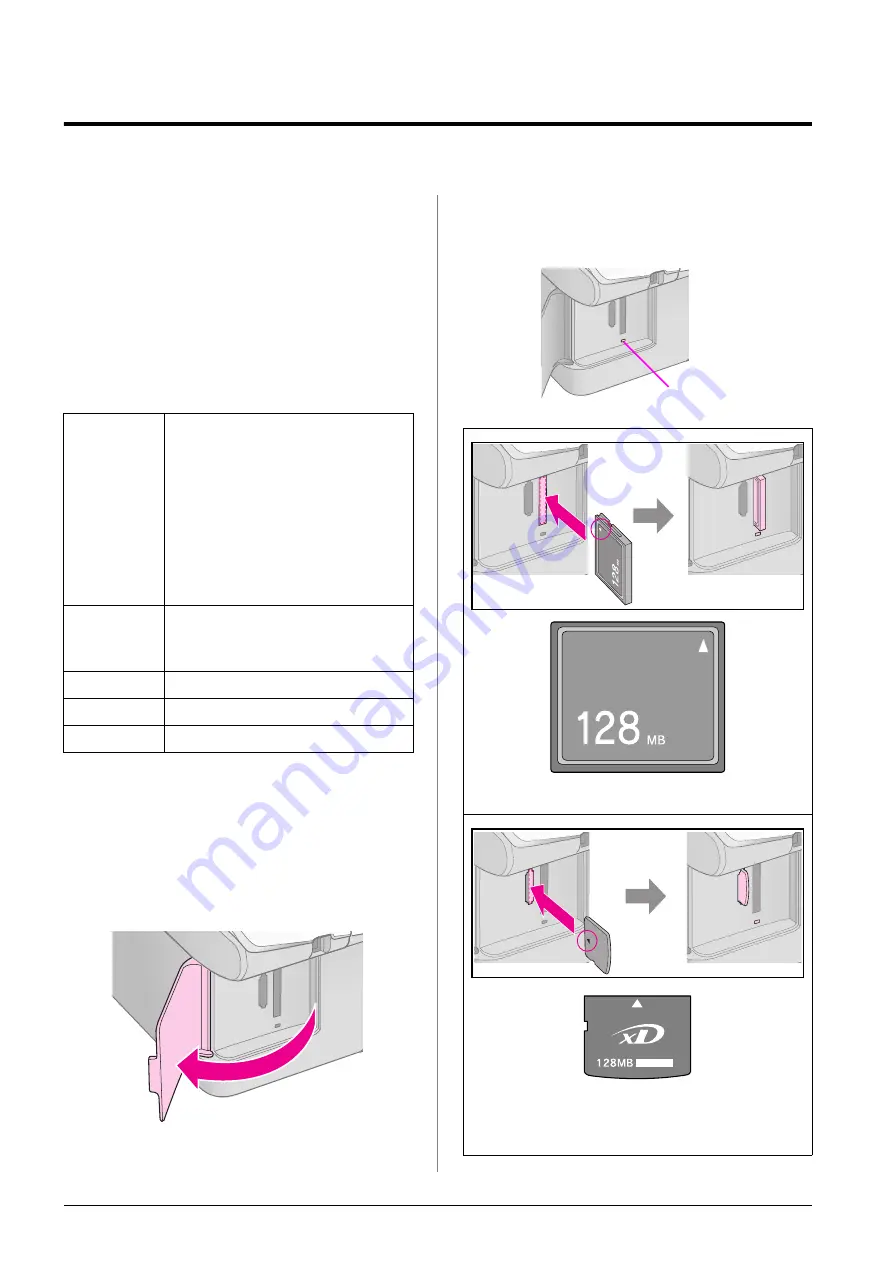
Inserting a memory card

1.

Turn off your computer or disconnect it from the 
product.

2.

Make sure the product is turned on.

3.

Open the memory card slot cover.

4.

Make sure the memory card light is off and no 
memory cards are in the slots. Then insert your 
memory card.

Card type

CompactFlash, Microdrive, 
SD Memory Card, SDHC Memory Card, 
MultiMediaCard, miniSD card, 
miniSDHC card, microSD card, 
microSDHC card, Memory Stick, 
Memory Stick PRO, 
Magic Gate Memory Stick, 
Magic Gate Memory Stick Duo, 
Memory Stick Duo, 
Memory Stick PRO Duo, 
xD-Picture Card, xD-Picture Card Type M 
xD-Picture Card Type H

Media format

DCF (Design rule for Camera File system) 
version 1.0 or 2.0 compliant

All card types standard version compliant.

File format

JPEG with the Exif Version 2.21 standard

Image size

80

×

80 pixels to 9200

×

9200 pixels

Number of files

Up to 999

memory card light

CompactFlash
Microdrive

xD-Picture Card
xD-Picture Card Type M
xD-Picture Card Type H

Summary of Contents for Stylus CX5900 Series

Page 1: ...ng from a Memory Card Handling a Memory Card 12 Printing Photos 14 Selecting and Printing Photos Using an Index Sheet 16 Printing from a Digital Camera Digital Camera Requirements 18 Connecting and Printing 18 Maintenance Replacing Ink Cartridges 19 Checking and Cleaning the Print Head 22 Aligning the Print Head 23 Cleaning This Product 24 Transporting This Product 24 Solving Problems Error Messag...

Page 2: ...structions on copying and printing from a memory card If you have problems using the product see the Solving Problems chapter in this book Online manuals User s Guide This guide provides instructions for printing and scanning from your computer and information on the software This guide is included on the software CD ROM and installed automatically when you installed the software To read this guid...

Page 3: ... Doing so may cause fire Except as specifically explained in your documentation do not attempt to service the product yourself Unplug the product and refer servicing to qualified service personnel under the following conditions if the power cord or plug is damaged if liquid has entered the product if the product has been dropped or the case damaged if the product does not operate normally or exhib...

Page 4: ...ectromagnetic interference that occurs from the use of any interface cables other than those designated as Epson Approved Products by Seiko Epson Corporation EPSON is a registered trademark and EPSON STYLUS and Exceed Your Vision are trademarks of Seiko Epson Corporation USB DIRECT PRINT and the USB DIRECT PRINT logo are trademarks of Seiko Epson Corporation Copyright 2002 Seiko Epson Corporation ...

Page 5: ...t USB port document cover memory card slot cover control panel external interface USB port document table paper support output tray output tray extension edge guide memory card slot feeder guard sheet feeder paper support extension cartridge cover scanner unit paper thickness lever LCD screen memory card light ...

Page 6: ... Bright White Ink Jet Paper Premium Ink Jet Plain Paper P On Press to turn the product on and off C Memory Card Press to select a memory card print option j Select Photo Select this option to choose the photos you want to print e f Print All PictBridge Select this option to print all the photos on a memory card to print photos using the DPOF information stored on the memory card or to print photos...

Page 7: ... d button to select the LCD contrast You can choose from 2 to 2 4 Press the x Start button again to confirm your selection 5 Press the F Setup Utilities button to return to the previous mode Changing LCD display for text display users only There are two types of LCD display settings Follow these steps to change your display setting 1 Press the Setup Utilities button to enter the setup mode Use the...

Page 8: ...per Choose from these paper types and settings You can use paper with a weight of 64 to 90 g m2 Note The availability of special media varies by location Loading Paper 1 Open and extend the paper support 2 Open the output tray and slide out the extensions 3 Flip the feeder guard forward Paper Type Size Paper Type Setting Loading Capacity Plain paper A4 Plain paper 12 mm Bright White Ink Jet Paper ...

Page 9: ...ended number of sheets Check the Paper Type setting before printing to make sure it matches the type of paper you have loaded Selecting Paper on page 6 The printable side is often whiter or brighter than the other side make sure it fits under the arrow inside the left edge guide place behind the tabs 10 15 cm 4 6 in and 13 18 cm 5 7 in A4 The LCD screen indicates that the lever has been moved and ...

Page 10: ...ejected automatically Placing Originals on the Document Table 1 Open the document cover and place your original face down on the document table in the upper left corner 2 Close the cover gently so you do not move the original c Caution Never open the document cover beyond where it stops and do not place heavy objects on top of the product If you need to copy a thick or large document you can remov...

Page 11: ...ress the x Start button again to confirm your selection Press the F Setup Utilities button to return to the previous mode Press the r Copy button Use the u or d button to select the number of copies 1 to 99 Use the l or r button to select color copy or black and white copy Display Color Copy Black and White Copy Icon Text Select l Plain Paper Select A4 Tip If you want to automatically resize the c...

Page 12: ...ner slightly Press the Photo button Use the l or r button to set the color restoration mode to on or off Restoring color in photos on page 11 Press the x Start button The photo is scanned and a preview is displayed on the LCD screen During scanning one of the following screens is displayed Icon panel Text panel Icon display Text display Use the l or r button to view the photos Use the u or d butto...

Page 13: ...played at the top of the LCD screen 6 Use the l or r button to view the photos Use the u or d button to set the number of copies 1 to 99 7 Select the paper type you loaded 8 Select the paper size you loaded 9 Press the x Start button again Your photo is copied If you need to stop copying press the y Stop Clear button Copying multiple photos Place each photo vertically as shown in the illustration ...

Page 14: ...are in the slots Then insert your memory card Card type CompactFlash Microdrive SD Memory Card SDHC Memory Card MultiMediaCard miniSD card miniSDHC card microSD card microSDHC card Memory Stick Memory Stick PRO Magic Gate Memory Stick Magic Gate Memory Stick Duo Memory Stick Duo Memory Stick PRO Duo xD Picture Card xD Picture Card Type M xD Picture Card Type H Media format DCF Design rule for Came...

Page 15: ...ause malfunction Note You can print only in color from a memory card you cannot print in black and white If a digital camera is connected to the product disconnect it before you insert your memory card Removing the memory card 1 Make sure all print jobs are finished 2 Open the memory card slot cover 3 Make sure the memory card light is not flashing 4 Remove the memory card by pulling it straight o...

Page 16: ...t g Photo Paper or h Matte Paper the photos are printed without borders to the edge of the paper 6 Select the paper size you loaded 7 Press the x Start button Your photos are printed If you need to cancel printing press the y Stop Clear button Printing all photos or DPOF photos Follow the steps below to print one copy of each photo on the card or to print only those photos that were pre selected w...

Page 17: ... borders to the edge of the paper 5 Select the paper size you loaded 6 Press the x Start button Your photos are printed If you need to cancel printing press the y Stop Clear button Printing the date on photos Follow the steps below to print the date they were taken 1 Press the F Setup Utilities button 2 Use the l or r button to select Date Stamp 3 Press the x Start button 4 Use the u or d button t...

Page 18: ... photos on your memory card you will need enough sheets for all the index pages to be printed 2 Insert a memory card page 12 3 Press the C Memory Card button until the m Print Index Sheet light turns on One of the following screens is displayed 4 Make sure l Plain Paper and A4 are selected 5 Press the x Start button The index sheet is printed If you need to cancel printing press the y Stop Clear b...

Page 19: ...ant to use page 6 Load enough sheets for the number of photos you want to print 4 Make sure the i Print from Index Sheet light is on One of the following screens is displayed 5 Select the paper type you loaded If you select l Plain Paper the photos are printed with a white border If you select g Photo Paper or h Matte Paper the photos are printed without borders to the edge of the paper 6 Select t...

Page 20: ... with your camera to the external interface USB port of the product 6 Make sure your camera is turned on The f e Print All PictBridge light turns on and one of the following screens is displayed 7 Use your camera to select the photos you want to print adjust any necessary settings and print your photos See your camera s manual for details Note If your camera is not compatible with PictBridge or US...

Page 21: ...x Start button You see a graphic showing the ink cartridge status 4 When you are done checking the ink cartridge status press the x Start button 5 Press the F Setup Utilities button to return to the previous mode When your ink starts getting low make sure you have replacement cartridges available You cannot print if a cartridge is expended Note Epson cannot guarantee the quality or reliability of ...

Page 22: ...ridges with low ink status cannot be used when reinserted Removing and installing ink cartridges Make sure you have a new ink cartridge before you begin Once you start replacing a cartridge you must complete all the steps in one session 1 Do one of the following If an ink cartridge is expended Look at the LCD screen to find out which cartridge should be replaced then press the x Start button If an...

Page 23: ...e before installing it otherwise print quality may decline or you may not be able to print If you have installed an ink cartridge without removing the yellow tape take the cartridge out of the product remove the yellow tape and then reinstall it Do not remove the transparent seal from the bottom of the cartridge otherwise the cartridge may become unusable Do not remove or tear the label on the car...

Page 24: ... recommend that you turn on the product at least once a month to maintain good print quality Checking the print head You can print a nozzle check pattern to see if any print head nozzles are clogged or to check the results after cleaning the print head 1 Load A4 size plain paper in the sheet feeder page 6 2 Press the F Setup Utilities button 3 Use the l or r button to select Check Ink Nozzles and ...

Page 25: ...t see any improvement after cleaning about four times turn off the product and wait overnight This lets any dried ink soften Then try cleaning the print head again If quality still does not improve one of the ink cartridges may be old or damaged and needs to be replaced Replacing Ink Cartridges on page 19 Aligning the Print Head If you notice that vertical lines are not aligned properly on the noz...

Page 26: ...l to keep water away from the printing and copying mechanisms and electronic components Do not spray the inside of the product with lubricants Unsuitable oils can damage the mechanism Contact your dealer or a qualified service person if lubrication is needed Transporting This Product If you need to move the product some distance you need to prepare it for transportation in its original box or one ...

Page 27: ...lacing Ink Cartridges on page 19 No paper is loaded in the sheet feeder Load paper in the sheet feeder Then press x Start to continue or y Stop Clear to cancel Loading Paper on page 6 Paper is jammed Clean the jam then press x Start Paper feed problems on page 27 The index sheet was not recognized because it is not positioned correctly Position the index sheet correctly on the document table align...

Page 28: ...acting Customer Support on page 29 The memory card does not contain any valid photos Remove the memory card Handling a Memory Card on page 12 Memory card error Remove the memory card Handling a Memory Card on page 12 The connected camera is not recognized Check the connection and try again Printing from a Digital Camera on page 18 The paper thickness lever is set to the wrong position Set the pape...

Page 29: ...he paper size settings are correct for the paper you have loaded Make sure your paper is loaded short edge first all the way to the right with the left edge guide lightly against the paper Loading Paper on page 6 Do not load paper above the c arrow mark inside the left edge guide Loading Paper on page 6 Blank pages are printed Make sure the paper size settings are correct for the paper you have lo...

Page 30: ...ble Cleaning This Product on page 24 Your printout is faint or has gaps Clean the print head Cleaning the print head on page 23 If you notice jagged vertical lines you may need to align the print head Aligning the Print Head on page 23 The ink cartridges may be old or low on ink Replace the ink cartridges Replacing Ink Cartridges on page 19 Make sure you select the correct paper type Selecting Pap...

Page 31: ...formation on contacting customer support see the online User s Guide Europe URL http www epson com Select the Support section of your local EPSON web site for the latest drivers FAQs manuals and other downloadables Check your Pan European Warranty Document for information on how to contact EPSON Customer support Australia URL http www epson com au Telephone 1300 361 054 Fax 02 8899 3789 Singapore ...

Page 32: ...not match the photos on the memory card Check the memory card Pre scanning error Check photo placement Not enough ink to perform head cleaning Replace with new ink cartridges Mechanical error Contact your dealer Waste ink pad in the product is saturated Contact your dealer Display Meaning Icon Text Waste ink pad in the product is saturated Contact your dealer No photo data on the memory card Check...

Page 33: ...cator when printing Copying printing a color copy Display Meaning Icon Text Copies Color copying B W copying Display Meaning Icon Text Copying printing a B W copy Fit to page Display Meaning Icon Text Print All Print index sheet Print from index sheet Place the index sheet and then press the x Start button DPOF data found Display Meaning Icon Text Restoration on Restoration off Display Meaning Ico...

Page 34: ... Start button to enter this mode No date 2006 06 16 Jun 16 2006 16 Jun 2006 Change Cartridges You can change the ink cartridges Press the x Start button to enter this mode Press the x Start button and then open the scanner unit Change ink cartridges Close the scanner unit and then press the x Start button Align print head You can align the print head Press the x Start button to enter this mode Ico...

Page 35: ...English ...

Page 36: ...Purchasing ink cartridges Product name Black Cyan Magenta Yellow DX6000 series T0711 T0712 T0713 T0714 CX5900 series T0731 T0732 T0733 T0734 ...

Reviews: