background image

Advanced Printing

Page 68

Now select the way you want the watermark to appear by choosing the 

following options. The layout graphic changes to reflect all the settings 
you choose.

Color lets you choose a color for your predefined watermark: 
BlackBlueAquaLimeFuchsiaRed, or Yellow. You cannot 
select a color for a custom watermark; it is printed in its original 
colors.

Intensity sets the lightness or darkness of the watermark based on 
where you move the slidebar. 

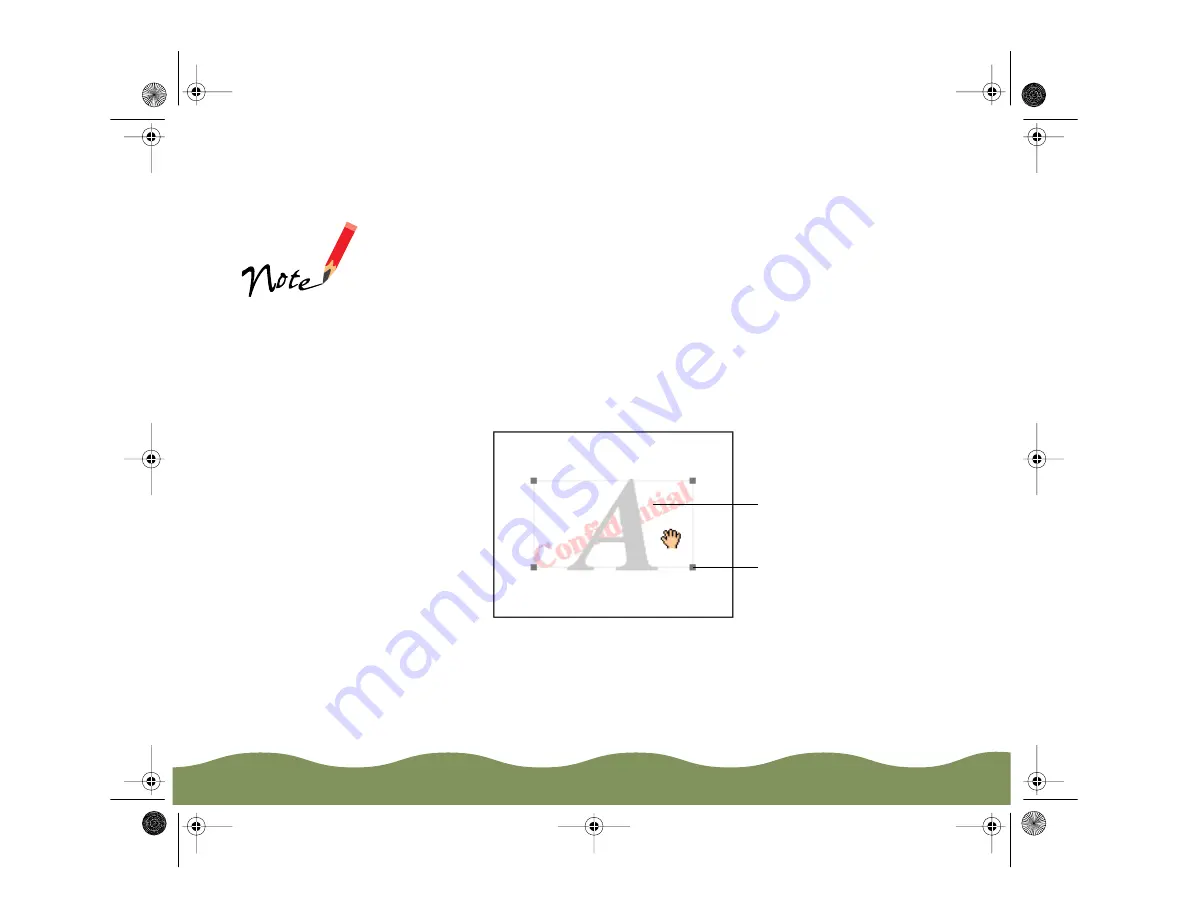
To adjust the size and position of the watermark, move the cursor 
over the Layout graphic. Four boxes appear in the corners of the 
graphic and the cursor changes to a hand.

If your monitor 
displays only 16 
colors, the Intensity 
adjustments are not 
shown in the Layout 
graphic. 

Click and drag anywhere 
in here to move the 
watermark

Click and drag one of the 
corner boxes to resize the 
watermark

color900.book  Page 68  Wednesday, January 6, 1999  12:39 PM

Summary of Contents for Stylus COLOR 900G

Page 1: ...c to get your EPSON Type B IEEE 1394 Interface Card and EPSON Stylus RIP by mail MAIL TO Epson Accessories Inc P O Box 2903 Torrance CA 90509 2903 C823722 A EPSON Type B IEEE 1394 FireWire Interface Card 199 00 C842421 A EPSON Stylus RIP PostScript Software 70 00 Name Company Street Address City State Zip Code Phone Fax Name Company Street Address City State Zip Code Phone Fax Subtotal Shipping Ca...

Page 2: ...EPSON Stylus COLOR 900 Manual color900 book Page 1 Wednesday January 6 1999 12 39 PM ...

Page 3: ...product or excluding the U S failure to strictly comply with SEIKO EPSON CORPORATION s operating and maintenance instructions SEIKO EPSON CORPORATION shall not be liable for any damages or problems arising from the use of any options or any consumable products other than those designated as Original EPSON Products or EPSON Approved Products by SEIKO EPSON CORPORATION EPSON EPSON Stylus and ESC P a...

Page 4: ...ons Notes and Tips 13 ENERGY STAR Compliance 14 Year 2000 Ready 14 Important Safety Instructions 14 Basic Printing 17 Printing from Windows 17 Printing from Windows Applications 18 Setting Default Printer Options 21 Checking Printer Status 23 Printing from a Macintosh 26 Checking Printer Status 29 color900 book Page 3 Wednesday January 6 1999 12 39 PM ...

Page 5: ...2 Using ColorSync on the Macintosh 43 Selecting Paper Size and Orientation Options 44 Selecting Paper Options in Windows 45 Selecting Paper Options on a Macintosh 50 Selecting Print Layout Options 55 Choosing Print Layout Options in Windows 55 Choosing Print Layout Options on a Macintosh 63 Using Print Preview on the Macintosh 71 Saving Custom Settings 73 Revising Custom Settings 74 Deleting Custo...

Page 6: ... Photo Quality Self Adhesive Sheets 85 EPSON Photo Quality Glossy Film 86 EPSON Photo Stickers 87 EPSON Iron On Cool Peel Transfer Paper 87 Managing Print Jobs 88 Managing Print Jobs in Windows 95 Windows 98 and Windows NT 4 0 89 Using the Progress Meter 90 Displaying the Progress Meter 91 Using the Spool Manager 93 Using Status Monitor 2 94 Managing Print Jobs in Windows 3 1 109 Using the Spool M...

Page 7: ... 122 Setting Up the Host System 122 Setting Up Client Systems 124 For Windows NT 4 0 Users 125 Setting Up Your Printer as a Shared Printer 125 Accessing the Printer Through a Network 126 For Macintosh Users 128 Selecting the Printer in the Chooser 128 Optional Interfaces 129 Using PC Interface Boards 130 Using Macintosh Interface Boards 130 Installing Optional Interfaces 131 color900 book Page 6 W...

Page 8: ... 145 Using the Print Head Alignment Utility 145 Using the DOS Print Head Alignment Utility 146 Using the Control Panel Buttons 147 Cleaning the Printer 148 Transporting the Printer 149 Troubleshooting 150 Identifying Printer Parts 151 Diagnosing Problems 152 Checking the Control Panel Lights 153 Running a Printer Check 155 Confirming the Printer ID Number 156 Improving Print Quality 157 Solving Pr...

Page 9: ...ws 98 and Windows NT 4 0 Instructions 182 Windows 3 1 Instructions 183 Macintosh Instructions 184 Where To Get Help 185 Specifications 187 Printing 187 Paper 188 Ink Cartridges 192 Mechanical 193 Electrical 193 Environmental 194 Safety Approvals 194 Interfaces 195 Index 197 color900 book Page 8 Wednesday January 6 1999 12 39 PM ...

Page 10: ...evels of brightness contrast sharpness and other settings You get even more precise color matching with ColorSync 2 01 and two Windows color management systems EPSON s specially formulated ink cartridges and wide variety of ink jet papers offer the most flexibility for getting the results you want With standard parallel serial and high speed USB Universal Serial Bus ports setting up your printer i...

Page 11: ...r and monitor Double speed 2X CD ROM drive quad speed 4X or faster recommended for installing the printer software For parallel connection a high speed bidirectional IEEE 1284 compliant parallel cable 6 to 10 feet long the cable must have a D SUB 25 pin male connector for your computer and a 36 pin Centronics compatible connector for the printer For USB connection to a computer running Windows 98 ...

Page 12: ...t least 16MB of available RAM 32MB recommended At least 50MB of free hard disk space 100MB recommended RGB display or better Double speed 2X CD ROM drive quad speed 4X or faster recommended for installing the printer software For serial connection an ImageWriter II serial cable or equivalent 8 pin mini DIN male male Belkin brand recommended EPSON part number F2V024 06 For USB connection to an iMac...

Page 13: ...Print Jobs explains how to control print jobs and check printer status while you re printing Network Printing describes how to set up your computers so you can use your printer on a network Optional Interfaces gives instructions on how to install and use EPSON interface boards Maintenance and Transportation gives instructions for replacing ink cartridges cleaning and aligning the print head and cl...

Page 14: ... referenced information Warnings Cautions Notes and Tips You ll find this information throughout your manual Warnings must be followed carefully to avoid bodily injury Cautions must be observed to avoid damage to your equipment Notes contain important information about your printer Tips contain additional hints for better printing color900 book Page 13 Wednesday January 6 1999 12 39 PM ...

Page 15: ...ure the other parts of your computer system are also ready for the year 2000 Important Safety Instructions Before using your printer read the following safety instructions to make sure you use the printer safely and effectively Turn off and unplug the printer before cleaning Clean with a damp cloth only Do not spill liquid on the printer Do not place the printer on an unstable surface or near a ra...

Page 16: ...sion cord does not exceed the cord s ampere rating Also make sure the total ampere rating of all devices plugged into the wall outlet does not exceed the wall outlet s ampere rating Except as specifically explained in this manual do not attempt to service the printer yourself Unplug the printer and refer servicing to qualified service personnel under the following conditions If the power cord or p...

Page 17: ...ely after you remove it from its foil package Leaving the cartridge unpacked for a long time before use may result in reduced print quality Do not use an ink cartridge beyond the date printed on the cartridge package For best results use up the ink cartridges within six months of installing them Do not shake an ink cartridge this can cause leakage Always turn the printer off using the Ppower butto...

Page 18: ... Start Here card Read this chapter to find out about Printing from Windows Printing from a Macintosh Printing from Windows This section tells you about Printing from Windows Applications Setting Default Printer Options Checking Printer Status For instructions on printing with DOS see Using Your Printer with DOS in the Printer Basics book color900 book Page 17 Wednesday January 6 1999 12 39 PM ...

Page 19: ...a Windows application and select a file you want to print 2 Open the File menu and click Print You see the Print dialog box for your application the Print dialog box for your application may look slightly different Most Windows examples show screen captures for Windows 95 Differences from Windows 3 1 or Windows NT are noted in the text or with another screen capture Click Properties color900 book ...

Page 20: ...ht click on an option for more information You can also set printer options by clicking Print Setup in the File menu then clicking the Printer Setup Properties or Options button However in most applications you ll then have to select the Print option from the File menu to print using your changes Click to select your Media Type Click for more information Use the Quality Speed slider to select your...

Page 21: ...d Some Media Types also have an intermediate setting This lets you choose from the fastest printing high quality printing or an intermediate setting if available that balances quality with speed for the media you re using To select 1440 dpi on plain paper or any other available resolution for your media you need to access the Advanced dialog box see Customizing Print Quality and Special Effects fo...

Page 22: ...e Checking Printer Status for more information Setting Default Printer Options When you change printer settings through your software application the settings apply only to the application you re using To adjust the default settings for all your Windows applications access the printer settings through the Printers utility or Control Panel Windows 3 1 Close all your applications before you start If...

Page 23: ... software settings as necessary Then click OK to apply your new default settings You can access the default Windows NT printer software settings only if you have the appropriate network access privileges such as Administrator Click to select your Media Type Click for more information Use the Quality Speed slider to select your print resolution Click to select Automatic mode These tabs are availabl...

Page 24: ...e printer software settings as necessary Then click OK to apply your new default settings Checking Printer Status While your document is printing your printer software reports how the job is doing See the section for your operating system Windows 95 Windows 98 or Windows NT 4 0 Windows 3 1 Click to select your Media Type Click to select Automatic mode Use the Quality Speed slider to select your pr...

Page 25: ...how much ink you have left and can view the Status Monitor 2 Printer Status window See Using Status Monitor 2 for more information You can also set up the way your printer software sends print jobs and select whether or not to display the Progress Meter See Optimizing Data Transfer and Displaying the Progress Meter for instructions Click to pause Click to cancel Click to restart Click to view the ...

Page 26: ... printer If you run out of paper while printing for example the Despooler warns you You can use the buttons to cancel pause or restart your print job You can also control print jobs using the Spool Manager see Using the Spool Manager for more information Click to pause or resume printing Click to cancel printing Click to restart printing color900 book Page 25 Wednesday January 6 1999 12 39 PM ...

Page 27: ...Open the File menu and click Page Setup Document Setup in some applications You see the Page Setup dialog box 3 Choose your paper size orientation and other options as described in Selecting Paper Options on a Macintosh and click OK On the Macintosh printer settings are saved with your document but not from one application to another If you want to reuse settings you can create document templates ...

Page 28: ...aper you choose determines the print quality resolution you can use It s very important to select the correct setting for your paper If you re not sure which to choose see Selecting Special Media 7 Choose Color or Black ink Click to select your Media Type Use the Quality Speed slider to select your print resolution Click to select Automatic mode For printing at the highest resolution 1440 dpi you ...

Page 29: ...tosh and Selecting Print Order Options for details Then click OK to return to the printer settings dialog box 11 Background printing allows you to continue working while your document prints To select background printing options before you print click the Background Printing icon See Setting Up Background Printing Options for details 12 If you want to preview your printout to view how the current ...

Page 30: ... of the current print job To cancel pause or restart a print job either the current one or any job waiting to print click the document s name to highlight it Then click one of the following buttons click to delete click to restart click to pause Job currently printing Jobs waiting to print Click to set priorities or print times for waiting print jobs When background printing is turned off you can ...

Page 31: ...color management system Your printer software s print layout options let you print almost any size image on your printer proof multiple pages on one sheet of paper and add watermarks not available with Windows 3 1 This chapter includes the following information Using Custom Project Types Customizing Print Quality and Special Effects Customizing Color Settings Using ColorSync on the Macintosh Selec...

Page 32: ...our application software 2 Access the printer settings dialog box as described in Printing from Windows or Printing from a Macintosh You see one of the following dialog boxes Windows 95 98 NT Click Custom then click here to see a list of project types Windows 3 1 Click Advanced then click here to see a list of project types Click Custom then click here to see a list of project types Macintosh colo...

Page 33: ...Camera not available with Windows 3 1 For printing images captured using a scanner or digital camera Corrects noise and other common flaws Text Graph For printing graphics intensive documents like presentation pages with charts and graphs Intensifies colors and lightens the midtones and highlights Economy For printing rough drafts of text on plain paper Saves ink ICM Image Color Matching Windows 9...

Page 34: ...n your screen For more information see Using ColorSync on the Macintosh 7 In Windows click the Paper and Layout tabs not available on Windows 3 1 to check or change any necessary settings as described in Selecting Paper Options in Windows and Choosing Print Layout Options in Windows On a Macintosh check or change any necessary settings on the Page Setup and the Layout dialog boxes as described in ...

Page 35: ...anced then click the More Settings button You see the Advanced dialog box called More Settings in Windows 3 1 After you customize your print settings for a special project you can save them as a group Then you can reuse them whenever you print a similar project See Saving Custom Settings for instructions If you selected a Custom Project type the Color Management section may look different Clicking...

Page 36: ...r most documents on plain paper transparencies or 360 dpi Ink Jet Paper Fine 360 dpi For high speed high quality output Photo 720 dpi Excellent high resolution output Photo 1440 dpi For the highest resolution output Macintosh Some of these options are automatically set or disabled by other settings you choose Click here to change your Print Quality resolution The available Print Quality settings m...

Page 37: ...r quality If vertical lines in your printout are misaligned when you use the High Speed setting you may need to turn it off or align the print head see Aligning the Print Head for instructions Flip Horizontal For printing a mirror image of your document Use with iron on transfer paper so your ironed on printout will read correctly Finest Detail For printing text graphics and line art with very sha...

Page 38: ... Digital Camera Correction Mode to automatically correct digital photographs for exposure and other common flaws and to adjust the tone or sharpness Using Custom Color Management Modes to select individual color values to fine tune the color in text graphics or economy mode documents Using a Color Management System for maximum color accuracy The appearance of the Color Management section of the Ad...

Page 39: ...Printing from a Macintosh 3 Click Custom then select either PhotoEnhance3 or Digital Camera as described in Using Custom Project Types 4 Click the Advanced button The Color Management section of the Advanced dialog box appears as shown here The Color Management section also changes to this view if you select the PhotoEnhance3 button on the Advanced dialog box Windows 95 98 NT Macintosh Click to se...

Page 40: ...g box Using Custom Color Management Modes You can choose from several custom Color Management modes or manually adjust brightness contrast saturation and CMY cyan magenta yellow color values 1 Create your image or document in your application software 2 Access the printer settings dialog box as described in Printing from Windows or Printing from a Macintosh 3 Click Custom in Windows 3 1 click Adva...

Page 41: ...raphics intensive documents like presentations with charts and graphs Intensifies colors and lightens the midtones and highlights No Color Adjustment Disables the color adjustment features of the printer software so you can use a stand alone color management utility Click the Color Adjustment button if you don t see this view The appearance of the Color section of the More Settings dialog box alwa...

Page 42: ...Increases or decreases the difference between the bright or dark parts of an image Saturation Makes colors more vivid or less vivid Cyan Magenta Yellow Increases or decreases the amount of the three ink colors that combine to make a full color printout Use these sliders to fine tune the color balance in your printout 7 Click OK to return to the printer settings dialog box color900 book Page 41 Wed...

Page 43: ...ting documents created in an ICM compatible application If you re using an ICM compatible monitor adjusts printed colors to closely match the screen colors sRGB Standard Red Green Blue not available with Windows 3 1 recommended only with Windows 98 For printing documents created in an sRGB compatible application using sRGB colors such as those designed for the World Wide Web First set up your sRGB...

Page 44: ...act method of color matching you want to use Follow these steps to set your monitor s ColorSync profile and use your printer software s ColorSync features 1 Open the ColorSync System Profile under Control Panels on the Apple menu 2 Click the Set Profile button 3 Select your monitor from the list and then click Select 4 Close ColorSync System Profile 5 Open an application and select a document to p...

Page 45: ...r and printer 11 Click OK to return to the printer settings dialog box Selecting Paper Size and Orientation Options Your printer can print on paper up to 9 5 inches wide and up to 44 inches long in either portrait or landscape orientation If you print multi page documents or multiple copies of documents you can print the pages collated and in reverse order You can even rotate the printed document ...

Page 46: ...e printer settings dialog box as described in Printing from Windows 3 Click the Paper tab You see the Paper dialog box Click to select your Paper Size Printer graphic reflects changes to Orientation and Printable Area settings Rotate by 180 is not available with Windows 3 1 Page graphics change to show Collate and Reverse Order settings color900 book Page 45 Wednesday January 6 1999 12 39 PM ...

Page 47: ...opies printed in sets click the Collate checkbox The page graphics change to show collated documents A4 210 297 mm B5 182 257 mm A5 148 210 mm Letter 8 1 2 11 in Legal 8 1 2 14 in Executive 7 1 4 10 1 2 in Half Letter 5 1 2 8 1 2 in A6 Index card 105 148 mm Index card 5 8 in Index card 8 10 in Envelope 10 4 1 8 9 1 2 in Envelope DL 110 220 mm Envelope C6 114 162 mm Envelope 132 220 mm Photo Paper ...

Page 48: ...14 mm To decrease the minimum bottom margin to 0 12 inch 3 mm set the Printable Area setting to Maximum To center your document on the page using either setting select the Centered checkbox 10 Click a tab for the settings you want to check or change next or click OK to print your document The Rotate by 180 setting lets you print the lower portion of a document first with a bottom margin as small a...

Page 49: ...ny width from 3 5 to 9 5 inches and any height length from 3 5 to 44 inches Follow these steps to create a User Defined paper size 1 Follow the steps in Printing from Windows to access the printer software then click the Paper tab 2 Click the Paper Size list and scroll to the bottom of it using the arrows or scroll bar 3 Click the User Defined option You see one of the following dialog boxes Windo...

Page 50: ...er tab again The paper size name you defined is added to the Paper Size list and selected as the current setting In Windows 3 1 the setting is named User Defined 6 Click a tab for the settings you want to check or change next or click OK to print your document Changing or Deleting a Custom Paper Size Windows 95 Windows 98 or Windows NT 1 Click User Defined in the Paper Size list 2 On the User Defi...

Page 51: ... 3 Click OK when you re done Selecting Paper Options on a Macintosh The Paper Size and Orientation options for your printer software are on the Page Setup dialog box The options for collating and reversing the page order are on the Layout dialog box Follow the steps in these sections for selecting the paper options Choosing Paper Size and Orientation Options Selecting Print Order Options color900 ...

Page 52: ...paper size see Creating Custom Paper Sizes Click to select your Paper Size Printer graphic reflects changes to Orientation and Printable Area settings Click to select your Orientation options Click to select your Printable Area options A4 210 297 mm B5 182 257 mm A5 148 210 mm Letter 8 1 2 11 in Legal 8 1 2 14 in Executive 7 1 4 10 1 2 in Half Letter 5 1 2 8 1 2 in A6 Index card 105 148 mm Index c...

Page 53: ...ate multiple copies of a multi page document or reverse the order in which pages are printed see Selecting Print Order Options for instructions If you ve finished selecting options click OK to close the Page Setup dialog box Then select Print from the File menu to print your document The Rotate by 180 degrees setting lets you print the lower portion of a document first with a bottom margin as smal...

Page 54: ...alog box 3 Click the New button Width and Height fields and Inches and cm buttons appear on the screen 4 Type the width and length of your custom paper in the Width and Height fields If you need to change from inches to centimeters click the cm button 5 Type a name for your paper size in the New Paper Size field then click OK The name is added to the Paper Size list and selected as the current set...

Page 55: ...s click the Collate checkbox The page graphics change to show collated documents 4 If you re printing a multi page document and want the last page printed first so the pages come out without needing to be reordered click the Reverse Order checkbox The page graphics change to show later pages printing first 5 Click OK to close the Layout dialog box For information on the other settings on the Layou...

Page 56: ...watermark Follow the steps in the section for your operating system Choosing Print Layout Options in Windows Choosing Print Layout Options on a Macintosh Choosing Print Layout Options in Windows Follow the steps in these sections to use options in the Layout dialog box Reducing and Enlarging Your Document Size Using Multiple Print Layouts and Page Frames Adding a Watermark Layout options are not a...

Page 57: ...ge of its original size Follow these steps to reduce or enlarge your document size 1 Create your document in your application software 2 Follow the steps in Printing from Windows to access the printer settings dialog box then click the Paper tab 3 Click the Paper Size list and select your document s size as determined by your application 4 If the Paper Size setting you selected is within the maxim...

Page 58: ...automatically turns on the Fit to Page setting so the document fits into the printable area on the output paper you select The selected Paper Size reduction percentage and Output Paper settings now appear above the printer graphic If you want to adjust the proportions or sizes further go to step 6 If you re ready to print go to step 8 Output Paper list Paper Size setting reduction percentage Outpu...

Page 59: ...o Page setting becomes active if necessary select the size of paper loaded in the printer Select Custom then select a percentage 10 to 400 in the Scale to field to resize the document by a specific amount Reduce Enlarge settings If you previously selected a Paper Size setting that is larger than the maximum paper size for your printer and then choose Normal the Paper Size changes to Letter 8 1 2 1...

Page 60: ... you can select Print Layout options in the printer software You can choose the way the pages are placed on the paper and add a lined frame to each page Follow these steps to use the Print Layout options 1 Follow the steps in Printing from Windows to access the printer settings dialog box 2 Click the Layout tab You see the Layout dialog box 3 To print multiple pages of your document on one sheet o...

Page 61: ...indicate how it should be handled For example you may want to add a watermark of the word Confidential to documents you don t want distributed to other parties Or you can add a custom bitmap of your company logo so your document looks like printed letterhead Follow these steps to add a watermark 1 Follow the steps in Printing from Windows to access the printer settings dialog box 2 Click the Layou...

Page 62: ... the Settings button You see the following dialog box Confidential Draft Urgent Priority Hot Do Not Copy For Your Eyes Only Review Copy Top Secret Duplicate WaterMark drop down list Click here to select a predefined watermark Click here to load a custom watermark you ve created Specify how you want your watermark to look using these options See how your selections will look in the Layout graphic c...

Page 63: ...Watermark field Click the Save button to add it to the list then click OK The custom watermark now appears as the selected watermark in the Watermark Settings dialog box and is shown in the on screen graphic Click Browse to select your bitmap file Then type a name for your custom watermark here and click Save You can create up to 10 custom watermarks using any bitmap file up to 15MB in size With W...

Page 64: ...You cannot select a color for a custom watermark it is printed in its original colors Intensity sets the lightness or darkness of the watermark based on where you move the slide bar 7 If you re finished changing Layout options click OK If you want to select more options see Reducing and Enlarging Your Document Size and Using Multiple Print Layouts and Page Frames Choosing Print Layout Options on a...

Page 65: ...o Page option 1 Create your image or document in your application software 2 Open the File menu and select Page Setup You see the Page Setup dialog box 3 Click the Paper Size list and select the original size of your document 4 Click OK to close the Page Setup dialog box 5 Now open the File menu and select Print 6 On the Printer Settings dialog box click the Layout icon You see the Layout dialog b...

Page 66: ... in the printer This automatically sets the correct reduction or enlargement to fit the document into the printable area on the selected paper size The selected document size and paper size settings now appear beneath the paper graphic 8 If you re finished selecting Layout options click OK If you want to select more options see Adding a Watermark and Using Multiple Print Layouts and Page Frames Se...

Page 67: ...gs dialog box click the Layout button 4 To use one of the predefined watermarks listed below click the arrow in the Name list in the Watermark box and select the watermark Then continue with step 6 Confidential Draft Urgent Priority Hot Do Not Copy For Your Eyes Only Review Copy Top Secret Duplicate To add a custom watermark you must first create the watermark as a PICT file in an application prog...

Page 68: ...ame of your PICT file appears in the Mark Name field and is added to the Watermark List Click the Save button to close the dialog box The custom watermark now appears as the selected watermark in the Layout dialog box and is shown in the layout graphic Click the Add button to select a PICT file You can create up to 10 custom watermarks from PICT files up to 1MB in size To delete a custom watermark...

Page 69: ...original colors Intensity sets the lightness or darkness of the watermark based on where you move the slidebar To adjust the size and position of the watermark move the cursor over the Layout graphic Four boxes appear in the corners of the graphic and the cursor changes to a hand If your monitor displays only 16 colors the Intensity adjustments are not shown in the Layout graphic Click and drag an...

Page 70: ...ore options see Using the Fit to Page Option and Using Multiple Print Layouts and Page Frames Using Multiple Print Layouts and Page Frames If you re printing a multi page document and you want a quick proof of the images on each page printed on one piece of paper you can select a Print Layout option in the printer software You can choose the way the pages are placed on the paper and add a lined fr...

Page 71: ... the page order click the arrow in the Page Order pop up list Then select the page order you want to use 6 If you want to frame each page s contents with a black line one dot wide click the Print page frames checkbox 7 If you re finished selecting Layout options click OK If you want to select more options see Using the Fit to Page Option and Adding a Watermark Click the arrow and select a multiple...

Page 72: ... Page Order Watermark Reverse Order and Collate Page Setup options such as Paper Size Orientation Rotate by 180 degrees and Printable Area Follow these steps to use Print Preview 1 Open an application and select a document to print 2 Open the File menu and click Print You see the printer settings dialog box 3 Click the Print Preview icon The Print button changes to the Preview button Click the Pri...

Page 73: ... buttons Click to see the entire page reduced to fit in the display Click to see a mid size preview Click to see the page enlarged with the most detail 7 To print your document click Print To close the print preview dialog box and return to your application click Cancel Help Cancel and Print buttons Page control buttons Preview image Preview sizing buttons When you click Cancel the Preview and Pri...

Page 74: ...then access the Advanced dialog box as described in Customizing Print Quality and Special Effects In Windows 3 1 access the main printer settings dialog box as described in Printing from Windows then click Advanced 2 Click the Save Settings button You see this dialog box 3 Type a unique name for your settings up to 16 characters and click the Save button 4 Click OK to close the Advanced dialog box...

Page 75: ... click Custom in Windows 3 1 click Advanced Then select the name of the custom settings group you want to redefine in the Custom Settings list 2 Click the Advanced button in Windows 3 1 click More Settings and change the printer settings 3 When you re finished changing the settings click Save Settings In Windows 3 1 click OK to close the More Settings dialog box and then click Save Settings on the...

Page 76: ... your changes Deleting Custom Settings 1 From the main printer settings dialog box click Custom then click the Advanced button 2 Click Save Settings on the Advanced dialog box In Windows 3 1 click Advanced then click Save Settings on the main printer settings dialog box 3 Select the custom settings group in the Custom Settings box and click Delete Then click OK to confirm the deletion Windows only...

Page 77: ...n better results with EPSON s specially coated ink jet paper For the best output use EPSON s photo quality paper ink jet paper glossy film ink jet cards and photo paper For special projects you can use a variety of EPSON media designed for ink jet printers ranging from transparencies to iron on transfer paper This chapter covers the following Selecting Special Media Media Loading and Handling Guid...

Page 78: ...41060 S041059 360 dpi Ink Jet Paper EPSON Iron On Cool Peel Transfer Paper Letter S041153 S041155 EPSON High Quality Ink Jet Paper Letter A4 8 3 11 7 inches S041111 S041117 Photo Quality Ink Jet Paper EPSON Photo Quality Ink Jet Paper Letter A4 8 3 11 7 inches Legal S041062 S041061 S041067 EPSON Photo Quality Ink Jet Cards A6 4 1 5 8 inches 8 10 inches S041054 S041122 EPSON Photo Quality Self Adhe...

Page 79: ...EPSON Photo Quality Glossy Film Letter A4 8 3 11 7 inches A6 4 1 5 8 inches S041072 S041071 S041107 Photo Quality Glossy Film EPSON Photo Stickers Kit CD ROM and paper EPSON Photo Stickers refill paper only A6 4 1 5 8 inches A6 4 1 5 8 inches S041144 KIT S041144 EPSON Ink Jet Transparencies Letter A4 8 3 11 7 inches S041064 S041063 Ink Jet Transparencies Media name Size Part number Media Type sett...

Page 80: ...ow mark on the left edge guide Remember to select the correct Media Type and Paper Size for your paper If the special media has protective sheets between the sheets of media be sure to remove the protective sheets before printing After printing cover the printed side of your media with these sheets before storing Use ink jet papers within one year of purchase Use glossy film and transparencies wit...

Page 81: ...on regular media Some media require additional loading instructions See the following sections for more information about Letterhead Preprinted Forms and Legal size Paper Envelopes EPSON Photo Paper EPSON Photo Quality Ink Jet Cards EPSON Ink Jet Transparencies EPSON Photo Quality Self Adhesive Sheets EPSON Photo Quality Glossy Film EPSON Photo Stickers EPSON Iron On Cool Peel Transfer Paper setti...

Page 82: ...ss lever to the position as shown Make sure you return the lever to the 0 position before you print on other media You can load up to 10 envelopes at a time Load the envelope flap edge first and printable side up Place it against the right edge guide and adjust the left edge guide as shown Select Plain paper as the Media Type and choose the correct envelope size as the Paper Size setting in the pr...

Page 83: ...covering and protect them from heat humidity and direct sunlight Return unused paper to the original package as soon as you finish printing Keep the following in mind when using EPSON Photo Paper Load the paper with the whiter glossier side facing up If you re loading Panoramic Photo Paper pull up the paper support extension Then load one sheet of Panoramic Photo Paper and hold up its top edge whi...

Page 84: ...nlarging Your Document Size 2 Choose these printer software settings Photo Paper as the Media Type setting Photo Paper 4 6 in as the Paper Size setting Maximum as the Printable Area setting EPSON 4 6 inch Photo Paper is perforated around the edges so you can trim your printouts and bleed the photo extend it to the edge of the paper on all sides trim size printed image size 0 67 in 0 24 in 0 12 in ...

Page 85: ... to 20 sheets of Photo Paper at a time Make sure you place the included support sheets A and B beneath the stack but don t print on them 4 Slide the left edge guide against the left edge of the paper 5 After you print your picture fold the paper back and forth along the perforations and carefully tear the margins off color900 book Page 84 Wednesday January 6 1999 12 39 PM ...

Page 86: ...osition as shown in Envelopes EPSON Ink Jet Transparencies Before you load transparencies place the included support sheet or a plain paper sheet beneath the stack You can load up to 30 transparencies However you may get better results by loading one sheet at a time Select Ink Jet Transparencies as the Media Type in the printer software EPSON Photo Quality Self Adhesive Sheets Use these sheets to ...

Page 87: ...top margin you can use is 1 2 inches 30 mm If you want to use a smaller top margin load and print one sheet at a time If your media has a cut corner position it in the printer as shown here Remove each sheet from the output tray immediately after it s printed Make sure each sheet is dry before stacking It is best not to use the Maximum printable area setting in the printer software when printing o...

Page 88: ...Cool Peel Transfer Paper You can print photos company logos or anything else you want on these transfer papers and then iron your images onto T shirts or other cotton cloth items Load one sheet of transfer paper at a time and select 360 dpi Ink Jet Paper as the Media Type setting Make sure you reverse your image before you print it especially if it includes text so it will read correctly when it s...

Page 89: ...m to monitor your printer s status and check on the current print job or jobs waiting to print This chapter provides instructions for the following Managing Print Jobs in Windows 95 Windows 98 and Windows NT 4 0 Managing Print Jobs in Windows 3 1 Managing Print Jobs on a Macintosh color900 book Page 88 Wednesday January 6 1999 12 39 PM ...

Page 90: ... Spool Manager appears in the taskbar at the bottom of the screen each time you print as described in Using the Spool Manager Status Monitor 2 which provides a variety of print monitoring options as described in Using Status Monitor 2 In addition the Speed Progress dialog box lets you optimize your system for the fastest transfer of data to your printer See Optimizing Data Transfer for details Win...

Page 91: ...uch ink you have left and can view the Status Monitor 2 Printer Status window See Using Status Monitor 2 for more information You can also set up the way your printer software sends print jobs and select whether or not to display the Progress Meter See Optimizing Data Transfer and Displaying the Progress Meter for instructions Click to pause Click to cancel Click to restart Click to view the Statu...

Page 92: ...o Settings then click Printers 2 Right click the EPSON Stylus COLOR 900 printer icon and select Properties Windows 95 and 98 or Document Defaults Windows NT from the menu 3 Click the Utility tab You see the Utility menu The Speed Progress button is grayed out when you access your printer software through an application You can access the Speed Progress dialog box only through the Windows Printer U...

Page 93: ...options in the Speed Progress dialog box see Optimizing Data Transfer 5 Click OK to close the Speed Progress dialog box and return to the Utility menu Then click OK again to exit your printer software Select whether you want the Progress Meter to appear or not color900 book Page 92 Wednesday January 6 1999 12 39 PM ...

Page 94: ...ger while you re printing click the EPSON Stylus COLOR 900 button that appears on the taskbar at the bottom of the screen You see the Spool Manager window To cancel pause resume or restart a print job click the job to highlight it then click the corresponding command button on the bottom of the window Print job file Command buttons color900 book Page 93 Wednesday January 6 1999 12 39 PM ...

Page 95: ...u view information about your printer and print jobs and control how you want printing monitored Before you can use Status Monitor 2 you must enable background monitoring for your printer Follow the instructions in these sections to use Status Monitor 2 Opening Status Monitor 2 Turning On Background Monitoring Setting Up Monitoring Preferences Using the Status Monitor 2 Main Window You can check p...

Page 96: ...print See Using the Job Status Window for more information Status Alert reports errors low ink levels and other problems as they occur See Setting Up Monitoring Preferences for more information Opening Status Monitor 2 To use Status Monitor 2 or to view any of its status windows you must first open it Follow these steps 1 Make sure your printer is turned on 2 Click Start point to Programs click th...

Page 97: ...taskbar even after you close Status Monitor 2 To reopen the utility double click the icon The color of the icon also helps you monitor your printer status as described in Interpreting the Installed Printer Icon Setting Up Monitoring Preferences You can select the way you want Status Monitor 2 to monitor your printer using the Monitoring Preferences window Follow these steps 1 If you haven t alread...

Page 98: ...nly if a printing error occurs If you select all the options the dialog box appears whenever you print encounter an error or have low ink levels If the Status Alert window takes a long time to appear after you send a print job you may want to decrease the monitoring interval This will make the Status Alert Window appear more quickly however shorter intervals may cause some applications to run more...

Page 99: ... you start Status Monitor 2 you see the main window If you see more than one EPSON printer in the Installed Printers list Status Monitor 2 has detected printer software for other EPSON printers on your system If you connect another EPSON printer you can monitor it with Status Monitor 2 the same way you monitor your EPSON Stylus COLOR 900 Menu bar Button bar Brief status messages appear here The nu...

Page 100: ...on bar If you re monitoring multiple printers you can reorder them in the Installed Printers list by clicking Printer Name Status or Job Count in the title bar Other options in Status Monitor 2 let you view more details on the printer or job status as described in Using the Printer Status Window and Using the Job Status Window You can also set when and if you want the Status Alert window to notify...

Page 101: ...r The color of the printer indicates the printer status as follows Color Status message Green Ready to print Yellow Paper and or ink level is low Red Paper and or ink is out paper is jammed or a print error has occurred Gray or dimmed Printer is either disconnected from your computer or turned off color900 book Page 100 Wednesday January 6 1999 12 39 PM ...

Page 102: ...lick the Utility tab then click the EPSON Status Monitor 2 icon You can also open Status Monitor 2 as described in Opening Status Monitor 2 and click your printer name in the Installed Printers list Then click the Printer Status icon or select Printer Status from the Printer menu You see the Printer Status window The Current Status tab gives printing status and troubleshooting tips Printer status ...

Page 103: ...ion Graphic Condition Ready to print Paper isn t loaded correctly Paper is jammed Black ink is out Color ink is out A communication error has occurred Another type of printer error has occurred The printer is cleaning the print head or charging the ink cartridges color900 book Page 102 Wednesday January 6 1999 12 39 PM ...

Page 104: ...n the window Click the printer name in the Installed Printers list to highlight it and click the icon or select Job Status from the Printer menu Right click the printer name in the Installed Printers list and select Job Status from the drop down menu These graphics indicate the amount of ink remaining in your cartridges The Job Status window is very similar to the Spool Manager window Both allow y...

Page 105: ...Document menu To pause or purge all waiting print jobs select Pause Printing or Purge Print Jobs from the Print menu You can also select or deselect the printer as your Windows default and access the printer software to change default settings from the Printer menu Information on jobs currently printing or waiting to be printed appears here Menu bar color900 book Page 104 Wednesday January 6 1999 ...

Page 106: ...ing Preferences for instructions The color of the printer icon in the Status Alert window indicates the type of error as described in Interpreting the Installed Printer Icon Click here to close the Status Alert dialog box Click the printer name to highlight it then click Details to open the Printer Status window see Using the Printer Status Window for more information color900 book Page 105 Wednes...

Page 107: ...re from the Windows Printers utility as described below 1 Click Start point to Settings then click Printers 2 Right click the EPSON Stylus COLOR 900 printer icon and select Properties Windows 95 and 98 or Document Defaults Windows NT from the menu 3 Click the Utility tab You see the Utility menu The Speed Progress button is grayed out when you access your printer software through an application Yo...

Page 108: ... this dialog box If you have more than one hard disk drive you can select a folder for storing multiple copy print jobs here You don t see this box if you have only one hard disk drive Not available with Windows NT color900 book Page 107 Wednesday January 6 1999 12 39 PM ...

Page 109: ...neath the EPSON Printer Port option High speed DMA transfer enabled tells you that you re already using fast DMA transfer mode For higher data transfer rates use DMA transfer lets you know that you can speed up printing by enabling DMA transfers on your system See your computer documentation or contact your computer manufacturer s technical support for instructions on using DMA transfers if your c...

Page 110: ...formation See Windows 3 1 for details on the Despooler Using the Spool Manager The Spool Manager works like the Windows Print Manager When you send a job to your printer your printer software creates a temporary print job file stores it in the C TEMP or C WINDOWS TEMP directory and assigns it to a print queue The software then sends the file to your printer at the right time To open Spool Manager ...

Page 111: ...Manager menu bar for detailed information Deleting a Print Job If you re having trouble printing it may be because of a stalled print job Follow these steps to delete it and continue printing 1 Open the Spool Manager as described in Using the Spool Manager 2 Click on any print jobs marked Held 3 Open the Document menu and click Delete Then click Yes 4 Exit Spool Manager and try printing again Queu...

Page 112: ...as described in Using the Spool Manager 3 Make sure EPSON Stylus COLOR 900 is selected and then choose Setup from the Queue menu The Queue Setup dialog box appears 4 Change the spool directory to the one you created in step 1 Also make sure Use Print Manager for this port is checked Then click OK 5 Choose Default Spool Directory from the Options menu 6 In the dialog box change the spool directory ...

Page 113: ...hat are waiting to be printed and lets you set priorities and print times for waiting print jobs You can also cancel pause or restart a print job See Using Monitor3 for details The Status Monitor lets you check how much ink you have left See Using the Macintosh Status Monitor for details The Configuration utility lets you select how you want to be notified of printer errors and where you want prin...

Page 114: ...d select the SC 900 icon Then select the port you re using 2 Under Background Printing click On and close the Chooser 3 To increase the memory allocation select EPSON Monitor3 in the Extensions folder in your System folder Then choose Get Info from the File menu and set the Memory Requirements to 2000 or 3000K depending on your system s available RAM You may need to perform different or additional...

Page 115: ... it Then click one of the following buttons click to delete click to restart click to pause Current print job Jobs waiting to print Click to set priorities or print times for waiting print jobs If the Monitor3 dialog box doesn t appear click the current application icon at the right end of the menu bar and select EPSON Monitor3 from the drop down menu When background printing is turned off you can...

Page 116: ... the job before Normal priority jobs in the print queue Hold holds the job in the print queue until you re ready to release it for printing by clicking restart Print Time opens the Set Print Time dialog box Enter the date and time you want to print the document then click OK If you see a stop sign icon and the message Print queue on hold in the EPSON Monitor3 dialog box select Start print queue fr...

Page 117: ... in your printer Follow these steps 1 Choose Page Setup or Print from the File menu in your application You see a printer settings dialog box 2 Click the Utility icon You see the Utility menu For information about these utilities see Maintenance and Transportation color900 book Page 116 Wednesday January 6 1999 12 39 PM ...

Page 118: ...ware checks the amount of ink remaining in the printer and displays the Status Monitor window 4 To recheck the ink level check click the Update button To close the Status Monitor click OK Click to recheck the ink level color900 book Page 117 Wednesday January 6 1999 12 39 PM ...

Page 119: ... from the File menu in your application You see a printer settings dialog box 2 Click the Utility icon You see the Utility menu 3 Click the Configuration button You see the Configuration Settings dialog box Select how you want to be notified of errors and warnings Select where you want print job files stored Click here to check for errors and or the ink level before printing Click here to return t...

Page 120: ...print job files created when you send a job to the printer Click the Select button to change the folder from the default folder shown Click the Check for errors before starting to print checkbox if you want your software to check for errors before starting your print job Click the Check the ink level before starting to print checkbox if you want your software to check for a low ink condition befor...

Page 121: ... Set a specific time for printing the print job Hold the print job for later printing Follow these steps 1 Open an application and select a document you want to print 2 Open the File menu and click Print You see the printer settings dialog box 3 Click the Background Printing icon You see the following dialog box 4 To turn background printing on or off click the On or Off button You can also turn b...

Page 122: ...ght Hold to hold the print job in the print queue until you re ready to release it using EPSON Monitor 3 see Using Monitor3 for details 6 Click OK to save your settings and return to the printer settings dialog box Click Cancel if you want to cancel your settings and return 7 Click Print to print your document If you selected Print at or Hold your document is spooled but held in the print queue un...

Page 123: ...ing the steps here make sure you ve installed the printer software on all the computers that will use the printer See the Start Here card for instructions Setting Up the Host System Follow these steps to share a printer connected directly to your computer with other computers on a network 1 Click Start point to Settings then click Control Panel 2 Double click Network 3 Click the File and Print Sha...

Page 124: ...ON Stylus COLOR 900 icon then click Sharing on the File menu 8 Click Shared As enter printer information as needed then click OK If a dialog box requesting the Windows 95 or 98 CD ROM appears insert the CD ROM in the CD ROM drive then follow the messages on the screen If a dialog box appears requesting you to restart your computer do so Then continue with step 6 color900 book Page 123 Wednesday Ja...

Page 125: ...rowse to specify the network path to the printer 4 When you return to the Details tab click OK To print from DOS applications as well as Windows applications click the Capture Printer Port button instead of Add Port Select the printer port in the Device list then specify its network path Select Reconnect at logon then click OK color900 book Page 124 Wednesday January 6 1999 12 39 PM ...

Page 126: ...inter and install the printer software on those computers Setting Up Your Printer as a Shared Printer Follow these steps to share a printer that is connected directly to your computer with others on a network 1 Click Start point to Settings and click Printers 2 Select your printer then click Sharing on the File menu This section is written for users printing over a small network only If you are on...

Page 127: ... each computer from which you want to access the printer click Start point to Settings and click Printers 2 Double click the Add Printer icon Do not choose any drivers from the Alternate Drivers list Your printer must be set up as a shared resource on the computer to which it is directly connected before you can access it from another computer color900 book Page 126 Wednesday January 6 1999 12 39 ...

Page 128: ...e click the icon of the computer that is directly connected to the printer Then click the printer s icon 5 Click OK and follow the on screen instructions Be sure to confirm all network settings with the network administrator color900 book Page 127 Wednesday January 6 1999 12 39 PM ...

Page 129: ...inter in the Chooser 1 Turn on your printer 2 Open the Chooser from the Apple menu and click your printer s icon 3 If you are using AppleTalk zones select the zone you want to use A list of all the printers connected to the selected zone appears on the right Click the name assigned to the EPSON Stylus COLOR 900 4 Click the Background Printing buttons to turn background printing on or off 5 Close t...

Page 130: ...oard contact your dealer or call EPSON Accessories at 800 873 7766 U S sales only Or visit our website at www epsonsupplies com U S sales only In Canada call 800 873 7766 for dealer referral Type of interface board Model number Compatibility 32KB serial C823071 PC 32KB parallel C80310 Type B bi d parallel C82345 Twinax C823151 PC Coax C823141 PC LocalTalk C823121 Macintosh Type B Ethernet C823622 ...

Page 131: ...fer to your computer documentation for information about matching the board s settings to your computer system If you install the Ethernet board connected to a thin coaxial 10BASE2 cable and the printer is the last device on the network you need to obtain a 50 ohm terminator The Ethernet transceiver is included on the EPSON Ethernet board so you do not need an adapter box for the printer Using Mac...

Page 132: ...ling Optional Interfaces Before you install an optional interface board in your printer make sure the printer is turned off and all the printer s lights are off Then follow these steps 1 Unplug the power cord from the electrical outlet 2 Disconnect any interface cables from the printer 3 Use a Phillips cross head screwdriver to remove the two screws securing the interface cover then lift off the c...

Page 133: ...unding wire connect it to one of the screws securing the parallel interface If you are using more than one computer reconnect the other interface cable as well 8 Make sure the printer is turned off Then plug in the power cord In most cases the printer automatically detects the interface you re using However if you have trouble printing through an installed interface board you may need to change th...

Page 134: ... your EPSON Stylus COLOR 900 printer working at its best Just follow the simple instructions in this chapter for Cleaning the Print Head Replacing an Ink Cartridge Aligning the Print Head Cleaning the Printer Transporting the Printer color900 book Page 133 Wednesday January 6 1999 12 39 PM ...

Page 135: ...nting before cleaning the print head Using the Head Cleaning Utility Follow these steps to run the Head Cleaning utility 1 Make sure the printer is turned on but not printing and both the B black and A color ink out lights are off 2 Start an application and open a document 3 Access the printer settings dialog box as described in Printing from Windows or Printing from a Macintosh 4 Click the Utilit...

Page 136: ... is complete click Finish If the pattern is missing dots click Clean to run another cleaning cycle If you don t see any improvement after cleaning two or three times check the print quality solutions in Improving Print Quality Using the Control Panel Follow these steps to clean the print head 1 Make sure the printer is turned on and not printing and that both the B black and A color ink out lights...

Page 137: ...he Utility tab Windows or the Utility icon Macintosh You see the Utility menu 6 Make sure paper is loaded in the printer and click the Nozzle Check icon then click Next The nozzle check pattern prints on your printer see Examining the Nozzle Check Pattern for details 7 If the nozzle check pattern is filled in completely click Finish If the pattern is missing dots click Clean to run another cleanin...

Page 138: ...ern colored magenta cyan and yellow Each staggered horizontal and straight vertical line should be complete with no gaps in the dot pattern If your printout looks okay you re done If any dots are missing as shown below clean the print head again see Cleaning the Print Head for instructions missing dots missing dots color900 book Page 137 Wednesday January 6 1999 12 39 PM ...

Page 139: ...Color ink cartridge T005011 When you need new ink cartridges contact your dealer or call EPSON Accessories at 800 873 7766 U S sales only Or visit our website at www epsonsupplies com U S sales only In Canada please call 800 873 7766 for dealer referral If you need to replace an ink cartridge before the lights flash because the ink is too old for example follow the instructions in Replacing an Out...

Page 140: ...the new ink cartridge from its packaging 2 Remove only the yellow part of the tape seal on top as shown below Don t pull off the blue portion or try to remove the clear seal underneath the cartridge 3 Make sure the printer is turned on and not printing then open the printer cover You must remove the yellow tape from the top of the cartridge or you will permanently damage it Do not remove the clear...

Page 141: ...r cartridge replacement position depending on which ink cartridge is empty 5 Pull up the ink cartridge clamp The cartridge rises up from its holder Don t open the clamp or remove a cartridge except to replace it with a new one Once you remove a cartridge you can t reuse it even if it contains ink To avoid damaging the printer never move the print head by hand color900 book Page 140 Wednesday Janua...

Page 142: ...aning button and close the printer cover The printer moves the print head and begins charging the ink delivery system The Ppower light flashes and the printer makes various sounds Charging takes about one minute When it s finished the Ppower light stops flashing and stays on If ink gets on your hands wash them thoroughly with soap and water If ink gets into your eyes flush them immediately with wa...

Page 143: ...k or A color ink out light is flashing or on 1 Remove the new ink cartridge from its packaging 2 Remove only the yellow part of the tape seal on top as shown below Don t pull off the blue portion or try to remove the clear seal underneath the cartridge 3 Make sure the printer is turned on and not printing then open the printer cover You must remove the yellow tape from the top of the cartridge or ...

Page 144: ...nk cartridge press the E load eject button again until the print head moves to the color ink cartridge replacement position 6 Pull up the ink cartridge clamp The cartridge rises up from its holder To avoid damaging the printer never move the print head by hand Don t open the clamp or remove a cartridge except to replace it with a new one Once you remove a cartridge you can t reuse it even if it co...

Page 145: ... Then continue with step 11 11 Press the E load eject button again and close the printer cover The printer moves the print head and begins charging the ink delivery system The Ppower light flashes and the printer makes various sounds Charging takes about one minute When it s finished the Ppower light stops flashing and stays on If ink gets on your hands wash them thoroughly with soap and water If ...

Page 146: ... the printer is turned on and letter size paper is loaded 2 Start an application and open a document 3 Access the printer settings dialog box as described in Printing from Windows or Printing from a Macintosh 4 Click the Utility tab Windows or the Utility icon Macintosh You see the Utility menu 5 Click the Print Head Alignment icon 6 Follow the instructions on the screen to print a test page and s...

Page 147: ...letter for D Then press Enter and follow the directions on the screen to install the print head alignment utility 3 After installing the utility type C EPCALIB2 where C is your hard disk drive letter Then press Enter The following window appears 4 Make sure EPSON Stylus COLOR 900 is selected Click Next then follow the directions on the screen to align the print head You must install this utility i...

Page 148: ...h buttons 3 The S paper out light flashes for about three seconds While it is flashing press the E load eject button The printer prints a sheet of instructions in English French German Italian Spanish and Portuguese explaining how to align the print heads Follow these instructions 4 After aligning the print head turn off the printer to exit print head alignment mode If you don t press the E load e...

Page 149: ...r of the printer with a soft damp cloth 4 Clean ink out of the printer s interior with a soft damp cloth Don t touch the gears inside the printer Never use alcohol or thinner for cleaning they can damage the printer components and case Don t use a hard or abrasive brush Don t get water on the printer components Don t spray lubricants or oils inside the printer Don t use any cleaning sheets include...

Page 150: ...pe as shown below then close the printer cover 5 Push in the output tray extensions and close the tray 6 Repack the printer and attachments in the original box using the protective materials that came with it See the unpacking sheet that was packed with your printer Be sure to keep the printer level as you transport it If you notice a decline in print quality after transporting the printer clean t...

Page 151: ... this chapter Then try the most likely solutions until the problem is fixed This chapter includes the following Identifying Printer Parts Diagnosing Problems Improving Print Quality Solving Printing Problems Solving Printer Software Problems Fixing Paper Problems Solving Miscellaneous Printout Problems Uninstalling Printer Software Where To Get Help color900 book Page 150 Wednesday January 6 1999 ...

Page 152: ...g the parts of the printer refer to the following illustrations ink cartridge clamps thickness lever control panel sheet feeder left edge guide output tray extensions output tray printer cover paper support right edge guide color900 book Page 151 Wednesday January 6 1999 12 39 PM ...

Page 153: ...r printer settings or have problems with color quality you may need to confirm your Printer ID number See Confirming the Printer ID Number for details If any of the suggested solutions in this chapter tell you to uninstall and then reinstall your printer software see Uninstalling Printer Software for instructions For more troubleshooting information check the Help and ReadMe files in the EPSON pro...

Page 154: ...on P The power light is on when the printer is on and ready to print The power light flashes when the printer is receiving print data printing or performing a maintenance operation such as cleaning the print head B or A When an ink out light flashes your ink supply is low Make sure you have a replacement cartridge When an ink out light comes on you need to replace the ink cartridge See Replacing a...

Page 155: ... and A color ink out lights come on jammed paper may be blocking movement of the print head Turn off the printer press the Ppower button remove the jammed paper wait 15 seconds then turn the printer on again If this does not clear the error contact your dealer or EPSON as described in Where To Get Help When all the lights flash your printer may have an internal error Turn off the printer press the...

Page 156: ...rface cable from the printer 3 Make sure paper is loaded in the printer 4 Hold down the E load eject button then press and release the Ppower button Continue holding down the E load eject button until the Ppower light starts to flash then release it The printer prints one page containing the printer s ROM version ink counter code and a nozzle check pattern Only the nozzle check pattern is shown be...

Page 157: ...an use the Printer and Option Information utility to confirm the Printer ID Color quality may improve after you confirm the ID number If you re using Status Monitor 2 this information is updated automatically However if a message appears prompting you to enter settings or if you change the printer s configuration you ll need to update the Printer ID manually Follow these steps 1 Make sure letter s...

Page 158: ...or a list of EPSON papers Match the Media Type setting in the printer software to the type of media you loaded in the printer Then the printer software can automatically select other settings for the best quality See Printing from Windows Applications Printing from a Macintosh or Printing on Special Media for details Turn off High Speed mode in the printer software as described in Customizing Prin...

Page 159: ...e printable side whiter face up See Media Loading and Handling Guidelines for instructions The print head nozzles are clogged Clean the print head See Cleaning the Print Head for instructions The ink cartridges are low on ink Check the B black and A color ink out lights to see which cartridge you may need to replace See Replacing an Ink Cartridge for instructions The Maximum Printable Area setting...

Page 160: ... off the High Speed setting if vertical lines are misaligned See Customizing Print Quality and Special Effects for information The print head is misaligned Run the Print Head Alignment utility See Cleaning the Print Head for instructions Possible cause Solution The Ink option is set to Black Change the Ink setting to Color See Printing from Windows Applications or Printing from a Macintosh for ins...

Page 161: ...re incorrect for your document Use the Automatic mode setting or different project type See Customizing Color Settings or Using ColorSync on the Macintosh for more information The print head nozzles are clogged Clean the print head See Cleaning the Print Head for instructions The ink cartridges are low on ink or one or more ink colors are empty Check the B black and A color ink out lights to see w...

Page 162: ...are See your software documentation for more information Possible cause Solution The print head nozzles are clogged Clean the print head See Cleaning the Print Head for instructions The Media Type setting doesn t match the loaded paper Make sure the Media Type setting matches the paper you re using See Printing from Windows Applications or Printing from a Macintosh for instructions The loaded pape...

Page 163: ...s Set it to the position for thicker paper and envelopes See Media Loading and Handling Guidelines The paper is damp or the printable side is face down Remove the paper and reload a new stack with the printable side face up See Media Loading and Handling Guidelines for instructions You loaded special media without a support sheet Follow the special media loading instructions in Media Loading and H...

Page 164: ...isaligned print head Turn off High Speed see Customizing Print Quality and Special Effects Then run the Print Head Alignment utility as described in Aligning the Print Head The resolution of your image may be too low If a photographic image looks grainy or rough try using the PhotoEnhance3 PhotoEnhance on Windows 3 1 and Sharpness settings to improve the printed quality See Customizing Color Setti...

Page 165: ...stem Requirements or Macintosh System Requirements The interface cable is securely connected to the printer and computer and both are turned on If you still can t print check the following solutions All lights are off Possible cause Solution The printer is not receiving power Try these solutions Make sure the printer is turned on Turn off the power and plug in the power cord securely Make sure the...

Page 166: ...jams inside the printer If on there is no paper in the sheet feeder or the paper is loaded incorrectly Load paper or remove the stack and reload it as described in the Printer Basics book or Media Loading and Handling Guidelines Then press the E load eject button to turn off the S paper out light and resume printing Possible cause Solution If flashing the ink supply is getting low You need to repl...

Page 167: ...r printer for network printing as described in Network Printing Your computer doesn t have enough memory to handle the file you re printing Try the following Close all other applications including screen savers and virus protections programs Reduce the resolution of your image Select fewer colors or a lower resolution for your monitor Add more memory to your computer Printing is stalled In Windows...

Page 168: ... are still flashing and on contact EPSON as described in Where To Get Help Possible cause Solution You haven t removed all the packing material from the printer Remove the packing material following the instructions on the unpacking sheet An internal error may have occurred Turn off your printer wait a few seconds and turn it on again If the lights still flash or stay on contact EPSON as described...

Page 169: ...ng when you turn it back on contact your EPSON dealer or see Where To Get Help The printer may be receiving data from the computer Turn the printer and computer off Disconnect the printer from the computer Turn the printer on If the Ppower light continues to flash for more than 5 minutes contact your EPSON dealer or see Where To Get Help Possible cause Solution color900 book Page 168 Wednesday Jan...

Page 170: ...ter software you see a New Hardware Found window The printer software doesn t work correctly after you upgrade your Windows operating system Possible cause Solution Windows has detected your printer Click Cancel and then click OK Never select any other option on the New Hardware Found window Possible cause Solution Your printer software is not set up correctly for the new operating system Uninstal...

Page 171: ...avers and virus protections programs Reduce the resolution of your image Select fewer colors or a lower resolution for your monitor Add more memory to your computer Possible cause Solution You need to increase the memory allocation for your application EPSON Monitor3 or both Choose Get Info from the File menu when the application is active or EPSON Monitor3 is selected and increase the memory requ...

Page 172: ...printer is connected to your computer with a bi directional cable 2 Then click Start select Settings and click Printers 3 Right click the EPSON Stylus COLOR 900 icon and select Properties 4 Click the Details tab then click the Spool Settings button 5 Click the Enable bi directional support for this printer radio button to turn on bi directional support 6 Click OK twice then close the Printers wind...

Page 173: ...ry RAM You re using background printing on a Macintosh Choose Get Info from the File menu when the application is active or EPSON Monitor3 is selected and increase the memory requirements See Using Monitor3 for more information If that doesn t work turn off background printing in the Chooser or in your printer software see Setting Up Background Printing Options for instructions You won t be able t...

Page 174: ...ion Your Macintosh has extension conflicts Disable Quick Draw GX in the Extensions Manager Make sure EPSON Monitor3 and SC 900 are enabled and then restart your Macintosh Possible cause Solution Not enough memory is allocated to the application Highlight the program icon and select Get Info from the File menu then increase the memory allocated to the application Possible cause Solutions The printe...

Page 175: ...ning On Background Monitoring for details Possible cause Solution Your printer is not set up correctly as a remote printer You may need to use a different network path and printer port Select a different port in the printer s Properties windows and enter the new network path to your printer at the DOS prompt Then restart your computer See your Windows NT documentation for instructions on changing ...

Page 176: ...oblems with paper handling check the following tables for solutions Paper doesn t eject fully or is wrinkled Possible cause Solution If the paper doesn t eject fully you may have set the wrong paper size Press the E load eject button to eject the paper Then make sure you select the correct paper size in your application or printer software See Selecting Paper Size and Orientation Options for instr...

Page 177: ... to fit the paper s width Try this Then do this Turn off your printer open the cover and carefully remove all the paper that s inside including any small pieces that may have torn off If possible remove the jammed paper from the front of the printer rather than from the sheet feeder Reload the paper as described in the Printer Basics book and Selecting Special Media If your paper jams frequently m...

Page 178: ...e sheets Reload the paper as described in the Printer Basics book and in Media Loading and Handling Guidelines Make sure the paper edge guides are snug against the edge of the paper If too many copies of a page or document are printing check the Copies settings in both the printer software and your application program See Selecting Paper Size and Orientation Options for more information color900 b...

Page 179: ... delete the stalled print jobs in Spool Manager For Windows 95 and Windows 98 see Deleting a Print Job For Windows 3 1 see Deleting a Print Job For Windows NT 4 0 you need to uninstall the EPSON Printer Port Select Start Programs EPSON then click EPSON Printer Port Uninstall and follow the on screen instructions On a Macintosh delete stalled print jobs using Monitor3 see Using Monitor3 or open the...

Page 180: ...re documentation for instructions on selecting the correct margins for your paper size Make sure the margins are within the printable area of the page See Printable area for more information Paper settings in the printer software are incorrect for your paper size Select the correct paper settings for your paper size Make sure the Printable Area setting is correct for your project See Selecting Pap...

Page 181: ... other applications you are running and turn off background printing as described in Setting Up Background Printing Options You need to increase the memory allocation for your application EPSON Monitor3 or both Choose Get Info from the File menu when the application is active or EPSON Monitor3 is selected and increase the memory requirements See Using Monitor3 for more information If that doesn t ...

Page 182: ...ect your printer in the Macintosh Chooser see your Start Here card for instructions Paper settings in the printer software are incorrect for your paper size Select the correct paper settings for your paper size Make sure the Printable Area setting is correct for your project See Selecting Paper Size and Orientation Options and Printing on Special Media for more information The print head nozzles a...

Page 183: ... the Add Remove button and then follow the instructions on the screen 5 If Status Monitor 2 is installed you need to uninstall it also First right click the icon in the bottom right corner of the taskbar and select Stop monitoring now to turn off background monitoring Then follow steps 1 through 4 again selecting EPSON Status Monitor 2 in the program list to uninstall it If you uninstall and then ...

Page 184: ... list 7 Restart your computer 8 To reinstall your software see the Start Here card Windows 3 1 Instructions 1 Double click the Main program group icon then double click the Control Panel icon 2 Double click Printers 3 Select EPSON Stylus COLOR 900 in the Installed Printers list and click the Remove button 4 To reinstall your software see the Start Here card color900 book Page 183 Wednesday January...

Page 185: ...ion screen click Continue 4 Click the arrow in the list showing Easy Install and select Remove 5 Click the Remove button at the bottom of the screen 6 After the software is uninstalled click Quit on the Installer window then restart your Macintosh 7 To reinstall your software see the Start Here card changes to Remove color900 book Page 184 Wednesday January 6 1999 12 39 PM ...

Page 186: ...se your Web browser or other software for FTP downloading to log onto ftp epson com with the user name anonymous and your e mail address as the password EPSON Download Service You can call the EPSON Download Service at 800 442 2007 Set your communications software to 8 data bits 1 stop bit no parity Modem speed can be up to 28 8 Kbps EPSON Forum on CompuServe Members of CompuServe can type GO EPSO...

Page 187: ...nsupplies com U S sales only In Canada please call 800 873 7766 for dealer referral Automated telephone services Service Access EPSON SoundAdviceSM For pre recorded answers to commonly asked questions about EPSON products 24 hours a day seven days a week call 800 922 8911 EPSON FaxAdviceTM Access EPSON s technical information library by calling 800 922 8911 You must provide a return fax number to ...

Page 188: ...olution Maximum 1440 720 dpi Input buffer 256KB Print direction Bidirectional with logic seeking Control code ESC P 2 and raster graphics code EPSON Remote and IBM X24E emulation code Character tables 1 italic and 12 graphics character tables Character sets 14 international character sets and 1 legal character set color900 book Page 187 Wednesday January 6 1999 12 39 PM ...

Page 189: ... 003 to 0 004 inch 0 08 to 0 11 mm 17 to 24 lb 64 to 90 g m2 Transparencies and glossy film Letter 8 5 11 inches A4 210 297 mm A6 105 148 mm glossy film only Transparencies and glossy film distributed by EPSON Photo Paper 4 6 inches 102 152 mm Letter 8 5 11 inches A4 210 297 mm Panoramic 8 27 23 4 inches 210 584 mm Photo Paper distributed by EPSON Photo stickers A6 105 148 mm with 16 frames Photo ...

Page 190: ...opes 10 9 5 4 1 inches 240 104 mm DL 8 7 4 3 inches 220 110 mm C6 4 4 6 4 inches 114 162 mm Note card envelope 5 2 8 7 inches 132 220 mm Plain bond or air mail paper 0 006 to 0 02 inch 0 16 to 0 52 mm 12 to 20 lb 45 to 75 g m2 Cards A6 105 148 mm 8 10 inches 203 254 mm ink jet cards only Ink jet cards and note cards distributed by EPSON Paper type Size Paper types Thickness Weight color900 book Pa...

Page 191: ... of paper may be changed by the manufacturer at any time EPSON cannot guarantee the use of any particular brand or type of paper Always test samples of paper stock before purchasing large quantities or printing large jobs Poor quality paper may reduce print quality and cause paper jams and other problems If you encounter problems switch to a higher grade of paper Do not load curled or folded paper...

Page 192: ...DL envelopes 0 12 inch 3 0 mm for all other paper sizes and C6 envelopes C1 The minimum bottom margin is 0 55 inch 14 0 mm using the Standard printable area setting C2 The minimum bottom margin can be decreased to 0 12 inch 3 0 mm using the Maximum printable area setting However the print quality in the expanded printable area may be reduced A BL BR C1 A BR C1 BL Envelopes Single sheets and cards ...

Page 193: ...03011 Color ink cartridge T005011 Color s Black Cyan magenta and yellow Print capacity 1200 pages A4 ISO IEC 10561 letter pattern 840 pages at 5 coverage at 360 dpi 570 pages A4 5 coverage at 360 dpi Cartridge life 2 years from production date and up to within 6 months after opening package at 77 C 25 F Storage temperature 4 to 104 F 20 to 40 C 1 month at 104 F 40 C Transit temperature 22 to 140 C...

Page 194: ...7 mm Depth 23 4 inches 594 mm Height 12 8 inches 325 mm Weight 18 5 lb 8 4 kg without the ink cartridges Electrical Also designed for IT power systems with Phase to Phase voltage 220 240 V Specification 120 V model 240 V model Input voltage range 99 V to 132 V 198 V to 264 V Rated frequency range 50 to 60 Hz Input frequency range 49 5 to 60 5 Hz Rated current 0 7 A 0 4 A Power consumption Approx 3...

Page 195: ...t 104 F 40 C Transit 4 to 140 F 20 to 60 C 120 hours at 140 F 60 C Humidity Operation 20 to 80 RH Storage 5 to 85 RH without condensation Stored in shipping container Safety Approvals Safety standards UL 1950 with D3 CSA 22 2 No 950 EMC FCC part 15 subpart B class B color900 book Page 194 Wednesday January 6 1999 12 39 PM ...

Page 196: ...TTL compatible Connector 57 30360 Amphenol connector or equivalent Specification Description Transmission mode IEEE 1284 Nibble mode Adaptable connector 57 30360 Amphenol connector or equivalent Synchronization Refer to the IEEE 1284 specification Handshaking Refer to the IEEE 1284 specification Signal level IEEE 1284 Level 1 device Data transmission timing Refer to the IEEE 1284 specification col...

Page 197: ...it Stop bit 1 bit Connector 8 pin mini DIN Recommended cable ImageWriter II cable preferably Belkin brand Specification Description Standard Based on Universal Serial Bus Specifications Revision 1 0 Universal Serial Bus Device Class Definition for Printing Devices Version 1 0 Bit rate 12 Mbps full speed device Data encoding NRZI Adaptable connector USB Series B Recommended cable length 6 5 feet 2 ...

Page 198: ...158 to 159 Basic printing 17 to 29 120 to 121 Bitmap files 60 to 62 Blank pages 181 Blurry printouts 162 to 163 Brightness setting 41 C Cable printer 10 11 Canceling print jobs Macintosh 29 114 Windows 24 to 25 Cards see Photo Quality Ink Jet Cards Character sets international 187 Character tables 187 Characters garbled 178 to 179 Cleaning print heads 134 to 136 printer 148 sheets 79 148 Coax inte...

Page 199: ... 1 110 Windows 95 and 98 94 104 Windows NT 166 Despooler 109 Diagnosing problems 152 to 157 Diffusion error 36 Digital Camera setting 32 38 to 39 Dithering 36 DMA transfers 108 172 Documentation how to use 12 to 13 DOS 17 146 E Economy setting 32 35 157 ECP mode 172 Electrical specifications 193 ENERGY STAR 14 Enhanced mode 172 Envelopes printing on 81 specifications 189 to 191 Environmental speci...

Page 200: ...M X24E emulation code 187 ICM Image Color Matching setting 32 42 161 Ink cartridge transporting 149 level 116 153 165 monitoring level 103 116 to 117 replacing cartridge 138 to 141 157 replacing outdated cartridge 138 142 to 144 setting 20 27 32 35 specifications 192 Ink Jet Paper choosing 20 27 77 to 78 specifications 188 to 191 Ink Jet Transparencies see Transparencies Ink setting 159 Installing...

Page 201: ... memory allocation 113 interface boards 129 to 132 managing print jobs 113 to 115 118 to 119 Monitor3 112 to 115 previewing 28 71 to 72 printing from 26 to 29 120 to 121 problems printing 173 Status Monitor 116 to 117 system requirements 11 uninstalling printer software 184 Magenta setting 41 Main tab 20 Maintaining printer 133 to 148 Manuals how to use 12 to 13 Margins incorrect 179 with multiple...

Page 202: ...32 Ordering interface boards 129 media 77 to 78 Orientation options 44 to 47 51 to 52 Outdated ink cartridge 138 142 to 144 157 P Packing printer 149 Page frames 59 to 60 69 to 70 Page layouts multiple 69 to 70 Page Order options 60 70 Page Setup dialog box 26 51 Panoramic Photo Paper see Photo Paper Paper glossy see Photo Quality Glossy Film handling problems 175 to 177 jams 154 176 ordering 77 t...

Page 203: ... specifications 188 PhotoEnhance setting 32 37 to 39 PICT files 66 to 67 Plain paper 20 27 188 to 191 Portrait setting 47 52 Preprinted forms loading 81 Previewing Macintosh 28 71 to 72 Print dialog box 18 Print head aligning 158 to 159 cleaning 134 to 136 Print jobs managing in Windows 89 to 111 managing on Macintosh 112 to 115 118 to 119 Print layouts multiple 59 to 60 69 to 70 Print Order optio...

Page 204: ...large setting 46 56 to 59 Rendering Intent setting 44 Replacing ink cartridge 138 to 141 Resolution see Print quality Reverse Order setting 47 54 Rotate by 180 setting 47 52 S Safety approvals 194 Safety instructions 14 to 16 Saturation setting 41 ScanDisk 174 Self Adhesive Sheets see Photo Quality Self Adhesive Sheets Self test 155 to 156 Serial interface boards 129 to 132 Serial interface specif...

Page 205: ...itor Macintosh 116 to 117 problems 171 uninstalling 182 Windows 24 94 to 106 Support sheet 84 85 86 Support technical 185 to 186 System requirements 10 to 11 T Technical specifications 187 to 196 Technical support 185 to 186 Testing printer 155 to 156 Text Graph setting 32 39 Thickness lever 80 81 85 Tone setting 39 Transparencies choosing 20 27 78 printing on 85 specifications 188 to 191 Transpor...

Page 206: ...ertical banding 159 W Watermarks 60 to 63 66 to 69 Windows default options setting 21 to 23 managing print jobs 24 to 25 89 to 111 printer status checking 24 to 25 90 printing from 17 to 23 Status Monitor 2 24 94 to 106 system requirements 10 uninstalling printer software 182 to 183 World Wide Web 185 Y Year 2000 14 Yellow setting 41 color900 book Page 205 Wednesday January 6 1999 12 39 PM ...

Reviews: