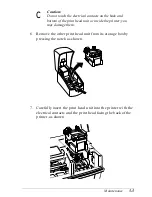
8. Press down the print head unit release lever until it clicks
into place.
c
Caution:
If the
Power
and
Ink Out
lights start flashing, remove
the print head unit (beginning with step 4) and reinsert it.
9. Press the
Load/Eject
button to return the print head to its
home position. (Even if you do not press
Load/Eject
, the
printer moves the print head back to its home position
about 60 seconds after you press down the lever.)
10. Place the print head unit you removed in the storage box.
Always store the unused print head unit in this box to
protect its delicate components.
11. Close the printer cover.
Replacing an Ink Cartridge
The printer’s
Ink Out
light tells you when an ink cartridge is
low on ink and when you need to replace the cartridge. If the
Ink Out
light flashes, the cartridge is low on ink. If the printer
stops and the
Ink Out
light comes on, the cartridge is empty.
c
Caution:
Do not replace an ink cartridge unless the
Ink Out
light tells
you to. If you replace a cartridge before the light flashes, the
sensor that tells you when ink is out will not work with the
new cartridge.
Leave the old cartridge installed in the printer until you are
ready to replace it with a new one. Attempting to print
without a cartridge installed can damage the printer.
5-6
Maintenance


