background image

Related tasks

Connecting to a Video Source for Sound

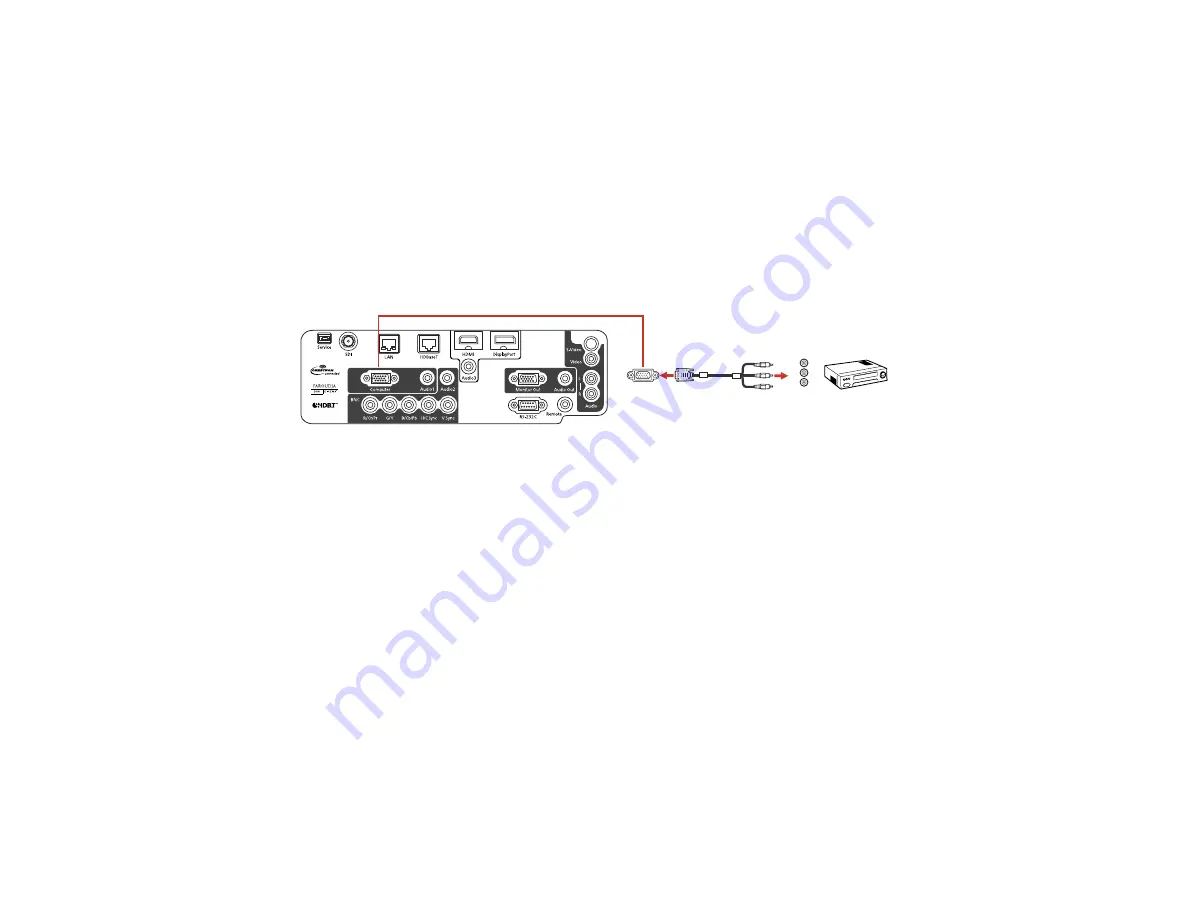
Connecting to a Component-to-VGA Video Source

If your video source has component video ports, you can connect it to the projector using an optional
component-to-VGA video cable. Depending on your component ports, you may need to use an adapter
cable along with a component video cable.

1.

Connect the component connectors to your video source's color-coded component video output
ports, usually labeled

Y

,

Pb

,

Pr

or

Y

,

Cb

,

Cr

. If you are using an adapter, connect these connectors

to your component video cable.

2.

Connect the VGA connector to a

Computer

port on the projector.

3.

Tighten the screws on the VGA connector.

If your image colors appear incorrect, you may need to change the

Input Signal

setting in the projector's

Signal menu.

Parent topic:

Connecting to Video Sources

Related references

Input Signal Settings - Signal Menu

Related tasks

Connecting to a Video Source for Sound

Connecting to an S-Video Video Source

If your video source has an S-Video port, you can connect it to the projector using an optional S-Video
cable.

1.

Connect the S-Video cable to your video source's S-Video output port.

37

Summary of Contents for PowerLite Pro G6050W

Page 1: ...PowerLite Pro G6050W G6150 G6450WU G6550WU G6750WU G6800 G6900WU User s Guide ...

Page 2: ......

Page 3: ...r Parts Interface Ports 19 Projector Parts Base 20 Projector Parts Control Panel 21 Projector Parts Remote Control 23 Setting Up the Projector 26 Projector Placement 26 Projector Setup and Installation Options 26 Projection Distance 29 Projector Connections 31 Connecting to Computer Sources 31 Connecting to a Computer for VGA Video 32 Connecting to a Computer for HDMI Video and Audio 32 Connecting...

Page 4: ...e Projector on a Network 52 Wired Network Projection 52 Connecting to a Wired Network 53 Selecting Wired Network Settings 53 Wireless Network Projection 56 Installing the Wireless LAN Module 57 Using Quick Wireless Connection Windows Only 59 Selecting Wireless Network Settings Manually 61 Wireless LAN Menu Settings 63 Selecting Wireless Network Settings in Windows 65 Selecting Wireless Network Set...

Page 5: ...est Pattern 92 Adjusting the Image Height 92 Image Shape 94 Correcting Image Shape with H V Keystone 94 Correcting Image Shape with Quick Corner 96 Correcting Image Shape with Arc Corner 97 Correcting Image Shape with Curved Surface 99 Correcting Image Shape with Point Correction 103 Correcting Image Shape with Corner Wall 105 Resizing the Image With the Zoom Ring 109 Focusing the Image Using the ...

Page 6: ...jector 128 Saving a User s Logo Image to Display 130 Locking the Projector s Buttons 132 Unlocking the Projector s Buttons 132 Installing a Security Cable 133 Projecting Two Images Simultaneously 133 Using Multiple Projectors 135 Projector Identification System for Multiple Projector Control 136 Setting the Projector ID 136 Setting the Remote Control ID 137 Adjusting the Position of the Projected ...

Page 7: ...ansporting the Projector 175 Projector Maintenance 175 Cleaning the Lens 175 Cleaning the Projector Case 176 Air Filter and Vent Maintenance 176 Cleaning the Air Filter 177 Replacing the Air Filter 180 Projector Lamp Maintenance 182 Replacing the Lamp 182 Resetting the Lamp Timer 186 Replacing the Remote Control Batteries 187 Transporting the Projector 189 Solving Problems 190 Projection Problem T...

Page 8: ...ems 203 Solutions When Network Alert E Mails are Not Received 203 Where to Get Help 203 Technical Specifications 205 General Projector Specifications 205 Projector Lamp Specifications 208 Remote Control Specifications 209 Projector Dimension Specifications 209 Projector Electrical Specifications 210 Projector Environmental Specifications 212 Projector Safety and Approvals Specifications 213 Suppor...

Page 9: ...PowerLite Pro G6050W G6150 G6450WU G6550WU G6750WU G6800 G6900WU User s Guide Welcome to the PowerLite Pro G6050W G6150 G6450WU G6550WU G6750WU G6800 G6900WU User s Guide 9 ...

Page 10: ...WU Up to 5200 lumens of brightness white light output and color light output PowerLite Pro G6750WU G6900WU Up to 6000 lumens of brightness white light output and color light output PowerLite Pro G6800 Up to 7000 lumens of brightness white light output and color light output Note Color brightness color light output and white brightness white light output will vary depending on usage conditions Colo...

Page 11: ...son s Instant Off and Direct Power On features for quick setup and shut down Support for Crestron RoomView network monitoring systems Network message broadcast system to project timely messages to all networked projectors Windows only Note The PowerLite Pro G6900WU projector with the standard lens is shown in most illustrations in this manual unless noted otherwise Product Box Contents Additional ...

Page 12: ...batteries two AA alkaline 6 Power cord 7 VGA computer cable 8 Lens unit screw 9 Projector documentation CD 10 Projector software CD PowerLite Pro G6050W G6150 G6450WU G6550WU G6750WU 1 Lens not included with the PowerLite Pro G6050WNL G6150NL G6450WUNL G6550WUNL G6750WUNL G6800NL G6900WUNL models 12 ...

Page 13: ... Epson or an authorized Epson reseller Note Older Mac computers 2009 and earlier may not support audio through the HDMI port To receive a DisplayPort signal you need a compatible DisplayPort cable To receive a HDBaseT signal PowerLite Pro G6750WU G6800 G6900WU you need a compatible 100Base TX LAN cable To receive a SDI signal PowerLite Pro G6900WU you need a compatible BNC video cable To project w...

Page 14: ...PDC20 V12H500020 Wireless IR mouse receiver for remote control ELPST16 V12H007T16 Polarizer Kit for 3D Stacking ELPPL01 Passive 3D glasses adult ELPGS02A Passive 3D glasses children ELPGS02B Advanced projector ceiling mount with precision gear ELPMBPRG Adjustable suspended ceiling channel kit ELPMBP01 False ceiling plate kit ELPMBP02 Structural round ceiling plate ELPMBP03 Adjustable extension col...

Page 15: ... ELPSC08 1 Year Extended Depot Repair Service Plan EPPFTPB1 1 Year Extended Exchange Service Plan EPPEXPB1 2 Year Extended Depot Repair Service Plan EPPFTPB2 2 Year Extended Exchange Service Plan EPPEXPB2 Parent topic Projector Features Warranty and Registration Information Your projector comes with a basic warranty that lets you project with confidence For details see the warranty that came with ...

Page 16: ...ess the Help button on the remote control to get quick solutions to common problems epson com support U S or epson ca support Canada View FAQs frequently asked questions and e mail your questions to Epson technical support 24 hours a day For detailed instructions on using your projector in a network environment PowerLite Pro G6050W G6150 G6450WU G6550WU G6750WU see the EasyMP Network Projection Op...

Page 17: ... Projector Parts Control Panel Projector Parts Remote Control Parent topic Introduction to Your Projector Projector Parts Front Top 1 Exhaust vent 2 Focus ring 3 Zoom ring 4 Lens unit release button 5 Remote control receivers 6 Projector status lights 17 ...

Page 18: ...U G6750WU 10 Air filter cover latch 11 Cable cover 12 Vertical lens shift dial 13 Lens shift dial lock 14 Horizontal lens shift dial 15 Lamp cover Parent topic Projector Part Locations Projector Parts Rear 1 Interface ports 2 Kensington security slot 3 AC input port 4 Control panel 5 HDMI cable clip slot 6 Power cable clip slot PowerLite Pro G6800 G6900WU 18 ...

Page 19: ...Audio1 port 2 Computer port 3 BNC ports 4 Audio2 port 5 RS 232C port 6 Remote port 7 Audio L R ports 8 Video port 9 S Video port 10 Audio Out port 11 Monitor Out port 12 DisplayPort connector 13 HDMI port 14 Audio3 port 15 HDBaseT port PowerLite Pro G6750WU G6800 G6900WU 19 ...

Page 20: ...16 Network LAN port 17 SDI port PowerLite Pro G6900WU 18 Service port Parent topic Projector Part Locations Projector Parts Base 1 Front adjustable foot 2 Rear feet 3 Screw holes for cable cover 20 ...

Page 21: ...on and displays the Control Panel Lock screen 4 Enter button selects options and optimizes screen image when projecting an RGB signal from the Computer or BNC ports 5 Down arrow button and displays a test pattern 6 Right arrow button and displays the Info menu 7 A V Mute button turns the video and audio on or off 8 Esc button cancels exits functions 9 Up arrow button and displays screen adjustment...

Page 22: ...Parent topic Projector Part Locations Related references Projector Light Status 22 ...

Page 23: ...Projector Parts Remote Control 23 ...

Page 24: ...image files when projecting from a computer over a network connection 13 Volume up down buttons adjust projector speaker or external speaker volume 14 User1 User2 and User3 buttons customizable for different functions 15 Numeric buttons enter numbers 16 ID button hold down to use numeric buttons to select a projector 17 ID switch enables or disables ID settings 18 Remote port connects to a remote ...

Page 25: ...t button lights up the buttons temporarily 28 Indicator light lights up when the remote control is in use 29 Remote control signal emitter emits remote control signals Parent topic Projector Part Locations 25 ...

Page 26: ...ng mount if you want to use it in a fixed location Keep these considerations in mind as you select a projector location Place the projector on a sturdy level surface or install it using a compatible mount Leave plenty of space around and under the projector for ventilation and do not place it on top of or next to anything that could block the vents Position the projector within reach of a grounded...

Page 27: ...Front Rear Front ceiling 27 ...

Page 28: ... front of the air exhaust and intake vents and when setting up multiple projectors 20 inches 50 cm of space between the projectors If you mount the projector to the ceiling it can be installed at the following angles Vertically Any angle in a complete 360 degree circle 28 ...

Page 29: ...erences Projector Setup Settings Extended Menu Projection Distance The distance at which you place the projector from the screen determines the approximate size of the image The image size increases the farther the projector is from the screen but can vary depending on the zoom factor aspect ratio and other settings Use the tables here to determine approximately how far to place the projector from...

Page 30: ...0 inches 104 to 189 inches 265 to 479 cm 4 150 inches 157 to 284 inches 400 to 721 cm PowerLite Pro G6050W 6450WU G6550WU G6750WU G6900WU Standard Zoom Lens 16 10 Aspect Ratio Screen or Projection distance image size Wide to Tele 1 50 inches 53 to 97 inches 135 to 247 cm 2 80 inches 86 to 156 inches 219 to 397 cm 3 100 inches 108 to 196 inches 275 to 498 cm 4 150 inches 164 to 295 inches 416 to 74...

Page 31: ...altitudes above 4921 feet 1500 m turn on High Altitude Mode to ensure the projector s internal temperature is regulated properly Connecting to Computer Sources Connecting to Video Sources Connecting to an HDBaseT Transmitter Connecting to an External Computer Monitor Connecting to External Speakers Parent topic Setting Up the Projector Related references Projector Setup Settings Extended Menu Prod...

Page 32: ...to a Computer port on the projector 4 Tighten the screws on the VGA connector Parent topic Connecting to Computer Sources Related tasks Connecting to a Computer for Sound Connecting to a Computer for HDMI Video and Audio If your computer has an HDMI port you can connect it to the projector using an optional HDMI cable Note To connect a Mac that includes only a Mini DisplayPort Thunderbolt port or ...

Page 33: ...ng to a Computer for DisplayPort Video and Audio If your computer has a DisplayPort or Mini DisplayPort connector you can connect it to the projector using an optional DisplayPort cable 1 Connect the DisplayPort cable to your computer s DisplayPort or Mini DisplayPort connector 2 Connect the other end to the projector s DisplayPort connector Note If you have problems hearing audio through the Disp...

Page 34: ...puter for Sound If your computer presentation includes sound and you did not connect it to the projector s DisplayPort or HDMI port you can still play sound through the projector s speaker system PowerLite Pro G6050W G6150 G6450WU G6550WU G6750WU Just connect an optional 3 5 mm stereo mini jack audio cable as described here Note If your projector does not have an internal speaker system PowerLite ...

Page 35: ...o Source Connecting to a Component to BNC Video Source Connecting to a Component to VGA Video Source Connecting to an S Video Video Source Connecting to a Composite Video Source Connecting to an SDI Video Source Connecting to a Video Source for Sound Parent topic Projector Connections Connecting to an HDMI Video Source If your video source has an HDMI port you can connect it to the projector using...

Page 36: ...taching and Removing the Cable Clips Connecting to a Component to BNC Video Source If your video source has component video ports you can connect it to the projector using an optional component to BNC video cable Depending on your component ports you may need to use an adapter cable along with a component video cable 1 Connect the component connectors to your video source s color coded component v...

Page 37: ...f you are using an adapter connect these connectors to your component video cable 2 Connect the VGA connector to a Computer port on the projector 3 Tighten the screws on the VGA connector If your image colors appear incorrect you may need to change the Input Signal setting in the projector s Signal menu Parent topic Connecting to Video Sources Related references Input Signal Settings Signal Menu R...

Page 38: ... style video or A V cable 1 Connect the cable with the yellow connector to your video source s yellow video output port 2 Connect the other end to the projector s Video port Parent topic Connecting to Video Sources Related tasks Connecting to a Video Source for Sound Connecting to an SDI Video Source If your video source has an SDI port you can connect it to the projector using an optional BNC vid...

Page 39: ...he projector to the video source using an optional stereo 3 5 mm mini jack audio cable If you are projecting video using the Video or S Video port connect the projector to the video source using an RCA audio cable Note If you connected your video source to the projector using an HDMI cable the audio signal is transferred with the video signal you do not need an additional cable for sound If you co...

Page 40: ... G6800 G6900WU This is useful when you want to send a signal to or control the projector from a remote location such as in a hall or event site since you can use a network cable up to 328 feet 100 m in length To ensure proper data transmission use a Category 5e STP cable or better 1 Turn off the projector and HDBaseT transmitter Note Make sure the projector and HDBaseT transmitter are turned off w...

Page 41: ...ojector This lets you see your presentation on the external monitor even when the projected image is not visible If you want to output images to an external monitor when the projector is turned off you need to select Communication On for the Standby Mode setting and Always On for the A V Output setting in the projector s Extended menu Note Monitors that use a refresh rate less than 60 Hz may not b...

Page 42: ... A V Output setting in the projector s Extended menu Note The projector s built in speaker system PowerLite Pro G6050W G6150 G6450WU G6550WU G6750WU is disabled when you connect external speakers 1 Make sure your computer or video source is connected to the projector with both audio and video cables as necessary 2 Locate the appropriate cable to connect your external speakers such as a stereo mini...

Page 43: ...f the projector is not facing up while the lens unit is removed to help prevent dirt or dust from entering the projector Be sure to attach a compatible lens only Caution Avoid touching the lens with your bare hands to prevent fingerprints on or damage to the lens surface 1 Turn the focus ring as shown until it stops Note If the projector is installed at an angle of 35 to 150 tighten the lens torqu...

Page 44: ...1 Tighten 2 Loosen 2 Hold the lens unit with the white dot facing up Insert the lens unit straight into the projector s lens socket and turn it clockwise until you hear it click into place 44 ...

Page 45: ...moving the Lens Unit Removing the Lens Unit You can remove the lens unit to replace it with a different lens Caution Remove the lens unit only when necessary to prevent dirt or dust from entering the projector and lowering the projection quality Avoid touching the lens with your bare hands to prevent fingerprints on or damage to the lens surface 1 Center the lens using lens shift 45 ...

Page 46: ...ve the screw securing the lens unit release button 3 Press and hold the lens unit release button as you turn the lens unit counterclockwise until you hear it click 4 Gently pull the lens unit straight out 46 ...

Page 47: ...ou can attach the cable cover that came with your projector to hide the attached cables from view 1 Bundle the cables together using a band or other fastener not provided 2 Place the cable cover on the projector as shown guiding the cables through the notch on the base of the cable cover 47 ...

Page 48: ...p the Projector Attaching and Removing the Cable Clips You can install the cable clips that came with your projector to provide additional support to the power and HDMI cables Note The PowerLite Pro G6050W G6150 G6450WU G6550WU and G6750WU models come with one cable clip to use with the HDMI cable 1 Plug in the power and HDMI cables 48 ...

Page 49: ...rs and lock the clips onto the power and HDMI connectors as shown To remove the cable clips open the clips and disconnect the cables Then pinch the sides of each cable clip anchor and carefully pull them out of the cable clip slots Parent topic Setting Up the Projector Related tasks Connecting to a Computer for HDMI Video and Audio Connecting to an HDMI Video Source Installing Batteries in the Rem...

Page 50: ...e only the type of batteries specified in this manual Do not install batteries of different types or mix new and old batteries 1 Open the battery cover 2 Insert the batteries with the and ends facing as shown 50 ...

Page 51: ...into place Warning Dispose of used batteries according to local regulations Do not expose batteries to heat or flame Keep batteries out of the reach of children they are choking hazards and are very dangerous if swallowed Parent topic Setting Up the Projector 51 ...

Page 52: ...rojection Operation Guide for instructions PowerLite Pro G6050W G6150 G6450WU G6550WU G6750WU EasyMP Monitor software Windows only lets you monitor and control your projector through the network You can download the latest software and documentation from the Epson web site Go to epson com support U S or epson ca support Canada and select your projector EasyMP Multi PC Projection software allows yo...

Page 53: ...d cable or better 1 Connect one end of the network cable to your network hub switch or router 2 Connect the other end of the cable to the projector s LAN port Parent topic Wired Network Projection Selecting Wired Network Settings Before you can project from computers on your network you must select the network settings for the projector using its menu system Note Make sure you already connected th...

Page 54: ...3 Select the Network menu and press Enter 4 Select Network Configuration and press Enter 5 Select the Basic menu and press Enter 54 ...

Page 55: ...s admin Projector Keyword PowerLite Pro G6050W G6150 G6450WU G6550WU G6750WU lets you turn on a security password to prevent access to the projector by anyone not in the room with it You must enter a displayed randomized keyword from a computer using the EasyMP Network Projection software to access the projector Note Use the displayed keyboard to enter the name passwords and keyword Press the arro...

Page 56: ...cess point using the EasyMP Network Projection software without the need for the optional wireless module After installing the module and setting up the projector install the network software from the Epson Projector Software CD or download the software as necessary Use the following software and documentation to set up control and monitor wireless projection EasyMP Network Projection software set...

Page 57: ...l the Epson 802 11b g n wireless LAN module PowerLite Pro G6050W G6150 G6450WU G6550WU G6750WU Do not install any other type of wireless LAN module Caution Never remove the module while its indicator light is green or flashing or while you are projecting wirelessly You may damage the module or lose data 1 Turn off the projector and unplug the power cord 2 Slide the air filter cover latch and open ...

Page 58: ...3 Remove the screw securing the wireless LAN module stopper then remove the stopper 4 Insert the wireless LAN module into the port 58 ...

Page 59: ...nt Parts Using Quick Wireless Connection Windows Only You can use the Quick Wireless Connection USB key to quickly connect your computer to the projector wirelessly PowerLite Pro G6050W G6150 G6450WU G6550WU G6750WU Then you can project your presentation and remove the key when you are done Note Make sure the wireless LAN module is installed 1 Turn on the projector 2 Press the LAN button on the re...

Page 60: ... used for the wireless LAN module You see a projected message that the network information update is complete 5 Remove the USB key 6 Reinsert the wireless LAN module into the projector 7 Now connect the USB key to a USB port on your computer or notebook Note In Windows Vista if you see the AutoPlay window select Run LaunchQWRD exe then select Allow on the next screen 60 ...

Page 61: ...presentation as necessary 10 When you finish projecting wirelessly select the Safely Remove Hardware option in the Windows taskbar then remove the USB key from your computer Note You may need to restart your computer to reactivate your wireless LAN connection Parent topic Wireless Network Projection Selecting Wireless Network Settings Manually Before you can project from your wireless network you ...

Page 62: ... long for accessing the projector over the web Default user name is EPSONWEB default password is admin Projector Keyword lets you turn on a security password to prevent access to the projector by anyone not in the room with it You must enter a displayed randomized keyword from a computer using the EasyMP Network Projection software to access the projector Note Use the displayed keyboard to enter t...

Page 63: ...ess settings for your projector you need to select the wireless network on your computer Wireless LAN Menu Settings Parent topic Wireless Network Projection Wireless LAN Menu Settings Setting Options Description Wireless LAN Power On Turns wireless LAN support on and off Off Wi Fi Protected Setup To Setup Wizard Select To Setup Wizard to start the WPS Connection Setup utility Wireless LAN System 8...

Page 64: ...me SSID Up 32 alphanumeric characters Sets the SSID network name of the wireless LAN system the projector is connecting to Search Access Point To Search View Search for available wireless network access points in Advanced connection mode Channel 1ch In Quick connection mode selects the frequency band 6ch channel used by the wireless 11ch LAN SSID Display On Selects whether to display the SSID on t...

Page 65: ...ws taskbar 2 Do one of the following If your projector is set up on an existing network Advanced mode select the network name SSID If your projector is configured for Quick mode select the projector s SSID 3 Click Connect Parent topic Wireless Network Projection Selecting Wireless Network Settings in Mac OS X Before connecting to the projector select the correct wireless network in Mac OS X 1 Clic...

Page 66: ...tings to match your network s settings Check with your network administrator for guidance on entering the correct information 1 Turn on the projector 2 Press the Menu button 3 Select the Network menu and press Enter 4 Select Network Configuration and press Enter 66 ...

Page 67: ... on screen instructions to save your settings and exit the menus Wireless Security Menu Settings Parent topic Wireless Network Projection Wireless Security Menu Settings Settings on the Security menu let you select the type of security and security settings that match the network you are connecting the projector to Setting Options Description Security Open Selects the type of security used on the ...

Page 68: ...p to 32 For WPA WPA2 EAP security characters selects the password for EAP authentication Client Certificate For WPA WPA2 EAP security displays the certificate s Issued to Issued by and Validity period if a client certificate has been set Verify Server Certificate On For WPA WPA2 EAP security selects whether to verify the Off server certificate when a CA certificate has been set CA certificate For ...

Page 69: ...rent topic Using the Projector on a Network Secure HTTP You can use the HTTPS protocol to increase security between the projector and a web browser communicating with it To do this you create a server certificate install it on the projector and turn on the Secure HTTP setting in the projector menus to verify the reliability of the web browser Even if you do not install a server certificate the pro...

Page 70: ...n uppercase or lowercase letters exactly as shown For the user ID enter EPSONWEB You cannot change the user ID For the password enter the default password admin You can change the Web Control password using the projector s Network menu 6 Under Network select the Administrator Settings option and select Manage Certificates You see a screen like this 7 Click the Browse button select the certificate ...

Page 71: ...tor s Web Control feature Client Certificate PEAP TLS EAP TLS Specification Description Format PKCS 12 Extension PKCS P12 Encryption RSA Hashes MD5 SHA 1 SHA 256 SHA 384 SHA 512 Key length 512 1024 2048 4096 bit Password Up to 32 alphanumeric characters required Server Certificate PEAP PEAP TLS EAP TLS EAP Fast Specification Description Format X509v3 Extension DER CER PEM Encryption RSA Hashes MD5...

Page 72: ...g Up Projector Network E Mail Alerts You can set up the projector to send you an e mail alert over the network if there is a problem with the projector 1 Press the Menu button 2 Select the Network menu and press Enter 3 Select Network Configuration and press Enter 4 Do one of the following Select the Mail menu and press Enter Turn on Mail Notification Select the Administrator Settings menu and pre...

Page 73: ...PowerLite Pro G6050W G6150 G6450WU G6550WU G6750WU 73 ...

Page 74: ...elect Complete or Setup complete and follow the on screen instructions to save your settings and exit the menus Note If a critical problem causes a projector to shut down you may not receive an e mail alert Network Projector E mail Alert Messages Parent topic Using the Projector on a Network Network Projector E mail Alert Messages When a problem occurs with a networked projector and you selected t...

Page 75: ... you can set up the projector for SNMP monitoring 1 Press the Menu button 2 Select the Network menu and press Enter 3 Select Network Configuration and press Enter 4 Do one of the following Select the Others menu and press Enter Select the Administrator Setting menu and press Enter then select the SNMP menu and press Enter PowerLite Pro G6800 G6900WU PowerLite Pro G6050W G6150 G6450WU G6550WU G6750...

Page 76: ...owerLite Pro G6800 G6900WU 8 If your network environment uses a Crestron RoomView controller turn on the Crestron RoomView setting to allow the projector to be detected PowerLite Pro G6800 G6900WU 9 If you are connecting to a network using Bonjour turn on the Bonjour setting PowerLite Pro G6800 G6900WU 10 If you want this projector to receive broadcasted messages over the network turn on the Messa...

Page 77: ...ector menu settings or control all projector functions using a web browser Note If you set Standby Mode to Communication On you can use a web browser to select settings and control projection even if the projector is in standby mode 1 Make sure the projector is turned on 2 Start your web browser on a computer connected to the network 3 Type the projector s IP address into the browser s address box...

Page 78: ... V Mute button control 5 Page Up and Page Down button controls 6 Closed caption control 7 Volume button controls 8 Source search control 9 Standby button control 6 Select the icon corresponding to the projector function you want to control Parent topic Using the Projector on a Network Related references Projector Setup Settings Extended Menu 78 ...

Page 79: ... Using Crestron RoomView Parent topic Using the Projector on a Network Setting Up Crestron RoomView Support To set up your projector for monitoring and control using a Crestron RoomView system make sure your computer and projector are connected to the network Note If you want to use the Crestron RoomView system when the projector is turned off you need to adjust the Standby Mode settings in the Ex...

Page 80: ...PowerLite Pro G6050W G6150 G6450WU G6550WU G6750WU 5 Set the Crestron RoomView setting to On to allow the projector to be detected 80 ...

Page 81: ... RoomView Support Controlling a Networked Projector Using Crestron RoomView Once you have set up your projector to use Crestron RoomView you can control and monitor projection using a compatible web browser 1 Start your web browser on a computer connected to the network 2 Type the projector s IP address into the browser s address box and press the computer s Enter key You see this screen 3 Select ...

Page 82: ...directly correspond to the projector s remote control buttons OK acts as the Enter button Menu displays the projector s menu 5 To view information about the projector click the Info tab 6 To change projector Crestron and password settings click the Tools tab select settings on the displayed screen and click Send 7 When you finish selecting settings click Exit to exit the program Parent topic Crest...

Page 83: ...Image Height Image Shape Resizing the Image With the Zoom Ring Focusing the Image Using the Focus Ring Remote Control Operation Selecting an Image Source Projection Modes Image Aspect Ratio Color Mode Controlling the Volume with the Volume Buttons Setting the Date and Time Turning On the Projector Turn on the computer or video equipment you want to use before you turn on the projector so it can di...

Page 84: ...he projector The projector beeps and the power light flashes green as the projector warms up After about 30 seconds the power light stops flashing and turns green Warning Never look into the projector lens when the lamp is on This can damage your eyes and is especially dangerous for children and pets If you do not see a projected image right away try the following Turn on the connected computer or...

Page 85: ...on the remote control 2 If you see a shutdown confirmation screen press the power button on the projector or the Standby button on the remote control again To leave the projector on press any other button The projector beeps twice the lamp turns off and the power light turns orange Note With Epson s Instant Off technology there is no cool down period so you can pack up the projector for transport ...

Page 86: ...ess Enter 4 Select the Language setting and press Enter 5 Select the language you want to use and press Enter 6 Press Menu or Esc to exit the menus Parent topic Using Basic Projector Features Setting the Screen Type You can use the Screen Type setting to match the aspect ratio of the displayed image to the screen being used 1 Turn on the projector and display an image 2 Press the Menu button 3 Sel...

Page 87: ...or the projected image Parent topic Using Basic Projector Features Related concepts Image Aspect Ratio Adjusting the Image Position Using Screen Position You can adjust the image position if there are margins between the edge of the image and the projected screen frame 1 Turn on the projector and display an image 2 Press the Menu button 3 Select the Extended menu and press Enter 4 Select Display S...

Page 88: ...6900WU models or 4 3 for the PowerLite Pro G6150 and G6800 models Parent topic Using Basic Projector Features Adjusting the Image Position Using Lens Shift If the projector cannot be installed directly in front of the screen you can adjust the position of the projected image using the lens shift feature Note Wait 30 minutes after turning on the projector before setting the focus zoom and lens shif...

Page 89: ...l lock as shown to release the lock 3 Turn the vertical and horizontal lens shift dials on the projector to adjust the position of the projected image as necessary The range in which the image can be moved is shown as follows 89 ...

Page 90: ...nter 3 V 67 PowerLite Pro G6050W G6450WU G6550WU G6750WU G6900WU V 57 PowerLite Pro G6150 G6800 4 H 30 Note The image cannot be moved to both the horizontal and vertical maximum values 4 When you are finished slide the lens shift dial lock as shown to lock the dials 90 ...

Page 91: ...es Displaying a Test Pattern You can display a test pattern to adjust the projection image without connecting a computer or video device Note The test pattern s shape is determined by the Screen Type setting Be sure to set the correct screen type before adjusting with the test pattern 1 Turn on the projector 2 Press the Test Pattern button on the remote control or the down arrow button on the cont...

Page 92: ...e Abs Color Temp Advanced Gamma1 RGB RGBCMY Reset Signal Auto Setup Settings Geometric Correction Extended Multi Projection Brightness Level Edge Blending2 Multi screen 1 Except for custom Gamma settings 2 Except for Black Level PowerLite Pro G6800 G6900WU Parent topic Displaying a Test Pattern Adjusting the Image Height If you are projecting from a table or other flat surface and the image is too...

Page 93: ...end or retract it 3 If the image is tilted rotate the rear feet to adjust their height If the projected image is unevenly rectangular you need to adjust the image shape Parent topic Using Basic Projector Features Related concepts Image Shape Related references Projector Feature Settings Settings Menu 93 ...

Page 94: ...e Shape with Quick Corner Correcting Image Shape with Arc Corner Correcting Image Shape with Curved Surface Correcting Image Shape with Point Correction Correcting Image Shape with Corner Wall Parent topic Using Basic Projector Features Correcting Image Shape with H V Keystone You can use the projector s H V Keystone setting to correct the shape of an image that is unevenly rectangular on the side...

Page 95: ...u see the H V Keystone adjustment screen 6 Use the arrow buttons on the projector or the remote control to select between vertical and horizontal keystone correction and to adjust the image shape as necessary 7 When you are finished press Esc After correction your image is slightly smaller Parent topic Image Shape Related references Projector Feature Settings Settings Menu 95 ...

Page 96: ...ar on all sides 1 Turn on the projector and display an image Note You can display a pattern to aid in adjusting the projected image using the Settings menu 2 Press the Menu button 3 Select the Settings menu and press Enter 4 Select the Geometric Correction setting and press Enter 5 Select the Quick Corner setting and press Enter Then press Enter again You see the Quick Corner adjustment screen 96 ...

Page 97: ... Related references Projector Feature Settings Settings Menu Related tasks Displaying a Test Pattern Correcting Image Shape with Arc Corner You can use the projector s Arc Corner setting to adjust the curve or arc of the sides of your image PowerLite Pro G6050W G6150 G6450WU G6550WU G6750WU 1 Turn on the projector and display an image Note You can display a pattern to aid in adjusting the projecte...

Page 98: ...e Settings menu and press Enter 4 Select the Geometric Correction setting and press Enter 5 Select the Arc Correction setting and press Enter Then press Enter again You see the Arc Correction adjustment screen 98 ...

Page 99: ...Displaying a Test Pattern Correcting Image Shape with Curved Surface You can use the projector s Curved Surface setting to adjust the shape of an image projected on a curved or spherical surface PowerLite Pro G6800 G6900WU 1 Turn on the projector and display an image Note You can display a pattern to aid in adjusting the projected image using the Settings menu Note For the best results keep the le...

Page 100: ...lect the Geometric Correction setting and press Enter 5 Select the Curved Surface setting and press Enter Note If you see a confirmation message to continue press Enter again You see this screen 6 Select the Correct Shape setting and press Enter 100 ...

Page 101: ...ontrol to select the area you want to adjust Then press Enter Note To reset your Curved Surface adjustments press the Esc button for at least 2 seconds to display a reset screen then select Yes 8 Use the arrow buttons on the projector to adjust the shape 101 ...

Page 102: ... one of the following from the Curved Surface menu screen Horizontal Linearity Adjusts horizontal expansion or contraction Vertical Linearity Adjusts vertical expansion or contraction 12 Select a displayed line to use as a baseline and press Enter The selected baseline flashes red and white 13 Adjust the linearity by doing one of the following Press the left arrow button to shrink or contract the ...

Page 103: ...e Shape with Point Correction You can use the projector s Point Correction feature to adjust the image via points on a grid This is useful to adjust overlapping areas in multiple projections that do not line up correctly 1 Press the Menu button 2 Select the Settings menu and press Enter 3 Select the Geometric Correction setting and press Enter 4 Select the Point Correction setting and press Enter ...

Page 104: ...from a single line to a double lined square 8 Use the arrow buttons to correct the distortion in all necessary directions Note You can press Enter to show or hide the image and grid to check the results 9 Press Esc to return to the previous screen and select another point to correct if necessary 10 When you are finished press Menu to exit Parent topic Image Shape Related references Projector Featu...

Page 105: ...d display an image Note You can display a pattern to aid in adjusting the projected image using the Settings menu Note The image may not be evenly focused throughout even after performing the steps below 2 Press the Menu button 3 Select the Settings menu and press Enter 4 Select the Geometric Correction setting and press Enter 5 Select the Corner Wall setting and press Enter Note If you see a conf...

Page 106: ...lect one of the following Horizontal Corner when the surfaces line up horizontally Vertical Corner when the surfaces line up vertically 8 Press the Esc button to return to the Corner Wall menu screen 9 Select the Correct Shape setting and press Enter 106 ...

Page 107: ... hide the image and grid to check the results 11 Use the arrow buttons on the projector or the remote control to select the area you want to adjust Then press Enter Tip When Horizontal Corner is selected adjust the top area by using the lowest point indicated by the blue arrow as your reference and adjusting the areas indicated by the top two black arrows Adjust the lower area by using the highest...

Page 108: ...ous two steps as necessary to adjust any remaining image parts If the image expands or contracts continue with the next step to adjust the linearity 14 Press the Esc button to return to the Corner Wall menu screen 15 Select the Linearity setting and press Enter 16 Adjust the linearity by doing the following Press the left arrow button to shrink or contract the distance between the lines closest to...

Page 109: ...tasks Displaying a Test Pattern Correcting Image Shape with Point Correction Resizing the Image With the Zoom Ring 1 Turn on the projector and display an image Wait 30 minutes after turning on the projector before setting the focus zoom and lens shift for maximum accuracy Note You can display a pattern to aid in adjusting the projected image using the Settings menu 2 To enlarge or reduce the image...

Page 110: ...enu 2 To sharpen the image focus rotate the projector s focus ring Focusing the Image with the Optional Short Throw Lens Parent topic Using Basic Projector Features Related tasks Displaying a Test Pattern Focusing the Image with the Optional Short Throw Lens If the optional short throw lens ELPLU01 is installed and the lens has been shifted using the lens shift option you can focus the image using...

Page 111: ...further Note Be careful not to shift the short throw lens when adjusting it to prevent the projected image from shifting 3 Support the front of the lens with one hand and use the other to carefully rotate the focus ring until the image around the lens projection axis is focused 111 ...

Page 112: ...er making adjustments re position the image using lens shift When adjusting the image height position the image lower than where you want it to be and then move it up using the vertical lens shift dial This will help prevent the image from moving down after adjustment Parent topic Focusing the Image Using the Focus Ring Related tasks Adjusting the Image Position Using Lens Shift Remote Control Ope...

Page 113: ...nditions with bright fluorescent lights or in direct sunlight or the projector may not respond to commands If you will not use the remote control for a long time remove the batteries Parent topic Using Basic Projector Features Related tasks Replacing the Remote Control Batteries 113 ...

Page 114: ...t a DVD or other video media and press its play button if necessary 3 Do one of the following Press the Source Search button on the projector or the Search button on the remote control until you see the image from the source you want Press the button for the source you want on the remote control If there is more than one port for that source press the button again to cycle through the sources 1 Co...

Page 115: ...e image over top to bottom to project upside down from a ceiling or wall mount Rear flips the image horizontally to project from behind a translucent screen Rear Ceiling flips the image over top to bottom and horizontally to project from the ceiling and behind a translucent screen Changing the Projection Mode Using the Remote Control Changing the Projection Mode Using the Menus Parent topic Using ...

Page 116: ...ion Mode Using the Menus You can change the projection mode to flip the image over top to bottom and or left to right using the projector menus 1 Turn on the projector and display an image 2 Press the Menu button 3 Select the Extended menu and press Enter 4 Select the Projection setting and press Enter 5 Select a projection mode and press Enter 6 Press Menu or Esc to exit the menus Parent topic Pr...

Page 117: ... Image Aspect Ratios Parent topic Using Basic Projector Features Related references Image Quality Settings Image Menu Changing the Image Aspect Ratio You can change the aspect ratio of the displayed image to resize it Note Set the Screen Type setting in the projector s Extended menu before changing the aspect ratio 1 Turn on the projector and switch to the image source you want to use 2 Press the ...

Page 118: ...r from the HDMI or HDBaseT PowerLite Pro G6750WU G6800 G6900WU port Aspect ratio setting Description Auto Automatically sets the aspect ratio according to the input signal Normal Displays images in the same aspect ratio of the input signal 4 3 Displays images at a 4 3 aspect ratio 16 9 Displays images at a 16 9 aspect ratio Full Displays images using the full size of the projection area but does n...

Page 119: ...ated references Image Quality Settings Image Menu Changing the Color Mode You can change the projector s Color Mode using the remote control to optimize the image for your viewing environment 1 Turn on the projector and switch to the image source you want to use 2 If you are projecting from a DVD player or other video source insert a disc or other video media and press the play button if necessary...

Page 120: ...tandard sRGB computer displays DICOM SIM Best for projecting X ray photographs and other medical images Multi Projection Best for projecting from multiple projectors reduces the color tone difference between images Note The DICOM SIM Color Mode is for reference purposes only and should not be used to make medical diagnoses Parent topic Color Mode Turning On Auto Iris In certain color modes you can...

Page 121: ...t topic Color Mode Controlling the Volume with the Volume Buttons You can use the Volume buttons on the remote control to adjust the volume as you project a presentation with audio The volume buttons control the projector s internal speaker system PowerLite Pro G6050W G6150 G6450WU G6550WU G6750WU or any external speakers you connected to the projector You must adjust the volume separately for eac...

Page 122: ...projector menus Parent topic Using Basic Projector Features Related references Projector Feature Settings Settings Menu Setting the Date and Time You can set the date and time for the projector 1 Press the Menu button 2 Select the Extended menu and press Enter 3 Select the Operation setting and press Enter 4 Select the Date Time setting and press Enter You see a screen like this 122 ...

Page 123: ...5 Select the Date Time setting and press Enter 6 Use the displayed keyboard to enter the date and time 7 When you are finished press Menu Parent topic Using Basic Projector Features 123 ...

Page 124: ...can temporarily turn off the projected picture and sound if you want to redirect your audience s attention during a presentation Any sound or video action continues to run however so you cannot resume projection at the point that you stopped it If you want to display an image such as a company logo or picture when the presentation is stopped you can set up this feature using the projector s menus ...

Page 125: ...justing Projector Features Zooming Into and Out of Images You can draw attention to parts of a presentation by zooming into a portion of the image and enlarging it on the screen 1 Press the E Zoom button on the remote control You see a crosshair on the screen indicating the center of the zoom area 2 Use the following buttons on the remote control to adjust the zoomed image Use the arrow buttons to...

Page 126: ...ctor s Buttons Installing a Security Cable Parent topic Adjusting Projector Features Password Security Types You can set up these types of password security using one shared password Power On Protection password prevents anyone from using the projector without first entering a password User s Logo Protection password prevents anyone from changing the custom screen the projector can display when it...

Page 127: ... Press the down arrow to select Password and press Enter You see the prompt Change the password 3 Select Yes and press Enter 4 Hold down the Num button on the remote control and use the numeric buttons to set a four digit password The password displays as as you enter it Then you see the confirmation prompt 5 Enter the password again You see the message Password accepted 6 Press Esc to return to t...

Page 128: ...n or related display settings select User s Logo Protection press Enter select On press Enter again and press Esc 3 To prevent changes to network settings select Network Protection press Enter select On press Enter again and press Esc 4 To prevent changes to the projector s time or schedule settings select Time Schedule Protection press Enter select On press Enter again and press Esc Note Be sure ...

Page 129: ...llowing may happen You see a wrong password message and a prompt to try again Enter the correct password to proceed If you enter an incorrect password several times in succession the projector displays a request code and a message to contact Epson Support When you contact Epson Support provide the displayed request code and proof of ownership for assistance in unlocking the projector Parent topic ...

Page 130: ...ent changes to the User s Logo by setting up password protection for it 1 Display the image you want to project as the User s Logo 2 Press the Menu button select the Extended menu and press Enter 3 Select the User s Logo setting and press Enter You see a prompt asking if you want to use the displayed image as a user s logo 4 Select Yes and press Enter You see a selection box overlaying your image ...

Page 131: ...essage screen 10 Select the Extended menu and press Enter 11 Select Display and press Enter 12 Select when you want to display the User s Logo screen To display it whenever there is no input signal select Display Background and set it to Logo To display it whenever you turn the projector on select Startup Screen and set it to On To display it whenever you press the A V Mute button select A V Mute ...

Page 132: ...Lock setting and press Enter 4 Select one of these lock types and press Enter To lock all of the projector s buttons select Full Lock To lock all buttons except the power button select Partial Lock You see a confirmation prompt 5 Select Yes and press Enter Unlocking the Projector s Buttons Parent topic Projector Security Features Unlocking the Projector s Buttons If the projector s buttons have be...

Page 133: ...le and secure it to a room fixture or heavy furniture Parent topic Projector Security Features Related references Projector Parts Rear Projecting Two Images Simultaneously You can use the split screen feature to simultaneously project two images from different image sources next to each other You can control the split screen feature using the remote control or the projector menus Note While you us...

Page 134: ...essary 4 To switch the images select the Swap Screens setting and press Enter 5 To change the image sizes select the Screen Size setting press Enter select a sizing option press Enter and press Menu to exit Note Depending on the video input signals the images may not appear at the same size even if you choose the Equal setting 6 To choose the audio you want to hear select the Audio Source setting ...

Page 135: ...le Projectors You can combine the projected images from two or more projectors to create one large image The following two options are available Project different images from each projector and create one seamless image Project the same image from each projector and use the Scale feature to create one seamless image 135 ...

Page 136: ...r more elaborate presentations To do this you assign an identification number to each projector and to the remote control Then you can operate all the projectors at once or individually You can also match the colors displayed by any projectors you plan to use near each other Caution Leave at least 20 inches 50 cm of space between the projectors to prevent them from overheating Setting the Projecto...

Page 137: ...rent topic Projector Identification System for Multiple Projector Control Setting the Remote Control ID The remote control s ID is set to zero by default so it can operate any compatible projector If you want to set the remote control to operate only a particular projector you need to set the remote control s ID to match the projector s ID 1 Turn on the projector you want the remote control to ope...

Page 138: ...sting the Position of the Projected Image From Multiple Projectors If you need to adjust the position of a projected image from multiple projectors perform the adjustments in the order listed here Note You can display a pattern to aid in adjusting the projected image using the Settings menu 1 Adjust the projector s physical position and angle to the screen 2 Use the projector s lens shift and zoom...

Page 139: ...n project the same image from multiple projectors and use the Scale feature to crop and combine them into one large image 1 Press the Menu button 2 Select the Signal menu and press Enter 3 Select the Scale setting and press Enter You see this screen 4 Select the Scale setting and select On 5 Select the Scale Mode setting and select one of the following options Zoom Display Maintains the image aspe...

Page 140: ...s the image horizontally and vertically at the same time Scale Vertically Scales the image vertically only Scale Horizontally Scales the image horizontally only 7 Select the Image Display Range setting and use the arrow buttons to adjust the coordinates and size of each image as you view the screen 8 When you are finished press Menu Parent topic Using Multiple Projectors 140 ...

Page 141: ...lti Projection or 3D Multi Projection for 3D images for the color mode 4 Press the Menu button 5 Select the Extended menu and press Enter 6 Select the Multi Projection setting and press Enter 7 Select the Brightness Level setting and press Enter 8 Select a brightness level 9 Press Esc to return to the previous screen Parent topic Using Multiple Projectors Related concepts Color Mode Related refere...

Page 142: ...the Edge Blending Guide Display and Pattern Guide settings Note If the projected guide is unclear try changing the Guide Colors setting 6 Select the edge you want to blend and press Enter You see a screen like this 7 Select the Blending setting and select On 8 Select the Blend Range setting and select the width of the blended area 142 ...

Page 143: ...50WU G6550WU G6750WU and select a gradient for the shaded area 11 When you are finished press the Menu button Parent topic Using Multiple Projectors Adjusting the Black Level When two images overlap the overlapping area can be different in brightness and tone from the areas that do not overlap You can use the projector s Black Level setting to reduce this difference and make it less noticeable Pow...

Page 144: ...of the overlapping areas may differ from the rest of the image even after adjusting the black level 1 Press the Menu button 2 Select the Extended menu and press Enter 3 Select the Multi Projection setting and press Enter 4 Select the Edge Blending setting and press Enter You see this screen 144 ...

Page 145: ...elect the Black Level setting and press Enter You see this screen 6 Select the Area Correction setting and press Enter The points you can use to set the range for black level adjustments are displayed 145 ...

Page 146: ...the geometric adjustment method selected For example if Left Edge is set and 5 5 is selected for the Point Correction setting you see a screen like this 7 Use the arrow buttons to select an adjustment point and press the Enter button The selected point turns orange 8 Use the arrow buttons to move the point 146 ...

Page 147: ...g and press Enter You see this screen 12 Adjust the brightness and tone of the areas that do not overlap to match the areas that overlap using the displayed adjustment sliders 13 When you are finished press the Menu button to exit Parent topic Using Multiple Projectors Matching the Image Colors You can match the display quality of multiple projectors that will project next to each other Note Make ...

Page 148: ...tor with the darkest display so it matches the lighter display and press Enter You may need to switch the remote control ID back and forth to make adjustments to each projector in all of these steps 9 Change the Adjustment Level setting to 5 on each projector but this time match the lighter display to the darker one 10 Adjust the Brightness Correct setting on Adjustment Level 2 3 and 4 in the same...

Page 149: ...enu and select one of the 3D color modes Parent topic Adjusting Projector Features Related concepts Color Mode Saving Settings to Memory and Using Saved Settings You can save customized settings for each of your video inputs and then select the saved settings whenever you want to use them 1 Turn on the projector and display an image 2 Press the Menu button 3 Select the Settings menu and press Ente...

Page 150: ...tor s schedule and have the projector automatically execute the command at the scheduled time Note The Time Schedule Protection setting in the Password Protection menu must be turned off to schedule an event 1 Press the Menu button 2 Select the Extended menu and press Enter 3 Select the Schedule Settings setting and press Enter The Schedule Settings screen appears 4 Select the Schedule menu and pr...

Page 151: ...r indicates a scheduled event The colors indicate the following One time event Reoccurring event Communication is on off Event is invalid Parent topic Saving a Scheduled Event Editing a Scheduled Event You can edit a scheduled event on the calendar displayed on the Schedule Settings screen 1 Press the Menu button 2 Select the Extended menu and press Enter 3 Select the Schedule Settings setting and...

Page 152: ...6 Select from the following options On Off Enable or disable the selected event Edit Edit the settings for the selected event Clear Delete the selected event Add New Add a new scheduled event 7 When you are finished select Return and press Enter 8 Select Setup complete and select Yes to save your changes Note To delete all scheduled events select Schedule Reset and select Yes Parent topic Saving a...

Page 153: ...ettings Menu Projector Setup Settings Extended Menu Projector Network Settings Network Menu Projector Information Display Info Menu Projector Reset Options Reset Menu Using the Projector s Menus You can use the projector s menus to adjust the settings that control how your projector works The projector displays the menus on the screen 1 Press the Menu button on the control panel or remote control ...

Page 154: ...ttings 5 Change the settings using the buttons listed on the bottom of the menu screens 6 To return all the menu settings to their default values select Reset 7 When you finish changing settings on a menu press Esc 8 Press Menu or Esc to exit the menus Parent topic Adjusting the Menu Settings Image Quality Settings Image Menu Settings on the Image menu let you adjust the quality of your image for ...

Page 155: ... darkens the overall image Contrast Varying levels available Adjusts the difference between light and dark areas of the image Color Saturation Varying levels available Adjusts the intensity of the image colors Tint Varying levels available Adjusts the balance of green to magenta tones in the image Sharpness Varying levels available Adjusts the sharpness or softness of image details Abs Color Temp ...

Page 156: ... Brightness setting does not affect lamp brightness To change the lamp brightness mode use the Power Consumption setting Parent topic Adjusting the Menu Settings Related references Available Color Modes Input Signal Settings Signal Menu Normally the projector detects and optimizes the input signal settings automatically If you need to customize the settings you can use the Signal menu The availabl...

Page 157: ...tion from an analog RGB computer Normal connection Wide Auto detects the resolution Manual automatically Normal for 4 3 or 5 4 screens Wide for widescreen Manual allows you to specify a resolution Tracking Varying levels available Adjusts signal to eliminate vertical stripes in images from an analog RGB computer connection Sync Varying levels available Adjusts signal to eliminate fuzziness or flic...

Page 158: ...iate G6450WU G6550WU G6750WU Normal frame between them G6900WU High Noise Reduction Off Reduces flickering in analog images in two levels cannot be NR1 set if Image Processing is set to NR2 Fast Mosquito NR On Reduces the noise or artifacts seen around the edges of objects Off that is caused by the decompression of MPEG video cannot be set if Image Processing is set to Fast Video Range Auto Sets t...

Page 159: ...ndards video ports Auto detects signals automatically Aspect See the list of available aspect Sets the aspect ratio width to ratios height ratio for the selected input source Scale Various scale options When using multiple projectors to project one image adjusts the scale of the image displayed by each projector Overscan Auto Changes the projected image ratio to make the edges visible by Off a sel...

Page 160: ...o the 2 DisplayPort connector Change the setting to reduce interference or correct other image problems Parent topic Adjusting the Menu Settings Related references Available Image Aspect Ratios Projector Feature Settings Settings Menu Options on the Settings menu let you customize various projector features 160 ...

Page 161: ...ction select to display a grid and finely adjust Corner Wall the image position PowerLite Pro Curved Surface select to adjust G6800 G6900WU the image when projecting on a curved surface Corner Wall select to adjust the image when projecting on a surface with a right angle Split Screen Divides the viewing area horizontally and displays two images side by side while in Split Screen mode press Menu t...

Page 162: ...ystem Remote Receiver Front Rear Limits reception of remote control signals by the selected receiver Front Off turns off all receivers Rear Off User Button User1 Assigns a menu option to the User1 User2 and User3 User2 buttons on the remote control for User3 one touch access Test Pattern Displays a test pattern to assist in adjusting the image press the left or right arrow buttons on the remote co...

Page 163: ... its operation Setting Options Description Display See the next table in this topic Closed Caption Off Controls use of closed captions and selects the closed caption CC1 type closed captions are only CC2 visible for NTSC signals connected through the S Video or Video ports User s Logo Creates a screen that the projector displays to identify itself and enhance security 163 ...

Page 164: ... Settings A V Output Selects various audio and video output settings Monitor Out A V Output select to output Audio Settings audio and video to an external device when the projector is in standby mode Standby Mode must be turned on to use this setting Monitor Out Select the image source to output to an external device when the projector is in standby mode When set to Auto an analog RGB signal from ...

Page 165: ...io and video to an external device A V Output must be set to Always On Communication from the HDBaseT port PowerLite Pro G6750WU G6800 G6900WU HDBaseT Control Communications When the projector is connected to the HDBaseT Transmitter PowerLite Pro enables or disables G6750WU G6800 G6900WU communication from the Ethernet and serial ports on the transmitter turning on this setting disables the projec...

Page 166: ...te a seamless screen Multi screen adjusts the tint and brightness of each projected image Projector ID sets the projector to a particular ID number which allows you to use a remote control to individually control projectors Schedule Settings Schedule specific operations to occur at a pre scheduled time Language Various languages available Selects the language for projector menu and message display...

Page 167: ...ir Filter Notice Displays a message when a clog in the air filter is detected Screen Sets the aspect ratio and position of the projected image according to the type of screen being used Panel Alignment Corrects color misalignment in the projected image Color Uniformity Adjusts the color tone balance Operation settings Setting Options Description Direct Power On Turns on the projector when you plug...

Page 168: ...les the remote control that came with the projector Inv Direction Button Enable this setting if the projector is installed on a ceiling and you want to invert the arrow buttons on the control panel Startup Source Search Automatically detect the image signal being input when the projector is turned on A V Mute Release A V Mute Select A V Mute if you want to use only the A V Mute button to All turn ...

Page 169: ...ojector s system time and date settings Parent topic Adjusting the Menu Settings Projector Network Settings Network Menu Settings on the Network menu let you view network information and set up the projector for monitoring and control over a network 169 ...

Page 170: ...tor Name Displays wired network status and details DHCP IP Address Subnet Mask Gateway Address MAC Address Network Configuration Accesses additional network Configures your network settings menus Parent topic Adjusting the Menu Settings Related concepts Wired Network Projection Wireless Network Projection Projector Information Display Info Menu You can display information about the projector and i...

Page 171: ...rce Displays the name of the port to which the current input source is connected Input Signal Displays the input signal setting of the current input source Resolution Displays the resolution of the current input source Video Signal Displays the video signal format of the current input source Refresh Rate Displays the refresh rate of the current input source Sync Info Displays information that may ...

Page 172: ...unication Check the network communication status wait a few moments and try connecting to the network again 0481 0482 0485 0433 Cannot display the transferred images Restart the EasyMP Network Projection program 0484 Communication with computer was disconnected Restart the EasyMP Network Projection program 04FE The EasyMP Network Projection program quit unexpectedly Check the network communication...

Page 173: ... sure that the security certificate is installed correctly 089B EAP server authentication failed Check the wireless LAN security settings and make sure that the security certificate is installed correctly 089C EAP client authentication failed Check the wireless LAN security settings and make sure that the security certificate is installed correctly 089D Key exchange failed Parent topic Projector I...

Page 174: ...e following settings using the Reset All option Input Signal User s Logo Language Network menu items Lamp Hours Password Multi screen Date Time Panel Alignment Color Uniformity Parent topic Adjusting the Menu Settings 174 ...

Page 175: ...pson servicer Warning Before cleaning any part of the projector turn it off and unplug the power cord Never open any cover on the projector except as specifically explained in this manual Dangerous electrical voltages in the projector can injure you severely Warning Do not try to service this product yourself except as specifically explained in this manual Refer all other servicing to qualified se...

Page 176: ...e projector Caution Do not use wax alcohol benzene paint thinner or other chemicals to clean the projector case These can damage the case Do not use canned air or the gases may leave a flammable residue Parent topic Projector Maintenance Air Filter and Vent Maintenance Regular filter maintenance is important to maintaining your projector Your Epson projector is designed with an easily accessible u...

Page 177: ...ter in the following situations The filter or vents get dusty You see a message telling you to clean it The projector s filter light flashes green 1 Turn off the projector and unplug the power cord 2 Slide the air filter cover latch and open the air filter cover 177 ...

Page 178: ...ust Caution Do not use excessive force when tapping the air filter or it may crack and become unusable Do not rinse the air filter in water or use any detergent or solvent to clean it Do not use canned air the gases may leave a residue or push dust and debris into the projector s optics or other sensitive areas 178 ...

Page 179: ...emaining dust Note If dust is difficult to remove or the air filter is damaged replace the air filter 6 Place the air filter back in the projector as shown and push gently until it clicks into place 7 Close the air filter cover Parent topic Air Filter and Vent Maintenance 179 ...

Page 180: ...fter cleaning the air filter you see a message telling you to clean or replace it The air filter is torn or damaged You can replace the air filter while the projector is mounted to the ceiling or placed on a table 1 Turn off the projector and unplug the power cord 2 Slide the air filter cover latch and open the air filter cover 180 ...

Page 181: ...rojector Note Air filters contain polypropylene Dispose of used air filters according to local regulations 4 Place the new air filter in the projector as shown and push gently until it clicks into place 5 Close the air filter cover 181 ...

Page 182: ...projector telling you to replace the lamp The projector s lamp light is flashing orange Replacing the Lamp Resetting the Lamp Timer Parent topic Projector Maintenance Related references Projector Light Status Optional Equipment and Replacement Parts Replacing the Lamp Before you replace the lamp let the projector cool down for at least one hour so the lamp will not be hot Warning Let the lamp full...

Page 183: ...ring the lamp cover and then remove the lamp cover Warning If the lamp is broken glass fragments may be loose inside the lamp chamber Be careful removing any broken glass to avoid injury 4 Loosen the screws securing the lamp to the projector The screws do not come all the way out 183 ...

Page 184: ...or Note The lamp s in this product contain mercury Please consult your state and local regulations regarding disposal or recycling Do not put in the trash 6 Gently insert the new lamp into the projector If it does not fit easily make sure it is facing the right way 184 ...

Page 185: ... lamp firmly and tighten the screws to secure it 8 Replace the lamp cover and tighten the screws to secure it Note Be sure the lamp cover is securely installed or the lamp will not come on Reset the lamp timer to zero to keep track of the new lamp s usage Parent topic Projector Lamp Maintenance 185 ...

Page 186: ... message and to keep track of lamp usage correctly Note Do not reset the lamp timer if you have not replaced the lamp to avoid inaccurate lamp usage information 1 Turn on the projector 2 Press the Menu button 3 Select the Reset menu and press Enter 4 Select Reset Lamp Hours and press Enter You see a prompt asking if you want to reset the lamp hours 5 Select Yes and press Enter 6 Press Menu or Esc ...

Page 187: ...s soon as they run out Caution Use only the type of batteries specified in this manual Do not install batteries of different types or mix new and old batteries 1 Open the battery cover as shown 2 Remove the old batteries Warning If the battery fluid has leaked wipe it away with a soft cloth and avoid getting the fluid on your hands If it gets on your hands wash them immediately to avoid injury 187...

Page 188: ...clicks into place Warning Dispose of used batteries according to local regulations Do not expose batteries to heat or flame Keep batteries out of the reach of children they are choking hazards and are very dangerous if swallowed Parent topic Projector Maintenance Related references Remote Control Operation 188 ...

Page 189: ... cover that was included with the projector to the lens mount Center the lens using lens shift Attach the protective lens pad that was included with the projector When transporting the projector a long distance or as checked luggage pack it in a firm box with cushioning around it and mark the box Fragile When shipping the projector for repairs place it in its original packing materials if possible...

Page 190: ...hen plug it back in and turn it on If this does not solve the problem check the following The lights on the projector may indicate what the problem is The projector s Help system can display information about common problems if the projector is operating The solutions in this manual can help you solve many problems If none of these solutions help you can contact Epson for technical support Parent ...

Page 191: ...atus and solution light Green Off Off Off Normal operation Flashing green Off Off Off Warming up Wait for an image to appear Orange Off Off Off Standby or sleep mode Flashing orange Off Off Off Preparing network monitoring or shutting down Wait for the light to remain orange before unplugging the projector 191 ...

Page 192: ...th dust or obstructed by nearby objects Clean or replace the air filter If operating the projector at high altitude turn on High Altitude Mode If the problem persists unplug the projector and contact Epson for help Red Flashing Off Off Lamp has a problem red Check to see if the lamp is burned out broken or installed incorrectly Reseat or replace the lamp as necessary Make sure that the vents and a...

Page 193: ...an or replace the air filter If the problem persists unplug the projector and contact Epson for help On Flashing Off Off The lamp is past its replacement period and orange needs to be replaced to avoid damage Do not continue using the projector Red Off Flashing red Off A fan or sensor has a problem Turn the projector off unplug it and contact Epson for help Red or flashing Flashing Flashing red Of...

Page 194: ...lve 4 Press Enter to view the solutions 5 When you are finished do one of the following To select another problem to solve press Esc To exit the help system press Help Parent topic Solving Problems Solving Image or Sound Problems Check the solutions in these sections if you have any problems with projected images or sound Solutions When No Image Appears Solutions When No Signal Message Appears Sol...

Page 195: ...wer Consumption setting Check the Display setting to make sure Messages is set to On If the projector does not respond when you press the control panel buttons the buttons may be locked Unlock the buttons If the projector does not respond when you press buttons on the remote control make sure the remote receivers are turned on For images projected with Windows Media Center reduce the screen size f...

Page 196: ...p to display on an external monitor 1 Hold down the laptop s Fn key and press the key labelled with a monitor icon or CRT LCD See your laptop manual for details Wait a few seconds for an image to appear 2 To display on both the laptop s monitor and the projector try pressing the same keys again 3 If the same image is not displayed by the laptop and projector check the Windows Display utility to ma...

Page 197: ...n the remote control to optimize the image signal Make sure you selected the correct Screen Type setting for the screen being used Make sure the Scale setting in the Extended menu is turned off Try adjusting the image position using the Screen Position menu setting Press the Aspect button on the remote control to select a different image aspect ratio If you zoomed into or out of the image using th...

Page 198: ...the following solutions Check the cables connecting your computer or video source to the projector They should be Separated from the power cord to prevent interference Securely connected at both ends Not connected to an extension cable No longer than 10 feet Check the settings on the projector s Signal menu to make sure they match the video source If available for your video source adjust the Prog...

Page 199: ...or close enough to the screen Position the projector so the keystone adjustment angle is not so wide that it distorts the image Adjust the Sharpness setting to improve image quality If you are projecting from a computer press the Auto button on the remote control to automatically adjust the tracking and sync If any bands or overall blurriness remain display a uniformly patterned image on the scree...

Page 200: ...ry selecting Normal in the projector s menus Position the projector close enough to the screen If the image has been progressively darkening you may need to replace the projector lamp soon Parent topic Solving Image or Sound Problems Related concepts Projector Lamp Maintenance Related references Input Signal Settings Signal Menu Image Quality Settings Image Menu Projector Feature Settings Settings...

Page 201: ... Sound Problems Related references Projector Setup Settings Extended Menu Related tasks Connecting to a Computer for Sound Connecting to a Video Source for Sound Connecting to External Speakers Solving Projector or Remote Control Operation Problems Check the solutions in these sections if you have problems operating the projector or remote control Solutions to Projector Power or Shut Off Problems ...

Page 202: ...replace the batteries Make sure you are operating the remote control within the reception angle and range of the projector Make sure the projector is not warming up or shutting down Check to see if a button on the remote control is stuck down causing it to enter sleep mode Release the button to wake the remote control up Strong fluorescent lighting direct sunlight or infrared device signals may be...

Page 203: ...ork Alert E Mails are Not Received If you do not receive an e mail alerting you to problems with a projector over the network try the following solutions Make sure the projector is turned on and connected to the network correctly If an error shut down the projector it cannot send an e mail Make sure you set up the projector e mail alert settings correctly on the projector s network Mail menu or in...

Page 204: ...ll have the following information ready Product name Product serial number located on the bottom or rear of the projector or in the menu system Proof of purchase such as a store receipt and date of purchase Computer or video configuration Description of the problem Purchase Supplies and Accessories You can purchase screens other optional accessories and replacement parts from an Epson authorized r...

Page 205: ...rojector Specifications Type of display Poly silicon TFT active matrix Resolution PowerLite Pro G6050W 1280 800 pixels WXGA PowerLite Pro G6150 G6800 1024 768 pixels XGA PowerLite Pro G6450WU G6550WU G6750WU G6900WU 1920 1200 pixels WUXGA Lens F 1 65 to 2 55 Focal length 21 28 to 37 94 mm Color reproduction Full color 1073 74 million colors Brightness PowerLite Pro G6050W Normal or Temp Interlock ...

Page 206: ...tput 4500 lumens ECO Power Consumption mode White light output 3915 lumens ISO 21118 standard PowerLite Pro G6550WU Normal or Temp Interlock Power Consumption mode White light output 5200 lumens ISO 21118 standard Color light output 5200 lumens ECO Power Consumption mode White light output 3952 lumens ISO 21118 standard PowerLite Pro G6750WU G6900WU Normal or Temp Interlock Power Consumption mode ...

Page 207: ...ite light output measured in accordance with ISO 21118 Contrast ratio 5000 1 with Auto Iris on and Normal Power Consumption mode Image size 50 inches 1 27 m to 300 inches 7 62 m Projection distance PowerLite Pro G6150 51 inches 1 30 m to 570 inches 14 47 m PowerLite Pro G6050W G6450WU G6550WU G6750WU G6800 G6900WU 53 inches 1 35 m to 591 inches 15 01 m Projection methods Front rear ceiling mounted...

Page 208: ...ption mode PowerLite Pro G6750WU G6800 G6900WU 39 dB Normal Power Consumption mode 31 dB ECO Power Consumption mode Keystone correction angle Vertical 30º with standard lens Horizontal 30º with standard lens Lens shift range PowerLite Pro G6150 G6800 approx Vertical 57 Manual Horizontal 30 Manual PowerLite Pro G6050W G6450WU G6550WU G6750WU G6900WU Vertical 67 Manual Horizontal 30 Manual Parent to...

Page 209: ...tion mode Up to about 2000 hours ECO Power Consumption mode Up to about 4000 hours Note Turn off this product when not in use to prolong the life of the projector Lamp life will vary depending upon mode selected environmental conditions and usage Brightness decreases over time Parent topic Technical Specifications Remote Control Specifications Reception range 49 feet 15 m Batteries Two alkaline or...

Page 210: ...e Pro G6800 G6900WU 21 3 lb 9 6 kg Standard lens is approximately 1 46 lbs 0 66 kg Parent topic Technical Specifications Projector Electrical Specifications Rated frequency 50 60 Hz Power supply 100 to 240 VAC 10 PowerLite Pro G6050W 5 0 to 2 2 A PowerLite Pro G6150 G6550WU 5 3 to 2 3 A PowerLite Pro G6450WU 4 7 to 2 1 A PowerLite Pro G6750WU G6800 G6900WU 5 7 to 2 5 A 210 ...

Page 211: ...Pro G6150 G6550WU Normal Power Consumption mode 528 W ECO Power Consumption mode 421 W PowerLite Pro G6450WU Normal Power Consumption mode 468 W ECO Power Consumption mode 421 W PowerLite Pro G6750WU G6800 G6900WU Normal Power Consumption mode 568 W ECO Power Consumption mode 421 W Standby 0 31 W Communication Off 2 8 W Communication On 211 ...

Page 212: ...PowerLite Pro G6750WU G6800 G6900WU Normal Power Consumption mode 542 W ECO Power Consumption mode 405 W Standby 0 41 W Communication Off 3 3 W Communication On Parent topic Technical Specifications Projector Environmental Specifications Temperature Operating 32 to 113 F 0 to 45 C Storage 14 to 140 F 10 to 60 C Humidity relative non Operating 20 to 80 condensing Storage 10 to 90 Operating altitude...

Page 213: ...display resolutions so your image will be resized to fit automatically Your computer s monitor port or video card refresh rate vertical frequency must be compatible with the projector See your computer or video card manual for details The table here lists the compatible refresh rate and resolution for each compatible video display format Display format Refresh rate in Hz Resolution in pixels Compu...

Page 214: ...024 768 MAC21 75 1152 870 Composite video TV NTSC 60 720 480 TV PAL 50 60 720 576 TV SECAM 50 720 576 Component video SDTV 480i 60 720 480 SDTV 576i 50 720 576 SDTV 480p 60 720 480 SDTV 576p 50 720 576 HDTV 720p 50 60 1280 720 HDTV 1080i 50 60 1920 1080 HDTV 1080p 2 50 60 1920 1080 HDMI and DisplayPort input signals Powerlite Pro G6150 G6800 VGA 60 640 480 SVGA 60 800 600 XGA 60 1024 768 214 ...

Page 215: ... 60 1600 1200 SDTV 480i5 480p 60 720 480 SDTV 576i5 576p 50 720 576 HDTV 720p 50 60 1280 720 HDTV 1080i 50 60 1920 1080 HDTV 1080p 245 305 50 60 1920 1080 HDMI and DisplayPort input signals PowerLite Pro G6050W G6450WU G6550WU G6750WU G6900WU VGA 60 640 480 SVGA 60 800 600 XGA 60 1024 768 WXGA 60 1280 7684 60 1280 800 60 1366 768 WXGA 60 1440 900 WXGA 60 1600 900 WSXGA 60 1680 1050 215 ...

Page 216: ...SDI input signals PowerLite Pro G6900WU SDTV 480i 60 720 480 SDTV 576i 50 720 576 HDTV 720p 50 60 1280 720 HDTV 1080i 50 60 1920 1080 HDTV 1080p 24 25 30 1920 1080 1 Only compatible when Wide is selected as the Resolution setting Powerlite Pro G6050W G6450WU G6550WU G6750WU G6900WU 2 PowerLite Pro G6450WU G6550WU G6750WU G6900WU only 3 Only compatible with VESA CVT RB Reduced Blanking input signal...

Page 217: ... your eyes Never let children look into the lens when it is on Never open any cover on the projector except the lamp and filter covers Dangerous electrical voltages inside the projector can severely injure you Except as specifically explained in this User s Guide do not attempt to service this product yourself Refer all servicing to qualified service personnel Warning The projector and its accesso...

Page 218: ...ompany Place the projector near a wall outlet where the plug can be easily unplugged Take the following precautions when handling the plug Do not hold the plug with wet hands Do not insert the plug into a dusty outlet Insert the plug firmly into the outlet Do not pull the power cord when disconnecting the plug always be sure to hold the plug when disconnecting it Do not overload wall outlets exten...

Page 219: ...you follow the operating instructions or exhibits a distinct change in performance if smoke strange odors or strange noises come from the projector if the power cord or plug is damaged or frayed if liquid or foreign objects get inside the projector or if it has been exposed to rain or water if it has been dropped or the housing has been damaged Do not touch the plug during an electrical storm Othe...

Page 220: ...or pull it excessively Keep the power cord away from hot electrical appliances If the lamp breaks ventilate the room to prevent gases contained in the lamp from being inhaled or coming in contact with your eyes or mouth If you do inhale gases or gases come in contact with your eyes or mouth seek medical advice immediately If the projector is mounted overhead and the lamp breaks be careful to preve...

Page 221: ...radio frequency energy and if not installed and used in accordance with the instructions may cause harmful interference to radio communications However there is no guarantee that interference will not occur in a particular installation If this equipment does cause interference to radio and television reception which can be determined by turning the equipment off and on the user is encouraged to tr...

Page 222: ...ion Multimedia Interface are the trademarks or registered trademarks of HDMI Licensing LLC HDBaseTTM and the HDBaseT Alliance logo are trademarks of the HDBaseT Alliance General Notice Other product names used herein are for identification purposes only and may be trademarks of their respective owners Epson disclaims any and all rights in those marks Parent topic Notices Open Source Software Licen...

Page 223: ...n Street Fifth Floor Boston MA 02110 1301 USA Everyone is permitted to copy and distribute verbatim copies of this license document but changing it is not allowed Preamble The licenses for most software are designed to take away your freedom to share and change it By contrast the GNU General Public License is intended to guarantee your freedom to share and change free software to make sure the sof...

Page 224: ... To prevent this we have made it clear that any patent must be licensed for everyone s free use or not licensed at all The precise terms and conditions for copying distribution and modification follow GNU GENERAL PUBLIC LICENSE TERMS AND CONDITIONS FOR COPYING DISTRIBUTION AND MODIFICATION 0 This License applies to any program or other work which contains a notice placed by the copyright holder sa...

Page 225: ...m is not required to print an announcement These requirements apply to the modified work as a whole If identifiable sections of that work are not derived from the Program and can be reasonably considered independent and separate works in themselves then this License and its terms do not apply to those sections when you distribute them as separate works But when you distribute the same sections as ...

Page 226: ...fy sublicense or distribute the Program except as expressly provided under this License Any attempt otherwise to copy modify sublicense or distribute the Program is void and will automatically terminate your rights under this License However parties who have received copies or rights from you under this License will not have their licenses terminated so long as such parties remain in full complian...

Page 227: ...mitation excluding those countries so that distribution is permitted only in or among countries not thus excluded In such case this License incorporates the limitation as if written in the body of this License 9 The Free Software Foundation may publish revised and or new versions of the General Public License from time to time Such new versions will be similar in spirit to the present version but ...

Page 228: ...s to make it free software which everyone can redistribute and change under these terms To do so attach the following notices to the program It is safest to attach them to the start of each source file to most effectively convey the exclusion of warranty and each file should have at least the copyright line and a pointer to where the full notice is found one line to give the program s name and a b...

Page 229: ...ermit incorporating your program into proprietary programs If your program is a subroutine library you may consider it more useful to permit linking proprietary applications with the library If this is what you want to do use the GNU Lesser General Public License instead of this License GNU LGPL This projector product includes the open source software programs which apply the GNU Lesser General Pu...

Page 230: ...ferring to freedom of use not price Our General Public Licenses are designed to make sure that you have the freedom to distribute copies of free software and charge for this service if you wish that you receive source code or can get it if you want it that you can change the software and use pieces of it in new free programs and that you are informed that you can do these things To protect your ri...

Page 231: ...developers Less of an advantage over competing non free programs These disadvantages are the reason we use the ordinary General Public License for many libraries However the Lesser license provides advantages in certain special circumstances For example on rare occasions there may be a special need to encourage the widest possible use of a certain library so that it becomes a de facto standard To ...

Page 232: ...work based on the Library independent of the use of the Library in a tool for writing it Whether that is true depends on what the Library does and what the program that uses the Library does 1 You may copy and distribute verbatim copies of the Library s complete source code as you receive it in any medium provided that you conspicuously and appropriately publish on each copy an appropriate copyrig...

Page 233: ...of this License to a given copy of the Library To do this you must alter all the notices that refer to this License so that they refer to the ordinary GNU General Public License version 2 instead of to this License If a newer version than version 2 of the ordinary GNU General Public License has appeared then you can specify that version instead if you wish Do not make any other change in these not...

Page 234: ...istribute that work under terms of your choice provided that the terms permit modification of the work for the customer s own use and reverse engineering for debugging such modifications You must give prominent notice with each copy of the work that the Library is used in it and that the Library and its use are covered by this License You must supply a copy of this License If the work during execu...

Page 235: ...of the other library facilities is otherwise permitted and provided that you do these two things a Accompany the combined library with a copy of the same work based on the Library uncombined with any other library facilities This must be distributed under the terms of the Sections above b Give prominent notice with the combined library of the fact that part of it is a work based on the Library and...

Page 236: ...tent application of that system it is up to the author donor to decide if he or she is willing to distribute software through any other system and a licensee cannot impose that choice This section is intended to make thoroughly clear what is believed to be a consequence of the rest of this License 12 If the distribution and or use of the Library is restricted in certain countries either by patents...

Page 237: ...D BY YOU OR THIRD PARTIES OR A FAILURE OF THE LIBRARY TO OPERATE WITH ANY OTHER SOFTWARE EVEN IF SUCH HOLDER OR OTHER PARTY HAS BEEN ADVISED OF THE POSSIBILITY OF SUCH DAMAGES END OF TERMS AND CONDITIONS How to Apply These Terms to Your New Libraries If you develop a new library and you want it to be of the greatest possible use to the public we recommend making it free software that everyone can ...

Page 238: ...pyright to the BSD License The BSD License are WITHOUT ANY WARRANTY without even the implied warranty of MERCHANTABILITY AND FITNESS FOR A PARTICULAR PURPOSE List of BSD License programs busybox 1 13 4 License terms of conditions of each program which are provided by owner of the copyright to the BSD License are as follows Copyright c The Regents of the University of California All rights reserved...

Page 239: ...t to the libjpeg The libjpeg are WITHOUT ANY WARRANTY without even the implied warranty of MERCHANTABILITY AND FITNESS FOR A PARTICULAR PURPOSE List of libjpeg programs libjpeg 6b License terms of conditions of each program which are provided by owner of the copyright to the libjpeg are as follows Copyright c 1994 1997 Thomas G Lane This file is part of the Independent JPEG Group s software For co...

Page 240: ...sing or publicity relating to this software or products derived from it This software may be referred to only as the Independent JPEG Group s software We specifically permit and encourage the use of this software as the basis of commercial products provided that all warranty or liability claims are assumed by the product vendor ansi2knr c is included in this distribution by permission of L Peter D...

Page 241: ...gram which are provided by owner of the copyright to the libpng are as follows For conditions of distribution and use see copyright notice in png h Copyright c 1998 2012 Glenn Randers Pehrson Version 0 96 Copyright c 1996 1997 Andreas Dilger Version 0 88 Copyright 1995 1996 Guy Eric Schalnat Group 42 Inc This copy of the libpng notices is provided for your convenience In case of any discrepancy be...

Page 242: ...g to the same disclaimer and license as libpng 0 96 with the following individuals added to the list of Contributing Authors Tom Lane Glenn Randers Pehrson Willem van Schaik libpng versions 0 89 June 1996 through 0 96 May 1997 are Copyright c 1996 1997 Andreas Dilger Distributed according to the same disclaimer and license as libpng 0 88 with the following individuals added to the list of Contribu...

Page 243: ...rce or altered source distribution The Contributing Authors and Group 42 Inc specifically permit without fee and encourage the use of this source code as a component to supporting the PNG file format in commercial products If you use this source code in a product acknowledgment is not required but would be appreciated A png_get_copyright function is available for convenient use in about boxes and ...

Page 244: ...such and must not be misrepresented as being the original software 3 This notice may not be removed or altered from any source distribution Jean loup Gailly jloup gzip org Mark Adler madler alumni caltech edu If you use the zlib library in a product we would appreciate not receiving lengthy legal documents to sign The sources are provided for free but without warranty of any kind The library has b...

Page 245: ...hat is included in or attached to the work an example is provided in the Appendix below Derivative Works shall mean any work whether in Source or Object form that is based on or derived from the Work and for which the editorial revisions annotations elaborations or other modifications represent as a whole an original work of authorship For the purposes of this License Derivative Works shall not in...

Page 246: ...e any other recipients of the Work or Derivative Works a copy of this License and b You must cause any modified files to carry prominent notices stating that You changed the files and You must retain in the Source form of any Derivative Works that You distribute all copyright patent trademark and attribution notices from the Source form of the Work excluding those notices that do not pertain to an...

Page 247: ...to in writing shall any Contributor be liable to You for damages including any direct indirect special incidental or consequential damages of any character arising as a result of this License or out of the use or inability to use the Work including but not limited to damages for loss of goodwill work stoppage computer failure or malfunction or any and all other commercial damages or losses even if...

Page 248: ...o the newlib are as follows The newlib subdirectory is a collection of software from several sources Each file may have its own copyright license that is embedded in the source file Unless otherwise noted in the body of the source file s the following copyright notices will apply to the contents of the newlib subdirectory 1 Red Hat Incorporated Copyright c 1994 2007 Red Hat Inc All rights reserved...

Page 249: ... INCIDENTAL SPECIAL EXEMPLARY OR CONSEQUENTIAL DAMAGES INCLUDING BUT NOT LIMITED TO PROCUREMENT OF SUBSTITUTE GOODS OR SERVICES LOSS OF USE DATA OR PROFITS OR BUSINESS INTERRUPTION HOWEVER CAUSED AND ON ANY THEORY OF LIABILITY WHETHER IN CONTRACT STRICT LIABILITY OR TORT INCLUDING NEGLIGENCE OR OTHERWISE ARISING IN ANY WAY OUT OF THE USE OF THIS SOFTWARE EVEN IF ADVISED OF THE POSSIBILITY OF SUCH ...

Page 250: ...OR PERFORMANCE OF THIS SOFTWARE 4 Advanced Micro Devices Copyright 1989 1990 Advanced Micro Devices Inc This software is the property of Advanced Micro Devices Inc AMD which specifically grants the user the right to modify use and distribute this software provided this notice is not removed or altered All other rights are reserved by AMD AMD MAKES NO WARRANTY OF ANY KIND EXPRESS OR IMPLIED WITH RE...

Page 251: ...ission Hewlett Packard Company makes no representations about the suitability of this software for any purpose 9 Hans Peter Nilsson Copyright C 2001 Hans Peter Nilsson Permission to use copy modify and distribute this software is freely granted provided that the above copyright notice this notice and the following disclaimer are preserved with no changes THIS SOFTWARE IS PROVIDED AS IS AND WITHOUT...

Page 252: ...IF ADVISED OF THE POSSIBILITY OF SUCH DAMAGE 12 SuperH Inc Copyright 2002 SuperH Inc All rights reserved This software is the property of SuperH Inc SuperH which specifically grants the user the right to modify use and distribute this software provided this notice is not removed or altered All other rights are reserved by SuperH SUPERH MAKES NO WARRANTY OF ANY KIND EXPRESS OR IMPLIED WITH REGARD T...

Page 253: ...EORY OF LIABILITY WHETHER IN CONTRACT STRICT LIABILITY OR TORT INCLUDING NEGLIGENCE OR OTHERWISE ARISING IN ANY WAY OUT OF THE USE OF THIS SOFTWARE EVEN IF ADVISED OF THE POSSIBILITY OF SUCH DAMAGE 14 Alexey Zelkin Copyright c 2000 2001 Alexey Zelkin phantom FreeBSD org All rights reserved Redistribution and use in source and binary forms with or without modification are permitted provided that th...

Page 254: ...R CONSEQUENTIAL DAMAGES INCLUDING BUT NOT LIMITED TO PROCUREMENT OF SUBSTITUTE GOODS OR SERVICES LOSS OF USE DATA OR PROFITS OR BUSINESS INTERRUPTION HOWEVER CAUSED AND ON ANY THEORY OF LIABILITY WHETHER IN CONTRACT STRICT LIABILITY OR TORT INCLUDING NEGLIGENCE OR OTHERWISE ARISING IN ANY WAY OUT OF THE USE OF THIS SOFTWARE EVEN IF ADVISED OF THE POSSIBILITY OF SUCH DAMAGE 16 FreeBSD Copyright c 1...

Page 255: ...itrus Project Copyright c 1999 Citrus Project All rights reserved Redistribution and use in source and binary forms with or without modification are permitted provided that the following conditions are met 1 Redistributions of source code must retain the above copyright notice this list of conditions and the following disclaimer 2 Redistributions in binary form must reproduce the above copyright n...

Page 256: ...EQUENTIAL DAMAGES INCLUDING BUT NOT LIMITED TO PROCUREMENT OF SUBSTITUTE GOODS OR SERVICES LOSS OF USE DATA OR PROFITS OR BUSINESS INTERRUPTION HOWEVER CAUSED AND ON ANY THEORY OF LIABILITY WHETHER IN CONTRACT STRICT LIABILITY OR TORT INCLUDING NEGLIGENCE OR OTHERWISE ARISING IN ANY WAY OUT OF THE USE OF THIS SOFTWARE EVEN IF ADVISED OF THE POSSIBILITY OF SUCH DAMAGE 20 DJ Delorie i386 Copyright C...

Page 257: ...and binary forms with or without modification are permitted provided that the following conditions are met 1 Redistributions of source code must retain the above copyright notice this list of conditions and the following disclaimer 2 Redistributions in binary form must reproduce the above copyright notice this list of conditions and the following disclaimer in the documentation and or other materi...

Page 258: ...AMAGE iconv Charset Conversion Library v2 0 28 Artem Bityuckiy enable newlib iconv Copyright c 2003 Artem B Bityuckiy SoftMine Corporation Rights transferred to Franklin Electronic Publishers Redistribution and use in source and binary forms with or without modification are permitted provided that the following conditions are met 1 Redistributions of source code must retain the above copyright not...

Page 259: ...CES LOSS OF USE DATA OR PROFITS OR BUSINESS INTERRUPTION HOWEVER CAUSED AND ON ANY THEORY OF LIABILITY WHETHER IN CONTRACT STRICT LIABILITY OR TORT INCLUDING NEGLIGENCE OR OTHERWISE ARISING IN ANY WAY OUT OF THE USE OF THIS SOFTWARE EVEN IF ADVISED OF THE POSSIBILITY OF SUCH DAMAGE 31 M Warner Losh targets using libc posix Copyright c 1998 M Warner Losh imp freebsd org All rights reserved Redistri...

Page 260: ...D WARRANTIES INCLUDING BUT NOT LIMITED TO THE IMPLIED WARRANTIES OF MERCHANTABILITY AND FITNESS FOR A PARTICULAR PURPOSE ARE DISCLAIMED IN NO EVENT SHALL THE REGENTS OR CONTRIBUTORS BE LIABLE FOR ANY DIRECT INDIRECT INCIDENTAL SPECIAL EXEMPLARY OR CONSEQUENTIAL DAMAGES INCLUDING BUT NOT LIMITED TO PROCUREMENT OF SUBSTITUTE GOODS OR SERVICES LOSS OF USE DATA OR PROFITS OR BUSINESS INTERRUPTION HOWE...

Page 261: ... retain the above copyright notice this list of conditions and the following disclaimer 2 Redistributions in binary form must reproduce the above copyright notice this list of conditions and the following disclaimer in the documentation and or other materials provided with the distribution 3 The name of the company may not be used to endorse or promote products derived from this software without s...

Page 262: ...PECIAL EXEMPLARY OR CONSEQUENTIAL DAMAGES INCLUDING BUT NOT LIMITED TO PROCUREMENT OF SUBSTITUTE GOODS OR SERVICES LOSS OF USE DATA OR PROFITS OR BUSINESS INTERRUPTION HOWEVER CAUSED AND ON ANY THEORY OF LIABILITY WHETHER IN CONTRACT STRICT LIABILITY OR TORT INCLUDING NEGLIGENCE OR OTHERWISE ARISING IN ANY WAY OUT OF THE USE OF THIS SOFTWARE EVEN IF ADVISED OF THE POSSIBILITY OF SUCH DAMAGE 37 MIP...

Page 263: ...URPOSE List of WPA Supplicant License programs WPA Supplicant 0 7 3 License terms of conditions of each program which are provided by owner of the copyright to the WPA Supplicant License are as follows Copyright c 2003 2011 Jouni Malinen j w1 fi and contributors All Rights Reserved Redistribution and use in source and binary forms with or without modification are permitted provided that the follow...

Page 264: ... LA LLC SEE HTTP WWW MPEGLA COM For MPEG 4 AVC THIS PRODUCT IS LICENSED UNDER THE AVC PATENT PORTFOLIO LICENSE FOR THE PERSONAL AND NON COMMERCIAL USE OF A CONSUMER TO i ENCODE VIDEO IN COMPLIANCE WITH THE AVC STANDARD AVC VIDEO AND OR ii DECODE AVC VIDEO THAT WAS ENCODED BY A CONSUMER ENGAGED IN A PERSONAL AND NON COMMERCIAL ACTIVITY AND OR WAS OBTAINED FROM A VIDEO PROVIDER LICENSED TO PROVIDE A...

Page 265: ...n files the Software to deal in the Software without restriction including without limitation the rights to use copy modify merge publish distribute sublicense and or sell copies of the Software and to permit persons to whom the Software is furnished to do so subject to the following conditions The above copyright notice and this permission notice shall be included in all copies or substantial por...

Page 266: ...cense officially announced by the Free Software Foundation consents to the use reproduction alteration and redistribution hereafter called utilization of this software this software includes alterations likewise below without compensation 1 When this software is utilized in the form of source code the above copyright declaration these conditions of utilization and the following stipulation of no g...

Page 267: ...ware made public hereafter TINET This projector product includes the open source software program TINET which applies the terms and conditions provided by owner of the copyright to the TINET The TINET are WITHOUT ANY WARRANTY without even the implied warranty of MERCHANTABILITY AND FITNESS FOR A PARTICULAR PURPOSE List of TINET programs tinet 1 4 4 License terms of conditions of each program which...

Page 268: ...ORY OF LIABILITY WHETHER IN CONTRACT STRICT LIABILITY OR TORT INCLUDING NEGLIGENCE OR OTHERWISE ARISING IN ANY WAY OUT OF THE USE OF THIS SOFTWARE EVEN IF ADVISED OF THE POSSIBILITY OF SUCH DAMAGE 6 TINET and TOPPERS TINET TCP IP Protocol Stack Copyright C 2001 2006 by Dep of Computer Science and Engineering Tomakomai National College of Technology JAPAN TINET TCP IP Protocol Stack Copyright C 200...

Page 269: ...ages occur either directly or indirectly through the utilization of this software Parent topic Notices Copyright Notice All rights reserved No part of this publication may be reproduced stored in a retrieval system or transmitted in any form or by any means electronic mechanical photocopying recording or otherwise without the prior written permission of Seiko Epson Corporation The information cont...

Page 270: ...uct While some countries laws permit limited copying or reuse of copyrighted material in certain circumstances those circumstances may not be as broad as some people assume Contact your legal advisor for any questions regarding copyright law Parent topic Copyright Notice Copyright Attribution 2013 Epson America Inc 9 13 CPD 38863R2 Parent topic Copyright Notice 270 ...

Reviews: