background image

Getting Photos Into Your Computer  

4-3

A

B

2

Remove the card by hand, then close the card and port 
cover.

3

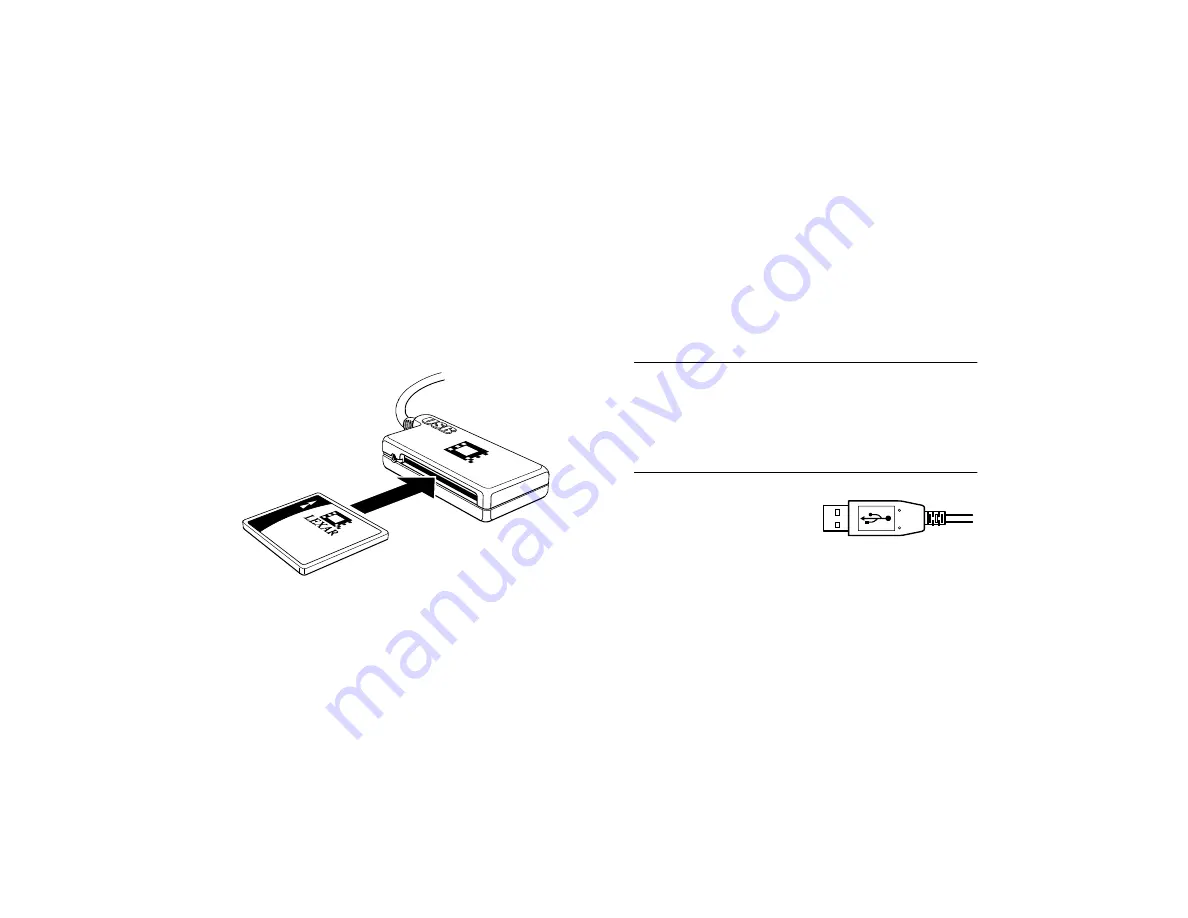
Insert the card into the slot in the cable connector with 
the label facing toward the side of the connector 
stamped “USB.” Make sure the pin holes on the card 
face into the connector slot. Push the card all the way 
into the slot.

Connecting the Jumpshot USB Cable

You can connect the USB cable to your computer’s USB 
port or USB hub while your computer is turned on or off.

1

Locate an available USB port or USB hub port on your 
computer system. See your computer documentation for 
instructions.

NOTE
If your system can’t recognize the USB CompactFlash card 
when it’s connected to a USB port on the keyboard or 
monitor of an iMac or Power Macintosh G3, or a hub port on 
any system, connect the USB cable directly to a USB port on 
your computer instead.

2

Position the JumpShot USB 
cable connector so the side 
shown here faces in the 
correct direction for your port. Then connect it to your 
computer’s USB port or USB hub port.

If you have a Windows 98 computer, see the next section for 
instructions on installing the USB CompactFlash card and 
USB cable drivers. If you have a Macintosh, see page 4-7 for 
instructions on transferring your pictures.

Summary of Contents for PhotoPC 650

Page 1: ...TV and VCR and switch to the correct video mode 5 Turn on the camera and set the LCD monitor switch to PLAYBACK The most recent picture appears on the TV screen 6 Press the or button to move through your pictures 7 To display or record your pictures as a slide show hold down either the or button until you hear two beeps then release the button The camera now scrolls through the pictures EPSON is a...

Page 2: ...ll of your images to your computer before you delete photos to safeguard against accidentally deleting the wrong photo A new CD ROM will be available that solves this problem Please contact end user technical support at 562 276 4303 in order to receive an updated disk EPSON is a registered trademark of SEIKO EPSON CORPORATION PhotoPC is a registered trademark of Epson America Inc Copyright 1999 by...

Page 3: ...A B ...

Page 4: ...tion and features described herein are subject to change without notice TRADEMARKS EPSON and EPSON Stylus are registered trademarks of SEIKO EPSON CORPORATION PhotoPC is a registered trademark and EPSON FaxAdvice is a trademark of Epson America Inc EPSON SoundAdvice is a service mark of Epson America Inc PictureWorks and HotShots are trademarks of PictureWorks Technology Inc Lexar Media is a trade...

Page 5: ...tting the USB CompactFlash Card 1 7 Installing Your PhotoPC 650 Software 1 8 Installing on a Windows PC 1 8 Installing on a Macintosh 1 8 Identifying Camera Parts 1 9 2 Taking Pictures Getting Ready to Take Pictures 2 1 Turning the Camera On and Off 2 2 Saving Battery Power with Auto Shut off 2 2 Using the Status Display Panel 2 2 Checking the Battery 2 3 Picture Taking Guidelines 2 3 Taking Pictu...

Page 6: ...er Transferring Photos with the JumpShot USB Cable 4 1 Inserting the USB CompactFlash Card in the JumpShot USB Cable 4 2 Connecting the Jumpshot USB Cable 4 3 Installing the Windows 98 USB CompactFlash Card and USB Cable Drivers 4 4 Transferring Pictures with Windows 98 4 5 Transferring Pictures with a Macintosh 4 7 Erasing Pictures 4 9 Transferring Pictures with the Serial Cable 4 9 Connecting th...

Page 7: ...ction 6 8 Printing an Individual Picture 6 8 Sizing and Printing Multiple Copies of an Individual Picture 6 9 Printing a Picture with Smart Print 6 11 Printing a Collection 6 12 Using Creative Templates 6 13 Creating a Photo Page 6 13 Modifying a Photo Page 6 15 Saving a Photo Page 6 17 Printing a Photo Page 6 18 Displaying Collection Slide Shows 6 18 7 Editing Images Making Basic Adjustments 7 2 ...

Page 8: ...ere To Get Help 9 9 Software CompactFlash Card and JumpShot USB Cable Support 9 10 A Using Optional Camera Accessories Using the Optional AC Adapter A 2 Using an Optional Tripod A 3 Using Optional Lenses A 3 Using Wide angle Lenses A 4 Using Telephoto Lenses A 5 Using Close up Lenses A 6 B Specifications Camera B 1 Physical Dimensions B 1 Safety Specifications B 1 Power Sources B 1 Environmental B...

Page 9: ...pictures on a TV or videotape them The PhotoPC 650 captures images at 1152 864 pixel resolution in 24 bit color using a 1 09 megapixel CCD sensor You can store approximately 88 pictures with the standard 8MB USB CompactFlash card and download pictures via your computer s USB port Windows 98 iMac or Power Macintosh G3 only or serial port Windows 95 98 or PowerPC Macintosh The camera s built in 37 m...

Page 10: ...feature for previewing and deleting pictures before the camera stores them Video output for playing your pictures back on a TV or for videotaping them Macro mode for close ups Built in threads for optional 37 mm lenses and filters Built in flash with red eye reduction mode Automatic shut off to save battery power Lexar Media JumpShot USB cable for transferring photos to your USB compatible Windows...

Page 11: ...ix A for details on using all the optional accessories Minimum System Requirements Make sure your system meets these minimum requirements Windows Systems IBM compatible PC with 486 66 or higher processor Pentium recommended Serial transfer Microsoft Windows 95 Windows 98 or Windows NT 4 0 and an available serial port USB transfer Windows 98 and an available USB port At least 16MB RAM 32MB recommen...

Page 12: ...s You ll get immediate attention if you have a problem with your PhotoPC 650 Safety Instructions Read these instructions and all warnings and instructions marked on your camera and batteries before using them To reduce the risk of electric shock don t remove the camera s cover or open any of the compartments except as instructed in this User s Guide To prevent fire or electric shock don t insert o...

Page 13: ...e batteries and or unplug the camera and the AC adapter and refer servicing to qualified service personnel under the following conditions if the power cord or plug is damaged if liquid has entered the camera if the camera has been dropped or its exterior has been damaged if the camera or its accessories do not operate normally or exhibit a distinct change in performance Adjust only those controls ...

Page 14: ...6 Introduction ...

Page 15: ...s chapter helps you get ready to use your new TPhotoPC 650 It covers the following Unpacking your PhotoPC 650 Installing the USB CompactFlash card Installing and using batteries Attaching the hand strap Removing the protective plastic Setting the date and time Formatting the USB CompactFlash card Installing your PhotoPC 650 software Identifying camera parts Getting Started ...

Page 16: ...our camera It s in the envelope labelled ATTENTION Installing the CompactFlash Card Follow these steps to install the USB CompactFlash card 1 Before you start make sure the camera is turned off The lens cover switch should be in the off position 2 Remove the USB CompactFlash card from the envelope labelled ATTENTION 3 Open the camera s card and port cover and insert the card all the way into the s...

Page 17: ... these steps 1 Turn the camera upside down with the front of the camera facing you 2 Push the battery cover down and to the right Then raise the cover 3 Insert all four batteries into the compartment positioning the and ends as shown 4 Close the battery cover by sliding it to the left while pressing it down until it snaps into place See the next page for important information about using your batt...

Page 18: ...ial cable you ll use more battery power so it s best to power your camera with the optional AC adapter See page A 2 for details on EPSON s optional power accessories TIP To save battery power use the camera s View mode sparingly You can still view pictures before saving them with the Quick Review feature see Chapter 2 for details Note the following as you use batteries Don t use manganese batterie...

Page 19: ...the holder on the camera then pull the strap through the loop Removing the Protective Plastic You may need to peel off protective plastic sheets from your camera s back panel the status display panel at the top of the camera and the viewfinder area on the front of the camera Setting the Date and Time Before you use the camera you need to set its clock Then the camera will automatically record the ...

Page 20: ...e clock 3 Press the SELECT button You see the clock setting display in the LCD monitor with the month setting highlighted in white 4 If necessary press the button to increase the number or the button to decrease the number until the month is correct 5 Press the SELECT button The month setting is saved and the day setting is highlighted 6 Adjust the day year hour and minute settings as described ab...

Page 21: ...the monitor switch to PLAYBACK as shown to the left 2 Press the SELECT button to display the LCD monitor menus 3 Press the or button until you see the Photo Control menu Then press the SELECT button to display the menu options as shown below 4 Press the or button until Reformat is highlighted then press the SELECT button A warning message appears 5 Press the SELECT button again to format the card ...

Page 22: ...ble click your PhotoPC 650 CD ROM icon 3 Double click the Setup exe icon The installer opens 4 Follow the instructions on the screen to install HotShots and EPSON PhotoPC 650 TWAIN Be sure to select Full Install on the Setup Options screen Installing on a Macintosh Close all open applications then follow these steps 1 Insert the EPSON CD ROM in your drive 2 Double click the PhotoPC 650 CD ROM icon...

Page 23: ...ng Camera Parts EPSON E P S O N viewfinder timer light front view shutter button flash lens lens cover on off card and port cover 37 mm threads for optional lenses bottom view tripod threads battery cover CompactFlash card eject switch ...

Page 24: ... Started LCD monitor switch status display panel viewfinder back view LCD monitor status light FUNCTION button EPSON top view shutter button image quality button status display panel flash button macro timer button ...

Page 25: ...ng you need to know about getting great shots including the following information Getting ready to take pictures Taking pictures with the viewfinder or LCD monitor Checking the picture counter Setting image quality Using macro mode to take close ups Using the flash and timer Getting Ready to Take Pictures Before you can take pictures with PhotoPC 650 you need to turn on the camera and check the st...

Page 26: ... Saving Battery Power with Auto Shut off When the LCD monitor is turned off and you wait more than 60 seconds before or after taking a picture the camera shuts off automatically to save battery power When the LCD monitor is on the camera shuts off if you wait more than 30 seconds before or after taking a picture To wake the camera after auto shut off press the SELECT or BACK button on the back of ...

Page 27: ...Taking Guidelines To take the best pictures follow these guidelines Make sure your subject and the camera aren t moving or your picture will be blurred When you auto focus your picture by pressing the shutter button halfway down position the most important subject in the center This sets the camera s focus point based on the distance from the camera to the center subject Objects in the foreground ...

Page 28: ...ject within it NOTE For best results use the LCD monitor to take macro mode pictures see page 2 10 for instructions If you use the viewfinder for macro or close up pictures you ll need to allow space around the image to compensate for any parallax shift the difference between what you see in the viewfinder and the captured image 4 Hold the shutter button halfway down to lock the auto focus You hea...

Page 29: ...s on the monitor for around 5 seconds A gauge on the image shows you the time you have left to delete the picture before it s saved To delete the picture hold down the FUNCTION button and press the BACK button If you didn t delete the image before the Quick Review gauge disappeared the image is saved when the status light stops flashing and turns green You can take another picture at this point Sa...

Page 30: ... the quality of your picture unless you turn the flash off See page 2 11 for instructions on using the flash The preview image may appear to flicker under strong fluorescent lighting When your subject is very bright a sunlit white wall for example you may see a band of washed out color in the image on the monitor This will not affect the actual image captured by the camera Follow these steps to ta...

Page 31: ...r camera saves it You can still delete the picture after it s saved The Quick Review image remains on the monitor for around 5 seconds A gauge on the image shows you the time you have left to delete the picture before it s saved To delete the picture hold down the FUNCTION button and press the BACK button If you didn t delete the image before the Quick Review gauge disappeared the image is saved w...

Page 32: ...d erase the ones you don t want to save see page 3 2 for instructions If you want to save your pictures before you erase them you need to transfer the images to your computer as described in Chapter 4 Setting Image Quality The PhotoPC 650 has four image quality resolution settings Press the image quality button on top of the camera to cycle from one setting to the other The PhotoPC 650 image quali...

Page 33: ...er for enlarging Standard Produces color images at 640 480 pixels The CompactFlash card holds approximately 88 pictures but the image size is smaller and includes less detail when enlarged You should use this setting when taking lower resolution pictures for distribution on the World Wide Web Uncompressed Produces color images at 1152 864 pixels with lossless compression The CompactFlash card hold...

Page 34: ...hing red light indicates that the camera has captured the image and is processing it CAUTION If you set the camera down while the light is still flashing make sure you handle it carefully The camera may lose your image if you set it down too hard 5 The Quick Review image appears on the LCD monitor If you don t see the image Quick Review mode may be turned off see page 3 14 to turn it on This lets ...

Page 35: ...fective within a range of 3 2 to 9 8 feet 1 to 3 m Press the flash button to cycle through the four flash settings An icon for each setting appears on the status display panel Auto The flash goes off automatically whenever it s needed for adequate lighting factory setting Use only when you re 3 2 to 9 8 feet 1 to 3 m from your subject Forced Flash The flash goes off with every picture you take Use...

Page 36: ...shing About 2 seconds before the camera takes the picture the red timer light flashes The camera beeps when the image is captured and the status light flashes red 5 The Quick Review image appears on the LCD monitor on the back of the camera to let you see how your picture will turn out and let you delete the picture if necessary before your camera saves it If you don t see the image Quick Review m...

Page 37: ... a television just as easily as on the camera s monitor This chapter explains the following Using playback mode menus Playing back pictures one by one Playing back multiple pictures Playing pictures as a slide show Turning off picture information Erasing and locking pictures Playing back pictures on a TV Changing the camera settings Setting the language of the playback mode menus Playing Back Pict...

Page 38: ...e SELECT button Blue menu icons appear at the top of the monitor with the currently selected menu highlighted in green 4 Press the and buttons to view the settings for other menus You can choose from the following menus Settings set the date time beep and Quick Review mode and LCD brightness See page 3 12 for more information Information turn off the display of information on played back pictures ...

Page 39: ... 5 To exit the menus press the BACK button until the menu icons and settings disappear Depending on the menu you may have to press this button several times to return to playback mode 6 When you re finished with playback mode slide the monitor switch OFF Playing Back Pictures One by One When you set the monitor switch to PLAYBACK you see the last picture you took on the LCD monitor along with the ...

Page 40: ...press the BACK button to exit the menus Thumbnail images of the last photos you took up to 9 of them appear on the LCD monitor with the currently selected image framed in white as shown on the right 4 Press the and buttons to move the white selection frame through the images on the LCD monitor When the frame reaches the first or last photo of the current group the previous or next group of up to n...

Page 41: ...button The pause icon appears next to the picture count on the monitor Press SELECT again to resume the slide show 4 To stop the slide show press the BACK button Press BACK again to return to playback mode Turning Off Picture Information The LCD monitor displays the image quality setting of each picture along with picture number information You can turn off the information display if you want Make...

Page 42: ...ed Picture Make sure the monitor switch is set to PLAYBACK and the image you want to erase is displayed Then follow these steps 1 Hold down the FUNCTION button and press the BACK button You see the following message on the LCD monitor 2 Press the SELECT button to erase the picture The monitor returns to playback mode NOTE If you try to erase a locked photo you see a warning message Press any butto...

Page 43: ...f you chose Erase All press the SELECT button A message appears asking you to confirm that you want to erase all the photos Press the SELECT button to erase the photos or press the BACK button to return to the Erase Photos menu without erasing the photos If you chose Select Photo continue with step 5 5 Press the SELECT button then press the or button to move the white selection box to the photo yo...

Page 44: ...rased You can lock selected photos or all the photos in the camera Make sure the monitor switch is set to PLAYBACK then follow these steps to lock pictures 1 Press the SELECT button to display the LCD monitor menus 2 Press the or button until you see the Photo Control menu then press the SELECT button to display the menu options 3 Press the button until Lock is highlighted then press the SELECT bu...

Page 45: ...ou want to lock press the BACK button The following message appears 8 Press the SELECT button to lock the images 9 Press BACK until you return to playback mode Unlocking Photos After you have locked your pictures you can unlock selected photos or all the photos in the camera Make sure the monitor switch is set to PLAYBACK then follow these steps to unlock pictures 1 Press the SELECT button to disp...

Page 46: ...ove through the images in the camera until the photo you want to unlock appears on the monitor 6 Press the SELECT button The lock icon disappears from the monitor If you want to unlock other photos at the same time use the or button to display them then press the SELECT button to select them NOTE To cancel the selection of a photo press the SELECT button again 7 When you have selected all the phot...

Page 47: ...LECT button to select the video standard you want to use 4 Press the BACK button to return to playback mode Playing Back Pictures Using the optional AC adapter is highly recommended when you play back your pictures on a TV See pages A 1 and A 2 for instructions and ordering information TIP You can videotape your pictures to share them without using a computer First set the camera s LCD monitor to ...

Page 48: ... press the BACK button slide the LCD monitor switch to OFF turn off the camera and disconnect the video cable Changing Camera Settings The Settings menu lets you change these camera settings Current date and time Alert beep on or off Quick Review mode setting on default or off Brightness of the LCD on the back of the camera Setting the Date and Time If you ever want to change the camera s clock se...

Page 49: ...back mode NOTE You need to reset the time and date whenever you replace the camera s batteries In this case you change the settings through the Clock Setting menu See page 1 5 for instructions Setting the Alert Beep The camera s alert beep lets you know when an image has been captured Set the monitor switch to PLAYBACK then follow these steps to turn the beep on or off 1 Press the SELECT button to...

Page 50: ...de setting is displayed 3 Press the SELECT button once to open the settings menu then press button twice to select the Quick Review mode icon 4 Press the SELECT button to select On or Off The current selection is highlighted 5 If you re finished changing settings press the BACK button until you return to playback mode Setting the LCD Monitor Brightness You may want to adjust the LCD monitor bright...

Page 51: ...nglish Español Spanish Portuguese Français French Deutsch German Italiano Italian Set the monitor switch to PLAYBACK and follow these steps to select a language 1 Press the SELECT button to display the LCD monitor menus 2 Press the or button until you see the Language menu 3 Press the SELECT button to open the Language menu 4 Press the or button until the language you want to use is highlighted Th...

Page 52: ...3 16 Playing Back Pictures ...

Page 53: ... the USB CompactFlash card from your camera insert it in the JumpShot USB cable and transfer pictures directly from the card See the next section for instructions 4 If you don t have compatible USB support on your system you can transfer your pictures by connecting the serial cable and using HotShots See page 4 9 for instructions Transferring Photos with the JumpShot USB Cable The fastest way to t...

Page 54: ...ctFlash Card in the JumpShot USB Cable Follow these CompactFlash card and USB cable precautions Insert only a Lexar Media USB CompactFlash card in the JumpShot USB cable You can identify the USB card by the USB logo on the label The JumpShot USB cable won t recognize any other type of CompactFlash card Never insert any other object into the slot on the USB cable you ll damage the cable components ...

Page 55: ...rt on your computer system See your computer documentation for instructions NOTE If your system can t recognize the USB CompactFlash card when it s connected to a USB port on the keyboard or monitor of an iMac or Power Macintosh G3 or a hub port on any system connect the USB cable directly to a USB port on your computer instead 2 Position the JumpShot USB cable connector so the side shown here fac...

Page 56: ...USB CompactFlash card is inserted into the JumpShot USB cable and that the cable is connected to your computer 2 Turn on your computer if it isn t already turned on During plug and play installation the light on the cable turns on If it doesn t turn on see page 9 4 for troubleshooting steps 3 You see the Add New Hardware Wizard that tells you Windows 98 has detected new hardware on your system Cli...

Page 57: ...at the next screen To check if your driver installation was successful do the following 1 Click Start point to Settings and click Control Panel 2 Double click the System icon 3 Click the Device Manager tab 4 Click the next to Universal serial bus controller in the device list You should see LexarMedia JumpShot listed as a USB device Transferring Pictures with Windows 98 Follow these steps to trans...

Page 58: ...n your hard disk 6 To copy all the pictures in the camera at once click the Photo650 folder hold down the mouse button and drag it to the picture folder on your hard disk Release the mouse button To copy individual pictures click the Photo650 folder to open it Then click the picture in the folder To copy multiple pictures press either the Shift or Ctrl key as you click the pictures you want Then h...

Page 59: ...SB CompactFlash card the computer no longer recognizes it as a drive TIP If you re using the JumpShot USB cable to transfer pictures it s a good idea to check Lexar Media s web site periodically for possible updates to your USB CompactFlash card and JumpShot USB cable drivers Access www lexarmedia com for details Transferring Pictures with a Macintosh Follow these steps to transfer your pictures v...

Page 60: ... Properly Ejecting the Card When you ve finished transferring pictures close the Photo650 and card folders and exit any open applications Then drag the card icon into the Trash folder Always drag the card icon into the trash before removing the card don t use the Eject command from the Special menu Pull the CompactFlash card out of the USB cable slot and install it back in your camera See page 1 2...

Page 61: ...serial cable and HotShots Connecting the camera to a Windows PC or Macintosh Transferring pictures using HotShots NOTE When the camera is connected to your system you can t use any of the camera controls To save battery power you can leave the camera turned off as you transfer the pictures or connect the optional AC adapter as described in Appendix A Connecting the Camera to a Windows PC Make sure...

Page 62: ... serial board you may be able to transfer pictures at 230 4Kb per second See page 4 23 for instructions on changing your Port speed setting with EPSON PhotoPC 650 TWAIN Connecting the Camera to a Macintosh Make sure you have the long serial cable and short Macintosh adapter that came with your camera Before you start turn off the camera LCD monitor and Macintosh NOTE On a PowerPC Macintosh you may...

Page 63: ...the long serial cable to the short Macintosh adapter cable then tighten the screws 3 Open the card and port cover on the side of the camera and insert the connector on the long serial cable into the camera s serial port 4 Turn on your Macintosh system Transferring Pictures Using HotShots To transfer your pictures via the serial cable using HotShots and the EPSON PhotoPC 650 TWAIN Windows or Plug I...

Page 64: ...mera 4 Click the arrow in the Select Camera menu Then click EPSON PhotoPC 650 TWAIN Windows or EPSON PhotoPC 650 Macintosh 5 Click the Get Pictures Now button You see the Get Pictures window 6 Click the Open Them button NOTE If you select Add to New Collection or Add to Existing Collection you may see a dialog box allowing you to change the transfer file format It s best to keep your files in the ...

Page 65: ...re ready to select the pictures you want to transfer see page 4 14 Changing the Picture Transfer Speed If the current transfer speed displayed on the Camera Content tab is 57600 or lower you can change it to speed up the transfer Follow these steps 1 Click the Setup tab You see the Setup screen 2 Click the arrow in the Speed setting list to open it Then select 115200 for Windows or 230400 for Maci...

Page 66: ...ows or the J key Macintosh and click multiple pictures Click the Select All button to select all of them Your selected pictures are outlined in red NOTE To permanently erase a picture from your camera select it and click Erase then confirm the erasure Once you ve selected pictures you re ready to transfer them to your camera See the next section Transferring Pictures From the Camera to Your Comput...

Page 67: ... See page 4 16 for instructions NOTE If your camera shuts off automatically while you re transferring pictures to save battery power click the Open Camera button on the TWAIN or Plug In window to wake it up Saving Pictures to a Folder 1 To save your pictures to a folder on your hard disk click the Save to Folder button You see one of these dialog boxes 2 Select the folder you want to save your pic...

Page 68: ... windows and return to HotShots You ll need to open your pictures from disk to use them in your image editing application To open them in HotShots see Chapter 6 for instructions To import them with another application see Chapter 5 Transferring Pictures into HotShots 1 To transfer your pictures into HotShots click the Transfer button If you selected Open Them in step 6 on page 4 12 HotShots automa...

Page 69: ... open the Edit menu and select Preferences Acquire Bring Pictures Into and choose a specific transfer method You can also select other transfer preferences this way See HotShots help utility for details Getting Images Into Other TWAIN or Plug In Applications If you use Adobe Photoshop or other TWAIN compliant or Plug In compatible applications you can transfer your pictures directly into your prog...

Page 70: ... your application s Plug In folder Then click and drag the Plug In alias from your desktop to the folder Opening EPSON PhotoPC 650 TWAIN or Plug In 1 Connect the camera to your computer using the serial cable see page 4 9 for instructions 2 Start your application 3 Windows From the File menu choose Import then Select TWAIN_32 Source or Acquire then TWAIN Select Source Go to step 4 Macintosh From t...

Page 71: ...select a faster transfer speed When you re ready to select the pictures you want to transfer see page 4 20 Changing the Picture Transfer Speed If the current transfer speed displayed on the Camera Content tab is 57600 or lower you can change it to speed up the transfer Follow these steps 1 Click the Setup tab You see the Setup screen 2 Click the arrow in the Speed setting list to open it Then sele...

Page 72: ...ows or the J key Macintosh and click multiple pictures Click the Select All button to select all of them Your selected pictures are outlined in red NOTE To permanently erase a picture from your camera select it and click Erase then confirm the erasure Once you ve selected pictures you re ready to transfer them to your camera See the next section Transferring Pictures From the Camera to Your Comput...

Page 73: ...disk See page 4 22 for instructions NOTE If your camera shuts off automatically while you re transferring pictures to save battery power click the Open Camera button on the TWAIN or Plug In window to wake it up Saving Pictures to a Folder 1 To save your pictures to a folder on your hard disk click the Save to Folder button You see one of these dialog boxes 2 Select the folder you want to save your...

Page 74: ...k to use them in your image editing application To open them in HotShots see Chapter 6 for instructions To import them with another application see Chapter 5 Transferring Pictures Into Your Application 1 To transfer pictures into your application click the Transfer button The pictures are automatically transferred into your computer s memory opened in individual windows in your application and num...

Page 75: ...ck the Open Camera button on the Camera Content tab If you still don t see your pictures and the error message appears again continue with step 2 2 Click the Setup tab on the window and make sure the Port option is set to either Auto Detect Windows or Auto Macintosh For best results try setting the Speed to 115200 Windows or 230400 Macintosh 3 Click the Camera Content tab then click Open Camera ag...

Page 76: ...wer wake it by turning it off and on again 6 Click Open Camera again If you still don t see your pictures and the error message appears again continue with step 7 7 Close the EPSON PhotoPC 650 TWAIN or Plug In window and try transferring your pictures again If you still don t see your pictures and the error message appears again see Chapter 9 for more troubleshooting tips ...

Page 77: ...cordianlike ribbing and prominent spines comprise this group of Mexican and Southwestern U S natives They vary in size and shape but all are easy to grow and can reach 10 ft tall and wide Spring and summer flowers bloom in pink or yellow in a circle at the plant s crown Don t plant where children are present Focus on Echinocatus This print sample was created using actual 1024x768 pixel images take...

Page 78: ...hese steps to import a picture into your document 1 Start your word processor or other application 2 Open the document in which you want to use the picture 3 Select the point where you want to place your picture 4 Select Picture from the Insert menu then select From File In some applications you may need to select different commands such as Import Picture which are usually in the File menu A file ...

Page 79: ... menu 4 Start your word processor or other application 5 Open the document in which you want to use the picture 6 Select the point where you want to place the picture 7 Choose Paste or Paste Special from the Edit menu A copy of the picture appears in your document Using Drag and Drop From a Collection Once you have organized your pictures into HotShots collections you can easily drag and drop them...

Page 80: ...ord processor or other application 6 Open the document in which you want to use the picture Arrange the window for HotShots so it is next to the window for your application 7 Click the image you want to copy from the HotShots collection 8 While holding down the mouse button drag the image to the location where you want it in your document 9 Release the mouse button The picture appears in your proj...

Page 81: ... collections Saving modified pictures Organizing pictures in collections Printing pictures and collections Using Photo Page layouts Displaying collections as slide shows Working with Photos and Collections Action Travel Inc Action Travel Inc Action Travel Inc Action Travel Inc 1357 World Drive Torrance CA 90509 Escape On An Affordable Outdoor Adventure Great Summer Weekend Specials Sailing Expedit...

Page 82: ...ghtness and contrast until you can clearly see the 0 and 10 then close the picture Opening an Individual Picture Follow these steps to open a picture that s not in a collection 1 Click the Get button on the remote control 2 Select Get from Disk and click the Open a Picture button You can also select Open Picture from the File menu 3 You see the Open dialog box Open the folder where you saved the p...

Page 83: ...es or not If you choose Yes your picture is saved with the same name automatically If you choose No your changes aren t saved Using Collections HotShots collections provide a convenient way to access and view your pictures Here are some of the things you can do with collections Add or delete pictures in collections Move or copy pictures from one collection to another Rename pictures and collection...

Page 84: ...ck the pictures Then click the Delete button You see a confirmation message click Yes Organizing Pictures in Collections You can easily drag and drop images between HotShots collections to organize them in any way you want Follow these steps to copy pictures from one collection to another 1 Follow the steps on page 6 2 to open the collection where the pictures are located Then open the collection ...

Page 85: ...2 Select Save As from the File menu You see the Save As dialog box 3 Select a location to store your renamed file Then type in the new name and click Save You see the JPEG Options dialog box 4 Click OK The new name appears above the picture in a window or below the picture in a collection Adding Collection Information To quickly add a text and or recorded description to your entire collection foll...

Page 86: ...llections to make it easy to find them by criteria such as subject keywords or description Follow these steps 1 Open your collection as described on page 6 2 2 Select the picture or pictures you want to add information to 3 To quickly add a keyword to multiple pictures click the Add to Keywords button Type a keyword in the field on the Add Keyword dialog box and click OK To add multiple informatio...

Page 87: ...ction To find a picture or set of pictures in a collection you can search for them by a variety of identification criteria Follow these steps to search in a collection 1 Open your collection as described on page 6 2 2 Click the Find button on the taskbar You see the Find in Collection dialog box 3 Select the search criteria you want to use in the Find Where fields as described in the following tab...

Page 88: ...tire collection of pictures and include descriptive information about them if you like Printing an Individual Picture To print an individual picture at the size of your paper first open the picture you want to print see page 6 2 for instructions Printing with Windows 1 Select Printer Setup from the File menu Make sure your printer is selected and click the Properties button 2 Select the print sett...

Page 89: ...elect the number of copies of your picture you want printed on one page 1 per page prints a single copy of your picture If the picture s proportions are different than the size you selected in step 3 it is sized to fit on the paper size you select in step 5 with its initial proportions Fill Page prints multiple copies of the picture at the size you select in step 5 filling the printable area on th...

Page 90: ...acintosh Select Page Setup at the bottom of the Share menu on the remote control You can also select Page Setup from the File menu Select some of the print settings for your printer making sure to select the correct paper size setting See your printer manual for instructions Select Print It Now from the bottom of the Share menu You see the Print dialog box Select the rest of your print settings Th...

Page 91: ...ed picture Follow these steps to print with Smart Print 1 Open the picture you want to print see page 6 2 for instructions 2 Click Share on the remote control to open the Share menu Then select Print Pictures from the menu 3 Select Smart Print from the bottom of the Share menu on the remote control You can also select Smart Print from the File menu You see the Smart Print dialog box Nine Smart Pri...

Page 92: ...rinting Multiple Copies of an Individual Picture on page 6 9 to print your picture using the new Smart Print setting The Smart Print setting you choose applies to any subsequent pictures you print To change the setting repeat the steps in this section NOTE The results you get with Smart Print depend on your current printer driver settings see your printer manual for details Printing a Collection F...

Page 93: ...rn to the Print dialog box click OK to print your collection Macintosh Select Page Setup from the File menu Select some of the print settings for your printer making sure to select the correct paper size setting See your printer manual for instructions Then click the Print button You see the Print dialog box Select the rest of your print settings then click Print to print your collection Using Cre...

Page 94: ...or the category appear in the list below the category 4 To view the Photo Page choices click the up or down arrow in the list When you find the Photo Page you want click it A Photo Page window opens 5 Arrange the Photo Page window and your picture or collection window so you can see them both Share button Make Photo Page option template categories Photo Page list import or drag pictures into these...

Page 95: ...rom disk double click a picture import area in the Photo Page template and select the file from the Open dialog box Your imported picture appears in the Photo Page 7 To import another photo in a different area of your template repeat step 6 To delete a picture you imported select Undo from the Edit menu 8 Now follow the steps in the next few sections to modify your Photo Page then save it and prin...

Page 96: ...e 10 with each mouse click Click the Pan tool then click and drag the picture to reposition it 4 To add text to the Photo Page click the Text tool Then click and drag the mouse over the area where you want to place a text box and type your text in the box 5 Now click on the text box border the border becomes striped with control boxes in each corner To resize or reposition your text box click and ...

Page 97: ...Photo Page format SSD so you can edit the Photo Page later if you need to Follow these steps to save a Photo Page 1 Select Save As from the File menu You see the Save As dialog box 2 Select the location where you want to store your Photo Page then select the file type in the Save as type list NOTE If you select a file type other than the Photo Page format SSD the picture text and template will be ...

Page 98: ...t some of the print settings for your printer making sure to select the correct paper size setting See your printer manual for instructions 2 Select Print from the File menu You see the Print dialog box Select the rest of your print settings then click Print to print your picture Displaying Collection Slide Shows You can display each photo in your collection on your full monitor screen one at a ti...

Page 99: ...escription Random Transitions Windows Random Macintosh Randomly uses all of the other transition types between pictures Wipe Down Replaces pictures by rolling down over them like a window shade being pulled down Wipe Up Replaces pictures by rolling up over them like a window shade being raised Wipe Left Replaces pictures by rolling left across them Wipe Right Replaces pictures by rolling right acr...

Page 100: ...6 20 Working with Photos and Collections ...

Page 101: ...matic image adjustment SmartPix for automatically optimizing images based on how they were captured camera scanner Internet etc and the lighting conditions of the photo Fix By Example for changing a variety of image characteristics using on screen before and after examples Special Effects for applying an assortment of fun and creative effects to your photos Editing Images W C FRUIT FARM W C FRUIT ...

Page 102: ...vertically 1 Open the picture you want to edit See page 6 2 for instructions 2 Point to Flip in the Image menu You see a submenu with Horizontal and Vertical options click the direction you want to flip the picture The picture in the window changes to reflect your selection If you change your mind about the edit select Undo from the Edit menu 3 To save your edited picture see page 6 3 for instruct...

Page 103: ...ate in the Image menu You see a submenu with these options 90 Degrees Counter Clockwise 90 Degrees Clockwise 180 Degrees Click the direction you want to rotate the picture The picture in the window changes to reflect your selection You may need to resize the picture window to see the entire image If you change your mind about the edit select Undo from the Edit menu 3 To save your edited picture se...

Page 104: ...ntimeters 4 Enter a new width and height for the picture To preserve the width and height proportions of your original picture leave the Preserve Aspect Ratio checkbox checked To change the picture s proportions to the width and height you specify click the checkbox to uncheck it this may distort your picture 5 Click OK The picture in the window changes to reflect your selection You may need to re...

Page 105: ... is displayed on top in pixels per inch To change the measurement units click the Units drop down menu and select inches or cm centimeters 4 Enter higher numbers in the Horizontal and Vertical field to increase the resolution or lower numbers to decrease it 5 To change the resolution equally both horizontally and vertically leave the Uniform Resolution checkbox checked You then need to enter a new...

Page 106: ...mage to see the changes more clearly click Zoom In from the Image menu If you change your mind about the edit select Undo from the Edit menu 4 To save your edited picture see page 6 3 for instructions Be sure to give your picture a new name if you want to save the original picture as it was Optimizing Pictures with SmartPix HotShot s SmartPix feature lets you optimize your image quality based on t...

Page 107: ... area is too small or you want to see a different example area click and drag the example area selector to choose a new area Drag the edges of the selector to enlarge the area drag the middle of the selector to reposition it 5 Click the arrow in the device drop down list and select the type of device used to capture your photo Camera Internet Scanner or Other Device Enhance button SmartPix option ...

Page 108: ...results click Cancel Changes at the bottom of the remote control To keep your changes and return to the main HotShots window click Done You can still cancel your SmartPix changes by selecting Undo from the Edit menu 10 To save your edited picture see page 6 3 for instructions Be sure to give your picture a new name if you want to save the original picture as it was Enhancing Pictures with Fix By E...

Page 109: ...nt of variation shown in the examples slide the variation slider in the remote control to the right or left 6 Click the example that looks best to you that example moves to the center and the surrounding examples adjust to reflect less or more correction proportionately Click an example as many times as you wish to get the results you want To undo the change you made click Reset on the remote cont...

Page 110: ...softened like an oil painting Water Color Image is brushed softly like a watercolor painting Puzzle Image is overlaid with a puzzle pattern Cool Edges Image color boundaries are traced for a vibrant neon effect Under Glass Image pixels are scattered like looking through textured glass Emboss Image tone is evened and pressed in resulting in a stamped effect Motion Blur Image is blurred to simulate ...

Page 111: ...o reposition it 5 To adjust the amount of variation shown in the examples slide the variation slider in the remote control to the right or left if available To select a different effect click its button use the arrows to view all the effect buttons 6 Click the example that has the type or level of effect you want that example is shown as the new With Changes and Zoomed Changes example The example ...

Page 112: ...ect common photographic flaws such as red eye and dust specks To add a special message to your pictures you can add text Follow these steps to use the Enhancement tools 1 Open the picture you want to edit See page 6 2 for instructions 2 Click the Enhance button on the remote control to open the Enhance menu 3 Click Tools You see an assortment of enhancement tools and tool options The tool options ...

Page 113: ...s you zoom To enlarge your window click and drag the edges as necessary Selecting an Enhancement Area You can use the shape selection tools to select a portion of your picture for enhancement or select the entire picture If you need to delete a selection area choose Select None from the Edit menu or press the Esc key on your keyboard Select All Choose Select All from the Edit menu to select the en...

Page 114: ...polygon tool option to select the lasso shape you want 2 Use the Feathering slider to smooth or harden the edges of selection area 3 Move the cursor to the area in your picture where you want to begin drawing the shape the cursor is a lasso for freehand tool or pointed arrow for polygon tool To draw a freehand shape click and drag the mouse over the picture in any shape you wish then release the b...

Page 115: ...ive pixels The middle setting is usually the best but you can choose higher settings for increased sensitivity or lower settings for decreased sensitivity 2 Use the Feathering slider to smooth or harden the edges of selection area 3 Move the cursor to the area in your picture on which you want to change the relative pixels the cursor is a magic wand Aim the upper tip of the wand on the spot you wa...

Page 116: ... color by sampling one from your image Click the Eyedropper tool Then move the cursor to the area in your picture containing the color you want to use the cursor changes to an eyedropper Click to select the color The foreground box of the Foreground Background tool changes to that color Cropping an Image If you want to save only part of your image you can crop out the portion you don t want Croppi...

Page 117: ... undo a crop select Undo from the Edit menu Using Paint and Drawing Tools You can customize your pictures using HotShots versatile painting and drawing tools To delete any changes you make with these tools select Undo from the Edit menu You can repeatedly select Undo to reverse multiple edits or select Redo to replace the changes you undid To delete all the changes made since you last saved the pi...

Page 118: ...re where you want to begin painting the cursor is a spray can Aim the top of the can on the place you want to start then click and drag the mouse to paint your design Fill Selection The Fill tool lets you paint solid portions of your image as if you d poured paint on them There are two types of Fill tools Fill Selection below and Fill Color Match see the next section Fill Selection lets you fill i...

Page 119: ... color for your fill as described on page 7 15 4 Move the cursor to the area in your picture on which you want to fill the relative pixels the cursor is a paint bucket Click the mouse button HotShots automatically creates a fill of the relative pixels Smudge The Smudge tool lets you blur the distinction of colors in an image area to remove blemishes blend colors and smooth harsh lines Click the Sm...

Page 120: ... then follow these steps 1 Choose the line weight solidity and transparency of the clone stroke with the line attribute options Select the weight of line from either the diffused line or solid line row Adjust the transparency slider to the left more transparent for a more faded cloned image or to the right less transparent for an exact clone 2 Move the cursor to the area in your picture you want t...

Page 121: ... color click the Line tool Then follow these steps 1 Choose the width of the line you want to draw in pixels by entering a number from 1 to 9 in the Stroke Size tool option Stroke Size 1 is one pixel wide and Stroke Size 9 is 15 pixels wide 2 Select a color for your line as described on page 7 15 3 Move the cursor to the area in your picture where you want to begin drawing the line the cursor is a...

Page 122: ...l type you chose in step 2 select a foreground and background color as necessary for your shape as described on page 7 15 5 Move the cursor to the area in your picture where you want to begin drawing the shape the cursor is a crosshair For a circle oval square rectangle or equilateral polygon click and drag the mouse to draw the shape For a freeform polygon click and release the mouse button then ...

Page 123: ...ture you want to correct the cursor is a paintbrush with an eye over it Click and release the mouse button on each affected pixel to change it from red to black NOTE If the red eye effect encompasses a large area of the eye you may want to use the Paint Brush tool to replace the original eye color instead of correcting it to black with the Red Eye Reduction tool See page 7 17 for instructions on u...

Page 124: ... each corner 3 To format all the text in the box click any of the text options you want to use To select a text color see the instructions on page 7 15 4 You can resize or reposition your text box by clicking and dragging the striped border To edit the text click inside the text box where you want the cursor positioned and add or delete text To delete a text box select it and press the Delete key ...

Page 125: ...acement JumpShot USB cable or additional USB Enabled CompactFlash cards contact Lexar Media at 800 789 9418 8 If you transfer pictures via the serial cable you can purchase either USB enabled or ATA compatible cards for your camera If your computer has a Type II PCMCIA card slot you can also transfer your pictures using an optional PCMCIA CompactFlash card adapter as described in this chapter Comp...

Page 126: ...pactFlash card follow the instructions beginning on page 8 3 Removing a CompactFlash Card CAUTION Never remove the card while the camera is accessing it Data in the card will likely be lost or damaged Avoid using or storing the card in direct sunlight or in dusty hot or humid places 1 Make sure the camera and the LCD monitor are turned off 2 Open the card and port cover on the side of the camera T...

Page 127: ...appears asking you to confirm the erasure of data 5 Press the SELECT button again to format the card and return to the Photo Control menu 6 Press BACK until you return to normal playback mode NOTE If you have problems formatting or using a CompactFlash card contact the manufacturer for technical support See page 9 10 for instructions on contacting Lexar Media For SanDisk cards call 408 542 0400 Tr...

Page 128: ...pe II PCMCIA slot 4 Once the adapter and card are installed in your computer s PCMCIA slot you can transfer photos by simply copying them to your hard drive The image files are stored in the Photo650 folder on the card In Windows use My Computer or the Windows Explorer to drag and drop image files to your hard drive See your Windows documentation for instructions On a Macintosh use the Finder to d...

Page 129: ... read the safety instructions in the Introduction Then follow the guidelines here 9 Cleaning the Camera Use a clean dry cloth to wipe the camera free of dust Don t use harsh or abrasive cleaners Don t use liquid or aerosol cleaners To clean the lens first blow off any loose dust or dirt Then breathe on the lens and wipe off all moisture with a soft lint free cloth or lens cleaning tissue To avoid ...

Page 130: ... fields Solving Camera Problems Check for your problem and possible solutions on the following pages The camera has no power Make sure the lens cover is open all the way The camera may have shut off automatically Press the SELECT or BACK button on the back of the camera or close and open the lens cover to turn the power back on Check the batteries and make sure they are installed correctly and tha...

Page 131: ...of your picture unless you turn the flash off Make sure you use a flash mode see page 2 11 Nothing appears on the LCD monitor If you re using View mode make sure the power is on Check your batteries and make sure they are installed correctly Replace the batteries if necessary The image on the monitor is too dark or light Adjust the brightness of the monitor using the Settings menu See page 3 14 fo...

Page 132: ...Flash card try the following 1 Make sure you installed the USB card and cable drivers as described in Chapter 1 Macintosh or Chapter 4 Windows 98 2 Try disconnecting and then reconnecting the USB cable while the card is inserted 3 Make sure the card is fully inserted into its slot in the USB cable Also make sure the card is a Lexar Media USB CompactFlash card you can t use any other type of card w...

Page 133: ...ure you don t run too many applications at the same time You may need to add memory to your system or use another method of getting photos into your documents Your application may not support drag and drop You are unable to copy and paste or import your photo into a document on your Macintosh Try increasing your virtual memory using the Memory Control Panel Also increase the memory allocation for ...

Page 134: ...heck Lexar Media s web site periodically for possible updates to your USB CompactFlash card and JumpShot USB cable drivers Access www lexarmedia com for details Your notebook computer can t access an ATA compatible CompactFlash card inserted with a PCMCIA adapter If you re using an IBM Thinkpad call IBM for technical support or follow these steps to download and install an updated driver from IBM ...

Page 135: ...ry importing them into your documents instead The colors in your picture have a yellow or green color cast When you take pictures under certain artificial lighting conditions such as fluorescent incandescent or halogen lighting the colors in your image may take on a yellow or green cast You can use HotShots to touch up the colors see Chapter 7 for instructions Your picture is blurry or out of focu...

Page 136: ...d to shoot your picture from a different angle Use HotShots to adjust the picture s brightness as described in Chapter 7 Part of your picture is missing Make sure you re not blocking the lens with your finger hand strap clothing or other object A horizontal or vertical red line appears on your picture Red lines are caused by glare Avoid photographing shiny surfaces that reflect excessive amounts o...

Page 137: ...873 7766 for dealer referral Electronic support services Service Access World Wide Web From the Internet you can reach EPSON s Home Page at http www epson com EPSON Internet FTP Site If you have Internet FTP capability use your Web browser or other software for FTP downloading to log onto ftp epson com with the user name anonymous and your e mail address as the password EPSON Forum on CompuServe M...

Page 138: ...e technical support via World Wide Web e mail and phone After 30 days web and e mail support is available NOTE If you wish to install HotShots and or the EPSON PhotoPC 650 TWAIN or Plug In driver on multiple computers please contact PictureWorks as described above for licensing requirements Service Access World Wide Web Visit www lexarmedia com for answers to frequently asked questions and for pos...

Page 139: ...rgeable batteries and 110V charger B818051 Replacement or additional NiMH rechargeable batteries for the NiMH Power Pak B818061 A To increase your camera s picture storage capacity and add flexibility you can use larger capacity CompactFlash cards and PCMCIA adapters if necessary For information on using CompactFlash cards see Chapter 8 Additionally you can expand the capabilities of your camera b...

Page 140: ... designed for the PhotoPC 650 Using any other adapter may cause fire electrical shock or injury Do not alter the plug on the power cable and do not use the adapter for any other purpose than powering your PhotoPC 650 To ensure the best performance make sure the AC adapter is fully plugged into the camera Follow these steps to connect the AC adapter 1 To avoid losing any images or settings make sur...

Page 141: ... on your camera let you attach wide angle telephoto and other types of 37 mm video camcorder lenses and filters The following table shows the minimum distance from the subject the diagonal angle of view and the millimeter equivalents for wide angle close up and telephoto lenses from Tiffen NOTE For the best results use lenses that screw directly onto the camera not the type that clip on with tabs ...

Page 142: ... when you re finished using them Using Wide angle Lenses Wide angle lenses let you capture a larger area in your pictures even when you can t move further away from the subject Group shots room interiors houses or buildings with surrounding landscape and accident scenes are some common applications for wide angle lenses Before you start turn on the camera and set the LCD monitor switch to VIEW The...

Page 143: ...angle lens First screw the filter or close up lens onto the camera then attach the wide angle lens Using Telephoto Lenses A telephoto lens lets you capture details in the distance even when you can t get closer to your subject The subject in your picture appears approximately 25 larger than without the lens Common uses for telephoto lenses include portraits architectural details and surveillance T...

Page 144: ...hoto lens First screw the filter or close up lens onto the camera then attach the telephoto lens Using Close up Lenses Although the macro mode on your camera lets you take pictures from as close as 5 9 inches you can use optional lenses to get even closer For example a 10 diopter lens lets you shoot from 1 5 inches as shown in the table on page A 3 To use a close up lens first turn on the camera a...

Page 145: ...tion of Conformity on file B Power Sources Environmental Includes 4 AA alkaline batteries Also accepts lithium or rechargeable NiCad or NiMH batteries Optional AC adapter B867038 Optional rechargeable NiMH Power Pak with charger and four batteries universal voltage B818172 or 110 V B818051 Temperature Operating 32 to 104 F 0 to 40 C Storage 4 to 140 F 20 to 60 C Humidity non condensing Operating 3...

Page 146: ... RCA type to camera RS 232 9 pin to Windows computer 8 pin mini DIN to Macintosh Serial communication speed Up to 115 2Kbps Windows or 230 4Kbps Macintosh with high speed serial port Storage type ATA compatible CompactFlash cards USB or non USB 8MB USB CompactFlash card standard described below USB CompactFlash card 8MB flash memory Average picture storage capacity Standard 88 640 480 pixels Fine ...

Page 147: ...or LCD 280 220 resolution 15 to 18 frames per second refresh rate instant preview and playback modes Sensitivity Equivalent to ISO 140 Exposure control Program auto exposure White balance Full automatic TTL white balance through lens Shutter Electromechanical shutter 1 4 second to 1 500 second speed Viewfinder Virtual with edge border 80 accuracy Aperture f2 f4 f5 6 f11 Flash modes Automatic force...

Page 148: ...c or Power Macintosh G3 LED indicator Steady green when USB CompactFlash card is recognized flashing green during data transfer Connector dimensions Length 3 inches 76 mm Width 1 5 inches 38 mm Height 0 7 inch 17 5 mm Cable length 2 5 feet 0 8 meters Width 1 97 inches 50 mm Height 1 18 inches 30 mm 1 85 inches 47 mm including pins Depth 3 74 inches 95 mm Output DC 7V 2 0A Input 110 to 120 V AC 50 ...

Page 149: ... specifications B 1 storing 9 2 using 1 4 to 1 5 Battery icon 2 3 Beep setting 3 12 to 3 13 Brightness setting LCD 3 12 3 14 to 3 15 Brightness adjusting image 7 8 to 7 10 C Cable JumpShot USB specifications B 4 support 9 10 unpacking 1 1 to 1 2 using 4 1 to 4 9 8 1 Cable serial 4 9 to 4 11 Cable video 3 11 to 3 12 Camera see PhotoPC 650 camera Caring for camera 9 1 to 9 2 CD ROM installing softwa...

Page 150: ...ing pictures from 4 1 to 4 9 8 3 to 8 4 USB cable see Cable Jumpshot USB using 8 1 to 8 4 Compression 2 9 CompuServe 9 9 Computer connecting camera to 4 9 to 4 11 Converting pictures 5 2 Copying pictures into documents 5 3 9 5 Correction tools HotShots 7 22 to 7 23 Cropping tool HotShots 7 16 to 7 17 D Date setting 1 5 to 1 6 3 12 to 3 13 Deleting pictures see Erasing pictures Dimensions AC adapte...

Page 151: ...nd JumpShot USB cable 9 10 EPSON 9 9 software 9 10 HotShots software calibrating monitor with 6 2 collections see Collections HotShots editing pictures in 7 1 to 7 24 information adding 6 5 to 6 8 inserting pictures into documents with 5 1 to 5 4 installing 1 8 opening pictures in 6 2 to 6 4 PictureWorks support 9 10 printing with 6 8 to 6 13 renaming pictures in 6 5 saving pictures in 6 3 6 5 Sma...

Page 152: ...9 10 Line tool HotShots 7 21 Locking and unlocking pictures 3 8 to 3 10 M Macintosh connecting to camera 4 9 to 4 11 installing software 1 8 system requirements Intro 3 Macro mode 2 4 2 10 to 2 11 9 7 to 9 8 Magic Wand tool HotShots 7 15 Maintenance 9 1 to 9 2 Multiple pictures playing back 3 4 N NiMH batteries optional Intro 3 NTSC setting video 3 11 O Optional accessories A 1 to A 6 P Paint Brus...

Page 153: ...ications B 1 to B 3 storing 9 2 time setting 1 5 to 1 6 3 12 to 3 13 PhotoPC 650 camera continued tripod attaching to A 3 turning on and off 2 1 to 2 2 unpacking 1 1 to 1 2 Physical dimensions B 1 B 4 Picture counter 2 8 Pictures close up 2 10 to 2 11 collections of see Collections HotShots converting 5 2 copying and pasting 5 3 9 5 downloading 4 1 to 4 24 dragging and dropping 5 3 to 5 4 editing ...

Page 154: ...1 4 2 3 A 1 to A 2 B 4 battery see Batteries camera specifications B 1 problems 9 2 saving 1 4 to 1 5 2 2 Printing in HotShots collections 6 12 to 6 13 Photo Pages 6 18 pictures 6 8 to 6 12 Smart Print 6 11 to 6 12 Problems camera 4 23 to 4 24 9 2 to 9 6 CompactFlash card 9 3 PCMCIA adapter 9 6 picture 9 7 to 9 8 Q Quick Fix HotShots 7 6 Quick Review mode setting 3 12 to 3 14 using 2 5 to 2 7 2 10...

Page 155: ... support 9 10 TWAIN see TWAIN EPSON PhotoPC 650 SoundAdvice EPSON 9 9 Special Effects tools HotShots 7 10 to 7 12 Specifications B 1 to B 4 Status display panel 2 2 2 8 9 4 Storing camera 9 2 Strap attaching 1 5 Support card and Jumpshot USB cable 9 10 EPSON 9 9 to 9 10 software 9 10 System requirements Intro 3 T Taking pictures close up 2 4 2 10 to 2 11 9 7 to 9 8 getting ready 2 1 to 2 3 using t...

Page 156: ...TWAIN EPSON PhotoPC 650 installing 1 8 support 9 9 transferring pictures with 4 11 to 4 24 U Unlocking pictures 3 9 to 3 10 Unpacking the camera 1 1 to 1 2 USB cable see Cable JumpShot USB Macintosh driver installing 1 8 Windows 98 driver installing 4 4 to 4 5 V VCR playing back pictures 3 11 to 3 12 Video cable 3 11 to 3 12 View mode see LCD monitor Viewfinder taking pictures with 2 4 to 2 5 9 8 ...

Page 157: ... cover third party parts components or peripheral devices added to the EPSON product after its shipment from EPSON EPSON is not responsible for warranty service should the EPSON label or logo or the rating label or serial number be removed or should the product fail to be properly maintained or fail to function properly as a result of misuse abuse improper installation neglect improper shipping da...

Page 158: ...e responsibility of the user to obtain and use a shielded equipment interface cable with this device If this equipment has more than one interface connector do not leave cables connected to unused interfaces Changes or modifications not expressly approved by the manufacturer could void the user s authority to operate the equipment FOR CANADIAN USERS This Class B digital apparatus complies with Can...

Reviews: