background image

Viewing Photos and Videos 27

Zooming an Image

You can zoom RAW images up to 100% and JPEG images 
up to 400%.

To zoom in on an image, press the 

 button. Keep 

pressing it to zoom in up to 400%.

To zoom out, press the 

 button. Continue pressing it 

to zoom all the way out.

To pan around a zoomed image, use the 4-way ring.

To return to the normal full-screen view, press 

Back

.

To select an area to zoom in, press 

OK

 when a full-screen 

image is displayed. Use the 4-way ring to move the red 
box to the area you want to zoom, then press 

OK

 again.

When you are viewing a zoomed-in image, you can display 
the next or previous photo without changing the zoom. 
Press 

Menu

 to display the pop-up menu, then select 

Next


Photo

 or 

Previous Photo

 and press 

OK.

Displaying Information

You can view metadata and Exif information, a histogram, 
and a visual alert indicating poorly exposed highlight and 
shadow areas of your photos.

1

To view the file name and date for a full-screen image, 
press the 

Display


button. 

2

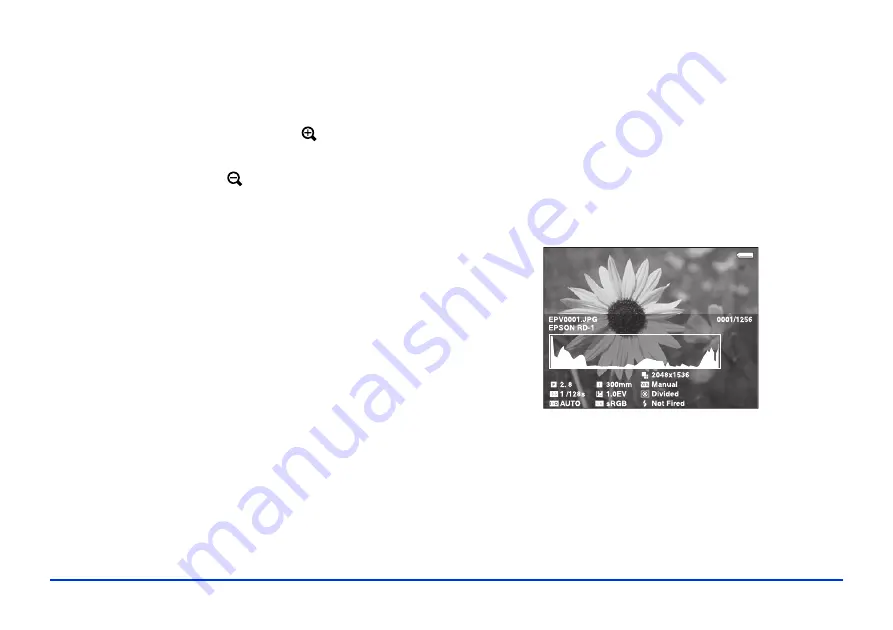
To view metadata, Exif information, and a histogram, 
press 

Display 

again:

28/12/2006    12:30:08

Summary of Contents for P5000 - Digital AV Player

Page 1: ...User s Guide P 5000 ...

Page 2: ...o Epson Corporation Photo Enhance is a trademark of Epson America Inc QuickTime and the QuickTime logo are trademarks or registered trademarks of Apple Inc used under license DivX DivX Certified and associated logos are trademarks of DivX Inc and are used under license CompactFlash is a registered trademark of SanDisk Corporation SD is a trademark of SD Card This product is protected by certain in...

Page 3: ...r applicable patents in the MPEG 2 patent portfolio which license is available from MPEG LA L L C 250 STEELE STREET SUITE 300 DENVER COLORADO 80206 DivX DivX Certified and associated logos are trademarks of DivX Inc and are used under license General Notice Other product names used herein are for identification purposes only and may be trademarks of their respective owners Epson disclaims any and ...

Page 4: ...ng Memory Cards Inserting and Removing Memory Cards 16 Using the CF Card Slot 17 Using the SD Card Slot 18 Copying Files From a Memory Card 19 Copying All Files 19 Copying Selected Files 20 Copying Files to a Folder 21 Creating a New Folder and Copying Files 22 Chapter 3 Viewing Photos and Videos Using the Viewer Screen 23 Changing the Display 24 Using the Pop up Menu 24 Supported Image Formats 25...

Page 5: ...ewer 41 Chapter 5 Managing Files Copying Files To and From Your Computer 42 Backing Up Files to Your Computer 43 Copying Files From Your Computer to the Viewer 44 Disconnecting the Viewer From Your Computer 44 Setting Backup and Conversion Preferences 45 Using the Viewer With USB Devices 46 Connecting a USB Device 47 Copying Files to the Viewer 47 Copying Files to the USB Device 48 Setting Folders...

Page 6: ...Problems 64 File Viewing Problems 65 File Operation Problems 66 Printing Problems 67 Updating the Firmware and Printer Driver 67 Uninstalling Software 67 Windows 67 Macintosh 68 Resetting the Viewer 68 Replacing the Battery 69 Where To Get Help 69 Internet Support 69 Speak to a Support Representative 69 Appendix A Notices and Specifications System Requirements 70 Windows System Requirements 70 Mac...

Page 7: ...e conversion and transfer Direct printing to PictBridge printers Lithium ion battery and AC adapter Video output to display pictures on a TV or projector Using the Documentation This guide provides information and instructions for all the viewer features including troubleshooting tips Make sure you read and follow all the Safety Instructions on page 71 Please follow these guidelines Warning Must b...

Page 8: ...card slot eject button Memory card access light Strap hook Headphone connector CompactFlash card slot Power switch with Hold function Battery cover A V Out connector Host USB connector for camera flash drive etc AC adapter connector Speaker Reset button Rubber cover Device USB connector for computer ...

Page 9: ...attery charging orange for problems Menu button Press to display a pop up menu Activity light Flashes blue during power on printing file transfer and computer connection 4 way ring Press to select a photo or navigate the menus button Press to select a file or rate a photo from 1 to 5 stars Display button Press to change the display or view photo information Back button Press to cancel your selecti...

Page 10: ...of the arrow on the battery 4 Close the battery cover and slide it to the left until it clicks Charging the Battery After installing the battery you need to charge it using the AC adapter It takes about 3 5 hours to fully charge the battery when the viewer is off and longer when the viewer is on The Charge light is green while the battery is being charged When the battery is fully charged the ligh...

Page 11: ...hen the viewer is operated during charging Charging will stop until the battery cools down Removing the Battery If you plan to store the viewer for an extended period of time you should remove the battery 1 Make sure the viewer is turned off Caution Remove the AC adapter if it is connected to the viewer Never remove the battery while the viewer is turned on Doing so may cause files to be lost or d...

Page 12: ... Time The first time you turn on the viewer you see the Language setting screen Note If you see the Home screen instead as shown in Using the Home Screen on page 14 the language has already been selected To change it or check the date and time select Settings on the Home screen Then follow the instructions in Date and Time or Language on page 62 1 Press OK to select English You see a message about...

Page 13: ...en See Using the Home Screen on page 14 for details Note If you remove the battery the date and time settings will be erased after about one day The next time you turn on the viewer the date and time setting screen will be displayed Locking the Buttons You can lock the buttons on the viewer This allows you to place the viewer in a purse or backpack and use it with headphones without accidentally p...

Page 14: ...s that the buttons are locked See Locking the Buttons page 13 My Music Listen to music copied from your computer See Playing Audio Files page 36 View Rated Files View files that you have rated with one or more stars See Rating Photos page 54 My Videos View folders and play videos that you have copied into the Videos folder See Viewing Videos page 30 My Photos View folders and files that you have c...

Page 15: ...iming for all of the power saving modes see Power Save on page 60 for more information The LCD screen turns dark after one minute of inactivity Press any button to turn it on The LCD screen turns off after five minutes of inactivity Press any button to turn it on The viewer turns off automatically after 10 minutes of inactivity Slide down the power switch to turn it back on When the AC adapter is ...

Page 16: ...r memory card Never remove a memory card or shake or drop the viewer while the memory card access light is flashing Doing so may cause files to be lost or damaged Do not put labels or stickers on memory cards The sticker may peel off preventing the card from being ejected and damaging the viewer Avoid using or storing cards in direct sunlight or in places that are extremely hot humid or dusty Memo...

Page 17: ...he slot If you are using a CompactFlash adapter put the card into the adapter and insert the adapter into the slot Caution Make sure you insert memory cards in the correct orientation Otherwise the card and viewer may be damaged To remove a card from the CF Card slot first make sure the memory card access light is off Then press the eject button and pull out the card If the button is not sticking ...

Page 18: ... shown below Then push the memory card all the way into the slot Caution Make sure you insert memory cards in the correct orientation Otherwise the card and viewer may be damaged To remove a card from the SD Card slot first make sure the memory card access light is off Then press in on the top of the card When the card pops up pull it out of the slot ...

Page 19: ... folder that is automatically created in the Backup Files folder on the viewer The folder is named according to the date and the date format you selected for example 12252006 001 Folders are numbered in the order they are copied If you want to change the name see Creating a New Folder and Copying Files on page 22 When the backup is complete you see thumbnail images of the copied photos Note The fi...

Page 20: ...heck boxes appear on each thumbnail image 6 Use the 4 way ring to highlight each photo you want to copy then press the button to select it The selected items are displayed with red check marks 7 When you are finished selecting photos press OK The files are copied to a folder that is automatically created in the Backup Files folder on the viewer The folder is named according to the date and the dat...

Page 21: ...to copy then press the button to select it The selected items are displayed with red check marks Note To select all files and folders press Menu and choose Select All To select more than one file or folder you must view them on the thumbnail mini thumbnail or detailed list screen For more information see Changing the Display on page 24 7 Press OK 8 Use the 4 way ring to select the folder where you...

Page 22: ...enter a new one 2 To keep the current name highlight Done and press OK Your files are copied to the new folder 3 To enter a new name use the Back backspace button to clear the current name Then enter a new name using the 4 way ring highlight each character and press OK to enter it To move the cursor forward or backward press or To delete the last letter input press Back To enter a space press Menu...

Page 23: ...illustrations identify the icons that appear on the screen By default unsupported files are not displayed If you want to change this setting see File Operation on page 61 Thumbnails of video files that have not been played back or have not been played back completely are displayed with or respectively not shown in mini thumbnail view Unsupported file format Rated file Locked file Music file PV My ...

Page 24: ...ou are doing with the viewer The following table summarizes the menu functions Thumbnails 12 per screen Mini thumbnails 64 per screen My Photos 2006 1205 EPV2014 JPG EPV2171 JPG EPV2242 JPG EPV2269 JPG EPV2273 JPG EPV2279 JPG EPV2283 JPG EPV2314 JPG EPV0013 TXT EPV2619 JPG EPV2620 JPG EPV0480 MP3 Down the Black Beaches Details file name date modified and file size Audio Track Setting Selects the a...

Page 25: ... off and sets display options for private folders and unsupported files See pages 61 to 62 Set as Screen Saver Creates a screen saver from the images in a folder See page 55 Slide Show Starts displaying the images in a folder as a slide show See page 28 Sort Organizes the files in a folder by date name or file extension Subtitle Setting Selects subtitles for DivX videos that include them Video Pri...

Page 26: ... select My Photos or Backup Files 2 Press OK 3 Select the folder containing the images you want to view then press OK You see a screen like this To move to the next screen press and hold the bottom of the 4 way ring 4 Use the 4 way ring to select the image you want to view then press OK The selected image is enlarged to fill the screen My Music View Rated Files My Videos My Photos Backup Files Mem...

Page 27: ...ayed Use the 4 way ring to move the red box to the area you want to zoom then press OK again When you are viewing a zoomed in image you can display the next or previous photo without changing the zoom Press Menu to display the pop up menu then select Next Photo or Previous Photo and press OK Displaying Information You can view metadata and Exif information a histogram and a visual alert indicating...

Page 28: ...on the viewer and does not change the file itself The Menu Display and buttons are not available in this mode 1 When you are viewing a full screen image press Menu and select Display Photo Enhance You can use the 4 way ring to view the next or previous photo in Display Photo Enhance 2 To return to the normal display press Back Displaying Images as a Slide Show You can display images in My Photos a...

Page 29: ...ing Settings on the Home screen See Slide Show on page 61 for details Rotating an Image Images that contain rotation information are automatically rotated on the viewer You can also rotate an image manually in My Photos 1 Select the image in thumbnail view then press the Menu button to display the pop up menu 2 Select Edit then press OK 3 Select Rotate Right rotate the image 90 clockwise or Rotate...

Page 30: ...le AAC PCM 30 fps 720 480 25 fps 720 576 8 Mbps peak 4 Mbps avg Motion JPEG G 711 PCM ADPCM 30 fps 720 480 25 fps 720 576 60 fps 320 240 mp4 MPEG 4 Advanced Simple Profile AAC PCM 30 fps 720 480 25 fps 720 576 8 Mbps peak 4 Mbps avg mov mp4 m4v H 264 AVC Baseline Profile Level 1 2 AAC PCM 30 fps 320 240 850 kbps peak 768 kbps avg wmv Windows Media Video 9 MP LL Windows Media Audio 9 9 1 30 fps 352...

Page 31: ...at Original Size from Play Settings in the pop up menu Setting Play at Full Screen displays the image by adjusting the longest side to the LCD display without changing the aspect ratio To play or pause the video press OK To adjust the audio volume press or To rewind or fast forward press left or right on the 4 way ring Press repeatedly to increase the speed This function may not work with some vid...

Page 32: ...ve battery life Original to display video with the most accurate color and brightness 4 Press OK to return to the video Viewing Files on a TV You can connect the viewer to a TV or projector and view your images videos and slide shows You will need a camcorder AV cable 3 5 mm mini plug to 3 RCA plugs available at many electronics stores 1 Connect the three RCA plugs to the video and audio IN jacks ...

Page 33: ... to set the Video Out setting to match your TV see page 62 Some TVs may crop your images on the top and bottom or you may notice some flickering for example near the edges of the screen This is a normal result of your viewer s high image resolution ...

Page 34: ...ics guide If you want to copy files from a music CD you first need to convert the file format to MP3 or M4A using CD copying software on your computer You can also use this software to change the song and artist names displayed on the playlist if necessary WMA and WAV files are automatically converted to M4A when they are transferred You can specify conversion settings if necessary see Setting Bac...

Page 35: ... to the viewer 6 Click the down arrow in the center of the screen to transfer the files to your viewer 7 Disconnect the viewer from your computer Windows Right click the icon in the lower right corner of your screen and select Safely Remove Hardware or Unplug or Eject Hardware Then remove the USB cable Macintosh Drag and drop the viewer icon to the trash then remove the USB cable 8 If you see a me...

Page 36: ...ted Playing Audio Files You can connect headphones to the jack on top of the viewer or listen through the viewer s built in speaker 1 Select My Music on the Home screen using the 4 way ring then press OK 2 Select Music List then press OK Audio file extensions Audio codec Details m4a AAC MPEG4 Maximum bit rate 320 kbps 48 kHz 16 bit Stereo mp3 MP3 MPEG 1 2 2 5 Layer 3 wma Windows Media Audio 9 Bit ...

Page 37: ...ed track using the 4 way ring then press OK You can do the following while listening to music or audio files To play or pause music press OK To adjust the volume press or To skip back or forward press left or right on the 4 way ring Press and hold to rewind or fast forward To return to the previous screen without stopping the audio press Back If you are not in My Music the audio stops when you pre...

Page 38: ... itself Follow the steps below to create a playlist using Epson Link2 or see Creating a Playlist on the Viewer on page 39 1 Connect the viewer to your computer as described on page 34 2 Double click the Epson Link2 icon on your desktop to open the program 3 Click Playlist on the left side of the screen 4 Click the icon in the lower right corner To play Select Current category once No Repeat Curren...

Page 39: ...e pop up menu 2 Select Add to Playlist then press OK 3 Select Create New Playlist then press OK The on screen keyboard appears with Playlist001 as the default name 4 To use this name highlight Done and press OK To enter a new name use the Back backspace button to clear the current name Then enter a new name using the 4 way ring highlight each character and press OK to enter it To move the cursor f...

Page 40: ... Playlist then press OK 3 Select the list you want to add to and press OK 4 Select the tracks for the playlist using the 4 way ring and the button then press OK Removing Tracks From a Playlist 1 Select a playlist in My Music then select a track you want to remove 2 Press Menu select Delete and press OK 3 Select each file you want to remove using the 4 way ring and the button then press OK The trac...

Page 41: ...he level of each frequency using the 4 way ring then press OK Note You may need to listen with headphones to hear the effects of the various settings Deleting Audio Files From the Viewer 1 In My Music press the Menu button to display the pop up menu 2 Select Delete 3 Select audio files to delete using the 4 way ring and the button 4 Once you have selected all the files you want to delete press OK ...

Page 42: ... use the Epson Link2 software to back up files from the viewer to your computer and copy files from your computer to the viewer Make sure you have installed the software following the instructions in your P 3000 P 5000 Basics guide 1 Connect the AC adapter to the viewer and plug it in Then turn on the viewer and your computer 2 Use the included USB cable to connect the viewer to your computer The ...

Page 43: ...ally Note Only files that haven t already been copied will be transferred 3 To transfer files manually click the Backup icon on the left side of the screen then click the icon in the middle of the screen All the files in the Backup Files folder of the viewer are copied to your computer By default the files are copied to the Epson Link2 Backup folder in Documents or My Documents If you want to chan...

Page 44: ...the type of files you want to transfer 4 Select the files to transfer in the Computer window then click the down arrow in the center of the screen The files are transferred to the viewer Note You can also transfer files by dragging and dropping them into the lower contents window For more information click the in the upper right corner of the Link2 screen Disconnecting the Viewer From Your Compute...

Page 45: ...aved on your computer You can also change the conversion settings for video files transferred from your computer to the viewer In Windows you can also change the conversion settings for audio files 1 Double click the Epson Link2 icon on your desktop to open the program 2 Click the settings icon in the upper right corner of the screen The Settings window appears ...

Page 46: ...s only Select Normal High Quality High Compression or Custom Selecting Custom allows you to specify the sampling rate and bit rate Choose higher settings for improved audio quality or lower settings for reduced file sizes 6 If you want to change the folder where files are backed up on your computer you can adjust the Store Folder Settings The default folder is Epson Link2 Backup in My Documents Wi...

Page 47: ... of the cable to the device and the other end to the Host USB connector on the viewer Note To prevent a possible malfunction do not use both USB connectors on the viewer at the same time 3 Turn on the viewer and the USB device if necessary Copying Files to the Viewer After you connect a USB device you can copy all the files to the viewer or select individual files to copy 1 On the Home screen use ...

Page 48: ...ted items are displayed with red check marks 6 When you are finished selecting files press OK The files are copied to a folder that is automatically created in the Backup Files folder on the viewer 7 Wait until all the files are copied then disconnect the USB device Copying Files to the USB Device You can copy all the files or selected files from the viewer to a USB device If your USB device has a...

Page 49: ...elect it The selected items are displayed with red check marks 7 When you are finished selecting photos press OK Your files are copied to the USB device When the copy is complete you can disconnect the device Setting Folders as Private You can select and hide folders so that other people cannot view the files Note Even if folders are set as private folders on the viewer they may still be viewed on...

Page 50: ...layed 6 Use the 4 way ring to highlight each folder you want to set as private and press to select it The selected items are displayed with red check marks 7 Once you have selected all the folders you want to set as private press OK Note You can press Menu and select either Select all or Deselect all then press OK or select Apply from the pop up menu 8 When you see the Password screen enter a 4 di...

Page 51: ...ursor forward or backward press or To delete the last letter input press Back To enter a space press Menu To switch between upper and lower case press Display To cancel the name highlight Cancel and press OK 5 After you enter the name select Done then press OK Deleting Files and Folders You can delete files and folders from the viewer using the menu and buttons as described below To use the Link2 ...

Page 52: ...a full screen photo press Menu and select Delete to enter deletion mode Select Delete again then press OK You can display additional photos to delete by pressing right or left on the 4 way ring To cancel deletion mode select Cancel and press OK or press the Back button 5 When the confirmation message appears select Yes then press OK Down the Black Beaches EPV2014 JPG EPV2171 JPG EPV2242 JPG EPV226...

Page 53: ... thumbnail screen you can press Menu and select Select all Deselect all or Apply 5 Press OK to lock the files or folders If you are viewing a full screen photo press Menu select Edit then select Lock Unlock to enter lock mode Select Lock or Unlock then press OK You can display additional photos to lock by pressing right or left on the 4 way ring To cancel select Cancel and press OK or press the Ba...

Page 54: ...tos or Backup Files then press the button to rate it Continue pressing the button to increase the rating up to 5 or remove the rating You can use the menu to rate multiple photos or folders 1 Select a photo or folder you want to rate 2 Press Menu select Rate then press OK 3 Select the number of stars you want to assign then press OK 4 Use the 4 way ring to highlight each file or folder you want to...

Page 55: ...s in the folder will be displayed as a slide show when the viewer is plugged in using the AC adapter and is inactive for 3 minutes If you want to change the timing for the screen saver see Power Save on page 60 If you want to change the transition effects see Slide Show on page 61 1 Select a folder then press Menu to display the pop up menu 2 Select Set as Screen Saver then press OK Note To cancel...

Page 56: ...ote For details about paper see your printer documentation Connecting the Viewer to a Printer Refer to your printer manual to locate the external device USB connector on the printer which may be labeled or EXT I F 1 Connect the AC adapter to the viewer and turn it on 2 Connect the small end of the USB cable to the Device USB connector on the viewer Paper Size Epson Ultra Premium Photo Paper Glossy...

Page 57: ...nt Note You cannot print a JPEG file if the vertical or horizontal size of the image exceeds 4600 pixels 2 Press Menu to display the pop up menu 3 Select Photo Print then press OK The number of prints is shown for each photo 4 Select the number of prints you want for each photo using the or button If you are printing a full screen photo you can set the number of prints you want then display the ot...

Page 58: ...ttings may be limited or set to Automatic The settings will be cleared once the image has been printed 7 Select Start Printing then press OK Print Settings Start Printings Picture number 1 Number of Prints Paper size Paper kind Layout Print Date Print Mode 1 4x6in Photo paper Border Do Not Print Photo Setting Description Number of Prints Set the number of prints video only Paper size Choose the pa...

Page 59: ...left or right on the 4 way ring to search for the frames you want to print 3 Press Menu to display the pop up menu 4 Select Video Print then press OK 5 Select a Frame Interval Long Medium or Short to take still images from the video 6 Select the frame where you want to start printing by pressing right or left on the 4 way ring then press OK 7 In the Print Settings screen specify the settings by pr...

Page 60: ...also given for all files in the Backup My Photos My Videos and My Music folders Power Save Use the following options to adjust how the viewer saves power Backlight Timer to set when the LCD screen turns dark during inactivity You can select 1 3 5 10 or 15 minutes Sleep Timer to set when the LCD turns off during inactivity You can select 1 3 5 10 or 15 minutes Power Off Timer to set when the viewer...

Page 61: ...f you want to clear them Or select Do Not Delete to copy files without deleting them from their original location Set Password to set a password for private folders The default password is 0000 Movie Setting Use these options for movies played on the viewer DivX Reg Code to display the DivX registration code This code is required when you buy copyright protected DivX VOD video content for download...

Page 62: ...Brightness to control the brightness of the screen Video Out to select NTSC or PAL according the type of TV system or external display connected to the viewer Color Space to set the color space if color space information in the image is unspecified Select sRGB or AdobeRGB Date and Time If you remove the battery the date and time settings will be erased after about one day Use this screen to re ent...

Page 63: ... on the LCD Refer to the following table to diagnose an error message For more assistance see Problems and Solutions on page 64 Error message Description Unable to access file Wait until the memory card access light turns off then reinsert the memory card and try again An error occurred during verification Files were not deleted from the memory card Some files failed to be copied Check the files a...

Page 64: ...r details see Charging the Battery on page 10 Press the reset button See Resetting the Viewer on page 68 Error message Description The power does not turn on Cause What to do The battery has run out When the icon appears on the top right corner of the LCD the battery has run out See ChargingtheBattery onpage 10 and charge the battery The battery is not installed correctly Make sure the battery is ...

Page 65: ...any button to turn the screen on If you ve connected the viewer to your TV or computer the LCD screen turns off You ve connected the viewer to your TV and the image is cut off or flickering Some TVs may crop your images at the top and bottom or you may notice some flickering near the edges of the screen This is a normal result of your viewer s high image resolution The video is not displayed clear...

Page 66: ...iewer to your computer it s best to delete files using the Link2 software or data may not be removed completely Check the Recycle Bin Windows or Trash Macintosh and empty it to clear any files You cannot copy files from an external USB device Connect the AC adapter to the viewer If the external USB device has its own power adapter connect it too You cannot delete a file Cause What to do The file i...

Page 67: ...Uninstaller Note For Windows Vista when you see the User Account Control screen click Allow 2 After the confirmation dialog box appears click Yes 3 When you see a message that uninstallation is complete click Finish You cannot print Cause What to do The printer is not supported Make sure your printer is supported See page 56 The printer s power is off Turn on the printer The USB cable is not conne...

Page 68: ... 4 Select Custom Install 5 Select Epson Link2 6 On the software installation screen select Uninstall 7 When you see a message asking you to restart click Restart Now Resetting the Viewer If the viewer stops working or you want to restore its default settings you can reset it Gently insert the end of a paper clip into the Reset button next to the viewer s USB ports The viewer shuts off resets to it...

Page 69: ...mon problems with your viewer You can download software and documentation get FAQs and troubleshooting advice or e mail Epson with your questions Speak to a Support Representative Before you call Epson for support please have the following information ready Product name Epson P 5000 Product serial number located on the bottom of the viewer Proof of purchase such as a store receipt and date of purc...

Page 70: ...fessional Windows XP Professional x64 Edition or Windows Vista At least 256MB RAM 100MB free hard disk space for installation 2GB required for operation SVGA monitor 800 600 16 bit color or higher USB type A connector Macintosh System Requirements To use your viewer software your system should have 700 MHz G4 processor or higher PowerPC or Intel CoreDuo Macintosh OS X 10 2 8 to 10 4 x At least 512...

Page 71: ...may damage both devices connected by the cable Do not insert objects into the slots or openings on the viewer Do not touch the components inside the viewer unless instructed to do so in the documentation Never force the viewer s components into place Although the viewer is designed to be sturdy rough handling can damage it Never spill liquid onto the viewer If the viewer emits unusual noises odors...

Page 72: ...d seek medical treatment If a battery is swallowed seek medical treatment immediately Use only an Epson lithium ion battery for the viewer according to the instructions in this manual Use only AC adapter model A351H and the viewer Model G961A G961B to charge batteries Do not use the battery that comes with the viewer for other devices To protect against short circuiting do not remove the outside s...

Page 73: ...umidity is very high Store batteries out of children s reach Disposing of the Battery Before disposing of the battery make sure you discharge it completely Warning Be sure to securely cover the end of the battery with tape to prevent combustion or explosion when disposing Do not incinerate or dispose of the battery in fire Do not dispose of batteries as ordinary refuse Instead dispose of them in a...

Page 74: ...e power outlet does not exceed the power outlet s ampere rating Do not use a damaged or frayed AC adapter If you use an extension cord with the viewer make sure the total amperage of all devices plugged into the extension cord does not exceed the cord s amperage rating Never disassemble modify or attempt to repair the AC adapter by yourself Do not use power outlets controlled by wall switches or a...

Page 75: ...contact Epson If the liquid crystal solution contained in the LCD panel on the viewer leaks out and gets onto your hands wash them thoroughly with soap and water If it gets into your eyes flush them immediately with water If discomfort or vision problems remain after a thorough flushing see a doctor immediately Use only a soft dry cloth to clean the display Do not use liquid or chemical cleaners S...

Page 76: ...lly or exhibit a distinct change in performance WARNING The cords included with this product contain chemicals including lead known to the State of California to cause birth defects or other reproductive harm Wash hands after handling provided in accordance with Proposition 65 in Cal Health Safety Code 25249 5 et seq Standards and Approvals Epson P 5000 AC Adapter Model A351H Battery Model D111A E...

Page 77: ...C Non operating 4 to 140 F 20 to 60 C Humidity without condensation Operating 30 to 80 Non operating 10 to 80 Altitude Operating 3000 m or less Non operating 12000 m or less Memory card CompactFlash memory card Type I Type II including Microdrive SD memory card SD High Capacity Card MultiMedia Card MultiMedia Card Plus Note A commercially available CF adapter is needed to use other memory cards Po...

Page 78: ...phone Out connector Quadrupole mini pin jack Ø 3 5 mm CF Card slot One slot Type 1 Type 2 3 3V for CompactFlash memory card or Microdrive SD Card slot One slot for SD memory card or MultiMedia card Type Rechargeable lithium ion battery Model D111A Size H W D 0 88 0 80 2 78 inches 22 45 20 4 71 mm Ratings 3 7 V 2600 mAh Temperature Storing 4 to 104 F 20 to 60 C Keep the battery in a cool place when...

Page 79: ...eating playlist 38 to 40 deleting files 41 equalizer 41 file formats 36 playing 36 to 41 problems 65 to 66 repeat and shuffle 38 B Backing up from memory cards 19 to 21 preferences 45 to from USB devices 47 to 49 to computer 42 to 44 Backup Files icon 14 Battery charging 10 to 11 cover 8 disposing of 73 icon 11 installing 10 removing 11 replacing 69 safety 72 to 73 specifications 78 Beep settings ...

Page 80: ...2 USB devices 47 Copying files from memory cards 19 to 21 files to from computer 42 to 44 files to from USB devices 47 to 49 problems 66 Customizing settings 60 to 62 D Date and time setting 12 to 13 62 Deleting audio files 41 files and folders 51 Device USB connector 8 34 42 to 44 56 to 57 Direct printing 56 to 59 Display button 27 Display modes video 32 Display Photo Enhance 28 DivX 30 61 DNG fi...

Page 81: ... to 49 deleting 51 locking 53 problems copying 66 problems viewing 65 rating 54 to 55 Firmware updating 67 Firmware version 62 Folders changing display 24 copying files to 21 creating 22 deleting 51 locking 53 renaming 51 setting as private 49 to 51 setting as screen saver 55 setting icon 54 H Hard drive capacity 60 Headphones connector 8 using 36 Histogram 27 Hold icon 14 Home screen 14 Host USB ...

Page 82: ...2 62 LCD 8 65 75 Lights 9 Link2 software backing up files 43 copying files 42 to 44 creating playlist 38 setting preferences 45 transferring music files 35 Locking buttons 13 files and folders 53 M Macintosh disconnecting from 44 system requirements 70 Maximum bit rate video 30 Memory card access light 15 adapter 16 copying files 19 to 21 safety instructions 75 types 16 Memory Card icon 14 Memory ...

Page 83: ...g music 36 to 41 videos 30 to 31 Playlist creating 38 to 40 modifying 40 Pop up menu 24 to 25 Power problems 64 saving 15 60 switch 8 turning off 15 turning on 12 Printing photos 56 to 59 problems 67 videos 59 Private folders 49 Problems audio and video 65 to 66 copying and deleting files 66 power 64 printing 67 solving 63 to 67 viewing files 65 Projector connecting to 32 Protecting files 53 R Rat...

Page 84: ...terface 78 standards and approvals 76 sRGB 28 62 Status and error messages 63 to 64 Support technical 69 System requirements 70 T Technical support 69 Time setting 12 to 13 Troubleshooting audio and video problems 65 to 66 error messages 63 to 64 file operation problems 66 file viewing problems 65 power problems 64 printing problems 67 Turning off power 15 Turning on power 12 TV connecting to 32 U...

Page 85: ...registration code 61 file formats 30 playing 30 to 31 printing 59 problems 65 to 66 screen size 31 selecting NTSC or PAL 62 settings 61 View Rated Files 14 W Wallpaper 54 Windows disconnecting from 44 system requirements 70 X xD Picture card 16 Z Zooming images 27 ...

Reviews: