


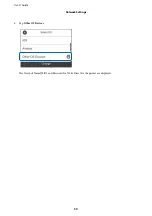
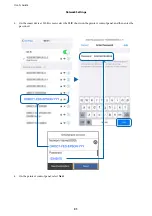


6.
Enter the password displayed on the printer's control panel on the computer or smart device.
Note:
When you enable Wi-Fi Direct, it remains enabled unless you restore the default network settings and disable Wi-Fi
Direct.
7.
After the connection is established, tap
OK
on the printer's control panel.
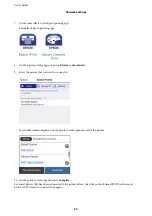
8.
Close the
Network Connection Settings
screen.
Related Information
&
“Checking the Network Connection Status” on page 38
&
“When You Cannot Make Network Settings” on page 205
Making Advanced Network Settings
You can change the network device name, TCP/IP setup, proxy server and so on. Check your network environment
before making changes.
1.
Select
Settings
on the home screen.
2.
Select
General Settings
>
Network Settings
>
Advanced
.
3.
Select the menu item for settings, and then select or specify the setting values.
Related Information
&
“Setting Items for Advanced Network Settings” on page 37
Setting Items for Advanced Network Settings
Select the menu item for settings, and then select or specify the setting values.
❏
Device Name
You can enter the following characters.
❏
Character limits: 2 to 15 (you must enter at least 2 characters)
❏
Usable characters: A to Z, a to z, 0 to 9, -.
❏
Characters you cannot use at the top: 0 to 9, -.
❏
Characters you cannot use at the bottom: -
User's Guide
Network Settings
37