7.1.3. Column layout on fanfold paper
When fanfold paper of from 4” to 10” in width is supplied with the MX-80 F/T
Type II, the graduations on the scale can be used as the indexes of print column
positions (1 to 80). Alignment of the print start position on fanfold paper with
the 1st column position at the extreme left of the scale will facilitate column
layout. Accordingly, center the paper by adjusting it to these indexes of the scale.
7.1.4. Top of form position setting
The term “Top of Form position” is defined as the position in which the first print
line lies on the form, and this position is determined when the power switch is
turned on. Namely, adjust the paper position by the manual paper feed knob
S O
that the required line position (i.e., the point at which the first line of the form is
desired to be printed) is at the print head level. If, at this point, power is applied
to the Printer, this line position automatically becomes the Top of Form position.
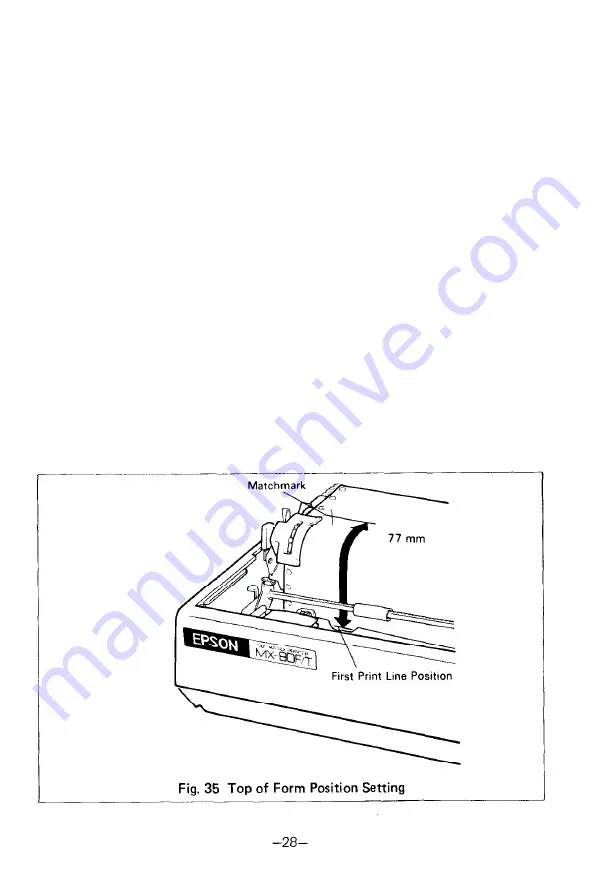
When printing forms, the matchmarks located on both the sprockets facilitate the
setting of the Top of Form position on the fanfold paper. To set the Top of Form
position, first enter (or preprint) a mark at a position on the edge of the paper
77mm above the first print line position of the paper, then align this mark with the
matchmarks on the sprockets by turning the manual paper feed knob. At this point,
turn the Power Switch on and the Printer will recognize this position as the Top
of Form position. Now, the printing can be started from the Top of Form position.
(See Fig. 35.1
In case of feeding one page of fanfold paper by operating the MX-80 F/T Type II
by the input of FF code, the abovementioned adjustment is effective.
Summary of Contents for M X - 8
Page 1: ...M X 8 0 EPSON DOT MATRIX PRINTER TYPE II Operation Manual EPSON P8190014 2 ...
Page 22: ... 1 6 ...
Page 41: ... 3 5 ...
Page 44: ...1 3 Printer initial check Take the following steps and become familiar with the Printer 3 8 ...
Page 55: ...Fig 57 Setting Form Length per Page 4 9 ...
Page 56: ...Fig 58 Setting Number of Columns per Line 5 0 ...
Page 57: ...Fig 59 Setting Skip over Perforation Function 5 1 ...
Page 80: ... 2 Normal density bit image printing 74 ...
Page 89: ......
Page 90: ...Fig Al 2 Driver Circuit Diagram 8 5 ...
Page 96: ......
Page 97: ...APPENDIX 4 Character Fonts 92 ...
Page 98: ...NOTE Numbers represent Hex code 93 ...
Page 99: ... 94 ...
Page 100: ... 95 ...
Page 101: ...APPENDIX 5 Control Codes ...


