7. Paper Loading
7.1. Fanfold paper
7.1.1. Loading of fanfold paper
The MX-80 F/T Type I I Printer accommodates fanfold paper from 4” to 10” in
width. To load the fanfold paper, observe the following procedure.
STEP 1.
Raise the printer lid.
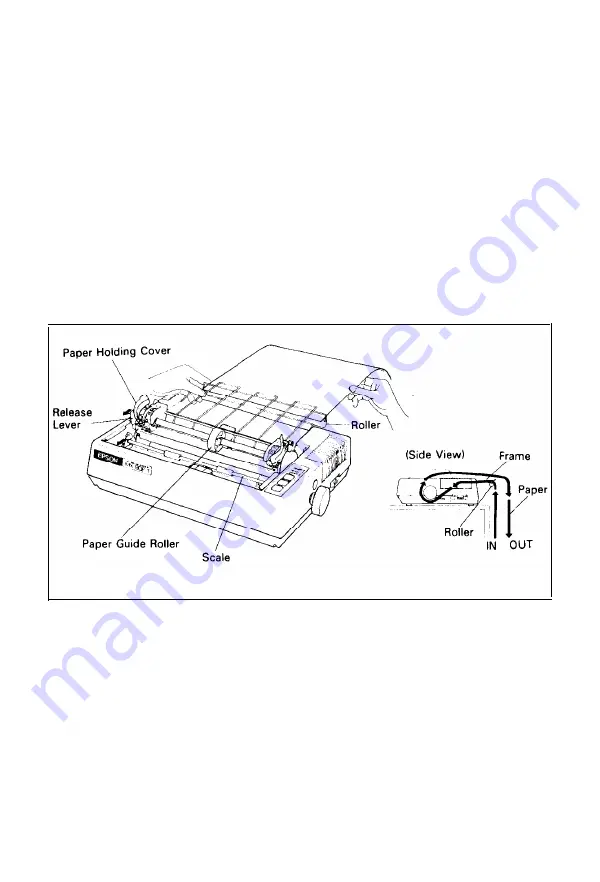
STEP 2. Unlock the release lever by pulling it in the direction of the arrow.
(See Fig. 30.)
STEP 3.
Pull the scale toward the front of the Printer to detach the scale from
the platen.
STEP 4.
Confirm that the paper guide roller is at the center of the sprocket shaft.
If not, set it at the center of the shaft.
NOTE: The paper guide roller contributes to smooth paper feeding.
STEP 5.
Raise the two paper holding covers, and be sure to insert the fanfold
paper between the frame and plastic roller of the separator. (See Fig. 30.)
Fig. 30 Insertion of Fanfold Paper
STEP 6.
Push the paper into the insertion slot between the paper guides at the
rear part of the printer mechanism.
NOTE: Be sure to pass the paper beneath the upper paper guide.
Adjust the position of the head adjusting lever in the forward (+) direction
when inserting thicker paper. (See Section 8, Gap Adjustment.)
STEP 7.
After the leading edge of the paper has emerged from the Printer, pull it
out gently to some length.
- 2 5 -
Summary of Contents for M X - 8
Page 1: ...M X 8 0 EPSON DOT MATRIX PRINTER TYPE II Operation Manual EPSON P8190014 2 ...
Page 22: ... 1 6 ...
Page 41: ... 3 5 ...
Page 44: ...1 3 Printer initial check Take the following steps and become familiar with the Printer 3 8 ...
Page 55: ...Fig 57 Setting Form Length per Page 4 9 ...
Page 56: ...Fig 58 Setting Number of Columns per Line 5 0 ...
Page 57: ...Fig 59 Setting Skip over Perforation Function 5 1 ...
Page 80: ... 2 Normal density bit image printing 74 ...
Page 89: ......
Page 90: ...Fig Al 2 Driver Circuit Diagram 8 5 ...
Page 96: ......
Page 97: ...APPENDIX 4 Character Fonts 92 ...
Page 98: ...NOTE Numbers represent Hex code 93 ...
Page 99: ... 94 ...
Page 100: ... 95 ...
Page 101: ...APPENDIX 5 Control Codes ...


