background image

EPSON FX-980

4/99

EPSON FX-980

 - 17

Using the Tractor in the Pull Position

Using the tractor in the pull position is ideal for printing on 
thick and heavy continuous paper, such as multipart forms or 
continuous paper with labels. However, you cannot use the 
tear-off feature with the pull tractor.

Because thick paper requires a straight paper path to avoid 
paper jams, you should load paper in the front or bottom slot 
when using the pull tractor. 

Do not load continuous paper with labels in the rear 
paper slot; the labels may come off their backing sheet 
inside the printer and cause a paper jam.

To further reduce the chance of paper jams and improve the 
performance of continuous paper, you can use two tractors in 
combination. When using this printing method, load the paper 
onto both the front push and pull tractors, or both the rear push 
and pull tractors. 

Installing the tractor in the pull position 

To install a tractor in the pull position, you must either remove 
the front push tractor or purchase the optional pull tractor 
(C800331). To remove the front push tractor, see “Removing 
the front push tractor” on page 14.

The tractor is installed in the rear push position only 
when the printer is shipped. The rear push tractor 
cannot be removed.

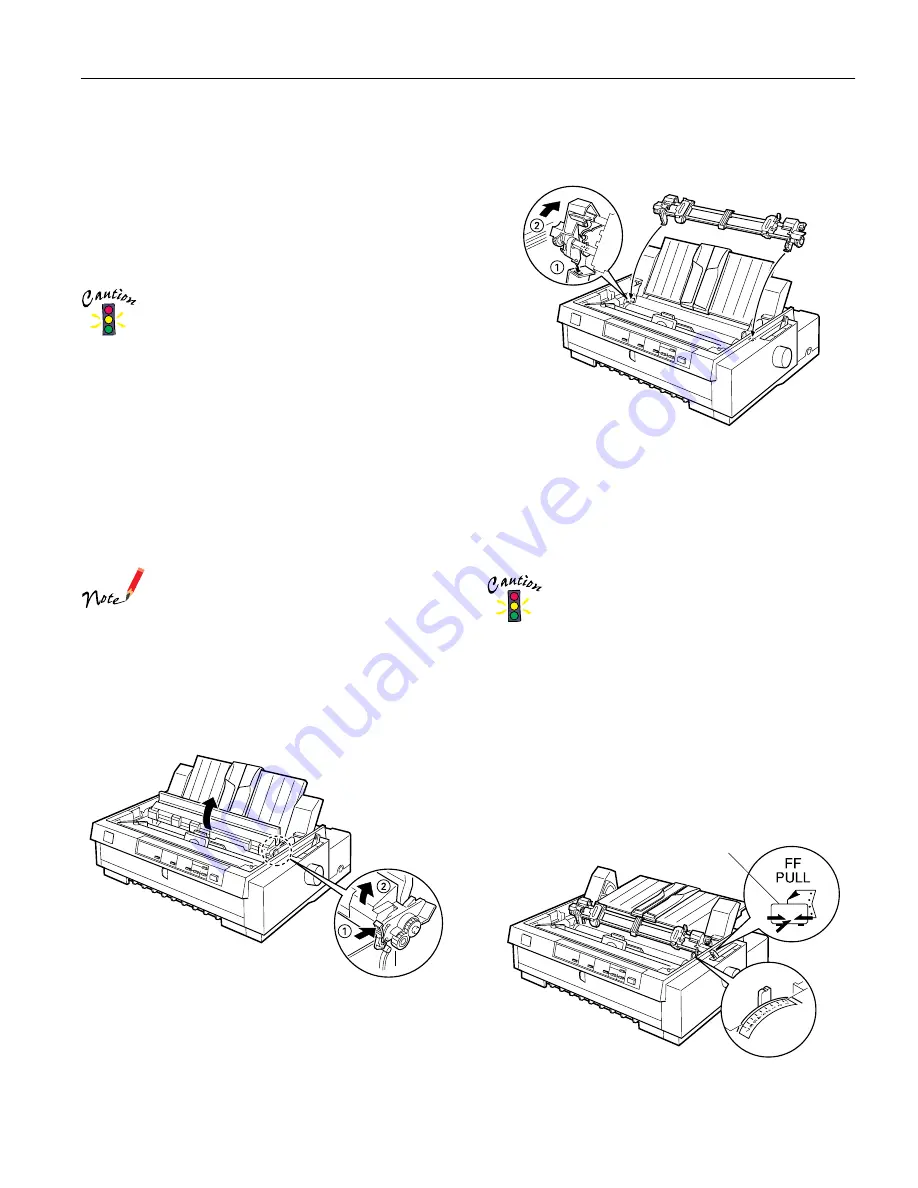
To install a tractor in the pull position, follow these steps:

1. Make sure the printer is turned off. Lift the printer cover up 

and off the printer.

2. Push up the tabs on each side of the paper tension unit and 

lift the unit up and off the printer. Store the paper tension 
unit in a safe place.

3. Lower the tractor into the mounting slots (

), and press 

down both ends (

) of the tractor to make sure that it is 

firmly seated.

You are now ready to load continuous paper onto the pull 
tractor as described in the next section. 

Loading paper onto the pull tractor

When using the pull tractor, if possible, load continuous paper 
in the front or bottom slot to avoid paper jams.

Do not load continuous paper with labels in the rear 
paper slot; the labels may come off their backing sheet 
inside the printer and cause a paper jam.

To load paper onto the pull tractor, follow these steps:

1. Make sure the printer is turned off, and the printer cover is 

removed. Also check that the tractor is installed in the pull 
position.

2. Slide the edge guides to the middle of the paper guide. Lift 

the center section of the paper guide up and lay it flat. 

3. Set the paper release lever to the pull tractor position.

Then set the paper thickness lever to accommodate your 
paper thickness.

-

pull tractor position

Summary of Contents for FX-980 - Impact Printer

Page 1: ... Allows you to use your printer with 8 5 inch roll paper like that used with telex machines knob paper guide cover paper guide base front paper guide closed rear edge guides printer cover control panel paper release lever tractor ribbon cartridge shield plate serial interface parallel interface paper tension unit paper thickness lever front edge guides front paper guide open User Replaceable Part ...

Page 2: ...ection Bidirectional logic seeking for text and graphics printing Unidirectional text or graphics printing can be selected using software commands Line spacing 1 6 inch or programmable in 1 216 inch increments Printable columns 80 columns at 10 cpi Resolution Maximum 240 144 dpi near letter quality Interfaces 1 standard bidirectional 8 bit parallel interface with IEEE 1284 nibble mode support 1 EI...

Page 3: ... 9 to 14 3 inches 100 to 364 mm Copies 1 original up to 5 copies Thickness 0 0047 to 0 018 inch 0 12 to 0 46 mm Weight 12 to 15 lb 40 to 58 g m2 Built in fonts Bitmap fonts EPSON Draft 10 12 15 cpi EPSON Roman 10 12 15 cpi proportional EPSON Sans Serif 10 12 15 cpi proportional Barcode fonts EAN 13 EAN 8 Interleaved 2 of 5 EPC A UPC E Code 39 Code 128 POSTNET Character tables 1 Italic table and 12...

Page 4: ... 0 035 inch 0 9 mm Binding Point glue or paper staples on both sides front bottom or rear entry Weight not multipart 14 to 22 lb 52 to 82 g m2 Weight 1 sheet of multipart 12 to 15 lb 40 to 58 g m2 Multipart forms require a straight paper path therefore load them in the front slot Continuous paper with labels front and bottom entry Label size minimum 0 938 2 5 inches 23 8 63 5 mm 0 1 inch 2 5 mm co...

Page 5: ...table width is 8 inches 203 mm For paper wider than 9 inches 229 mm the side margins increase to match the width of the paper Roll paper A The minimum top and bottom margins are 0 17 inch 4 2 mm B The minimum left and right margins are 0 12 inch 3 mm The maximum printable width is 8 inches 203 mm Safety Approvals 120 V Safety standards UL 1950 CSA C22 2 No 950 EMI FCC part 15 subpart B class B CSA...

Page 6: ... or advances continuous paper to the next top of form position when held down Load Eject button Loads a single sheet of paper Ejects a single sheet of paper when a sheet is loaded Loads continuous paper from the standby position Feeds continuous paper backward to the standby position in micro adjust mode Micro Adjust buttons When you hold down the Pause button for 3 seconds the printer enters the ...

Page 7: ...se No paper is loaded in the selected paper source Load paper in the printer Then press the Pause button to turn off the Pause light if necessary The paper is not loaded correctly Remove your paper and reload it Then press the Pause button to turn off the Pause light if necessary Paper is jammed in the printer Clear the paper jam as described in Clearing Paper Jams on page 24 f Paper Out n Pause C...

Page 8: ...sition Description rear push To use this tractor load paper in the rear slot When you print on multipart forms that are bound on only one side by point glueing load them in the rear paper slot the front push tractor cannot feed this type of form Do not load continuous paper with labels in the rear slot the labels may come off their backing sheet inside the printer and cause a paper jam Because thi...

Page 9: ...the top slot You can load ordinary single sheets single sheet multipart forms envelopes or postcards in the top slot Load envelopes in the top slot only Loading paper in the front slot You can load ordinary single sheets single sheet multipart forms or postcards in the front slot Always use the front paper slot to load glue fastened single sheet multipart forms bound at the side of the form Combin...

Page 10: ...r one position lower to improve print quality Paper release lever position Description Single sheet position For loading single sheets from the top or front slot Rear push tractor position For loading continuous paper from the tractor in the rear push position Set the lever to this position when using the rear push and pull tractors in combination Front push tractor position For loading continuous...

Page 11: ...ractor paper slots however for best results use the tractor in the pull position and load paper in the front or bottom paper slot You load labels the same way you load ordinary continuous paper except you must set the paper thickness lever to 2 before printing Do not load continuous paper with labels in the rear paper slot because the paper path from the rear slot is curved labels may come off the...

Page 12: ...pulling the tab at the center of the guide Then remove the guide by grasping both sides and pulling it straight out of the printer 2 Insert the tractor into the mounting slots and press down both ends of the tractor to make sure that it is firmly seated You are now ready to load continuous paper onto the front push tractor as described in the next section Loading paper onto the front push tractor ...

Page 13: ...r guide 9 Slide the edge guides to the middle of the top paper guide base Lift the center section of the paper guide base up and lay it flat Make sure that the printer cover and the paper guide cover are closed Always close the printer cover before printing The printer does not print when the cover is open 10 Turn on the printer You may need to check andchange the printer driver settings When the ...

Page 14: ...veral pages at a time may cause a paper jam Removing the front push tractor To remove the tractor from the front push position follow these steps 1 Remove any paper from the tractor as described in the previous section 2 Turn off the printer 3 Open the front paper guide by pulling the tab at the center of the guide Then remove the guide by grasping both sides and pulling it straight out of the pri...

Page 15: ...nment on page 4 and Printable Area on page 5 for more information on the left margin position 5 Slide the right sprocket to match the width of your paper but do not lock it Move the paper support midway between the two sprockets 6 Make sure your paper has a clean straight edge Then open both sprocket covers and fit the first three holes of the paper printable side down over the tractor pins Then c...

Page 16: ...e printed document follow these steps 1 Make sure the Tear Off Bin lights are flashing This indicates your paper is at the current tear off position You may need to press the Tear Off Bin button to advance the paper to the tear off position 2 Open the paper guide cover and tear off the printed document using the tear off edge of the printer Never use the knob to adjust the tear off position while ...

Page 17: ...ush position only when the printer is shipped The rear push tractor cannot be removed To install a tractor in the pull position follow these steps 1 Make sure the printer is turned off Lift the printer cover up and off the printer 2 Push up the tabs on each side of the paper tension unit and lift the unit up and off the printer Store the paper tension unit in a safe place 3 Lower the tractor into ...

Page 18: ...e paper until the perforation between the first and second page is even with the top of the ribbon 9 Fit three holes on each side of the paper over the tractor pins on both sprockets Then close the sprocket covers 10 Slide the right sprocket to remove any slack in the paper then lock it in place by pushing the sprocket lock back If you use the front slot attach the front paper guide with the conti...

Page 19: ...r at the perforation nearest the paper entry slot 2 To eject the paper hold down the LF FF button Using two tractors in a push and pull combination You can use two tractors at the same time to improve continuous paper feeding and reduce paper jams You can load paper onto both the front push and pull tractors in the front paper slot or you can load paper onto both the rear push and pull tractors in...

Page 20: ...om the paper otherwise print quality may be reduced 9 Attach the paper guide Then slide the edge guides to the middle of the paper guide Lift the center section of the paper guide up and lay it flat 10 Attach the printer cover and close the paper guide cover Always close the printer cover before printing The printer does not print when the cover is open 11 You may need to check and change the prin...

Page 21: ...cause it to lose the top of form position The knob can be used only when the printer is turned off 2 Make sure that the tractor is installed in the front or rear push position you want to use 3 Load continuous paper onto the front or rear push tractor as described earlier The printer loads your continuous paper automatically when you begin printing Adjusting the Top of Form Position The top of for...

Page 22: ... Tear Off Bin button After your document prints check that the Tear Off Bin lights are not flashing Then press the Tear Off Bin button The Tear Off Bin lights start flashing and the paper advances to the tear off edge If the Tear Off Bin lights are flashing the paper is in the tear off position If you press the Tear Off Bin button again your paper feeds to the top of form position Advancing the pa...

Page 23: ...y be hot let it cool before you replace the ribbon cartridge Moving the print head while the printer is on may damage the printer 1 Make sure the printer is turned off If the printer is connected to an electrical outlet unplug it from the outlet 2 Lift the printer cover by its back edge and pull it straight up and off 3 Slide the print head to the ribbon installation position the indented portion ...

Page 24: ...re it moves smoothly 11 Replace the printer cover Clearing Paper Jams To clear a paper jam follow these steps 1 Press the Operate button to turn off the printer 2 If a single sheet of paper is stuck on the paper guide base gently remove it 3 Remove the printer cover If continuous paper from the rear slot is loaded in the printer remove the paper guide base 4 If continuous paper is jammed in the pr...

Page 25: ...efault settings you can change describe how to change them and show you how the control panel lights help you make settings Follow the printed instructions to change the default settings using the buttons on the control panel The arrows on the instruction sheets indicate the printer s current settings 5 When you finish making your settings press the Operate button to turn off the printer and exit ...

Page 26: ...r is turned off Whenever you turn off the printer wait at least 5 seconds before turning it back on otherwise you may damage the printer 2 To run the test using the Draft font hold down the LF FF button while you press the Operate button to turn on the printer To run the test using the printer s letter quality fonts hold down the Load Eject button while you turn on the printer Either self test can...

Page 27: ...ter on the printer mechanism or electronic components Do not use a hard or abrasive brush Do not spray the inside of the printer with lubricants unsuitable lubricants can damage the printer mechanism Contact an EPSON dealer if you think lubrication is needed Transporting the Printer If you need to transport your printer some distance carefully repack it using the original box and packing materials...

Reviews: