Installation and Setup Procedures 2
This chapter provides tips to help you select a site, set up, and test the printer. There is
information on the using
parallel and serial interfaces, along with cabling
configurations for serial transmission. The last portion of the chapter provides information
customers need to know about this printer to ensure maximum problem-free operation.
Site Requirements
Selection of a suitable location is essential to proper operation of the FX-870/1170. The
printer must be placed on a level, stable surface in a clean environment, which is not
subject to rapid fluctuations in temperature, vibration,
sunlight.
Use this list in placement of the printer:
Place the printer on a stable, flat surface capable of supporting at least twice the
weight of the printer (30 lb. for the narrow carriage printer or 40 lb. for the wide
carriage).
.
If you are using the built-in parallel interface, place the printer close enough to the
computer that you need a cable no longer than 10 feet, maximum. If the printer must
be farther than 10 feet from the computer, install an optional Type B serial interface.
Leave adequate space around the printer for proper ventilation.
.
Avoid electrical outlets controlled by wall switches or automatic timers. Accidental
disruption of power can erase information stored in printer memory.
Keep the entire computer system away from potential causes of electromagnetic
interference, such as loudspeakers or the base unit of cordless telephones.
.
Avoid dusty environments.
Removing the Packing Materials
Be sure to remove all the protective tape and packing material for the printer before
attempting to put the printer together. Refer to the Notice Sheet inserted in the printer for
directions. Save the packing materials in case the printer needs to be shipped later.
The Correct Power On Sequence
While the printer is plugged in, power is always applied to the secondary circuit. When you
press the OPERATE button, the printer performs the following power on sequence:
Checks
and
.
Moves the carriage back and forth until it finds the home position.
.
Lights control panel
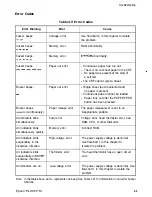
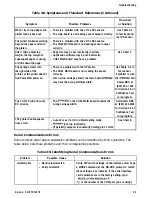
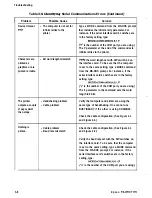
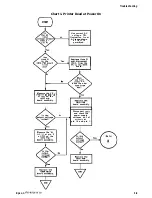
If the printer cannot complete this sequence successfully, refer to Chapter 3,
Troubleshooting. Otherwise,
turn the printer off, and perform the self-test.
Epson
2-1

