


178
6.
Press the
start button to send the fax.
Note:
To cancel faxing, press the
stop button.
Your product scans your original and prompts you to place additional pages, if necessary.
After scanning your originals, your product dials the number and sends the fax.
Note:
If the fax number is busy or there is a problem, the product automatically redials after one minute.
While the product is sending a color fax, other features are unavailable.
Parent topic:
Sending Faxes from the Product Control Panel
Fax Sending Options
While sending a fax, you can select
Scan Settings
and
Fax Send Settings
and select these options.
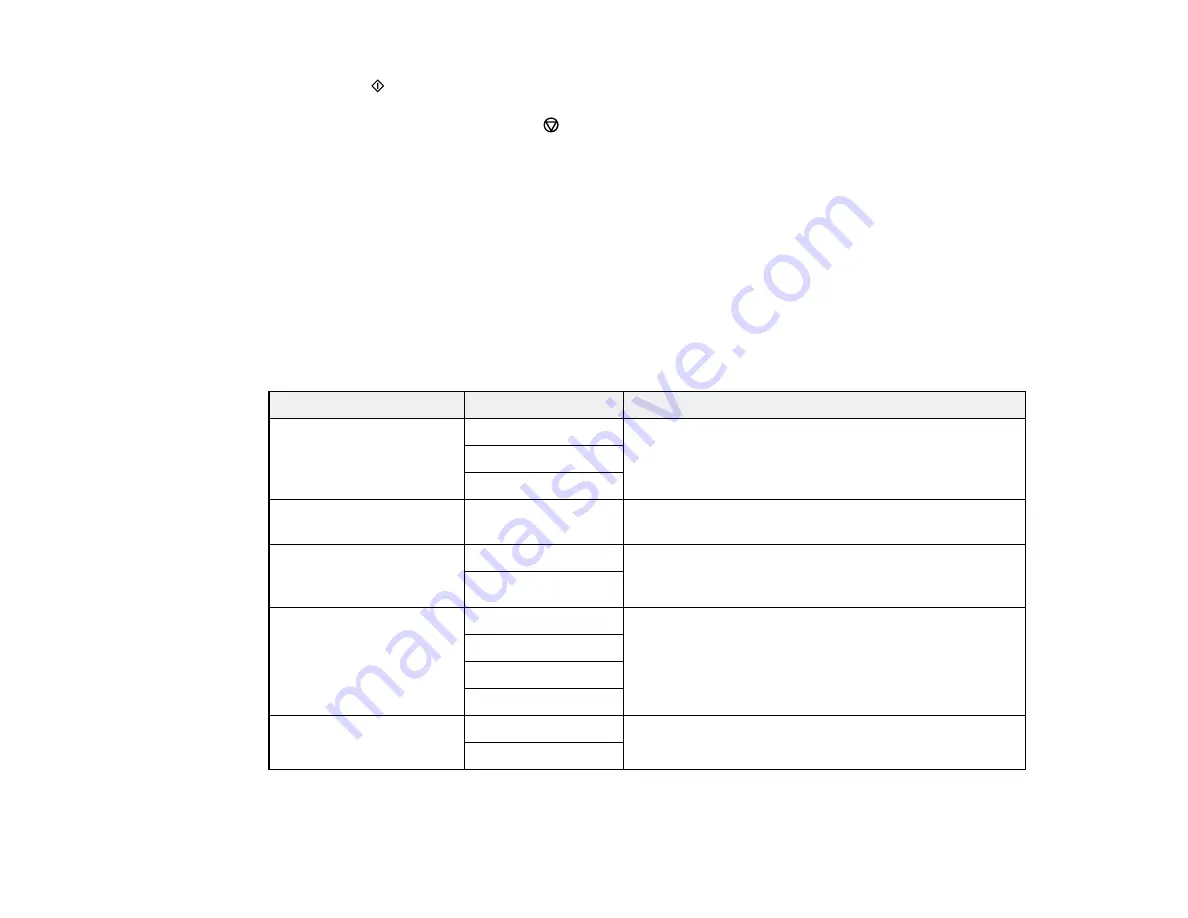
Scan Settings
Setting
Options
Description
Resolution
Standard
Adjusts the scan resolution and print quality of
outgoing faxes
Fine
Photo
Density
Varying levels
available
Lets you select from various density levels
ADF Continuous Scan
Off
Select
On
to have the product to ask if you want to
scan another page after a document in the ADF has
finished scanning
On
Original Size (Glass)
Half Letter
Sets the size for a document placed on the scanner
glass
A5
Letter
A4
Color Mode
B&W
Select whether to scan images in color or black and
white
Color
Fax Send Settings
Summary of Contents for ET-4800
Page 1: ...ET 4800 User s Guide ...
Page 2: ......
Page 128: ...128 You see an Epson Scan 2 window like this ...
Page 140: ...140 1 Click the Settings button You see a screen like this 2 Click the File Name Settings tab ...
Page 142: ...142 You see a screen like this 2 Click the Save Settings tab ...
Page 145: ...145 You see a screen like this 2 Click the Customize Actions tab ...
Page 147: ...147 You see this window ...
Page 212: ...212 You see a window like this 5 Click Print ...
Page 237: ...237 Related concepts Print Head Cleaning Print Head Alignment ...


