background image

35

List of Functions

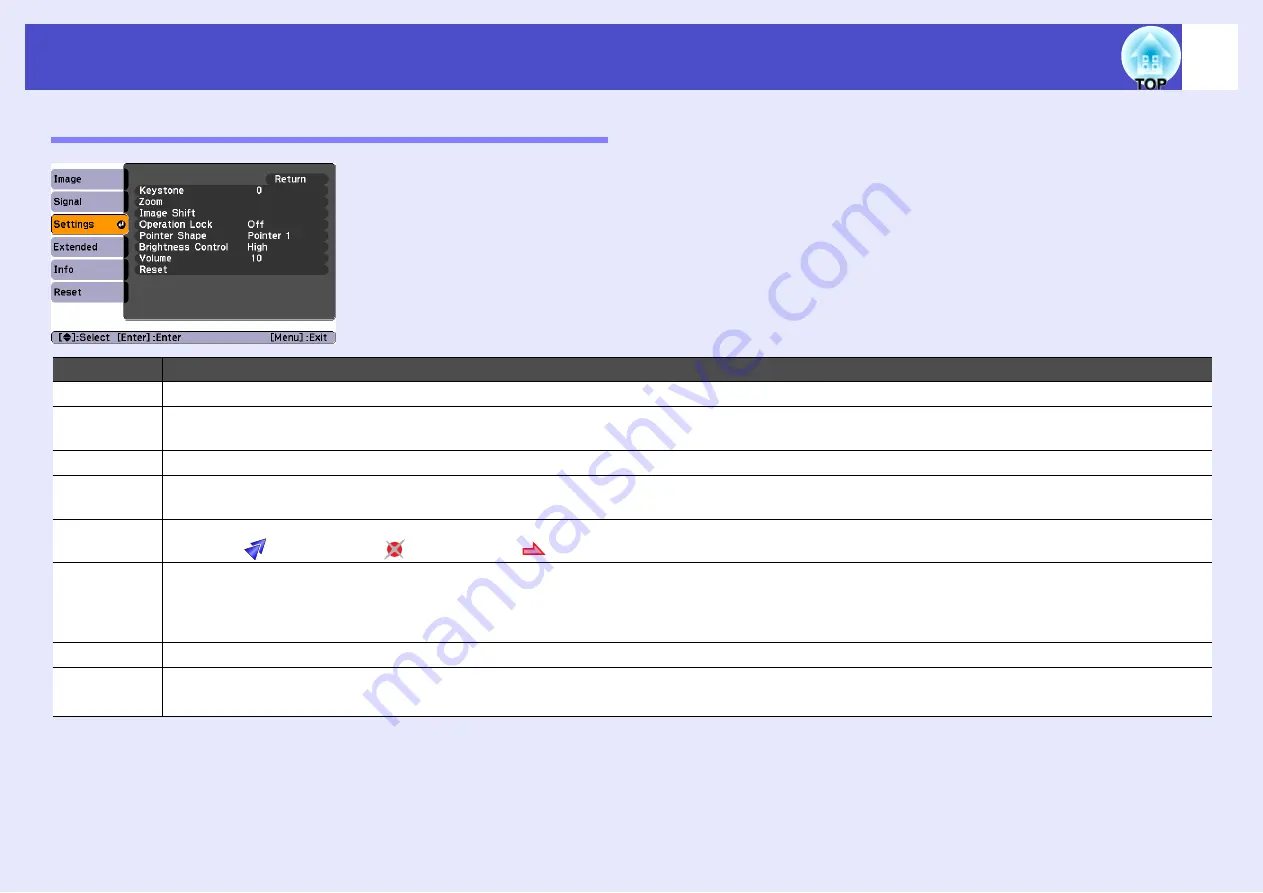
"Settings" Menu

Sub-menu

Function

Keystone

Corrects vertical keystone distortion in images. 

s

Quick Start Guide

Zoom

Adjusts the size of the projected image. 

s

Quick Start Guide

Wide: Larger Tele: Smaller 

Image Shift

Adjusts the projection position. 

s

p.16

Operation 
Lock

When set to "On", the operation of all buttons on the projector's control panel except for the [Power] button will be disabled. 

s

p.29

Pointer 
Shape

The shape of the pointer can be selected. 

s

p.22

Pointer 1: 

         Pointer 2: 

         Pointer 3: 

Brightness 
Control

This lets you set the lamp brightness to one of two settings.
Select "Low" if the images being projected are too bright such as when projecting images in a dark room or onto a small screen.
When "Low" is selected, the brightness of the images is reduced, the amount of electricity consumed and noise produced during projection are 
reduced and the lamp's operating life is extended. (Electrical consumption: about a 35 W decrease, lamp life: about 1.5 times longer)

Volume

Adjusts the volume. 

s

p.17

Reset

Adjustment values for the "Settings" menu functions are returned to their default settings, except for "Image Shift" and “Zoom".
If you would like to return all menu items to their default, see "Reset All". 

s

p.39

Summary of Contents for EMP-S4

Page 1: ...User s Guide ...

Page 2: ...egarding a topic can be found Click on the page number to display that page Indicates that an explanation of the underlined word or words in front of this symbol appears in the glossary of terms Click the underlined word or words to display the corresponding entry in the Glossary section of the Appendices sp 66 Indicates operating methods and the order of operations The procedure indicated should ...

Page 3: ...e Remote Control 18 Useful Functions Functions for Enhancing Projection 20 Pausing the Image and Sound Temporarily A V Mute 20 Freezing the Image Freeze 21 Changing the Aspect Ratio Resizing 21 Displaying the Pointer Pointer 22 Enlarging Part of the Image E Zoom 23 Using the Remote Control to Operate the Mouse Pointer Wireless Mouse 24 Security functions 26 Preventing theft Password Protect 26 Ope...

Page 4: ...hecking Projected Images on an External Monitor Monitor Output 63 Optional Accessories and Consumables 64 Screen Size and Projection Distance 65 Glossary 66 List of ESC VP21 Commands 68 Command List 68 Cable Layouts 68 USB Connection Setup 69 List of Supported Monitor Displays 70 Specifications 71 Appearance 72 Index 73 ...

Page 5: ...tion buzzer beeps twice Once you hear the confirmation buzzer beep twice you can unplug the power cable A single foot design means you do not have to make any difficult leveling adjustments You can easily make height adjustments with one hand sQuick Start Guide Easy to use big button control panel For ease of use buttons are classified and arranged according to their projection and adjustment func...

Page 6: ...gs sp 15 Manage users with password protect You can set up a password to restrict the use of the projector sp 26 Operation lock stops the use of all control panel buttons except for the Power button This can prevent your settings being changed by accident or on purpose when using the projector at an event at a school and so on sp 29 Colour Mode Security Function ...

Page 7: ...d A V Mute The power supply to the unit remains on even in A V Mute Do not forget to switch off the power supply When Sleep Mode is set to On after about 30 minutes in A V Mute the power turns off automatically At the time of purchase Sleep Mode is set to Off Focus ring sQuick Start Guide Adjusts the image focus Foot adjust lever sQuick Start Guide Pull out the foot lever to extend and retract the...

Page 8: ...pment is projected Computer port S Video port Video port Enter button sp 12 p 32 Automatically adjusts analogue RGB images from computers and RGB video images to the optimum images If a configuration menu or help screen is displayed it accepts and enters the current selection button sQuick Start Guide p 32 Press to correct keystone distortion If a configuration menu or help screen is displayed it ...

Page 9: ... video sources USB port sp 24 p 68 Connects the projector to a computer via the USBg cable when using the wireless mouse function Computer images cannot be projected by using the USB cable to connect the computer Monitor Out port sp 63 Outputs the projected computer s analogue RGB signals or RGB video signals to an external monitor from the source that is connected to the Computer port This featur...

Page 10: ...ng inside the projector when air is drawn in It should be cleaned and replaced periodically Suspension bracket fixing points 3 points sp 55 p 64 Attach the optional ceiling mount here when suspending the projector from a ceiling Front adjustable foot Foot adjust lever Air intake vent sp 56 Clean the air intake vent periodically ...

Page 11: ... emitting area sQuick Start Guide A V Mute button sp 20 E Zoom button sp 23 Enter button sp 25 p 32 Esc button sp 25 p 32 Auto button sp 12 Menu button sp 32 Power button sQuick Start Guide Color Mode button sp 15 buttons sp 25 p 32 Freeze button sp 21 Page down Page up buttons sp 25 Computer button sp 18 Resize button sp 21 Pointer button sp 22 Search button sp 18 Help button sp 41 Volume buttons...

Page 12: ...usting Computer Images and RGB Video Images 12 Automatic Setup 12 Adjusting the Tracking 12 Adjusting the Sync 13 Selecting the Projection Quality Color Mode 15 Adjusting the Projection Position Image Shift 16 Adjusting the Volume 17 Changing the Projected Image Source Search 18 Automatically Detect Incoming Signals and Change the Projected Image Source Search 18 Changing Directly from the Remote ...

Page 13: ...g automatic setup you will need to adjust the Trackingg manually using the following procedure PROCEDURE A Select Signal from the configuration menu and then select Tracking For details on this operation refer to Using the Configuration Menu sp 32 Check the buttons you can use and the operations they perform in the guide at the bottom of the screen Automatic Setup If you press the Auto button on t...

Page 14: ...etup you will need to adjust the Sync synchronisation g manually using the following procedure PROCEDURE A Select Signal from the configuration menu and then select Sync For details on this operation refer to Using the Configuration Menu sp 32 Check the buttons you can use and the operations they perform in the guide at the bottom of the screen The image will flash when continuous tracking adjustm...

Page 15: ...trackingg first it will not be possible to get the best adjustment results Incorrect tracking adjustment may not be noticeable with some types of picture However pictures with lots of lines and shading will tend to show incorrect tracking adjustments more clearly so check the tracking adjustment first Flickering and fuzziness may also occur when the brightness contrastg sharpness zoom and keystone...

Page 16: ...RGB video images are being input The images are vivid and brought into contrast Ideal for projecting still pictures such as photos in a bright room Sports When component video S video or composite video images are being input The images are vivid and brought to life Ideal for watching TV programmes and so on in a bright room Presentation Ideal for giving presentations in a bright room Theatre Give...

Page 17: ...Press the Esc button to close the adjustment screen The screen closes automatically if no operations are performed for about 10 seconds The projection position cannot be adjusted when zoom is set to maximum wide Even if you turn the power supply off the Image Shift settings you make are kept When either the projector position or the angle of the projector is changed you can readjust or perform the...

Page 18: ... when it is pressed to the side the volume decreases The volume gauge appears on the screen when the volume is being adjusted If the value displayed in the gauge on the screen stops changing when the volume is being adjusted it indicates that the limit for volume adjustment has been reached The volume can also be adjusted using the configuration menu sp 35 Remote control ...

Page 19: ...arch button until the target image is projected Changing Directly from the Remote Control You can use the remote control to change directly to the target input source Computer S Video Video Skip Using the Remote Control Using the Control Panel When your video equipment is connected start playback The following screen is displayed when only the picture signal projected now is input or when no pictu...

Page 20: ...porarily A V Mute 20 Freezing the Image Freeze 21 Changing the Aspect Ratio Resizing 21 Displaying the Pointer Pointer 22 Enlarging Part of the Image E Zoom 23 Using the Remote Control to Operate the Mouse Pointer Wireless Mouse 24 Security functions 26 Preventing theft Password Protect 26 When Password Protect is Enabled 26 Setting Password Protect 27 Operation Button Lock Function 29 ...

Page 21: ...les PROCEDURE You can turn A V Mute on or off by opening and closing the A V mute slide or pressing the A V Mute button When you close the A V mute slide an image is not projected but when you press the A V Mute button it enters the state set in A V Mute in the configuration menu sp 36 Using the remote control Using the projector If you use this function when projecting moving images the images an...

Page 22: ...been recorded in digital video or onto DVDs can be viewed in 16 9 wide screen format PROCEDURE The display is changed whenever you press the button Sound does not stop Even though the image on the screen is frozen the image source continues to project and so it is not possible to resume projection from the point where it was paused Pressing the Freeze button also clears configuration menu displays...

Page 23: ... draw attention to the area you are talking about PROCEDURE A Display the pointer Each time you press the button the pointer appears or disappears B Move the pointer icon Remote control You can use the Pointer Shape command in the Settings menu to change the shape of the pointer to one of three different shapes sp 35 Pointer icon Remote control ...

Page 24: ...the cross to the area of the image that is to be enlarged or reduced C Enlarge You can reduce the enlarged image by pressing the button To cancel the E Zoom press the Esc button Remote control The enlargement ratio will appear on the screen You can scroll the screen by tilting the button The selected area can be enlarged by between 1 to 4 times in 25 incremental steps Remote control Cross Remote c...

Page 25: ...USB port The USB cable can only be connected to computers with a standard USB interface If using a computer which is running Windows the computer must have had a full version of Windows 98 2000 Me XP Home Edition XP Professional installed If the computer is running a version of Windows 98 2000 Me XP Home Edition XP Professional that has been upgraded from an earlier version of Windows correct oper...

Page 26: ...utton and tilt and drag the button 2 Release the Enter button to drop at the desired location To previous slide To next slide If the mouse button settings are set to reverse on the computer the operation of the remote control buttons will also be reversed The wireless mouse function cannot be used while the following functions are being used While a configuration menu is being displayed While a he...

Page 27: ...e after the power cable has been disconnected and then reconnected If Direct Power On is set to On and you are using a circuit breaker or similar to centrally control the power the password entry screen will be displayed the first time the projector is turned on after the power supply is restored When Password Protect is Enabled Remote control Numeric buttons Keep Pressed If an incorrect password ...

Page 28: ...let If the projector s power is on when it is in standby mode the password entry screen will not be displayed Use the following procedure to set Password Protect PROCEDURE A Hold down the Freeze button for approximately 5 seconds The Password Protect menu will be displayed B Turn Power On Protect on 1 Select Power On Protect and then press the Enter button 2 Select On and then press the Enter butt...

Page 29: ...r the elapsed time will start D Enter the password 1 To set a password select Password and then press the Enter button 2 The message Change the password will be displayed so select Yes and then press the Enter button The default setting for the password is 0000 but you should change this to your own desired password If you select No the screen shown at step 1 will be displayed again 3 While holdin...

Page 30: ...he range of buttons that can be operated PROCEDURE A From the configuration menu select Settings Operation Lock For details on this operation refer to Using the Configuration Menu sp 32 Check the buttons you can use and the operations they perform in the guide at the bottom of the screen B Set to On If set to On none of the buttons on the control panel except the Power button can be operated Using...

Page 31: ...accordance with the selected setting There are two methods to cancel the projector s control panel lock Using remote control change the Settings Operation Lock in the configuration menu to Off Hold down the projector s Enter button continuously for about 7 seconds a message will be displayed and the lock will be cancelled ...

Page 32: ...u This chapter explains how to use the configuration menu and its functions Using the Configuration Menu 32 List of Functions 33 Image Menu 33 Signal Menu 34 Settings Menu 35 Extended Menu 36 Info Menu 38 Reset Menu 39 ...

Page 33: ...ation Menu A Selecting from the top menu C Changing the selected item B Selecting from the sub menu Top menu Sub menu Settings guide Using the remote control Using the control panel Select the setting to change Buttons used ...

Page 34: ... Color Temp g You can adjust the overall tint of images If you select High images appear bluish and if you select Low images appear reddish This item cannot be selected if sRGBg has been selected as the Color Mode setting in the Image menu Color Adjustment Adjusts the red green and blue colour strength of the image Red Adjust the saturation of the red component Green Adjusts the saturation of the ...

Page 35: ...into progressiveg p signals This is ideal for using when viewing still images Computer Input Selects the input signal in accordance with the equipment that is connected to the Computer port If set to Auto the input signal is set automatically in accordance with the connected equipment If the colours do not appear correctly when you select Auto select the appropriate signal for the connected equipm...

Page 36: ...ightness Control This lets you set the lamp brightness to one of two settings Select Low if the images being projected are too bright such as when projecting images in a dark room or onto a small screen When Low is selected the brightness of the images is reduced the amount of electricity consumed and noise produced during projection are reduced and the lamp s operating life is extended Electrical...

Page 37: ... being input to Black Blue or Logo Startup Screen The startup screen the image projected when starting the projector is displayed when starting On or not displayed when starting Off The setting is enabled after turning the power supply off and then back on A V Mute You can choose the screen display in A V mute when the A V Mute button is pressed from Black Blue and Logo Projection Sets the project...

Page 38: ...unit remains on Do not forget to switch off the power supply When set to On after about 30 minutes in A V Mute the power turns off automatically At the time of purchase Sleep Mode is set to Off High Altitude Mode When using above an altitude of about 1500m set to On Link 21L Sets whether communication using a USB connection and the EMP Link 21Lg utility software is being used or not To enable the ...

Page 39: ...hen the input source is composite video or S video Resolution Displays the input resolution Does not appear when the input source is composite video or S video Video Signal Shows the video signal format Not displayed for computer RGB video or component video images Refresh Rateg Displays the refresh rate Does not appear when the input source is composite video or S video Sync g Info Information fr...

Page 40: ...items in all menus to their default settings The Computer Input Zoom Image Shift Lamp Hours and Language settings will not be reset to their defaults Reset Lamp Hours Clear the cumulative lamp operating time and reset to 0H Perform this procedure when you replace the lamp ...

Page 41: ... if a problem is found Using the Help 41 Problems Solving 43 Reading the Indicators 43 Power indicator lights red 43 Lamp or Temp indicator flashes orange 45 When the Indicators Provide No Help 46 Problems relating to images 47 Problems when projection starts 52 Other problems 52 ...

Page 42: ...you in solving the problem It uses a series of menus in a question and answer format PROCEDURE A Display the Help menu B Select a menu item C Confirm the selection Using the control panel Using the remote control Using the control panel Using the remote control Using the control panel Using the remote control ...

Page 43: ...at the operations in steps 2 and 3 to proceed through the menu to more detailed items E Press the Help button to exit the help menu If the Help function does not provide a solution to the problem refer to Problem Solving sp 43 ...

Page 44: ...the electrical outlet and contact your dealer or the nearest address provided in the International Warranty Conditions section of the Safety Instructions World Wide Warranty Terms booklet Fan related error Sensor error Stop using the projector disconnect the power cable from the electrical outlet and contact your dealer or the nearest address provided in the International Warranty Conditions secti...

Page 45: ... the lamp is not cracked and that the air filter and air intake vent are clear Remove the lamp and check if it is cracked sp 59 Clean the air filter and the air intake vent sp 56 If it is not cracked Replace the lamp and turn on the power If error still occurs Replace it with a new lamp and turn on the power If error still occurs Stop using the projector disconnect the power cable from the wall ou...

Page 46: ...ntinue to use the lamp after it has passed the replacement period the possibility that the lamp may break will increase Replace the lamp with a new one as soon as possible The Power indicator status will vary depending on the projector status at the time If the projector is not operating properly even though the indicators are all showing normal refer to When the Indicators Provide No Help on the ...

Page 47: ...ence distortion or black white checked patterns appear Image is truncated large or small sp 50 Only part of the image is displayed Image colours are not right sp 51 The whole image appears purplish or greenish images are black white colours appear dull and so on Computer monitors and LCD screens have different colour reproduction performance so that the colours projected by the projector and the c...

Page 48: ...Have the configuration menu settings been made correctly Reset all of the settings Reset Reset All sp 39 Is the projected image completely black Some input images such as screen savers may be completely black Are the image signal format settings correct If a composite videog or S Videog source is connected to the projector use the Video Signal menu command to select the signal format Signal Video ...

Page 49: ...he remote control or the projector s control panel to change the image sp 18 Is the power for the computer or video source turned on Turn the power on for the devices Are the image signals being output to the projector If the image signals are only being output to the computer s LCD monitor or to the accessory monitor you need to change the output to an external destination as well as the computer...

Page 50: ...disappear Check Remedy Are the image signal format settings correct If a composite videog or S Videog source is connected to the projector use the Video Signal menu command to select the signal format Signal Video Signal sp 34 Are the cables connected correctly Check that all of the cables required for projection are securely connected sQuick Start Guide Is an extension cable being used If an exte...

Page 51: ...djust the setting manually using the Position menu command If signals other than analogue RGB images from a computer or RGB video images are being input adjust the setting manually using the Position menu command Signal Position sp 34 Has the computer been set for dual display If dual display has been activated in the Display Properties of the computer s Control Panel the projector will only proje...

Page 52: ...r Adjustment sp 33 Have the colour saturation and tint been adjusted correctly Use the Color Saturation and Tint menu commands to adjust the colour and tint Image Color Saturation Tint sp 33 Check Remedy Have the image brightness and luminance been adjusted correctly Use the Brightness and Brightness Control menu commands to adjust the brightness and luminance Image Brightness sp 33 Settings Brigh...

Page 53: ...bly a poor contact in the power cable or the power cable may be defective Reinsert the power cable If this does not solve the problem stop using the projector disconnect the power cable from the wall outlet and contact the nearest address provided in the International Warranty Conditions section of the Safety Instructions World Wide Warranty Terms booklet Other problems Check Remedy Is the audio s...

Page 54: ...rescent lamps shining onto the remote control light receiving area Set the projector up in a location where strong light will not shine onto the remote control light receiving area Are the batteries dead or have the batteries been inserted correctly Insert new batteries while making sure that they are inserted the correct way around sp 57 Has a remote control button been pressed for more than 30 s...

Page 55: ...nt Period 58 Replacing the Lamp 59 Resetting the Lamp Operating Time 61 Replacing the Air Filter 62 Checking Projected Images on an External Monitor Monitor Output 63 Optional Accessories and Consumables 64 Optional Accessories 64 Consumables 64 Screen Size and Projection Distance 65 Glossary 66 List of ESC VP21 Commands 68 Command List 68 Cable Layouts 68 USB connection 68 USB Connection Setup 69...

Page 56: ... use lubricants oils and so on the casing may crack and the projector may fall causing serious injury and serious damage to the projector When installing or adjusting the ceiling mount do not use adhesives to prevent the screws from loosening and do not use oils or lubricants and so on Front projection Front projection Rear projection using a translucent screen Rear projection The optional ceiling...

Page 57: ...ake vents it can cause the internal temperature of the projector to rise and this can lead to problems with operation and shortening of the optical engine s service life It is recommended that you clean these parts at least once every three months Clean them more often than this if using the projector in particularly dusty environments Cleaning the Projector s Surface Do not use volatile substance...

Page 58: ...ries are becoming flat Replace the batteries Have two spare AAA size alkali batteries ready to use when required PROCEDURE A Remove the battery cover While pushing the catch of the battery compartment cover lift the cover up B Insert the batteries Check the positions of the and marks inside the battery holder to ensure that the batteries are inserted the correct way C Replace the battery cover Pre...

Page 59: ...jected images Brightness Control sp 35 When used continuously at high brightness Approx 1900 hours When used continuously at low brightness Approx 2900 hours If you continue to use the lamp after this period the possibility of the lamp breaking becomes greater When the lamp replacement message appears replace the lamp with a new one as soon as possible even if it is still working Depending on the ...

Page 60: ...it has stopped illuminating there is a possibility that the lamp may be broken If replacing the lamp of a projector which has been installed on the ceiling you should always assume that the lamp is broken and you should stand to the side of the lamp cover not underneath it Remove the lamp cover gently Small pieces of glass may fall out when the lamp cover is opened If pieces of glass get into your...

Page 61: ...ul to avoid pieces of broken glass E Install the new lamp Insert the new lamp so that the lamp fits in place correctly and once it is fully inserted tighten the two screws F Install the lamp cover Slide the lamp cover and tighten the cover fixing screws Install the lamp securely If the lamp cover is removed the lamp turns off automatically as a safety precaution Moreover the lamp will not turn on ...

Page 62: ...and turn on the projector B Select Reset from the configuration menu and then select Reset Lamp Hours For details on this operation refer to Using the Configuration Menu sp 32 Check the buttons you can use and the operations they perform in the guide at the bottom of the screen C When Execute appears select Yes The lamp operating time will then be reset Resetting the Lamp Operating Time Do not res...

Page 63: ...the confirmation buzzer beeps twice disconnect the power cable B Remove the air filter Put your finger into the recess of the air filter and slide it forward to remove it C Install the new air filter Slide the air filter covers in from the outside and push them in until they click into place Replacing the Air Filter Recess Dispose of used air filters properly in accordance with your local regulati...

Page 64: ...ng input to the Computer Component Video terminal by connecting an external monitor to this projector Component video S Video and component video images cannot be output to an external monitor The setting gauge for keystone correction and the configuration menus and help menus are not output to the external monitor Cable provided with monitor To Monitor Out port black Monitor port ...

Page 65: ...GA HD15 PC cable ELPKC02 1 8 m 6 ft for mini D Sub 15 pin mini D Sub 15 pin This is the same as the computer cable supplied with the projector VGA HD15 PC cable ELPKC09 3 m 9 8 ft for mini D Sub 15 pin mini D Sub 15 pin VGA HD15 PC cable ELPKC10 20 m 65 6 ft for mini D Sub 15 pin mini D Sub 15 pin Use one of these longer cables if the computer cable supplied with the projector is too short Compone...

Page 66: ...4 to 2 1 7 to 0 9 40 81 61 32 24 117 to 159 3 8 to 5 2 6 to 3 2 3 to 1 1 50 100 76 39 30 147 to 200 4 8 to 6 6 7 to 4 2 8 to 1 4 60 120 90 47 35 177 to 240 5 8 to 7 9 9 to 4 3 4 to 1 7 80 160 120 63 47 237 to 321 7 8 to 10 5 12 to 6 4 5 to 2 3 100 200 150 79 59 297 to 402 9 7 to 13 2 14 to 7 5 7 to 2 9 120 240 180 94 71 357 to 483 11 7 to 15 9 17 to 9 6 8 to 3 4 150 300 230 118 91 447 to 605 14 7 ...

Page 67: ...y Dolby Laboratories Normal stereo is a 2 channel format which uses two speakers Dolby Digital is a 6 channel 5 1 channel system which adds to this a centre speaker two rear speakers and a sub woofer EMP Link 21L A utility software program that allows the projector to be connected to a computer so that the computer can be used to control the projector For details on acquiring the software and for ...

Page 68: ...XGA A type of video signal with a resolution of 1280 horizontal 1024 vertical dots which is used by IBM PC AT compatible computers Sync synchronisation The signals output from computers and RGB video equipment have a specific frequency If the projector frequency does not match this frequency the resulting images will not be of a good quality The process of matching the phases of these signals the ...

Page 69: ...minates with an error the projector outputs an error message and then returns the code When issuing any of the above commands tack a Carriage Return CR code 0Dh on to the end Cable Layouts Connector shape USB type B Item Command Power ON OFF On PWR ON Off PWR OFF Signal selection Computer Auto SOURCE 1F Computer SOURCE 11 Component Video SOURCE 14 Video SOURCE 41 S Video SOURCE 42 A V Mute ON OFF ...

Page 70: ...ll the downloaded USB driver onto your computer Read the instructions displayed on the download screen C Change the Link21L setting in the Extended menu to On If this is not set to On it is not possible to communicate using a USB connection D Turn the projector s power off E Turn off this projector after the confirmation buzzer beeps twice Once the projector s power has turned back on communicatio...

Page 71: ...4 800 600 SXGA 60 1280 960 800 600 SXGA 60 1280 1024 750 600 MAC13 640 480 800 600 MAC16 832 624 800 600 MAC19 1024 768 800 600 MAC19 60 1024 768 800 600 MAC21 1152 870 794 600 SDTVg 625i 50 720 576 800 600 SDTV 525i 60 720 480 800 600 SDTV 525p 60 640 480 800 600 HDTVg 750p 60 1280 720 800 450 HDTV 1125i 60 1920 1080 800 450 Component Video RGB Video Signal Refresh rateg Hz Resolution dots 2 Aspe...

Page 72: ...ating 250W 100 to 120V area 240W 220 to 240V area Standby 5W 100 to 120V area 6W 220 to 240V area Operating altitude 0 to 2286 m 0 to 7500 ft Operating temperature 5 to 35ºC 41 to 95ºF No condensation Storage temperature 10 to 60ºC 14 to 140ºF No condensation Weight Approx 2 6 kg Connectors Computer 1 Mini D Sub 15 pin female Blue S Video 1 Mini DIN 4 pin Video 1 RCA pin jack Audio Input 1 RCA pin...

Page 73: ...72 Appearance Units mm 3 M4 9 115 127 80 12 104 7 327 83 7 50 1 7 7 87 Centre of lens 69 7 12 Distance from center of lens to suspension bracket fixing point 247 ...

Page 74: ...Display Background 36 E ESC VP21 68 Extended Menu 36 E Zoom 23 F Focus ring 6 Freeze 21 Front adjustable foot 6 G Game 15 Glossary 66 H HDTV 70 Help function 41 High Altitude Mode 37 I Image Menu 33 Image Shift 16 35 Indicator 43 Info Menu 38 Input Signal 38 K Keystone 35 L Lamp cover 6 Lamp Hours 38 Lamp indicator 43 Lamp replacement period 58 Language 37 Link 21L 37 Low 35 M Menu 32 Message 36 M...

Page 75: ... 70 S Search 10 Security lock 6 Settings Menu 35 Setting Up the Projector 55 Sharpness 33 Signal Menu 34 Sleep Mode 37 Source 38 Source Search 7 18 Speaker 8 Specifications 71 Sports 15 Squeeze mode 21 sRGB 15 Startup Screen 36 Storage temperature 71 Sub menu 32 Supported Monitor Displays 70 Suspension bracket fixing point 9 72 S Video port 8 Sync 13 34 Sync Info 38 T Temp indicator 43 Theatre 15 ...

Page 76: ...ce with the instructions may cause harmful interference to radio or television reception However there is no guarantee that interference will not occur in a particular installation If this equipment does cause interference to radio and television reception which can be determined by turning the equipment off and on the user is encouraged to try to correct the interference by one or more of the fol...

Page 77: ...oduct or excluding the U S failure to strictly comply with SEIKO EPSON CORPORATION s operating and maintenance instructions SEIKO EPSON CORPORATION shall not be liable against any damages or problems arising from the use of any options or any consumable products other than those designated as Original EPSON Products or EPSON Approved Products by SEIKO EPSON CORPORATION General Notice Macintosh Mac...

Reviews: