background image

List of Supported Monitor Displays

106

f

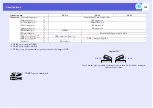
Component Video

Units: dots

* Letterbox signal

f

Composite video/S-video

Units: dots

* Letterbox signal

Signal

Refresh rate

g


(Hz)

Resolution

Aspect Mode

4:3

16:9

SDTV

g

(480i)

60

720

^

480/720

^

360

*

1024

^

768

1024

^

576

SDTV(576i)

50

720

^

576/720

^

432

*

1024

^

768

1024

^

576

SDTV(480p)

60

720

^

480/720

^

360

*

1024

^

768

1024

^

576

SDTV(576p)

50

720

^

576/720

^

432

*

1024

^

768

1024

^

576

HDTV

g

(720p)

50/60

1280

^

720

1024

^

768

1024

^

576

HDTV(1080i)

50/60

1920

^

1080

1024

^

768

1024

^

576

Signal

Refresh rate

g


(Hz)

Resolution

Aspect Mode

4:3

16:9

TV (NTSC)

60

720

^

480/720

^

360

*

1024

^

768

1024

^

576

TV(PAL, SECAM)

50

720

^

576/720

^

432

*

1024

^

768

1024

^

576

Summary of Contents for E-Torl EB W6

Page 1: ...1 User s Guide ...

Page 2: ...l is ignored or if sufficient care is not taken Attention Indicates procedures which may result in damage or injury if sufficient care is not taken q Indicates additional information and points which may be useful to know regarding a topic s Indicates a page where detailed information regarding a topic can be found g Indicates that an explanation of the underlined word or words in front of this sy...

Page 3: ...ge Menu 40 Signal Menu 41 Settings Menu 43 Extended Menu 44 Info Menu Display only 46 Reset Menu 47 Troubleshooting Using the Help 49 Problem Solving 51 Reading the Indicators 51 When the Indicators Provide No Help 55 Appendices Installation Methods 64 Cleaning 65 Cleaning the Projector s Surface 65 Cleaning the Lens 65 Cleaning the Air Filter and Air Intake Vent 65 Replacing Consumables 66 Replac...

Page 4: ...le Display and Slideshow 95 Optional Accessories and Consumables 97 Glossary 98 ESC VP21 Commands 100 Command List 100 Cable Layouts 100 USB Connection Setup 101 List of Supported Monitor Displays 102 EB W6 102 EB X6 105 EB S6 107 Specifications 109 Specifications 109 Operating Requirements of Supplied Software 112 Appearance 113 Index 114 ...

Page 5: ...camera and so on as a slideshow This makes projection easy since it is not necessary to connect a computer s p 90 f Password Protect to restrict and manage users By setting a password you can restrict who can use the projector s p 31 f Control Panel Lock restricts button operation on the control panel You can prevent people from changing the settings on the projector without permission s p 34 f Eq...

Page 6: ... desk s Quick Start Guide E Foot adjust lever Pull out the foot lever to extend and retract the front foot s Quick Start Guide F A V mute slide Slide shut when not using the projector to protect the lens By closing during projection you can hide the image and the sound A V Mute s Quick Start Guide p 22 G Remote receiver Receives signals from the remote control s Quick Start Guide H Focus ring Adju...

Page 7: ...o sources Audio input port Connects to the audio output port of the equipment you want to project from and inputs the audio s Quick Start Guide H USB port Type B You can use a number of functions by connecting a computer via a USB cable and making connection settings Connect to a computer by USB cable to project images from the computer s p 82 You can Page Up Down and operate a mouse pointer using...

Page 8: ...eo signals from a computer and component videog signals from other video sources F S Video input port For S videog signals from video sources Video input port For composite videog signals from video sources Audio input port Connects to the audio output port of the equipment you want to project from and inputs the audio s Quick Start Guide G USB port Type B You can use a number of functions by conn...

Page 9: ... the current selection and moves to the next level EB W6 s p 37 EB X6 s p 38 E v w buttons Corrects keystone distortion If pressed when a configuration menu or a help screen is displayed these buttons select menu items and setting values s Quick Start Guide EB W6 s p 37 EB X6 s p 38 F Help button Displays and closes the help screen which shows you how to deal with problems if they occur s p 49 G E...

Page 10: ...election and moves to the next level s p 39 H C F E D A B G I E v w buttons Corrects keystone distortion If pressed when a configuration menu or a help screen is displayed these buttons select menu items and setting values s Quick Start Guide p 39 F Help button Displays and closes the help screen which shows you how to deal with problems if they occur s p 49 G Esc button Stops the current function...

Page 11: ...f s p 22 G Auto Setup button If pressed during projection of computer signal images it automatically adjusts the tracking synchronization and position to project the optimum image H Aspect button The aspect ratiog changes each time the button is pressed s p 24 I Page buttons You can Page Up Down between pages projected by USB display s p 82 Page Up Down between slides of a slideshow can be made s ...

Page 12: ...s to the previous level s p 37 49 When using the Wireless Mouse function this functions as the right mouse button s p 87 O Volume buttons a b a Lowers the volume b Raises the volume s Quick Start Guide P Help button Displays and closes the help screen which shows you how to deal with problems if they occur s p 49 Q Color Mode button Each time the button is pressed the color mode changes s p 19 Nam...

Page 13: ...6 s p 38 EB S6 s p 39 When using the Wireless Mouse function this functions as the left mouse button s p 87 E Auto Setup button If pressed during projection of computer signal images it automatically adjusts the tracking synchronization and position to project the optimum image s p 41 F Page buttons You can Page Up Down between pages projected by USB Display s p 82 Page Up Down is enabled when the...

Page 14: ... the current function If pressed when a configuration menu is displayed it moves to the previous level EB X6 s p 38 EB S6 s p 39 When using the Wireless Mouse function this functions as the right mouse button s p 87 N Help button Displays and closes the help screen which shows you how to deal with problems if they occur s p 49 O button If pressed when a configuration menu or a help screen is displ...

Page 15: ...ick Start Guide C Security cable installation point Pass a commercially available anti theft wire lock through here when you want to secure the projector to a fixed object s p 35 A D B B E C D Air filter Air intake vent This prevents dust and other foreign particles from getting inside the projector when air is drawn in The projector displays a warning message when it is time to clean or replace t...

Page 16: ... the Image Freeze 23 Changing the Aspect Ratio 24 Switching methods 24 Changing the aspect ratio of video equipment images 25 Changing the aspect of computer images For EB X6 S6 26 Changing the aspect of computer image HDMI image For EB W6 27 Enlarging Part of the Image E Zoom 29 Security Functions 31 Managing Users Password Protect 31 Type of Password Protect 31 Setting Password Protect 31 Enteri...

Page 17: ...Automatic Detection of Input Signal Source Search You can project the target image quickly because the Source Search button skips input ports where no image is being input Switching to HDMI and Slideshow are only available with EB W6 When your video equipment is connected start playback before beginning this operation When two or more pieces of equipment are connected press the Source Search butto...

Page 18: ...lowing for button operation s p 11 q The following screen showing the status of image signals is displayed when only the image that the projector is currently displaying is available or when no image signal can be found You can select the input port where the connected equipment you want to use is projecting If no operation is performed after about 10 seconds the screen closes EB W6 ...

Page 19: ...on while the color mode name is displayed on the screen it changes to the next color mode Mode Application Game Ideal for use in a bright room This is the brightest mode and reproduces shadow tones well Presentation Ideal for making presentations using color materials in a bright room Text Ideal for making presentations using black and white materials in a bright room Theater Ideal for watching fi...

Page 20: ... A Press the Menu button and select Image Color Mode in the configuration menu EB W6 s p 37 EB X6 s p 38 EB S6 s p 39 B Select a Color Mode name C Press the Menu button to close the configuration menu Procedure Using the remote control EB W6 EB X6 S6 Using the control panel EB W6 X6 EB S6 ...

Page 21: ...ton and select Image Auto Iris in the configuration menu EB W6 s p 37 EB X6 s p 38 EB S6 s p 39 B Select On The set value is stored for each color mode C Press the Menu button to close the configuration menu Procedure Using the remote control EB W6 EB X6 S6 Using the control panel EB W6 X6 EB S6 q This item can be selected only when Game or Theater is selected as the Color Mode setting in the Imag...

Page 22: ...Remote control EB W6 EB X6 S6 Projector q If you use this function when projecting moving images the images and sound continue to be played back by the source and you cannot return to the point where A V Mute was activated From the remote control you can choose to display black blue or logo as the A V mute display using the Extended Display A V Mute setting in the configuration menu s p 44 When th...

Page 23: ...ng any images if the Freeze function is activated beforehand Each time you press the button Freeze turns on or off Procedure Remote control EB W6 EB X6 S6 q Audio does not stop The image source continues to play back the moving images even while the screen is frozen so it is not possible to resume projection from the point where it was paused If the Freeze button is pressed while the configuration...

Page 24: ... types of aspect ratio are as follows f Switching methods EB W6 Each time you press the button the aspect name is displayed on the screen and the aspect changes If you press the button while the aspect name is displayed on the screen it changes to the next aspect mode EB X6 S6 A Press the Menu button and select Signal Aspect from the configuration menu EB X6 s p 38 EB S6 s p 39 Procedure q This ca...

Page 25: ...elect the aspect ratio and press the Enter button Your selected aspect is set f Changing the aspect ratio of video equipment images EB X6 S6 During 720p 1080i signal input the display has a zoom ratio of 4 3 display of image with left and right cut off EB W6 4 3 16 9 16 9 Normal Full Through Zoom ...

Page 26: ...e 4 3 Projects to the full projection size at an aspect of 4 3 Apply when you want to project images with a 5 4 aspect ratio 1280 1024 etc at full projection size During 1280 1024 signal input 16 9 Projects at aspect ratio 16 9 Apply when you want to project a full screen on a 16 9 screen During 1280 1024 signal input q When some portions of an image are missing or not all of the image can be proj...

Page 27: ... screens set the aspect to 16 9 Setting Explanation Projection example Normal During image input from Computer input port Projects to the full projection size retaining the aspect of the input image During 1024 768 signal input Auto During image input from HDMI input port Projects in an appropriate aspect based on information from the signal being input During 1280 800 signal input 16 9 Projects t...

Page 28: ...image size to the center of the screen This is ideal for clearer projection When image resolution is above 1280 800 the periphery of the image is not projected During 800 600 signal input During 1400 1050 signal input Setting Explanation Projection example q When some portions of an image are missing or not all of the image can be projected during computer image projection set Resolution in the co...

Page 29: ... E Zoom This is useful when you want to expand images such as graphs and tables to see them in greater detail A Start E Zoom B Move the cross to the area of the image that you want to enlarge Procedure Remote control EB W6 EB X6 S6 Remote control EB W6 EB X6 S6 Cross ...

Page 30: ...uickly by holding the button down You can reduce the enlarged image by pressing the button Press the Esc button to cancel Remote control EB W6 EB X6 S6 q The enlargement ratio appears on the screen The selected area can be enlarged to between 1 to 4 times in 25 incremental steps Hold down the button to scroll the image ...

Page 31: ...er On Protect is On the password must be entered whenever the projector is turned on after it has been disconnected from the power supply to which it was connected the last time the password was entered If the correct password is not entered projection does not start 2 User s Logo Protect Even if someone tries to change the user s logo set by the owner of the projector it cannot be changed When Us...

Page 32: ...layed select Yes and then press the Enter button The default setting for the password is 0000 Change this to your own desired password If you select No the screen shown in step 1 is displayed again 3 Enter a four digit number using the numeric buttons With the EB W6 enter the digit while holding down the Num button The number entered is displayed as When you enter the fourth digit the confirmation...

Page 33: ...this happens disconnect the power plug from the electrical outlet and then reinsert it and turn the projector s power back on The projector displays the password entry screen again so that you can enter the correct password If you have forgotten the password make a note of the Request Code xxxxx number that appears on the screen and contact the nearest address provided in the Support and Service G...

Page 34: ...locked This is useful at events or shows when you want to deactivate all buttons and only project or at schools when you want to limit button operation The projector can still be operated using the remote control A Press the Menu button and select Settings Control Panel Lock in the configuration menu EB W6 s p 37 EB X6 s p 38 EB S6 s p 39 Check the buttons you can use and the operations they perfo...

Page 35: ...Security System on the Kensington homepage http www kensington com Security cable installation point A commercially available theft prevention wire lock can be passed through the installation point to secure the projector to a desk or pillar f Installing the wire lock Pass an anti theft wire lock through the installation point See the documentation supplied with the wire lock for locking instructi...

Page 36: ...menu and its functions Using the Configuration Menu For EB W6 37 Using the Configuration Menu For EB X6 38 Using the Configuration Menu For EB S6 39 List of Functions 40 Image Menu 40 Signal Menu 41 Settings Menu 43 Extended Menu 44 Info Menu Display only 46 Reset Menu 47 ...

Page 37: ...u For EB W6 A Selecting from the top menu C Changing the selected item B Selecting from the sub menu Top menu Sub menu Settings Guide Select the setting to change Using the remote control Using the control panel Buttons used D Exit ...

Page 38: ...u For EB X6 A Selecting from the top menu C Changing the selected item B Selecting from the sub menu Top menu Sub menu Settings Guide Select the setting to change Using the remote control Using the control panel Buttons used D Exit ...

Page 39: ...u For EB S6 A Selecting from the top menu C Changing the selected item B Selecting from the sub menu Top menu Sub menu Settings Guide Select the setting to change Using the remote control Using the control panel Buttons used D Exit ...

Page 40: ...the image sharpness Color Temp You can adjust the overall tint of the image When High is selected the image becomes tinged with blue and when Low is selected the image becomes tinged with red This item cannot be selected if sRGBg is selected as the Color Mode setting in the Image menu Color Adjustment Red Green Blue You can adjust the saturation of each color individually This item cannot be selec...

Page 41: ...MI can be set only during 480i 576i signal input Off IP conversion is carried out for each field in the screen This is ideal for viewing images with a large amount of movement On interlaceg i signals are converted into progressiveg p signals This is ideal for viewing still images HDMI Video Range EB W6 only This cannot be set when a digital RGB signal is input When the projector s HDMI input port ...

Page 42: ...of Functions 42 Reset You can reset all adjustment values in the Signal menu to their default settings except for Input Signal To return all menu items to their default settings see s p 47 Sub Menu Function ...

Page 43: ...ntrol panel s p 34 Brightness Control You can set the lamp brightness to one of two settings Select Low if the images being projected are too bright such as when projecting images in a dark room or onto a small screen When Low is selected the amount of electricity consumed and the lamp s operating life are changed as follows and fan rotation noise during projection is reduced Electrical consumptio...

Page 44: ...Logo Startup Screen 1 You can set whether the startup screen the image projected when starting the projector is displayed On or not Off A V Mute 1 You can set the screen displayed during A V Mute as Black Blue or Logo User s logo You can change the user s logo that is displayed as a background and displayed during A V Mute s p 72 Projection You can choose one of the following settings according to...

Page 45: ...en using the projector above an altitude of 1500 m USB Type B Connect the projector to a computer with a USB cable and set to USB Display to project the image on the computer s p 82 Set to Wireless Mouse to operate the mouse pointer by remote control s p 87 Set to Page Up Down to page up down by remote control s p 86 Link 21Lg You can set whether to use the utility software EMP Link 21L On or not ...

Page 46: ...nput Signal setting from the Signal menu according to Source Resolution You can display the input resolution Video Signal You can display the content of Video Signal set in the Signal menu Refresh Rateg You can display the refresh rate Syncg Info You can display the image signal information This information may be needed if service is required Status This is information about problems that have oc...

Page 47: ...et all items in all menus to their default settings The following items are not reset to their defaults Input Signal User s Logo Lamp Hours and Language Reset Lamp Hours You can clear the cumulative Lamp Hours use time and return it to 0H Reset it when you replace the lamp ...

Page 48: ...f a problem is found Using the Help 49 Problem Solving 51 Reading the Indicators 51 t Power indicator lights red 52 i o Indicator is lit or flashing orange 54 When the Indicators Provide No Help 55 Problems relating to images 56 Problems when projection starts 60 Other problems 61 ...

Page 49: ...he problem By answering the questions you can make the correct settings A Press the Help button The help screen is displayed B Select a menu item Procedure Using the remote control EB W6 EB X6 S6 Using the control panel EB W6 X6 EB S6 Using the remote control EB W6 EB X6 S6 Using the control panel EB W6 X6 EB S6 ...

Page 50: ... shown on the screen below Press the Help button to exit Help Using the remote control EB W6 EB X6 S6 Using the control panel EB W6 X6 EB S6 q If Help does not provide a solution to the problem refer to Problem Solving s p 51 Displayed help contents differ with the model of projector ...

Page 51: ...indicators mean and how to remedy problems that they indicate If all indicators are off check that the power cable is connected correctly and that the power is being supplied normally Sometimes when the power cable is unplugged the t indicator remains lit for a short period which is not a fault Indicates the operating status Orange Standby condition When the t button is pressed in this condition p...

Page 52: ...r or the nearest address provided in the Support and Service Guide s Epson Projector Contact List High Temp Error overheating The lamp turns off automatically and projection stops Wait for about five minutes After about five minutes the projector switches to standby condition so check the following two points Check that the air filter and air exhaust vent are clear and that the projector is not po...

Page 53: ... or the nearest address provided in the Support and Service Guide s Epson Projector Contact List If it is cracked Replace it with a new lamp or contact your local dealer for further advice If replacing the lamp yourself be careful to avoid pieces of broken glass you cannot continue projecting until the lamp is replaced s Epson Projector Contact List Check that the lamp cover and the lamp are secur...

Page 54: ...mp Replace it with a new lamp s p 68 If you continue to use the lamp after the replacement period has passed the possibility that the lamp may explode increases Replace it with a new lamp as soon as possible q If the projector is not operating properly even though the indicators are all showing normal refer to When the Indicators Provide No Help s p 55 If an indicator is displaying a status not de...

Page 55: ...es s p 58 Problems such as interference distortion or black white checked patterns appear f The image is truncated large or small or the aspect is not suitable s p 58 Only part of the image is displayed or the height and width ratios of the image are not correct and so on f Image colors are not right s p 59 The whole image appears purplish or greenish images are black white colors appear dull and ...

Page 56: ...ation menu settings correct Reset all of the settings s Reset Reset All p 47 Is the projected image completely black Some input images such as screen savers may be completely black Is the image signal format setting correct Change the setting according to the signal for the connected equipment s Signal Video Signal p 41 Check Remedy Is the computer s image signal being output to the LCD and the mo...

Page 57: ...re output externally they no longer appear on the LCD monitor or accessory monitor sComputer s documentation under a title such as External output or Connecting an external monitor If the connection is made while the power of the projector or computer is already turned on the function Fn key that changes the computer s image signal to external output may not work Turn the power for the computer an...

Page 58: ...Change the setting according to the signal for the connected equipment s Signal Resolution p 41 Is the image still being enlarged by E Zoom Press the Esc button on the remote control to cancel E Zoom s p 29 Is Position adjusted correctly Press the Auto button on the remote control or the Enter button on the control panel to perform automatic adjustment of the computer image being projected If the ...

Page 59: ...olor adjusted correctly Adjust the Color Adjustment setting in the configuration menu s Image Color Adjustment p 40 Are the color saturation and tint adjusted correctly Adjust the Color Saturation and Tint settings in the configuration menu s Image Color Saturation Tint p 40 Check Remedy Are the image brightness and luminance adjusted correctly Adjust the Brightness and Brightness Control settings...

Page 60: ...ble may be defective Reinsert the power cable If this does not solve the problem stop using the projector disconnect the power cable from the electrical outlet and contact your local dealer or the nearest address provided in the Support and Service Guide s Epson Projector Contact List Is the control panel lock set to Full Lock When you press and hold down the Enter button on the control panel for ...

Page 61: ...s about 30 horizontally and about 15 vertically Is the remote control too far from the projector The operating range for the remote control is about 6 m Is direct sunlight or strong light from fluorescent lamps shining onto the remote receiver Set the projector up in a location where strong light does not shine onto the remote receiver Are the batteries dead or have the batteries been inserted cor...

Page 62: ...72 Screen Size and Distance 75 EB W6 75 EB X6 76 EB S6 77 Connecting to External Equipment 78 Connecting to an External Monitor EB X6 S6 only 78 Connecting and Removing a USB Device EB W6 only 79 Connecting a USB Device 79 Reading the Indicators 79 Removing a USB Device 79 Inserting and Ejecting a SD Card EB W6 only 80 Inserting a SD Card 80 Reading the SD Card Access Lamp 80 Ejecting a SD Card 81...

Page 63: ...les 97 Glossary 98 ESC VP21 Commands 100 Command List 100 Cable Layouts 100 USB connection 100 USB Connection Setup 101 List of Supported Monitor Displays 102 EB W6 102 Computer images analog RGB 102 Component Video 103 Composite video S video 103 Input signal from HDMI input port 104 EB X6 105 Computer images analog RGB 105 Component Video 106 Composite video S video 106 EB S6 107 Computer images...

Page 64: ...en installing or adjusting the ceiling mount do not use adhesives to prevent the screws from loosening and do not use oils or lubricants and so on Attention Do not use the projector on its side This may cause malfunctions to occur Project images from front of the screen Front projection Project images from behind a translucent screen Rear projection Suspend the projector from the ceiling and proje...

Page 65: ...vent and clean or replace the air filter s How to replace the air filter p 71 Attention Do not use volatile substances such as wax alcohol or thinner to clean the projector s surface The quality of the case may change or become discolored Attention Do not rub the lens with harsh materials or subject the lens to shocks as it can easily become damaged Attention If dust collects on the air filter it ...

Page 66: ...atteries Have two spare AA size alkaline or manganese dry batteries ready to use You can only use AA size alkaline or manganese dry batteries A Remove the battery cover While pushing the battery cover catch lift the cover up B Replace the old batteries with new batteries Caution Check the positions of the and marks inside the battery holder to ensure the batteries are inserted the correct way Atte...

Page 67: ...ce Replacing the Lamp f Lamp replacement period It is time to replace the lamp when The message Replace the lamp is displayed The lamp indicator flashes orange The projected image gets darker or starts to deteriorate EB W6 EB X6 S6 A message is displayed Flashing orange The illustration is of the EB W6 ...

Page 68: ... used the lamp may become darker or stop working before the lamp warning message appears You should always have a spare lamp ready in case it is needed Warning When replacing the lamp because it has stopped illuminating there is a possibility that the lamp may be broken If replacing the lamp of a projector which has been installed on the ceiling you should always assume that the lamp is broken and...

Page 69: ...e the lamp cover Loosen the lamp cover fixing screw with the screwdriver supplied with the new lamp or a head screwdriver Then slide the lamp cover straight forward and lift it to remove C Loosen the two lamp fixing screws D Take out the old lamp If the lamp is cracked replace it with a new lamp or contact your local dealer for further advice s Epson Projector Contact List Procedure ...

Page 70: ...lamp After replacing the lamp make sure you reset the lamp hours in the configuration menu s p 47 Attention Make sure you install the lamp securely If the lamp cover is removed the lamp turns off automatically as a safety precaution If the lamp or the lamp cover is not installed correctly the lamp does not turn on This product includes a lamp component that contains mercury Hg Please consult your ...

Page 71: ... A After you turn off the projector s power and the confirmation buzzer beeps twice disconnect the power cable B Remove the air filter Put your finger into the recess of the air filter and slide it forward to remove it C Install the new air filter Slide the air filter in from the outside and push until it clicks into place Procedure q Dispose of used air filters properly in accordance with your lo...

Page 72: ...rm in the guide under the menu q When registering a user logo the current user logo is erased and the default setting is not resumed Procedure Using the remote control EB W6 EB X6 S6 Using the control panel EB W6 X6 EB S6 q If User s Logo Protect from Password Protect is set to On a message is displayed and the user s logo cannot be changed You can make changes after setting User s Logo Protect to...

Page 73: ...elect this image is displayed select Yes F Select the zoom factor from the zoom setting screen q When you press the Enter button on the remote control or the control panel the screen size may change as it changes to the resolution of the image signal Using the remote control EB W6 EB X6 S6 Using the control panel EB W6 X6 EB S6 q You can save at up to 400 300 dots in size ...

Page 74: ... Logo is displayed select Yes The image is saved After the image has been saved the message Completed is displayed q Saving the user s logo may take about 15 seconds Do not use the projector or any connected equipment while it is saving This may cause malfunctions to occur ...

Page 75: ...0 130 75 51 30 196 to 236 77 to 93 4 1 6 80 170 110 67 43 255 to 307 101 to 121 0 0 70 140 110 55 43 253 to 304 100 to 120 0 0 70 150 87 59 34 229 to 276 90 to 109 5 1 9 100 220 130 87 51 320 to 385 126 to 152 0 0 80 160 120 63 47 290 to 348 114 to 137 0 0 80 180 100 71 39 263 to 316 103 to 124 6 2 2 120 260 160 102 63 385 to 463 152 to 182 0 0 100 200 150 79 59 363 to 436 143 to 172 0 0 100 220 1...

Page 76: ... 80 160 120 63 47 229 to 275 90 to 108 13 5 80 180 100 71 39 249 to 300 98 to 118 3 1 1 100 200 150 79 59 287 to 345 113 to 136 16 6 3 100 220 120 87 47 313 to 376 123 to 148 3 1 4 150 300 230 118 91 432 to 519 170 to 204 24 9 4 150 330 190 130 75 471 to 566 185 to 223 5 2 200 410 300 161 118 577 to 693 227 to 273 32 12 5 200 440 250 173 98 629 to 755 247 to 297 7 2 7 250 510 380 201 150 722 to 86...

Page 77: ... 70 150 87 59 34 226 to 306 89 to 120 4 to 20 1 4 to 7 9 80 160 120 63 47 237 to 321 93 to 126 11 to 6 4 5 to 2 3 80 180 100 71 39 259 to 350 102 to 138 4 to 23 1 6 to 9 100 200 150 79 59 297 to 402 117 to 158 14 to 7 5 7 to 2 9 100 220 120 87 47 324 to 438 128 to 173 5 to 29 2 to 11 3 150 300 230 118 91 447 to 605 176 to 238 22 to 11 8 5 to 4 3 150 330 190 130 75 487 to 659 192 to 259 8 to 43 3 t...

Page 78: ... images on an external monitor when giving presentations even if you cannot see the screen Connect to an external monitor using the cable supplied with the monitor q Component video signals and images from equipment connected to the Video port and S Video port cannot be output to an external monitor The setting gauge for Keystone the configuration and help screen and so on are not output to an ext...

Page 79: ...ce After finishing projecting use the following procedure to remove USB devices from the projector A Turn off power for the digital camera or USB device B Remove from the projector s USB port Type A q Use a USB cable of up to 3 meters in length If the cable length is over 3 meters the slideshow may not operate normally USB cable To USB port Type A To digital camera s USB port Attention Normal oper...

Page 80: ...slot with its top surface facing up Firmly insert the card as far as it can go Reading the SD Card Access Lamp The SD card access lamp is lit or flashing as follows to indicate the access status of the SD card Attention Insert the SD card so that it faces the correct direction Inserting a card in the wrong direction may result in malfunction or damage Procedure SD card commercially available Flash...

Page 81: ...81 Ejecting a SD Card A Lightly press the SD card The SD card ejects B Grip the SD card and pull it straight out Attention Do not remove the card while its access lamp is flashing You may damage the card or projector Procedure SD Card Access Lamp ...

Page 82: ...EB W6 Attention Do not connect via a USB hub connect the projector directly to the computer Procedure Connects to the power cable supplied Turn the power on for the projector Open the A V mute slide Connect the supplied USB cable Also connect an audio cable commercially available when you want to output audio from the projector s speaker Turn the power on for the computer s When connecting for the...

Page 83: ...or the projector Open the A V mute slide Connect the supplied USB cable Also connect an audio cable commercially available when you want to output audio from the projector s speaker Turn the power on for the computer s When connecting for the first time p 84 s From the second time p 85 Using the control panel Using the remote control Beep EB X6 EB S6 ...

Page 84: ...driver is not installed Be sure to select Agree If you want to cancel installation select Disagree C Computer images are projected It may take a little time before computer images are projected Until computer images are projected leave the equipment as it is and do not disconnect the USB cable or turn off the power to the projector q When images are not projected click All Programs EPSON Projector...

Page 85: ...g with USB Cable for Projection USB Display 85 f From the second time Computer images are projected It may take a little time before computer images are projected Leave the equipment as it is during this period ...

Page 86: ...Remote Control When projecting a computer screen image you can operate Page Up Down with the supplied remote control if the computer is not nearby A Connect the computer to the projector by USB cable EB W6 s p 82 EB X6 S6 s p 83 B Set Extended USB Type B to Page Up Down under the configuration menu When using USB Display set Extended USB Type B to USB Display under the configuration menu s p 82 Yo...

Page 87: ...computer to the projector by USB cable EB W6 s p 82 EB X6 S6 s p 83 B Set Extended USB Type B to Wireless Mouse under the configuration menu To display previous slide next slide in PowerPoint slideshow To previous slide EB W6 To next slide EB X6 S6 To previous slide To next slide q You cannot use the Wireless Mouse function during use of USB Display You cannot use the Wireless Mouse function and P...

Page 88: ...ng on your version of the Windows or Macintosh operating system You may need to make settings on the computer side to use the mouse Refer to the computer s documentation for more detailed information Moving mouse pointer Mouse click operation Drag and drop Double click Press the button rapidly twice Left click Right click 1 Hold down Enter and press to drag 2 Release Enter at any position to drop ...

Page 89: ...ick 1 Hold down Enter and press to drag 2 Release Enter at any position to drop q When the left and right mouse buttons are set oppositely on your computer the remote control operations are also reversed You cannot use the Wireless Mouse function when using the following functions Using the Configuration Menu Using the Help Menu Using E Zoom Capturing a user s logo Adjusting the volume ...

Page 90: ...ow starts automatically when the projector is connected to a USB storage device or SD card Refer to the following for how to connect a USB storage device or SD card Connecting a USB storage device s p 79 Connecting a SD card s p 80 Type File type extension Comment Still images only jpg Shall be JPEG files that support the Exif standard Images with a resolution above 8176 x 6144 cannot be projected...

Page 91: ...lowing kind of screen is displayed when the slideshow begins This screen is called the file browser screen When the projector is connected to multiple storage devices the following kind of drive selection screen is displayed containing icons that indicate the type of storage In this case press the button and after selecting the drive for the content you want to display press the Enter button Proce...

Page 92: ...der and image file are surrounded by a colored border cursor The contents screen runs to multiple pages according to the number of folders and image files When you select an image file and press the Enter button the selected image file is played When you select a folder and press the Enter button the contents of the folder are displayed When you select the Back to Top icon and press the Enter butt...

Page 93: ...u want to project B Press the Enter button The selected image file is played Procedure q Position the cursor on the image file press the Esc button and the following sub menu is displayed In this state you can also play the image file by pressing the Enter button During play press the button to switch between image files ...

Page 94: ...ile browser screen is automatically displayed again When Continuous Play on the option screen is set to On the slideshow is automatically repeated s p 95 Procedure q When you want to start a slideshow from a particular image file play the file and press the Enter button When you want to play a slideshow of image files in a particular folder position the cursor on the folder in the browser and pres...

Page 95: ...e or run a slideshow B When an image is displayed press the button or button Setting Image File Display and Slideshow To set the browser s image display order and set Slideshow display the option menu A Press the button on the file browser screen position the cursor over Option at the control panel bottom and press the Enter button The option screen is displayed Procedure Bottom Top Bottom Top Bot...

Page 96: ...sor on OK and then press the Enter button Item Function Display Setting Sets the order of files for display Files can be selected in order of name or ascending order of update Continuous Play Sets whether to play Slideshow repeatedly Screen switching time Sets the display time for one file in a slideshow You can set No or 1 to 60 sec If you set No images are not switched automatically Effect Sets ...

Page 97: ...100 screen ELPSC10 Portable roll type screens Aspect ratiog 4 3 50 portable screen ELPSC06 A compact screen that can be carried easily Aspect ratio 4 3 HD 15 cable ELPKC02 1 8m for mini D Sub15 pin mini D Sub 15pin This is the same as the computer cable supplied with the projector HD 15 cable ELPKC09 3m for mini D Sub15 pin mini D Sub 15pin HD 15 PC cable ELPKC10 20 m for mini D Sub15 pin mini D S...

Page 98: ... aspect ratiog of 16 9 Dolby Digitalg audio reception and playback or output Interlace A method of image scanning whereby the image data is divided into fine horizontal lines that are displayed in sequence starting from left to right and then from top to bottom The even numbered lines and odd numbered lines are displayed alternately Progressive A method of image scanning whereby the image data fro...

Page 99: ...synchronized flickering blurriness and horizontal interference occur Tracking The signals output from computers have a specific frequency If the projector frequency does not match this frequency the resulting images are not of a good quality The process of matching the frequency of these signals the number of crests in the signal is called Tracking If tracking is not carried out correctly wide ver...

Page 100: ... processed terminates due to a problem an error message is output and a is returned Add a Carriage Return CR code 0Dh to the end of each command and transmit Cable Layouts f USB connection Connector shape USB Type B Item Command Power ON OFF ON PWR ON OFF PWR OFF Signal selection Video SOURCE 41 S Video SOURCE 42 HDMI EB W6 only SOURCE 30 USB Display SOURCE 51 Slideshow EB W6 only SOURCE 52 A V Mu...

Page 101: ...SB Display In addition to that the following preparations are required A Download the USB driver USB COM Driver from the Epson Web site to your computer Go to http www epson com and select the support section of your local Epson Web site B Install the downloaded USB driver onto your computer Read the instructions displayed on the download screen C Set Extended Link 21L to On from the projector s c...

Page 102: ... 720 1280 800 1280 800 1024 768 WXGA 60 1280 768 1280 768 1280 720 1280 800 1280 768 1280 768 60 1360 768 1280 722 1280 720 1280 800 1280 722 1280 768 60 75 85 1280 800 1280 800 1280 720 1280 800 1280 800 1280 800 WXGA 60 75 85 1440 900 1280 800 1280 720 1280 800 1280 800 1280 800 WSXGA 3 60 1680 1050 1280 800 1280 720 1280 800 1280 800 1280 800 SXGAg 70 75 85 1152 864 1066 800 1280 720 1280 800 1...

Page 103: ...1280 800 1280 800 768 576 SDTV 480p 60 720 480 720 360 1066 800 1280 720 1280 800 1280 800 640 480 SDTV 576p 50 720 576 720 432 1066 800 1280 720 1280 800 1280 800 768 576 HDTVg 720p 50 60 1280 720 1280 720 1280 720 1280 800 1280 720 1280 720 HDTV 1080i 50 60 1920 1080 1280 720 1280 720 1280 800 1280 720 1280 800 Signal Refresh rateg Hz Resolution Aspect Mode Normal 16 9 Full Zoom Through TV NTSC ...

Page 104: ...280 1024 1280 720 1280 800 1280 800 1280 800 SXGA 60 1400 1050 1280 720 1280 800 1280 800 1280 800 UXGA 60 1600 1200 1280 720 1280 800 1280 800 1280 800 SDTVg 480i 60 720 480 720 360 1280 720 1280 800 1280 800 640 480 SDTV 480p 60 720 480 720 360 1280 720 1280 800 1280 800 640 480 SDTV 576i 50 720 576 720 432 1280 720 1280 800 1280 800 768 576 SDTV 576p 50 720 576 720 432 1280 720 1280 800 1280 80...

Page 105: ... 576 SVGAg 56 60 72 75 85 iMac 1 800 600 800 450 2 1024 768 1024 768 1024 576 XGAg 60 70 75 85 iMac 1 1024 768 1024 576 2 1024 768 1024 768 1024 576 WXGA 60 1280 768 1024 614 1024 768 1024 576 60 1360 768 1024 578 1024 768 1024 576 60 75 1280 800 1024 640 1024 768 1024 576 WXGA 60 1440 900 1024 640 1024 768 1024 576 SXGAg 70 75 1152 864 1024 768 1024 768 1024 576 60 1280 1024 960 768 1024 768 1024...

Page 106: ...0 480 720 360 1024 768 1024 576 SDTV 576i 50 720 576 720 432 1024 768 1024 576 SDTV 480p 60 720 480 720 360 1024 768 1024 576 SDTV 576p 50 720 576 720 432 1024 768 1024 576 HDTVg 720p 50 60 1280 720 1024 768 1024 576 HDTV 1080i 50 60 1920 1080 1024 768 1024 576 Signal Refresh rateg Hz Resolution Aspect Mode 4 3 16 9 TV NTSC 60 720 480 720 360 1024 768 1024 576 TV PAL SECAM 50 720 576 720 432 1024 ...

Page 107: ...800 600 800 600 800 450 SVGAg 56 60 72 75 85 iMac 1 800 600 800 450 2 800 600 800 600 800 450 XGAg 60 70 75 85 iMac 1 1024 768 1024 576 2 800 600 800 600 800 450 WXGA 60 1280 768 800 480 800 600 800 450 60 1360 768 800 451 800 600 800 450 60 75 1280 800 800 500 800 600 800 450 WXGA 60 1440 900 800 500 800 600 800 450 SXGAg 70 75 1152 864 800 600 800 600 800 450 60 1280 1024 750 600 800 600 800 450...

Page 108: ...0i 60 720 480 720 360 800 600 800 450 SDTV 576i 50 720 576 720 432 800 600 800 450 SDTV 480p 60 720 480 720 360 800 600 800 450 SDTV 576p 50 720 576 720 432 800 600 800 450 HDTVg 720p 50 60 1280 720 800 600 800 450 HDTV 1080i 50 60 1920 1080 800 600 800 450 Signal Refresh rateg Hz Resolution Aspect Mode 4 3 16 9 TV NTSC 60 720 480 720 360 800 600 800 450 TV PAL SECAM 50 720 576 720 432 800 600 800...

Page 109: ...stment Manual 1 to 1 2 Digital 1 0 to 1 35 Lamp UHE lamp 170 W Model No ELPLP41 Max audio output 7 W monaural 1 W monaural Speaker 1 Power supply 100 to 240 V AC 10 50 60 Hz 2 8 to 1 5 A Power consumption 100 to 120 V area Operating 246 W Standby power consumption 3 0 W 220 to 240 V area Operating 231 W Standby power consumption 4 3 W Operating altitude Altitude 0 to 2286m 0 ft to 7500 ft Operatin...

Page 110: ...port 1 HDMI Monitor Out port 1 Mini D Sub15 pin female black USB port Type A 1 3 1 USB connector Type A USB port Type B 2 3 1 USB connector Type B Card slot 1 SD card x 1 1 USB Type A supports USB1 1 2 USB Type B supports USB2 0 3 USB ports are not guaranteed to operate all devices that support USB Angle of tilt If you use the projector tilted at an angle of more than 30 it could be damaged and ca...

Page 111: ...ed in accordance with the instructions may cause harmful interference to radio or television reception However there is no guarantee that interference will not occur in a particular installation If this equipment does cause interference to radio and television reception which can be determined by turning the equipment off and on the user is encouraged to try to correct the interference by one or m...

Page 112: ...ements OS Windows 2000 SP4 Windows XP SP1 Windows XP SP2 Windows Vista Windows Vista SP1 CPU Mobile Pentium III 1 2GHz or greater Recommended Pentium M 1 6 GHz or greater Memory capacity 256 MB or greater Recommended 512 MB or greater Hard disk space 256 MB or greater Display XGA 1024 768 or greater resolution 16 bit color or greater display color Approx 32 000 color display ...

Page 113: ...113 Appearance External dimensions are the same for the EB W6 X6 S6 but the EB S6 differs only in the distance from the lens center to the ceiling mount The illustration is of the EB W6 ...

Page 114: ...nded menu 44 External dimension diagram 113 External monitor 78 E zoom 29 F Focus ring 6 Freeze 23 Front 44 Front adjustable feet 6 Full lock 34 G Game 19 Glossary 98 H Help function 49 High Altitude Mode 45 How to replace the air filter 71 How to replace the lamp 68 I Image menu 40 Indicators 51 Info menu 46 Input Signal 41 46 K Keystone 43 L Lamp cover 6 Lamp Hours 46 Lamp indicator 51 Lamp repl...

Page 115: ...ze 75 SD card 80 Settings menu 43 Sharpness 40 Sleep Mode 45 Source 46 Source Search 9 10 13 Specifications 109 Sports 19 sRGB 19 Startup Screen 44 Storage temperature 109 Sub Menu 37 38 39 Supported monitor displays 102 Suspension bracket fixing points 15 S video port 7 8 Sync Info 46 Synchronization 41 T Temp indicator 51 Theater 19 Tint 40 Top menu 37 38 39 Tracking 41 U USB port 8 User s logo ...

Page 116: ...eiko Epson Corporation shall not be liable against any damages or problems arising from the use of any options or any consumable products other than those designated as Original Epson Products or Epson Approved Products by Seiko Epson Corporation The contents of this guide may be changed or updated without further notice Illustrations in this guide and the actual projector may differ General Notic...

Reviews: