56
Parent topic:
Scanning Multi-Page Originals as Separate Files - Windows
You can use Document Capture Pro (Windows) to scan multi-page originals as separate scanned files.
You indicate where you want the new scanned files to start by inserting a blank page or barcode
between the pages of your original.
Note:
The settings may vary, depending on the software version you are using. See the Help information
in Document Capture Pro for details.
1.
Load a multi-page original with blank pages or barcodes inserted where you want to start a new
scanned file.
2.
Do one of the following to start Document Capture Pro:
•
Windows 10
: Click
and select
All Apps
>
Epson Software
>
Document Capture Pro
.
•
Windows 8.x
: Navigate to the
Apps
screen and select
Document Capture Pro
.
•
Windows (other versions)
: Click
or
Start
, and select
All Programs
or
Programs
. Select
Epson Software
>
Document Capture Pro
.
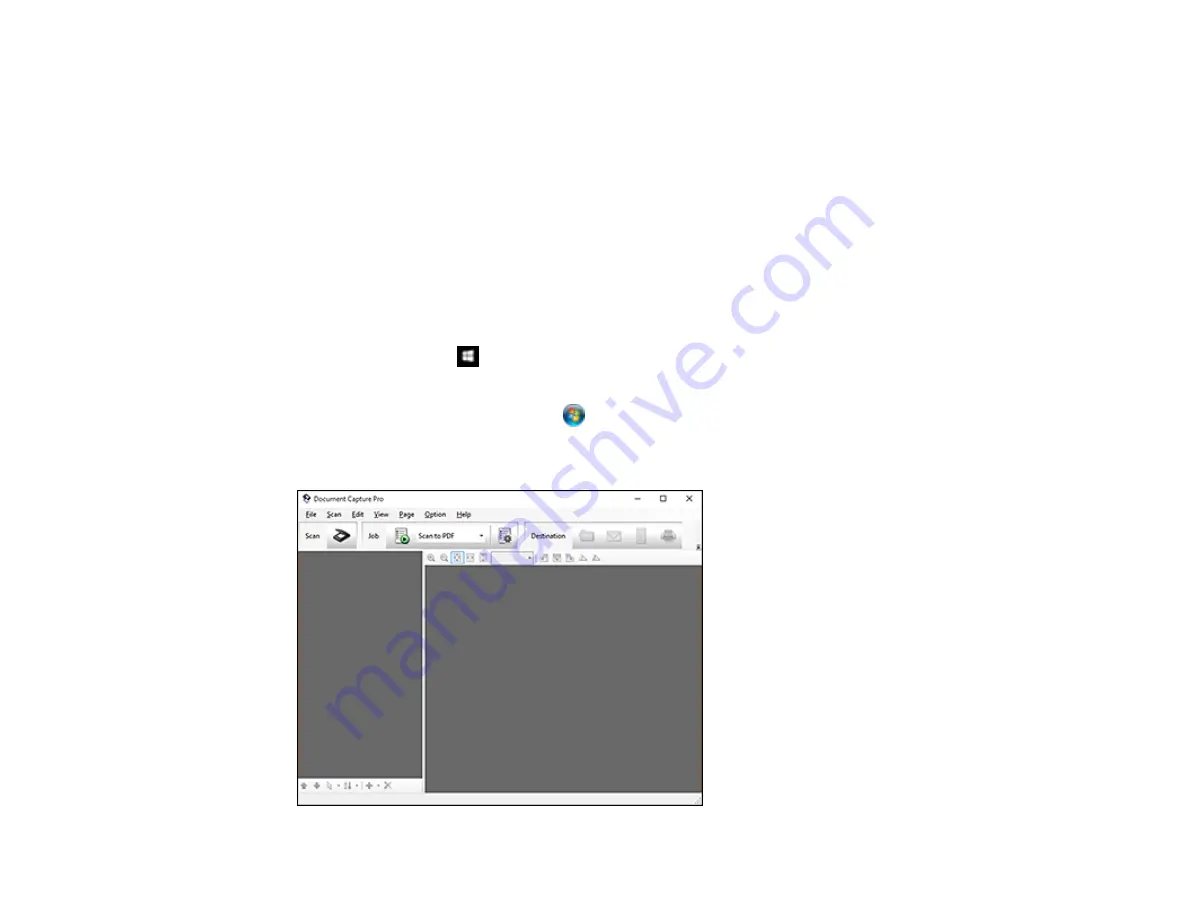
You see this window:
Summary of Contents for DS-320
Page 1: ...DS 320 User s Guide ...
Page 2: ......
Page 6: ......
Page 10: ...10 7 ADF Automatic Document Feeder 1 Power inlet 2 USB port ...
Page 15: ...15 2 Press the power button to turn on the scanner if necessary 3 Extend the paper guide ...
Page 23: ...23 4 Raise the input tray edge guides and adjust them to the width of the receipt ...
Page 27: ...27 2 Press the power button to turn on the scanner if necessary 3 Extend the paper guide ...
Page 40: ...40 You see an Epson Scan 2 window like this ...
Page 42: ...42 You see an Epson Scan 2 window like this ...
Page 44: ...44 You see a window like this 3 Click the Scan icon ...
Page 47: ...47 You see this window ...
Page 62: ...62 You see your scanned image 8 Click on the Export icon ...
Page 63: ...63 9 Select the program or format you want to scan to and click Next ...
Page 71: ...71 3 Pull the edge of the scanner cover firmly at the arrow mark to open it ...
Page 75: ...75 8 Press the pickup roller cover latch and pull up the cover to remove it ...
Page 82: ...82 5 Press the pickup roller cover latch and pull up the cover to remove it ...
Page 85: ...85 9 Squeeze the tabs on the sides of the separation pad and pull up to remove it ...
Page 95: ...95 3 Pull the edge of the scanner cover firmly at the arrow mark ...


