


EPSON Stylus CX4100/CX4200/CX4700/CX4800/DX4200/DX4800/DX4850
Revision A
MAINTENANCE
Overview
188
6.1 Overview
This section provides information to maintain the printer in its optimum condition.
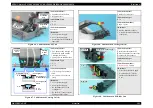
6.1.1 Cleaning
This printer has no mechanical components which require regular cleaning except the
Print Head. Therefore, when returning the printer to the user, check the following parts
and perform appropriate cleaning if stain is noticeable.
Exterior parts
Use a clean soft cloth moistened with water, and wipe off any dirt. If the exterior
parts are stained by the ink, use a cloth moistened with neutral detergent to wipe it
off.
Inside the printer
Use a vacuum cleaner to remove any paper dust.
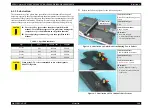
LD Roller
When paper loading function does not operate because friction of the LD Roller is
lowered by any paper dust, set the adhesive side up of the cleaning sheet (included
in the media) to remove any paper dust. Repeat loading the cleaning sheet several
times.
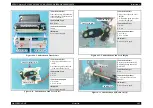
Document glass
Remove dust or any paper with a clean dry cloth. In case dirt is serious or alien
substance is stick, wipe it off with a cloth moistened with neutral detergent. In case
Stain is remained, wipe again with a dry clean cloth.
6.1.2 Service Maintenance
If any abnormal print (dot missing, white line, etc.) has occurred or the printer indicates
the “Maintenance request error” (This error is displayed as “Maintenance call error” in
the STM3), take the following actions to clear the error.
Print Head cleaning
When dot missing or banding phenomenon has occurred, you need to perform the
Print Head cleaning operation*
1
by using the Print Head cleaning function. This
function can be performed by the control panel operation, the printer driver utility
and the Adjustment program.
In case that the cleaning sequence is performed by the control panel operation,
confirm that the printer is in stand-by state (the Power LED is lighting), and hold
down the Ink SW on the control panel for more than 3 seconds. Then, the printer
starts the cleaning sequence (the Power LED blinks during this sequence).
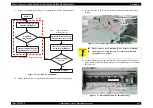
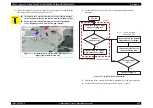
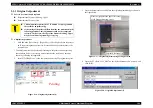
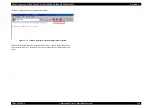
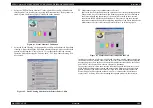
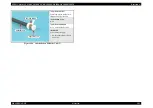
In case that you select and perform the manual cleaning by the printer driver
utility, the most appropriate cleaning mode is selected. The following is the
process to perform the Print Head cleaning from the printer driver utility.
As for the operation of the Adjustment program, refer to Chapter 5 Adjustment.
Note *1: The Stylus CX4700/CX4800/DX4800/DX4850/CX4100/CX4200/DX4200 has three
modes for manual cleaning, and even during printing, the appropriate cleaning mode
is automatically selected and performed according to various conditions. Therefore
the ink consumption amount for manual cleaning varies depending on each mode
(Refer to Chapter 2).
C A U T I O N
Never use chemical solvents, such as thinner, benzine, and
acetone to clean the exterior parts of the printer like the
Housing. These chemicals may deform or deteriorate the
components of the printer.
Be careful not to damage any components when you clean
inside the printer.
Do not scratch the coated surface of the PF Roller Unit. Use
soft brush to wipe off any dusts. Use a soft cloth moistened
with alcohol to remove the ink stain.
Do not use cleaning sheet included in the media for normal
usage. It may damage the coated surface of PF Roller Unit.
If the adhesive surface of the cleaning sheet is set to the LD
Roller shaft side and used to clean the LD Roller surface, it is
no problem.
When using compressed air products; such as air duster, for
cleaning during repair and maintenance, the use of such
products containing flammable gas is prohibited.
Summary of Contents for CX4200 - Stylus Color Inkjet
Page 9: ...C H A P T E R 1 PRODUCTDESCRIPTION ...
Page 60: ...C H A P T E R 2 OPERATINGPRINCIPLES ...
Page 87: ...C H A P T E R 3 TROUBLESHOOTING ...
Page 121: ...C H A P T E R 4 DISASSEMBLY ASSEMBLY ...
Page 171: ...C H A P T E R 5 ADJUSTMENT ...
Page 187: ...C H A P T E R 6 MAINTENANCE ...
Page 194: ...C H A P T E R 7 APPENDIX ...
Page 221: ...Model PX A650 Stylus CX4700 CX4800 DX4800 DX4850 Board C571 PNL Rev D Sheet 1 1 ...
Page 222: ...Model Stylus CX4100 CX4200 DX4200 Board C577 PNL Rev A Sheet 1 1 ...


