5-18
5-18
|
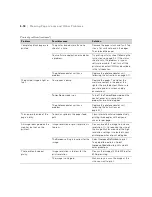
Clearing Paper Jams and Other Problems
Completely blank pages are
printed
The printer loaded more than one
sheet at a time.
Remove the paper stack and fan it. Tap
it on a flat surface to even the edges.
Then reload the paper.
Your software application or cable has
a problem.
Try printing a status sheet following the
instructions on page 5-2. If the status
sheet prints, the problem is in your
software or cable. If not, turn off the
printer and contact IKON as described
in the Introduction.
The photoconductor unit has a
problem.
Replace the photoconductor unit,
following the instructions on page 4-11.
The printed image is light or
faint.
Your paper is damp.
Replace the paper. The higher the
moisture content in the paper, the
lighter the printed output. Make sure
you store paper in a clean and dry
environment.
Toner Save
mode is on.
Turn off the
Toner Save
mode on the
control panel or in your printer
properties or print dialog box.
The photoconductor unit has a
problem.
Replace the photoconductor unit,
following the instructions on
page 4-11.
The non-printed side of the
page is dirty.
Toner has spilled in the paper feed
path.
Clean internal printer components by
printing three pages with only one
character per page.
An image looks good on the
monitor, but not on the
printout.
Image resolution or print resolution is
too low.
Re-scan or edit the image to increase
resolution. Or, try reducing the size of
the image. Make sure one of the high
resolution settings is selected in your
printer properties or print dialog box.
The
Screen
setting is incorrect for the
image.
Select
Increase Definition
to print
finely detailed patterns. Select
Increase Gradation
to print smooth
color gradations.
Photo printouts appear
grainy.
Image resolution is too low for the
print resolution.
Re-scan the image at 200 to 300 dpi for
600 dpi printing.
The image is enlarged.
Make sure you scan the image at the
size you want to print.
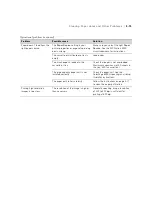
Printout problems (continued)
Problem
Possible cause
Solution
Summary of Contents for ColorPage 8000
Page 61: ...3 18 3 18 Configuring the Printer ...
Page 81: ...4 20 4 20 Maintaining and Transporting the Printer ...
Page 107: ...A 8 A 8 Installing Options ...
Page 119: ... 6 6 Index ...
Page 121: ...8 8 ...

