background image

123

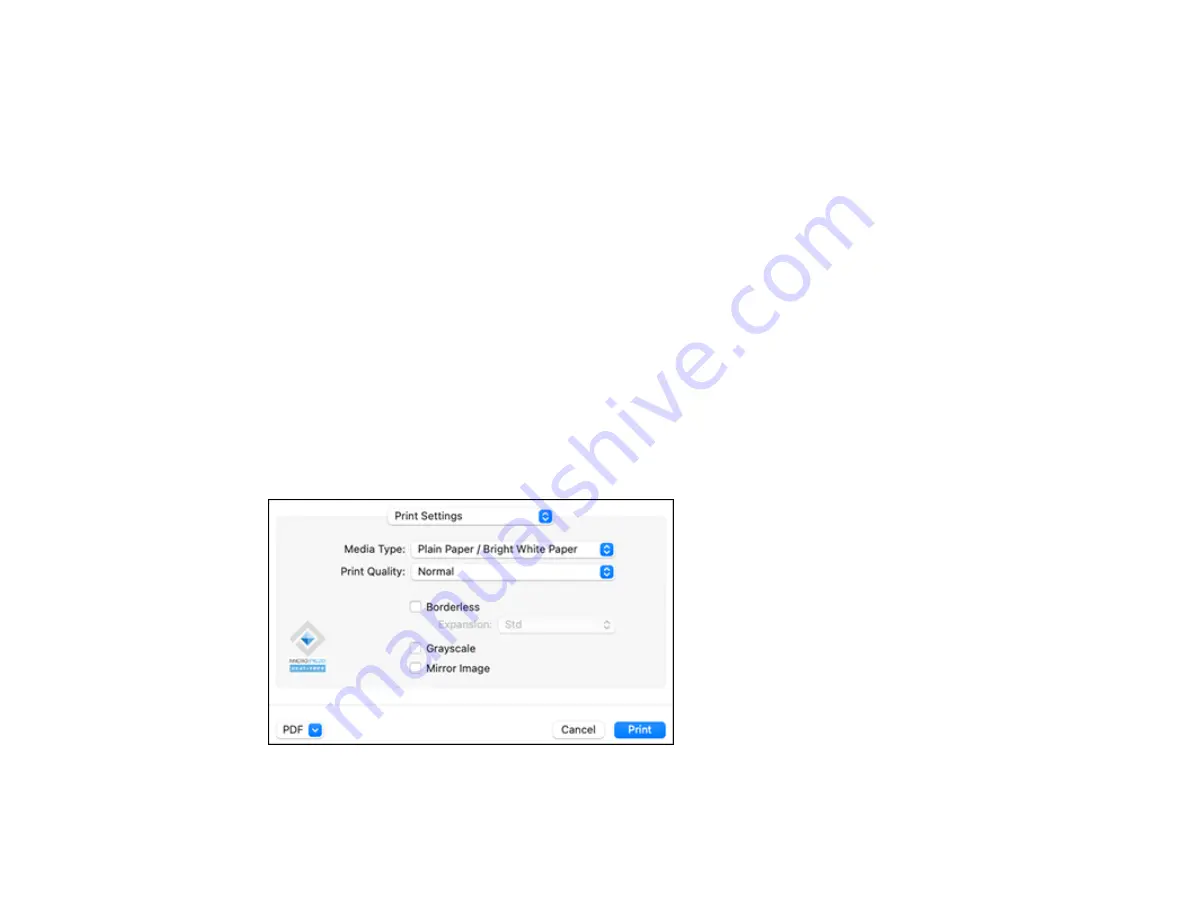
Bidirectional printing

Prints in both directions (right-to-left and left-to-right), speeding up printing, but may reduce print
quality.

Output documents for filing

Outputs all landscape, portrait, 1-sided, and 2-sided documents in the same orientation for easier
filing.

Remove white borders

Removes white margins that may appear when you print borderless photos.

Warning Notifications

Lets you choose whether or not to receive warning notifications from the printer software for various
operating conditions.

Establish bidirectional communication

Allows the product to communicate with the computer. Do not change the default setting unless you
experience issues when using a shared printing pool.

Parent topic:

Selecting Printing Preferences - Mac

Printing Your Document or Photo - Mac

Once you have selected your print settings, you are ready to print.

Click

Print

at the bottom of the print window.

Checking Print Status - Mac

Summary of Contents for C11CK60201

Page 1: ...WF 2960 User s Guide ...

Page 2: ......

Page 3: ...n Language 23 Selecting the Date and Time 23 Adjusting Control Panel Sounds 25 Turning Off the Operation Time Out Setting 25 Preventing PC Connection via USB 25 Using Power Saving Settings 26 Changing the Sleep Timer Settings 26 Changing the Power Off Timer Settings 26 Using the Epson Smart Panel Mobile App 26 Voice activated Printing 27 Epson Connect Solutions for Smartphones Tablets and More 28 ...

Page 4: ... and Messages 43 Changing or Updating Network Connections 48 Accessing the Web Config Utility 48 Changing a USB Connection to a Wi Fi Connection 49 Changing a Wi Fi Connection to a Wired Network Connection 49 Connecting to a New Wi Fi Router 50 Disabling Wi Fi Features 51 Disabling Wi Fi Direct Simple AP Mode 51 Loading Paper 53 Loading Paper in the Cassette 53 Paper Loading Capacity 60 Double sid...

Page 5: ...ided Printing Options Windows 88 Print Density Adjustments Windows 88 Selecting Additional Layout and Print Options Windows 89 Custom Color Correction Options Windows 91 Image Options and Additional Settings Windows 92 Header Footer Settings Windows 93 Selecting a Printing Preset Windows 94 Selecting Extended Settings Windows 95 Extended Settings Windows 97 Printing Your Document or Photo Windows ...

Page 6: ... Mac 124 Printing from a Smartphone or Tablet 125 Printing with Epson Photo 125 Cancelling Printing Using a Product Button 125 Scanning 126 Starting a Scan 126 Starting a Scan Using the Product Control Panel 126 Scanning to a Connected Computer 127 Scanning to the Cloud 128 Setting Up a WSD Port Windows 7 Windows Vista 129 Control Panel Scanning Options 130 Starting a Scan Using Epson ScanSmart 13...

Page 7: ... 163 Connecting a Telephone or Answering Machine 163 Setting Up Fax Features 166 Setting Up Basic Fax Features 167 Using the Fax Setup Wizard 167 Selecting the Line Type 169 Setting the Number of Rings to Answer 169 Selecting Advanced Fax Settings 170 Basic Settings Fax 171 Receive Settings Fax 173 Report Settings Fax 174 Security Settings Fax 175 Setting Up the Fax Utility Windows 175 Setting Up ...

Page 8: ...ety Precautions 196 Check Cartridge and Maintenance Box Status 198 Checking Cartridge and Maintenance Box Status on the LCD Screen 199 Checking Cartridge and Maintenance Box Status Windows 199 Checking Cartridge and Maintenance Box Status Mac 202 Purchase Epson Ink Cartridges and Maintenance Box 204 Ink Cartridge and Maintenance Box Part Numbers 204 Removing and Installing Ink Cartridges 205 Print...

Page 9: ...ur Product 234 Cleaning the Paper Rollers 238 Cleaning the Print Head Path 240 Transporting Your Product 243 Solving Problems 247 Checking for Software Updates 247 Product Status Messages 248 Running a Product Check 251 Resetting Control Panel Defaults 252 Solving Setup Problems 252 Product Does Not Turn On or Off 252 Noise After Ink Installation 253 Software Installation Problems 253 Solving Netw...

Page 10: ...rinting from a Computer 272 Nothing Prints 273 Product Icon Does Not Appear in Windows Taskbar 274 Printing is Slow 275 Solving Page Layout and Content Problems 277 Inverted Image 277 Too Many Copies Print 278 Blank Pages Print 278 Incorrect Margins on Printout 279 Border Appears on Borderless Prints 279 Incorrect Characters Print 280 Incorrect Image Size or Position 281 Slanted Printout 281 Solvi...

Page 11: ...297 Solving Faxing Problems 297 Cannot Send or Receive Faxes 298 Cannot Receive Faxes with a Telephone Connected to Your Product 301 Fax Memory Full Error Appears 301 Fax Quality is Poor 302 Sent Fax is Received in an Incorrect Size 302 Received Fax is Not Printed 303 Uninstall Your Product Software 303 Uninstalling Product Software Windows 303 Uninstalling Product Software Mac 305 Where to Get He...

Page 12: ...Screen Safety Instructions 322 Wireless Connection Safety Instructions 323 Telephone Equipment Safety Instructions 323 Important Privacy Notice Printer Serial Number 323 FCC Compliance Statement 324 Binding Arbitration and Class Waiver 326 Trademarks 330 Copyright Notice 330 libTIFF Software Acknowledgment 331 A Note Concerning Responsible Use of Copyrighted Materials 331 Default Delay Times for P...

Page 13: ...13 WF 2960 User s Guide Welcome to the WF 2960 User s Guide For a printable PDF copy of this guide click here ...

Page 14: ...inting Epson Connect Solutions for Smartphones Tablets and More Using AirPrint Setting Up Printing on a Chromebook Android Printing Using the Epson Print Enabler Using Epson Print and Scan App with Windows Tablets Using the Mopria Print Service Product Parts Locations See these sections to identify the parts on your product Product Parts Front and Top Product Parts Inside Product Parts Back Parent...

Page 15: ...15 Product Parts Front and Top 1 Automatic Document Feeder ADF cover 2 ADF input tray 3 ADF edge guide 4 ADF document support 5 ADF output tray extension ...

Page 16: ...16 6 ADF output tray 1 Output tray 2 Paper cassette 3 Paper cassette edge guides 4 Legal size paper guide Parent topic Product Parts Locations ...

Page 17: ...17 Product Parts Inside 1 Document cover 2 Scanner glass 3 Control panel 4 Front cover ...

Page 18: ...ce box cover 2 Rear cover duplexer 3 AC inlet 4 LAN port 5 USB port 6 EXT port 7 LINE port Parent topic Product Parts Locations Using the Control Panel See these sections to learn about the control panel and select control panel settings Control Panel Buttons and Lights The LCD Screen Status Icon Information ...

Page 19: ...he Date and Time Adjusting Control Panel Sounds Turning Off the Operation Time Out Setting Preventing PC Connection via USB Parent topic Product Basics Control Panel Buttons and Lights 1 The power button and light 2 The home button 3 The received fax light 4 The LCD screen 5 The help button Parent topic Using the Control Panel ...

Page 20: ...n 4 Displays fax data information 5 Menu options 6 Scrolls to show more menu options Parent topic Using the Control Panel Status Icon Information Your product displays status icons on the LCD screen for certain product status conditions Icons Description Ink and maintenance box status select the icon to view the ink and maintenance box levels ...

Page 21: ...on s signal strength Wi Fi Direct is disabled Wi Fi Direct is enabled Indicates whether the Mute and Quiet Mode settings are enabled or disabled Select the icon to change the settings When Quiet Mode is enabled and depending on the selected paper type and print quality noise is reduced during printing at the cost of print speed When Mute is enabled sounds from the product such as button presses ar...

Page 22: ...rent topic Using the Control Panel Entering Characters on the LCD Screen Follow these guidelines to enter characters for passwords and other settings To move the cursor select the left or right arrows To change the case of letters select To delete the previous character select To enter numbers or symbols select To enter a commonly used domain name select To enter a space select Parent topic Using ...

Page 23: ...uctions Parent topic Using the Control Panel Changing LCD Screen Language You can change the language used on the LCD screen 1 Press the home button if necessary 2 Select Settings General Settings Basic Settings Language 3 Select a language Parent topic Using the Control Panel Selecting the Date and Time Before faxing select the current date time and daylight saving phase in your area and choose y...

Page 24: ... from Winter to Summer your product automatically sets its clock ahead one hour When you change from Summer to Winter it sets its clock back one hour 5 Select Date Time 6 Select the date format you want to use 7 Use the displayed keypad to enter the current date then select OK 8 Select the time format you want to use then select OK 9 Use the displayed keypad to enter the current time 10 Select Tim...

Page 25: ... Off the Operation Time Out Setting The Operation Time Out setting causes the LCD screen to return to the Home screen after a few minutes of inactivity This feature is enabled by default but you can turn it off 1 Press the home button if necessary 2 Select Settings General Settings Basic Settings 3 Scroll down and set Operation Time Out to Off Parent topic Using the Control Panel Preventing PC Con...

Page 26: ...ngs General Settings Basic Settings Sleep Timer 3 Do one of the following Select the or icons to increase or decrease the number of minutes Select the minutes field and use the displayed numeric keypad to enter the number of minutes 4 Select OK when you are finished Parent topic Using Power Saving Settings Changing the Power Off Timer Settings You can have the product turn off automatically if it ...

Page 27: ... product with your mobile device Parent topic Product Basics Related topics Wi Fi or Wired Networking Voice activated Printing Take advantage of voice activated hands free printing from your Epson product with Alexa Siri and Google Assistant Depending on which voice assistant you use you can ask your product to print photos calendars recipes photo props and more Click here for more information 1 C...

Page 28: ... Email Print Epson Remote Print Scan and send a file as an email or upload it to an online service directly from your Epson product with Epson Scan to Cloud Setting Up Epson Connect Services Using Epson Email Print Using Epson Remote Print Using Epson Scan to Cloud Parent topic Product Basics Related tasks Using AirPrint Android Printing Using the Epson Print Enabler Setting Up Printing on a Chrom...

Page 29: ...installed your product software see the link below to use your product control panel to activate your unique email address Or visit epson com connect U S or epson ca connect Canada to learn more about Email Print create your Epson Connect account and register your product to the Epson Connect service 3 Now you are ready to send and print emails to your product s Email Print address Note Go to epso...

Page 30: ...tasks Setting Up Epson Connect Services Related topics Wi Fi or Wired Networking Using Epson Scan to Cloud The Epson Scan to Cloud service allows you to scan and send a file as an email or upload it to an online service directly from your Epson product Register an email address or online services such as Box DropBox Evernote or Google Drive with your Epson Connect account 1 Connect your Epson prod...

Page 31: ...thout the need to install drivers or download software Note If you disabled paper configuration messages on your product control panel you cannot use AirPrint See the link below to enable the messages if necessary 1 Load paper in your product 2 Set up your product for wireless printing See the link below 3 Connect your Apple device to the same wireless network that your product is using 4 Print fr...

Page 32: ...rint Enabler plug in from Google Play 3 Go to Settings on your Android device select Printing and enable the Epson plug in if necessary 4 Connect your Android device to the same wireless network as your product 5 Now you are ready to print From an Android application such as Chrome or Gmail tap the menu icon and print whatever is on the screen Note If you do not see your product tap All Printers a...

Page 33: ... Print Service from Google Play Note For details on the Mopria Print Service click here U S or click here Canada Some Amazon Fire tablets also use the Mopria Print Service 1 Connect your Epson product to your wireless network See the link below 2 On your Android device download the Mopria Print Service app from Google Play Note On some Samsung Galaxy devices Mopria may come preinstalled 3 Go to Se...

Page 34: ...ception of traffic over the wireless LAN Your router may already have a default password enabled by your Internet service provider ISP See your ISP and router documentation for instructions on how to change the default password and better secure your network Connect your product only to a network protected by a firewall Connecting your product directly to the Internet may leave it vulnerable to se...

Page 35: ... point can be connected to your computer over a wireless or wired network 1 Epson product 2 Wireless router or access point 3 Computer with a wireless interface 4 Computer 5 Internet 6 Ethernet cable used only for wired connection to the wireless router or access point Selecting Wireless Network Settings from the Control Panel Parent topic Wi Fi or Wired Networking ...

Page 36: ...te The installer program guides you through network setup Note Breakdown or repair of this product may cause loss of network data and settings Epson is not responsible for backing up or recovering data and settings during or after the warranty period We recommend that you make your own backup or print out your network data and settings 1 Press the home button if necessary 2 Select the icon You see...

Page 37: ...To delete the previous character select To enter numbers and symbols select To enter a space select To finish entering your network name or password select OK 7 Select the Enter Password field and use the displayed keyboard to enter your network password 8 When you are finished confirm the displayed network settings and select Start Setup to begin setup 9 Do one of the following If setup was succe...

Page 38: ...escribed on the Start Here sheet Parent topic Wi Fi Infrastructure Mode Setup Related references Status Icon Information Related tasks Entering Characters on the LCD Screen Wi Fi Direct Mode Setup You can set up your product to communicate directly with your computer or another device without requiring a wireless router or access point In Wi Fi Direct Mode the product itself acts as a network acce...

Page 39: ...compatible Epson printing app is installed on your mobile device before connecting to the product 1 Press the home button if necessary 2 Select the icon You see a screen like this 3 Select Wi Fi Direct Start Setup The product information is displayed on the screen 4 Do one of the following Open the Epson Smart Panel app on your device and use the information on the LCD screen to select your produc...

Page 40: ...on Related tasks Using the Epson Smart Panel Mobile App Wi Fi Protected Setup WPS If your network uses a WPS enabled wireless router or access point you can quickly connect your product to the network using Wi Fi Protected Setup WPS Note To check if your router is WPS enabled look for a button labeled WPS on your router or access point If there is no hardware button there may be a virtual WPS butt...

Page 41: ...lated references Status Icon Information Printing a Network Status Sheet You can print a network status sheet to help you determine the causes of any problems you may have using your product on a network 1 Make sure a few sheets of plain paper are loaded in the product 2 Press the home button if necessary 3 Select Settings General Settings Network Settings Network Status Print Status Sheet 4 Selec...

Page 42: ...the network connection is checked you see a screen like this 4 Select Print Check Report to print the network connection report Examine the error codes and solutions shown on the network connection report Network Connection Report Codes and Messages Parent topic Wi Fi or Wired Networking Related topics Loading Paper ...

Page 43: ...ote Error codes and messages listed here may not all apply to your product Error Codes and Messages Error code and message Solution E 1 Confirm that the network cable is connected and network devices such as hub router or access point are turned on Make sure your router access point and or hub are turned on and the network cable is securely connected to your device and to your product If you are t...

Page 44: ...t and remove any obstacles between them Also move your product away from devices such as wireless phones or microwaves Confirm that the SSID shown on the network connection report matches the label on your router or access point Also make sure your SSID uses only ASCII characters and symbols or your product cannot display the SSID correctly If you are trying to connect using the WPS push button me...

Page 45: ... product s MAC address so it is not filtered Locate the MAC address on the network connection report and check your router or access point documentation for instructions If your router or access point is using shared authentication with WEP security confirm that you are using the correct authentication key and index If your router or access point limits the number of connected devices raise the co...

Page 46: ...ned on and do the following If your product s Obtain IP Address setting is set to Manual check the IP address subnet mask and default gateway addresses on the network connection report to see if they are correct If not correct the settings If DHCP is enabled set your product s Obtain IP Address setting to Auto If you want to use the DHCP assigned address as a static address set the Obtain IP Addre...

Page 47: ...ork settings If your router or access point uses WEP security with several registered passwords make sure that the first registered password is set on your product E 13 Confirm the following Entered security key password is correct Index of the security key password is set to the first number Connection and network setup of the PC or other device is correct Contact your network administrator for a...

Page 48: ...cted device first The same SSID as Wi Fi Direct exists in the environment Change the Wi Fi Direct SSID if you cannot connect a smart device to the printer Change the Wi Fi Direct SSID You can change the network name after DIRECT XX The custom name must be 22 characters or less Parent topic Printing a Network Connection Report Changing or Updating Network Connections See these sections to change or...

Page 49: ...o locate the serial number Parent topic Changing or Updating Network Connections Related tasks Printing a Network Status Sheet Changing a USB Connection to a Wi Fi Connection If you have already connected your product to your computer using a USB connection you can change to a Wi Fi connection 1 Disconnect the USB cable from your product 2 Uninstall your product software 3 Download and install you...

Page 50: ...ed tasks Disabling Wi Fi Features Connecting to a New Wi Fi Router If you change the wireless router you have been using on your network you need to update your product s Wi Fi connection to the new router Note If you switch to a 5 GHz wireless router set the router to operate in dual band 2 4 GHz and 5 GHz mode If your router uses a single network name SSID for both the 2 4 GHz and 5 GHz band giv...

Page 51: ...mple AP Mode You may need to disable your product s Wi Fi Direct connection if you change your network connection type or need to solve a problem with your network connection Note When the Wi Fi Direct Simple AP connection is disabled all computers and smart devices connected to the product in Wi Fi Direct Simple AP mode are disconnected If you want to disconnect a specific device disconnect from ...

Page 52: ...52 Parent topic Changing or Updating Network Connections Related references Status Icon Information ...

Page 53: ...Selecting the Paper Settings Control Panel Selecting the Default Paper Source Settings Selecting the Universal Print Settings Loading Paper in the Cassette You can press the help button and select How To Load Paper to view paper loading instructions on the LCD screen Note Before loading paper make sure your product is not currently printing scanning or copying 1 Open the front cover ...

Page 54: ...54 2 Pull out the paper cassette until it stops 3 Squeeze the tab on the right edge guide and slide the edge guides outward ...

Page 55: ...he stack on a flat surface to even the edges Note Do not fan or curl photo paper 5 Do one of the following Insert paper into the cassette with the glossy or printable side down and slide it in until it stops Note Make sure the paper is loaded against the rear of the cassette ...

Page 56: ...56 For legal size paper extend the legal paper guide and load paper using the guide line as shown Load up to 10 envelopes with the printable side down and flap facing right as shown ...

Page 57: ...acing as shown Load paper printable side up and slide it in until it stops Select Letterhead as the paper type setting To load a sheet of paper longer than legal size open the paper support and insert the paper as shown Select User Defined as the paper size setting ...

Page 58: ...rhead make sure you select Letterhead as the paper type setting Make sure you select the correct paper size setting For letterhead paper if you print on paper that is smaller than the setting in the printer driver the printer may print beyond the edges of the paper which can lead to ink smears on your printouts and excess ink building up inside the printer Borderless printing and 2 sided printing ...

Page 59: ...on one side of pre printed paper Reduce the number of sheets to half or less or load one sheet of paper at a time if paper jams continue For pre punched paper load a single sheet of defined size plain paper with holes at the left or right Adjust the print position of your file to avoid printing over the holes Automatic 2 sided printing is not available for pre punched paper For paper longer than L...

Page 60: ...r Letterhead Letter 8 5 11 inches 216 279 mm or A4 8 3 11 7 inches 210 297 mm 150 sheets Legal 8 5 14 inches 216 356 mm Mexico Oficio 8 5 13 4 inches 216 340 mm Oficio 9 8 46 12 4 inches 215 315 mm Executive 7 25 10 5 inches 184 267 mm Half Letter 5 5 8 5 inches 140 216 mm A6 4 1 5 8 inches 105 148 mm or 8 5 13 inches 216 330 mm 50 sheets User defined 3 5 5 inches to 8 5 47 24 inches 89 127 mm to ...

Page 61: ... incorrectly or printing is uneven or smeared load 1 sheet at a time Epson Premium Presentation Paper Matte Double sided Epson Brochure Flyer Paper Matte Double sided Epson Photo Quality Self adhesive Sheets 1 sheet Envelopes 10 envelopes Printing from computer only Parent topic Loading Paper in the Cassette Related references Paper Specifications Double sided Printing Capacity You can print doubl...

Page 62: ...56 mm Mexico Oficio 8 5 13 4 inches 216 340 mm Oficio 9 8 46 12 4 inches 215 315 mm 8 5 13 inches 216 330 mm or user defined 3 5 5 inches to 8 5 47 24 inches 89 127 mm to 215 9 1200 mm 1 sheet Epson Bright White Pro Paper Epson Bright White Premium Paper Epson Multipurpose Plus Paper Letter 8 5 11 inches 216 279 mm 120 sheets 30 sheets Epson Premium Presentation Paper Matte Double sided Epson Broc...

Page 63: ... adhesive Sheets Envelopes Parent topic Loading Paper in the Cassette Borderless Paper Type Compatibility You can print borderless photos on compatible paper types in compatible sizes Borderless Paper Types Epson Bright White Pro Paper Epson Multipurpose Plus Paper Epson Photo Paper Glossy Epson Premium Photo Paper Glossy Epson Ultra Premium Photo Paper Glossy Epson Premium Photo Paper Semi gloss ...

Page 64: ...rest one call 800 GO EPSON 800 463 7766 in the U S or 800 807 7766 in Canada Paper Type Size Part number Sheet count Epson Bright White Pro Paper Letter 8 5 11 inches 216 279 mm S041586 500 Epson Bright White Premium Paper Letter 8 5 11 inches 216 279 mm S450218 4 500 Epson Multipurpose Plus Paper Letter 8 5 11 inches 216 279 mm S450217 4 500 Epson Presentation Paper Matte Letter 8 5 11 inches 216...

Page 65: ...41727 100 5 7 inches 127 178 mm S041464 20 8 10 inches 203 254 mm S041465 20 Letter 8 5 11 inches 216 279 mm S042183 S041667 25 50 Epson Ultra Premium Photo Paper Glossy 4 6 inches 102 152 mm S042181 S042174 60 100 5 7 inches 127 178 mm S041945 20 8 10 inches 203 254 mm S041946 20 Letter 8 5 11 inches 216 279 mm S042182 S042175 25 50 Epson Premium Photo Paper Semi gloss 4 6 inches 102 152 mm S0419...

Page 66: ...eets Plain Paper Bright White Paper Letterhead paper Letterhead Envelopes Envelope Epson Ultra Premium Photo Paper Glossy Ultra Premium Photo Paper Glossy Epson Premium Photo Paper Glossy Premium Photo Paper Glossy Epson Photo Paper Glossy Photo Paper Glossy Epson Premium Photo Paper Semi gloss Premium Photo Paper Semi Gloss Epson Presentation Paper Matte Presentation Paper Matte Epson Premium Pre...

Page 67: ...tting is disabled you cannot use AirPrint 4 Select Paper Setting 5 Do one of the following to select your paper settings Select a Paper Size and Paper Type setting Select Favorite Paper Settings to select from a list of saved presets 6 When you are finished press the home button to exit Paper Type Settings Control Panel Parent topic Loading Paper Paper Type Settings Control Panel Select a Paper Ty...

Page 68: ...ngs using the control panel on the product 1 Press the home button if necessary 2 Select Settings General Settings Printer Settings 3 Select one of these Auto Error Solver options Turn on this setting to display a warning and print single sided when a 2 sided printing error occurs or to print only what the printer could process when a memory full error occurs Turn off this setting to display an er...

Page 69: ...paper type or size does not match the loaded paper Paper Type Notice Paper Setup Auto Display On Select On to automatically display a menu that lets you select the paper size and type when you load paper in the product Note If you disable this setting you cannot use AirPrint Off Parent topic Selecting the Default Paper Source Settings Selecting the Universal Print Settings You can change the defau...

Page 70: ... Description Top Offset Adjust the top or left margin Left Offset Top Offset in Back Adjust the top or left margin of the back page when printing double sided Left Offset in Back Check Paper Width On Select On to check the paper width before printing This prevents printing beyond the edges of the paper when the paper size settings are incorrect but may reduce the printing speed Off Skip Blank Page...

Page 71: ...acing Originals in the Automatic Document Feeder Placing Originals on the Scanner Glass You can place originals up to this size on the scanner glass Letter 8 5 11 inches 216 279 mm or A4 8 3 11 7 inches 210 297 mm Note To view animated instructions on how to place originals on the scanner glass press the help button and select How To Place Originals Scanner Glass Note When originals are placed in ...

Page 72: ...ny dust or dirt on the scanner glass the scanning range may expand to include it so the image of the original may be displaced or reduced Remove any dust and dirt on the scanner glass before scanning 2 Place your original facedown on the scanner glass with the top facing into the corner Slide the original to the edges of the indicated corner ...

Page 73: ...to trap your fingers when closing the document cover or you may be injured Remove your originals after scanning If you leave the originals on the scanner glass for a long time they may stick to the glass surface Parent topic Placing Originals on the Product Related topics Copying Scanning Faxing Placing Originals in the Automatic Document Feeder You can place single or multi page original document...

Page 74: ...s press the help button and select How To Place Originals ADF Note When originals are placed in the ADF and on the scanner glass priority is given to the originals in the ADF 1 Open the ADF document support and slide out the ADF output tray extension 2 Slide the ADF edge guide outward ...

Page 75: ...our stack of originals and tap them gently on a flat surface to even the edges 4 Insert the originals into the ADF faceup and short edge first Note Do not load originals above the arrow mark on the ADF edge guide ...

Page 76: ...Paper type Paper size Paper weight Loading capacity Plain paper Letter 8 5 11 inches 216 279 mm 17 to 24 lb 64 to 95 g m Approximately 30 sheets or 0 13 inches 3 3 mm A4 8 3 11 7 inches 210 297 mm Legal 8 5 14 inches 216 356 mm 10 sheets 8 5 13 inches 216 330 mm Caution Do not load the following types of originals in the ADF or they may be damaged or may damage the scanner Use the scanner glass fo...

Page 77: ...als with labels stickers or sticky notes Ripped curled folded deteriorated or wrinkled originals Originals with holes Transparencies Parent topic Placing Originals in the Automatic Document Feeder Related topics Copying Scanning Faxing ...

Page 78: ... in the ADF 2 Load the paper you want to print on 3 Press the home button if necessary 4 Select Copy 5 Select B W or Color 6 To print more than one copy select the or icons to increase or decrease the number of copies Note You can also select Copies and use the displayed numeric keypad to select the number of copies up to 99 7 Change any of the displayed settings as necessary 8 Select Advanced Set...

Page 79: ...y 4 Select Copy 5 Select the Advanced Settings tab 6 Enable one of these options ID Card Copy Scan and copy both sides of an ID card onto one side of the paper Borderless Copy Copy a photo without margins around the edges 7 To print more than one copy select Copies and use the displayed numeric keypad to select the number of copies up to 99 8 Change any of the displayed settings as necessary 9 Whe...

Page 80: ...y depending on the paper settings you selected for the paper sources Reduce Enlarge Actual Size Copies the original at its full size or 100 magnification Auto Fit Page Automatically sizes the image to fit the paper size you selected A4 A5 and other conversions Automatically converts from one size to another Original Size Various sizes Select the document size of your original When copying non stan...

Page 81: ...ve the binding holes on an original On ID Card Copy Off Select On to copy both sides of an ID card onto one side of a sheet of paper On Borderless Copy Off Copies the original without margins around the edges The image is enlarged a little to remove margins from the edges of the paper Select Expansion to adjust the amount to expand the original when printing borderless copies On Standard Medium Mi...

Page 82: ...Mac Printing from a Smartphone or Tablet Printing with Epson Photo Cancelling Printing Using a Product Button Printing with Windows You can print with your product using any Windows application as described in these sections Note If you are using your Epson product with the Windows 10 S operating system you cannot use the software described in this section You also cannot download and install any ...

Page 83: ...e print command in your application Note You may need to select a print icon on your screen the Print option in the File menu or another command See your application s help utility for details 3 If necessary select your product name as the printer you want to use Note You may also need to select Properties or Preferences to view your print settings You see the Main tab of your printer settings win...

Page 84: ...t matches the print quality you want to use 9 Select a Color option To print a color document or photo select the Color setting To print text and graphics in black or shades of gray select the Black Grayscale setting 10 To print on both sides of the paper select the 2 Sided Printing setting and select the options you want 11 To print multiple pages on one sheet of paper or print one image on multi...

Page 85: ...nting on plain paper Standard For everyday text and image printing Standard Vivid For text and graphics with good quality and print speed High For photos and graphics with high print quality More Settings Opens a window that lets you choose among levels of speed and quality Parent topic Selecting Basic Print Settings Windows Multi Page Printing Options Windows You can select any of the available o...

Page 86: ...int job by automatically flipping the paper on the long edge Auto Short edge binding to print your double sided print job by automatically flipping the paper on the short edge Manual Long edge binding to print your double sided print job by printing one side and prompting you to flip the paper over on the long edge to print the other side recommended for paper types that do not support automatic d...

Page 87: ...rinting as the Document Type setting The software automatically sets the Adjustments options for that document type 6 If necessary select the Adjustments options you want to use 7 Click OK to return to the Main tab 8 Print a test copy of your double sided document to test the selected settings 9 Follow any instructions displayed on the screen during printing ...

Page 88: ... Start Page Selects whether printing starts on the front or back page Create Folded Booklet Options Select the Booklet checkbox and a binding option to print double sided pages as a booklet Parent topic Selecting Double sided Printing Settings Windows Print Density Adjustments Windows You can select any of the available options on the Print Density Adjustment window to adjust the print quality of ...

Page 89: ...on to size your image to fit the paper you loaded Select the size of your document or photo as the Document Size setting and the size of your paper as the Output Paper setting If you want to center your image on the paper select the Center option Select the Zoom to option to reduce or enlarge your document or photo by a specific percentage Select the percentage in the menu 2 Select one of the foll...

Page 90: ...rk adds a visible watermark to your printout Header Footer adds information such as the date and time to the top or bottom of your printout Note Click the Settings button to customize the text and location of the header or footer 4 Select any of the Additional Settings options to customize your print Custom Color Correction Options Windows Image Options and Additional Settings Windows Header Foote...

Page 91: ...r tones Depending on the selected color mode you can also adjust the midtone density using the Gamma setting Fix Photo Improves the color contrast and sharpness of flawed photos Note Fix Photo uses a sophisticated face recognition technology to optimize photos that include faces For this to work both eyes and the nose must be visible in the subject s face If your photo includes a face with an inte...

Page 92: ... increase readability Emphasize Thin Lines Adjusts the weight of printed lines to increase visibility Edge Smoothing Smooths jagged edges in low resolution images such as screen captures or images from the Web Fix Red Eye Reduces or removes red eye in photos Print Text in Black Prints colored text in black For Color Text Prints colored text on a background pattern or underlined For Color Graphs an...

Page 93: ...ft to right Parent topic Selecting Additional Layout and Print Options Windows Header Footer Settings Windows You can select any of the Header Footer Settings options to add headers or footers when you print The items are available to print at the top or bottom of your pages in either the left right or center of the page Note These settings are not saved with your document ...

Page 94: ...name computer name date and time come from the Windows Control Panel on your computer Parent topic Selecting Additional Layout and Print Options Windows Selecting a Printing Preset Windows For quick access to common groups of print settings you can select a printing preset on the Main or More Options tab Note You can create your own preset by clicking the Add Remove Presets button 1 Click the Main...

Page 95: ... a preset to change its settings or delete it or use any of the available options on the screen to control your printing presets 4 To choose a preset for printing select it 5 Click OK Parent topic Printing with Windows Selecting Extended Settings Windows You can select additional settings that apply to all the print jobs you send to your product ...

Page 96: ...ight click the icon for your product in the right side of the Windows taskbar or click the up arrow and right click 2 Select Printer Settings 3 Click the Maintenance tab You see the maintenance options 4 Click the Extended Settings button ...

Page 97: ...ndow Enable EPSON Status Monitor 3 Enables product monitoring for ink and paper supplies and other issues Check Paper Width Before Printing Prevents printing beyond the edges of the paper if the paper size setting is incorrect may reduce print speed Separator Page Before each document prints a separator page containing the title user date and time Remove white borders Removes white margins that ma...

Page 98: ...o perform ICM color matching Always Use the Driver s Paper Source Setting Prints using the paper source setting in the printer driver rather than the setting in your application Output 1 page documents facedown in 2 Sided mode Outputs single sided pages in a 2 sided print job facedown instead of faceup Output documents for filing Outputs all landscape portrait 1 sided and 2 sided documents in the ...

Page 99: ...see your application s Print window such as this one 2 Click OK or Print to start printing Checking Print Status Windows Parent topic Printing with Windows Related tasks Selecting Basic Print Settings Windows ...

Page 100: ...ccess to some printer settings to prevent unauthorized changes 1 Do one of the following Windows 11 Click search for Settings and select it Select Bluetooth devices Printers scanners Select your product name and select Printer properties Windows 10 Click and select Settings Devices Printers scanners Select your product name and select Manage Printer properties Windows 8 x Navigate to the Apps scre...

Page 101: ... the Optional Settings tab by changing the user or group permissions in the Security tab 3 Click Driver Settings You see this window 4 Select the checkbox for each setting you want to lock To lock all print settings select All Document Settings 5 Under Advanced Settings select the setting option you want to use for each locked setting 6 Click OK Locked Setting Options Parent topic Printing with Wi...

Page 102: ... you select the size position and other watermark settings Header Footer Off Prohibits headers or footers On Allows headers and footers Settings Lets you select the text and position for printing headers and footers Color Color Allows color printing Grayscale Allows printing in black or shades of gray only 2 sided printing Off Allows printing on one side of the paper only On Allows printing on bot...

Page 103: ...n a program the changes apply only while you are printing in that program session If you want to change the print settings you use in all your Windows programs you can select new default print settings 1 Access the Windows Desktop and right click the icon for your product in the right side of the Windows taskbar or click the up arrow and right click 2 Select Printer Settings You see the printer se...

Page 104: ... Language of the Printer Software Screens Parent topic Printing with Windows Changing the Language of the Printer Software Screens You can change the language used on the Windows printer software screens 1 Access the Windows Desktop and right click the icon for your product in the right side of the Windows taskbar or click the up arrow and right click 2 Select Printer Settings You see the printer ...

Page 105: ... you access them Parent topic Selecting Default Print Settings Windows Changing Automatic Update Options Your printer software for Windows automatically checks for updates to the product software You can change how often the software checks for updates or disable this feature 1 Access the Windows Desktop and right click the icon for your product in the right side of the Windows taskbar or click th...

Page 106: ...asks Checking for Software Updates Printing with the Built in Epson Driver Windows 10 S You can print with the built in Epson printer driver using any printing program on Windows 10 S as described in these sections Note The built in Epson driver in Windows 10 S does not include all the available print settings for your product To print with additional settings download and install the Epson Print ...

Page 107: ...document for printing 2 Select the print command in your application Note You may need to select a print icon on your screen the Print option in the File menu or another command See your application s help utility for details 3 If necessary select your product name as the printer you want to use Note You may also need to select Properties or Preferences to view your print settings You see a window...

Page 108: ... for details 5 Click the Advanced button You see a window like this 6 Select the size of the paper you loaded as the Paper Size setting 7 To print multiple copies select or enter the number as the Copy Count setting 8 To print multiple copies of multi page documents in sets select the Collated checkbox 9 Click OK You return to the printing preferences window ...

Page 109: ...109 10 Select the Layout tab 11 Select the orientation of your document as the Orientation setting ...

Page 110: ...14 Click OK or Print to start printing Parent topic Printing with the Built in Epson Driver Windows 10 S Printing on a Mac You can print with your product using any Mac printing program as described in these sections Note If you have an Internet connection it is a good idea to check for updates to your product software on Epson s support website or using Epson Software Updater Selecting Basic Prin...

Page 111: ...cting Basic Print Settings Mac Select the basic settings for the document or photo you want to print 1 Open a photo or document for printing 2 Select the print command in your application Note You may need to select a print icon on your screen the Print option in the File menu or another command See your application s help utility for details 3 Select your product as the Printer setting 4 If neces...

Page 112: ...Note The print window may look different depending on the Mac OS version and the application you are using 5 Select the Copies and Pages settings as necessary Note If you do not see these settings in the print window check for them in your application before printing ...

Page 113: ...ion before printing They may be accessible by selecting Page Setup from the File menu Note Paper sizes may include additional options such as Borderless 7 Select any application specific settings that appear on the screen such as those shown in the image above for the Preview application 8 Select Print Settings or Printer Features from the pop up menu ...

Page 114: ...st for details 10 Select the Print Quality setting you want to use 11 Select the Borderless checkbox if you want to print a borderless photo If the option is grayed out change the Media Type setting to a paper type that supports borderless printing 12 Select any of the available print options Print Quality Options Mac Print Options Mac Parent topic Printing on a Mac Related references Paper or Med...

Page 115: ... For text and graphics with increased quality and print speed Parent topic Selecting Basic Print Settings Mac Print Options Mac You can select any of the print options to customize your print Some options may be unavailable depending on other settings you have chosen Expansion If you selected a borderless paper size setting this option adjusts the image expansion settings to control printing at th...

Page 116: ...elect the Borderless checkbox or a paper size with a Borderless option You can also select a custom setting to create a custom paper size but the Quality setting will be limited to Normal Note You must select a compatible borderless paper type and size to print without borders Check the borderless paper compatibility list for details 2 Select the orientation of your document or photo as shown in t...

Page 117: ...s select a Layout Direction setting To print borders around each page on the sheet select a line setting from the Border pop up menu To print on both sides of each page select a setting from the Two Sided pop up menu To invert or flip the printed image select the Reverse page orientation or Flip horizontally settings Parent topic Printing on a Mac Selecting Double sided Printing Settings Mac You c...

Page 118: ...options 2 Select the type of document you are printing as the Document Type setting The software automatically sets the Adjustments options for that document type 3 If necessary customize the Adjustments settings as instructed on the screen 4 Print a test copy of your double sided document to test the selected settings 5 Follow any instructions displayed on the screen during printing Double sided ...

Page 119: ...Print Density Sets the level of ink coverage for double sided printing Increased Ink Drying Time Sets the amount of time required for drying ink after printing on one side of the paper before printing the other side in double sided printing Parent topic Selecting Double sided Printing Settings Mac Managing Color Mac You can adjust the Color Matching and Color Options settings to fine tune the colo...

Page 120: ...Options menus Color Matching Settings EPSON Color Controls Lets you manage color using controls in your printer driver or turn off color management ColorSync Prints using standard color profiles for your product and paper to help match image colors You can customize the conversion method and filter settings on the ColorSync pop up menu in the print window Color Options Settings Manual Settings Let...

Page 121: ...nose must be visible in the subject s face If your photo includes a face with an intentional color cast such as a statue you may want to turn off Fix Photo to retain the special color effects Off No Color Adjustment Turns off color management in your printer software so you can manage color using only your application software Note An ICC profile is required if color management is turned off Paren...

Page 122: ...e printing preferences 5 Click OK Printing Preferences Mac Parent topic Printing on a Mac Printing Preferences Mac You can select these settings on the Options or Driver tab Skip Blank Page Ensures that your product does not print pages that contain no text or images Quiet Mode Lessens noise during printing but may decrease print speed Permit temporary black printing Allows you to print using blac...

Page 123: ...os Warning Notifications Lets you choose whether or not to receive warning notifications from the printer software for various operating conditions Establish bidirectional communication Allows the product to communicate with the computer Do not change the default setting unless you experience issues when using a shared printing pool Parent topic Selecting Printing Preferences Mac Printing Your Doc...

Page 124: ...the printer icon when it appears in the Dock You see the print status window 2 Select the following options as necessary for your Mac OS version To cancel printing click the print job and click or Delete To pause a print job click the print job and click or Hold To resume a print job click the paused print job and click or Resume To pause printing for all queued print jobs click Pause or Pause Pri...

Page 125: ...u can print photos CD DVD labels and more using a variety of layouts and templates with Epson Photo Features include image corrections and adjustments and adding text and stamps to photos We recommend printing on genuine Epson photo paper for the best results Make sure you have set up your product as described on the Start Here sheet and installed the Epson Photo software See the Epson Photo help ...

Page 126: ... Starting a Scan from a Smartphone or Tablet Parent topic Scanning Related topics Placing Originals on the Product Starting a Scan Using the Product Control Panel You can scan an image to a variety of destinations using your product s control panel 1 Make sure you installed the product software and connected the product to your computer or network Note Restart your computer after installing the pr...

Page 127: ... Panel Scanning Options Parent topic Starting a Scan Related tasks Using Epson Scan to Cloud Related topics Placing Originals on the Product Wi Fi or Wired Networking Scanning to a Connected Computer You can scan an original and save it to a connected computer using your product s control panel The computer must be connected using a USB cable or connected to the same network as your product You ca...

Page 128: ... a computer before saving Windows 7 or later or OS X 10 11 x or later Save as JPEG to save the scanned scanned image as a JPEG file Save as PDF to save the scanned document or image as a PDF file 7 Select the icon to start scanning Your product scans your original and saves the scanned file to your computer Note The color size and border of the scanned image will not be exactly the same as the ori...

Page 129: ...the same as the original Parent topic Starting a Scan Using the Product Control Panel Related references Control Panel Scanning Options Related tasks Setting Up Epson Connect Services Using Epson Scan to Cloud Related topics Placing Originals on the Product Setting Up a WSD Port Windows 7 Windows Vista You can scan to a networked Windows computer using WSD Web Services for Devices You must first s...

Page 130: ...one of the following Windows 7 Click and select Devices and Printers Windows Vista Click Start and select Control Panel Hardware and Sound Printers 10 Make sure that an icon appears for your product s name on the network When you use WSD select your product name to scan over the network Parent topic Starting a Scan Using the Product Control Panel Related tasks Printing a Network Status Sheet Relat...

Page 131: ...rround Erases the shadows that appear around the edges of a document Center Erases the shadows that appear in the center of a document when copying a book Remove Punch Holes Erasing Position Erases the binding holes on a document Original Orientation Select the orientation of your original Clear All Settings Yes Select Yes to restore all scan settings to their defaults No Parent topic Starting a S...

Page 132: ...en like this Parent topic Starting a Scan Starting a Scan Using the Epson Scan 2 Icon You can start the Epson Scan 2 program to select scan settings scan and save the scanned image to a file Note If you are using your Epson product with the Windows 10 S operating system you cannot use the software described in this section You also cannot download and install any Epson product software from the Ep...

Page 133: ...lect EPSON Epson Scan 2 Windows 8 x Navigate to the Apps screen and select Epson Scan 2 Windows other versions Click or Start and select All Programs or Programs Select EPSON Epson Scan 2 Epson Scan 2 Mac Open the Applications folder open the Epson Software folder and select Epson Scan 2 ...

Page 134: ...134 You see an Epson Scan 2 window like this ...

Page 135: ...n You also cannot download and install any Epson product software from the Epson website for use with Windows 10 S you must obtain software only from the Windows Store 1 Open your scanning program and select its scanning option See your scanning program help for instructions 2 Select your product Note In certain programs you may need to select your product as the source first If you see a Select S...

Page 136: ...136 You see an Epson Scan 2 window like this ...

Page 137: ...opics Placing Originals on the Product Scanning a Document in Epson ScanSmart You can scan and review documents and photos in Epson ScanSmart Note The images in this guide show Windows screens Mac screens may be slightly different Depending on your product model and software version not all options may be available 1 Load your original into the product 2 Open Epson ScanSmart on your computer Do on...

Page 138: ...elect an option for the Scan area setting if necessary Note The Scan area setting limits the scan area to a selected size starting at the placement arrow on the scanner bed It does not scale the image to the selected size 4 Select SCAN ...

Page 139: ...Stitch Images and follow the on screen instructions to combine them into a single image 6 If Photo Mode is automatically detected the following enhancement options are available Auto Color Enhancement automatically adjusts the brightness contrast and saturation of your photos Restore Faded Colors restores the colors in faded photos automatically Remove Red Eye automatically removes the red eye eff...

Page 140: ...ng a Scan to Email Sending a Scan to a Cloud Service Printing a Scan Parent topic Scanning Related topics Placing Originals on the Product Saving a Scan You can save a scanned image to your computer in a variety of formats 1 Make sure your originals are scanned and reviewed See the link below 2 In the Select Action window click Save ...

Page 141: ...ng a Document in Epson ScanSmart Attaching a Scan to Email You can attach a scanned image to an email as a file attachment Note Your email app and account settings should be configured before scanning You must install a MAPI type email program such as Outlook Express Windows Live Mail Entourage or Mac Mail Attach to Email only supports 32 bit MAPI compatible mail apps Web based email services such...

Page 142: ...Character Recognition language If you also want to save a copy of the scanned image to your computer make sure the checkbox is selected and select the folder on your computer in which to save the file 4 Click Attach to E mail Your email program opens with the file attached to a new email Parent topic Scanning a Document in Epson ScanSmart Sending a Scan to a Cloud Service You can upload scanned im...

Page 143: ...t type and scan date for the file name are automatically detected You can change them as necessary You can save the scanned image in a variety of formats If you select Searchable PDF as the File type setting you can select the OCR Optical Character Recognition language If you also want to save a copy of the scanned image to your computer click the checkbox 5 Click Send Parent topic Scanning a Docu...

Page 144: ...change the print settings if necessary Select the number of copies you want to print If you also want to save a copy of the scanned image to your computer click the checkbox The document type and scan date for the file name are automatically detected You can change them as necessary You can save the scanned image in a variety of formats If you select Searchable PDF as the File type setting you can...

Page 145: ... Changing the Save Settings Customizing Action Icons Parent topic Scanning Changing the Epson Product If you are using more than one Epson product with Epson ScanSmart you can change the product that you are using with your computer Note A product connected to your computer via USB takes priority over a product with a Wi Fi connection 1 On the main screen click Change You see a screen like this ...

Page 146: ... such as the resolution document size and more Note If you select Auto Mode you cannot change the scan settings 1 Click the Settings button You see a screen like this 2 Do one of the following To change Document Mode settings select Document Mode Custom Settings To change Photo Mode settings select Photo Mode and click Close When you start a scan you will be prompted to select scan settings ...

Page 147: ...147 You see a screen like this 3 Change the settings as necessary and click Save Parent topic Selecting Epson ScanSmart Settings ...

Page 148: ...148 Changing the File Name Settings You can change the default file naming method for your scans 1 Click the Settings button You see a screen like this 2 Click the File Name Settings tab ...

Page 149: ...a prefix for the file name Select the date format Select a numbering format as the counter format 4 Click Close Parent topic Selecting Epson ScanSmart Settings Changing the Save Settings You can change the file type options for saving your scans 1 Click the Settings button ...

Page 150: ...150 You see a screen like this 2 Click the Save Settings tab ...

Page 151: ...ange the settings as necessary 4 Click Open folder after saving to open the file folder after a file is saved 5 Click Close Save Settings Parent topic Selecting Epson ScanSmart Settings Save Settings You can change the settings for how scanned images are saved PDF Options ...

Page 152: ... Standard Images load from top to bottom in a web browser It takes longer to load the entire image Progressive Images first load completely at low resolution and then adjust to high resolution in a web browser Embed ICC Profile Windows only Allows you to add ICC profiles to the image TIFF Options Setting Options Description Byte Order Windows Macintosh Specifies the operating system where the scan...

Page 153: ... Icons You can customize which scan action icons appear on the Select Action screen Note You can also customize them by clicking the Customize icon on the Select Action screen 1 Click the Settings button You see a screen like this 2 Click the Customize Actions tab ...

Page 154: ...an your document and save the scanned image in various file formats in your operating system s Documents or My Documents folder or open it in your scanning program You can preview the scanned image and select or change settings as necessary Note If you are using your Epson product with the Windows 10 S operating system you cannot use the software described in this section You also cannot download ...

Page 155: ...155 You see this window ...

Page 156: ... the Image Type setting 6 Select the Resolution setting you want to use for your scan 7 Select the Rotate setting to rotate the scanned image 8 Select the Correct Document Skew setting to correct skewed originals image contents or both 9 Click the Preview button Epson Scan 2 previews your original and displays the results in the Epson Scan 2 window 10 Reinsert your original into the ADF if necessa...

Page 157: ...n Guidelines Parent topic Scanning Additional Scanning Settings Main Settings Tab You can select these additional scanning settings on the Epson Scan 2 Main Settings tab Not all adjustment settings may be available depending on other settings you have chosen Rotate Rotates the original image clockwise to the desired angle before scanning it Select Auto to allow your product to automatically rotate...

Page 158: ... image This setting is available only if you select Grayscale or Black White as the Image Type setting Brightness Adjusts the overall lightness and darkness of the scanned image Contrast Adjusts the difference between the light and dark areas of the overall scanned image Gamma Adjusts the midtone density of the scanned image Unsharp Mask Makes the edges of certain image areas clearer Turn off this...

Page 159: ...nstalled automatically when you install your product software as instructed on the Start Here sheet If you install your scanner software programs individually be sure to also install this component if you want to perform OCR 1 Load your original in the product for scanning 2 Start Epson Scan 2 3 Select your scan settings 4 Click Preview and adjust the area you want to scan if necessary 5 If you ar...

Page 160: ...tting and select a Folder setting for your document 13 Click Scan The scanned image is saved as a searchable PDF Parent topic Scanning in Epson Scan 2 Image Format Options You can select different image formats and related options For details on available options click the icon on the Epson Scan 2 Image Format Options window Not all image formats have options BITMAP bmp A standard image file forma...

Page 161: ...e PDF file Recognized text in the scanned document can be searched Parent topic Scanning in Epson Scan 2 Scan Resolution Guidelines The Resolution setting measured in dpi dots per inch controls the amount of detail captured in your scans Increasing the resolution raises the amount of detail captured but comes with the following disadvantages Larger file sizes It takes longer to scan your originals...

Page 162: ...ou will scan the image at 100 or a smaller size Select the Epson Scan 2 Resolution setting based on how you will use the scanned image Email view on a computer screen post on the web 96 to 200 dpi Print fax convert to editable text OCR create searchable PDF 200 to 300 dpi Parent topic Scanning in Epson Scan 2 ...

Page 163: ... You must connect your product to a telephone wall jack to send or receive faxes If you want to use the same telephone line to receive calls you can connect a telephone or answering machine to your product using an additional phone cable Note In areas where lightning strikes occur frequently we recommend that you use a surge protector Note If you do not connect a telephone to your product make sur...

Page 164: ...our product Note If you have a DSL or ISDN connection you must connect the appropriate DSL filter or ISDN terminal adapter or router to the wall jack to be able to use the line for faxing or voice calls using your product Contact your DSL or ISDN provider for the necessary equipment ...

Page 165: ...second phone cable remove the cap from the EXT port on your product Note If your telephone has a fax function disable the fax function before connecting it If you are not able to completely disable the fax function on your telephone you may not be able to use it as an external telephone ...

Page 166: ...answering machine s setting for the number of rings Make sure to connect the telephone to the EXT port on your product If you split the telephone line between your telephone and the product they will not work correctly Parent topic Faxing Related references Basic Settings Fax Related tasks Receiving Faxes Automatically Setting the Number of Rings to Answer Setting Up Fax Features Before faxing wit...

Page 167: ... Type Setting the Number of Rings to Answer Parent topic Setting Up Fax Features Using the Fax Setup Wizard You can setup the product s basic fax settings using the Fax Setting Wizard This wizard is automatically displayed when the product is turned on for the first time You can also change these settings individually from the Fax Settings menu 1 Press the home button if necessary 2 Select Setting...

Page 168: ...e next step If you did not connect an external telephone or answering machine select No and go to step 10 Receive Mode is automatically set to Auto otherwise you cannot receive faxes 9 On the next Receive Mode Setting screen select Yes to receive faxes automatically or select No to receive faxes manually Note If you connect an external answering machine and select to receive faxes automatically ma...

Page 169: ...Press the home button if necessary 2 Select Settings General Settings Fax Settings Basic Settings Line Type PBX You see a screen like this 3 Set the switch to Use to activate the setting 4 Select Access Code 5 Use the displayed keypad to enter the access code such as 9 and select OK 6 Select Done to exit Parent topic Setting Up Basic Fax Features Setting the Number of Rings to Answer If you connec...

Page 170: ...your answering machine is set to for answering a call Note An answering machine picks up every call faster than the product but the product can detect fax tones and start receiving faxes If you answer the phone and hear a fax tone check that the product has started receiving the fax then hang up the phone Parent topic Setting Up Basic Fax Features Selecting Advanced Fax Settings You can select a v...

Page 171: ...sic Settings Fax Set the basic options you want to use for incoming and outgoing faxes Setting Options Description Fax Speed Fast 33 600bps Sets the speed at which you send and receive faxes Medium 14 400bps Slow 9 600bps ECM On Turns on Error Correction Mode ECM to automatically correct errors in sent or received fax data Off Turns off Error Correction Mode ECM color faxes cannot be sent or recei...

Page 172: ...lusion on outgoing faxes Fax Header Receive Mode Manual Lets you confirm whether an incoming fax should be printed a telephone must be connected to the product Auto Automatically receives and prints faxes Distinctive Ring DRD All If you are using a Distinctive Ring Service on your phone line your telephone company can assign two or more phone numbers to the same line and assign different ring patt...

Page 173: ...g Options Description Save to Computer No Select Yes to save received faxes as PDF files to a connected computer when using FAX Utility After selecting Yes you can select Yes and Print Yes Yes and Print Auto Reduction On Select to reduce the size of large received faxes to fit on the paper size in the selected paper source Off Select to print large incoming faxes at their original size on multiple...

Page 174: ... may not be available Off Print Suspend Time Off Select On to set a time period to stop automatic printing of faxes or reports and save received faxes in the product s memory Make sure there is enough free memory before using this function On Time to Stop Time to Restart Quiet Mode On Select On to reduce noise during printing Printing speed may be reduced Off Parent topic Selecting Advanced Fax Se...

Page 175: ...be entered as the recipient On Confirm Address List Off Selects whether or not to display a recipient confirmation screen before a fax is sent On Backup Data Auto Clear Off Automatically erases sent or received fax data from your product s memory On Clear Backup Data Deletes all sent or received fax data remaining in your product s memory run this function if you are giving away or disposing of yo...

Page 176: ...t EPSON Software Windows 8 x Navigate to the Apps screen Windows other versions Click or Start Programs or All Programs EPSON Software 2 Select FAX Utility The first time you use the FAX Utility you see this introduction window 3 Read about the FAX Utility and click Return to the main window at the bottom of the window ...

Page 177: ...ansfer your product s fax settings to the FAX Utility Note For detailed information click Help or Open Online Help Parent topic Setting Up Fax Features Setting Up Fax Features Using the Fax Utility Mac You can set up your fax header and select your fax settings using the FAX Utility for Mac ...

Page 178: ...rinter list 4 Select Fax Settings 5 Follow the prompts that appear on the screen to enter your fax header information and select your fax settings Note For detailed information select the FAX Utility icon Parent topic Setting Up Fax Features Setting Up Contacts and Contact Groups You can set up a list of contacts and their fax numbers so you can quickly select them for faxing You can also set up c...

Page 179: ...t Fax Contacts 3 Select Add Entry 4 Select Add Contact or Add Group Note You must create a contact before a group can be created 5 Select each field as necessary and enter the information for your contact or group Note If necessary enter an outside line access code such as 9 at the beginning of the fax number If the access code has been set up in the Line Type setting enter the pound sign instead ...

Page 180: ...ntacts Using the Product Control Panel Sending Faxes See these sections to send faxes using your product Sending Faxes from the Product Control Panel Sending Faxes Using the Fax Utility Windows Sending Faxes Using the Fax Utility Mac Parent topic Faxing Sending Faxes from the Product Control Panel See these sections to send faxes using the product s control panel Sending a Fax Using the Keypad Con...

Page 181: ...rol panel by entering the fax number or selecting the number from either the contact list or fax history Note You can send a black and white fax to up to 100 contacts or 99 groups at a time or send a color fax to one recipient at a time If your recipient s fax machine does not print in color your fax is automatically sent in black and white 1 Place your original on the product for faxing 2 Press t...

Page 182: ...act again to deselect it You can also select the Search for Contacts field to search for recipients by name index name or entry number Select Close when you are finished Select from the sent fax history Select Recent to display the sent fax history Select a recipient from the list Note To delete entered recipients select the recipient field select the recipient you want to delete and select Remove...

Page 183: ...ilable Lets you adjust the sharpness of an image ADF Continuous Scan Off Select On to have the product to ask if you want to scan another page after a document in the ADF has finished scanning On Original Size Glass Half Letter Sets the size for a document placed on the scanner glass A5 Letter A4 Color Mode B W Select whether to scan images in black and white or color Color Direct Send Off Select ...

Page 184: ...defaults No Parent topic Sending Faxes from the Product Control Panel Sending a Fax at a Specified Time You can send a fax at a time of your choice Note Make sure the product s date and time settings are correct You can only send faxes in black and white when you use this option 1 Place your original on the product for faxing 2 Press the home button if necessary 3 Select Fax 4 Enter a fax number o...

Page 185: ...T port on your product you can send a fax by dialing the fax number from the connected telephone If the recipient s phone number and fax number are the same you can speak to the recipient before sending the fax Note When a fax number is dialed using the connected telephone sending a fax takes longer because the product scans and sends the fax simultaneously While sending the fax other features can...

Page 186: ... telephone Parent topic Sending Faxes from the Product Control Panel Related topics Placing Originals on the Product Sending Faxes Using the Fax Utility Windows You can send a fax from a printing program in Windows You can fax up to 100 pages at a time including a cover sheet 1 Open the file you want to fax and select the print command You see a window like this ...

Page 187: ...ons button click it Then click Preferences or Properties on the next screen For more information about selecting fax print settings click Help 4 Select the Page Range as necessary Leave the Number of copies set to 1 5 Click Print or OK If you re faxing for the first time you see a window like this one 6 Enter your sender information so that recipients can identify the origin of the fax Then click ...

Page 188: ...ng the Epson FAX Utility click Help 8 Select a cover sheet and enter a subject and message then click Next 9 Click Send to transmit your fax Parent topic Sending Faxes Sending Faxes Using the Fax Utility Mac You can send a fax from a Mac printing program using the FAX Utility You can fax up to 100 pages at a time including a cover sheet 1 Open the file you want to fax ...

Page 189: ...print window may look different depending on the Mac OS version and the application you are using 3 Select your product FAX option as the Printer setting 4 If necessary click the arrow next to the Printer setting or the Show Details button to expand the print window 5 Select the number of pages you are faxing as the Pages setting Note Leave the Copies setting set to 1 6 Select Recipient Settings f...

Page 190: ...following to choose your recipient Select a name or group from the Recipient List Enter a name company and fax number and click the button Click the icon and select a recipient from your address book 8 Select Fax Settings from the pop up menu ...

Page 191: ...anually Receiving a Fax by Polling Saving and Viewing Received Faxes Parent topic Faxing Fax Reception Your product will automatically receive and print faxes when you set the Receive Mode to Auto If you connected a telephone to your product so you can use the same phone line for faxes and voice calls you can also set your product to receive faxes manually This allows you to check for a fax tone u...

Page 192: ... answer a call For example if the answering machine is set to pick up on the fourth ring set the product to pick up on the fifth ring or later Parent topic Receiving Faxes Related references Basic Settings Fax Related tasks Receiving Faxes Manually Receiving Faxes Manually You can set up your product to receive faxes manually by setting the Receive Mode to Manual This lets you check for a fax tone...

Page 193: ...icon 4 Set Polling Receive to On 5 Select Close 6 Enter the fax number you expect to receive the fax from Note If direct dialing has been restricted you can only select the number from the contact list or fax history 7 Select the icon to start receiving the fax Parent topic Receiving Faxes Saving and Viewing Received Faxes You can save received faxes in your product s memory and view them on the L...

Page 194: ...on screen instructions Note Delete faxes after you print or view them to prevent the product s memory from filling up When the memory is full you can only print or reject incoming faxes Parent topic Receiving Faxes Checking Fax Status You can check the status of current fax jobs or faxes that have been received or sent on the product control panel 1 Press the home button if necessary 2 Select Fax ...

Page 195: ...format select Settings General Settings Fax Settings Report Settings on the LCD screen and then change the Attach Fax image to report or Report Format settings Fax Report Options Parent topic Faxing Fax Report Options Select the fax report or list you want to print Last Transmission Prints a report for the previously sent fax or fax received through polling Fax Log Prints the fax log Fax Settings ...

Page 196: ...Cartridges Printing with Black Ink and Expended Color Cartridges Conserving Low Black Ink with Windows Maintenance Box Replacement Related concepts Purchase Epson Ink Cartridges and Maintenance Box Ink Safety Precautions Keep ink cartridges and maintenance box out of the reach of children and do not drink the ink Keep the ink cartridges out of direct sunlight Store ink cartridges in a cool dark pl...

Page 197: ...ou must remove the yellow tape from the cartridge before installing it otherwise print quality may decline or you may not be able to print Do not remove the transparent seal from the bottom of the cartridge This may cause the cartridge to become unusable Do not touch the green IC chip on the side of the cartridge This may prevent normal operation Make sure to install all ink cartridges The printer...

Page 198: ...ude this reserve Quoted yields may vary depending on the images that you are printing the paper type that you are using the frequency of your prints and environmental conditions such as temperature Do not use the cartridges that came with the printer for the replacement The ink in the ink cartridges supplied with your printer is partly used during initial setup In order to produce high quality pri...

Page 199: ... Check Cartridge and Maintenance Box Status Related concepts Maintenance Box Replacement Related tasks Removing and Installing Ink Cartridges Checking Cartridge and Maintenance Box Status Windows A low ink reminder appears if you try to print when ink is low and you can check your cartridge or maintenance box status at any time using a utility on your Windows computer Note You can continue printin...

Page 200: ...en Note If any of the cartridges installed in the product is broken incompatible with the product model or improperly installed Epson Status Monitor will not display an accurate cartridge status 3 To disable the low ink reminder right click the product icon in the Windows taskbar and select Monitoring Preferences ...

Page 201: ...w 4 Deselect the See Low Ink Reminder alerts checkbox at the bottom of the screen 5 To disable promotional offers deselect the Display Epson Offers checkbox 6 Click OK Parent topic Check Cartridge and Maintenance Box Status ...

Page 202: ...idges and maintenance box using a utility on your Mac Note You can continue printing while the low ink message is displayed Replace the ink cartridges when required 1 In the Apple menu or the Dock select System Preferences Select Print Fax Print Scan or Printers Scanners select your product and select Options Supplies Select Utility and select Open Printer Utility 2 Select EPSON Status Monitor ...

Page 203: ...Replace or reinstall the maintenance box or any ink cartridge as indicated on the screen Note If any of the cartridges installed in the product is broken incompatible with the product model or improperly installed Epson Status Monitor will not display an accurate cartridge status Parent topic Check Cartridge and Maintenance Box Status ...

Page 204: ...n branded or altered Epson cartridges that functioned prior to a firmware update may not continue to function The included initial cartridges are designed for reliable printer setup and cannot be used as replacement cartridges or resold After setup the remaining ink is available for printing Yields are based on ISO 24711 in default mode printing continuously Yields vary due to print images setting...

Page 205: ... drying out Do not open ink cartridge packages until you are ready to install the ink Cartridges are vacuum packed to maintain reliability Note If you remove a low or expended ink cartridge you cannot re install and use the cartridge 1 Turn on your product If an ink cartridge is expended you see a message on the LCD screen Note which cartridges need to be replaced and follow the on screen instruct...

Page 206: ...2 Lift up the scanner unit until it locks into place Caution Do not move the print head by hand otherwise you may damage your product Do not touch the flat white cable or translucent film inside the product ...

Page 207: ...k gets on your skin wash it thoroughly with soap and water If ink gets into your eyes flush them immediately with water If ink gets into your mouth spit it out and see a doctor right away Keep ink cartridges out of the reach of children 4 If you are replacing the black ink cartridge gently shake the new black ink cartridge four or five times before unpacking it Do not shake the color ink cartridge...

Page 208: ...tion Do not shake the cartridges after opening the packages or ink may leak 5 Remove the cartridge from the package Caution Do not touch the areas shown here Doing so may prevent normal operation and printing ...

Page 209: ...the cartridge Caution Do not remove any other labels or seals or the ink cartridge may leak or become unusable 7 Insert the new cartridge into the holder and push it down until it clicks into place and is level with the other cartridges ...

Page 210: ...t turn off the product while ink is charging or you may not be able to print Caution If you remove an ink cartridge for later use protect the ink supply area from dirt and dust and store it in the same environment as the printer The valve in the ink supply port is designed to contain any excess ink but do not touch the ink supply port or surrounding area Always store ink cartridges with the label ...

Page 211: ... black or grayscale You cannot select borderless printing or copying 1 When you see a message on the LCD screen to replace a color ink cartridge select Proceed You see a message that you can temporarily print with black ink 2 Select Proceed again 3 If you want to print or copy in black only select No remind me later The current print job is canceled 4 Press the home button if necessary 5 Try print...

Page 212: ...elect the Black Grayscale checkbox 7 Click OK 8 Print your document Epson Status Monitor 3 displays a print message 9 Click Print in Black to print your document Parent topic Printing with Black Ink and Expended Color Cartridges Printing with Expended Color Cartridges Mac If printing stops you can cancel your print job and select settings to temporarily print with only black ink on plain paper let...

Page 213: ...ng 7 Click OK 8 Close the utility window 9 Load plain paper or an envelope in your product 10 Access the print settings in your print application 11 Select Print Settings from the pop up menu 12 Select a non borderless paper size as the paper size setting 13 Select Plain Paper Bright White Paper Letterhead or Envelope as the paper type setting 14 Select the Grayscale option 15 Select any other opt...

Page 214: ...atus Monitor must be enabled Click Yes to use a mixture of color inks to create black or No to continue using the remaining black ink for the document you are printing Click Disable this feature to continue using the remaining black ink Note If you disable this feature it remains disabled until you install a new black ink cartridge Parent topic Replacing Ink Cartridges and Maintenance Boxes Mainte...

Page 215: ...ept when replacing the maintenance box otherwise ink may leak If you cannot replace the cover the maintenance box may not be installed correctly Remove the maintenance box and reinstall it Do not tilt the maintenance box after removing it otherwise ink may leak Do not touch the openings in the maintenance box or you may get ink on you Do not reuse a maintenance box that has been removed and left u...

Page 216: ...f your printouts become too light or you see dark or light bands across them you may need to clean the print head nozzles Cleaning uses ink so clean the nozzles only if print quality declines You can check for clogged nozzles before you clean them so you don t clean them unnecessarily If you still see white or dark lines or missing nozzles in your printouts even after cleaning the print head sever...

Page 217: ...tenance Checking the Nozzles Using the Product Control Panel You can check the print head nozzles using the control panel on your product 1 Load a few sheets of plain paper in the product 2 Press the home button if necessary 3 Select Maintenance Print Head Nozzle Check 4 Select Print The nozzle pattern prints 5 Check the printed pattern to see if there are gaps in the lines Print head is clean Pri...

Page 218: ...off the product or open the scanner unit during a cleaning cycle or you may not be able to print If you don t see any improvement after cleaning the print head up to 3 times turn the product off using the power button and wait at least 12 hours Then run a nozzle check and try cleaning the print head again if necessary If quality still does not improve run a Power Cleaning Parent topic Print Head N...

Page 219: ...right side of the Windows taskbar or click the up arrow and right click Mac In the Apple menu or the Dock select System Preferences Select Print Fax Print Scan or Printers Scanners select your product and select Options Supplies Select Utility and select Open Printer Utility 3 Select Nozzle Check or Print Head Nozzle Check You see a window like this 4 Click Print ...

Page 220: ... 5 Check the printed pattern to see if there are gaps in the lines Print head is clean Print head needs cleaning Print head needs Power Cleaning 6 Do one of the following If there are no gaps click Finish ...

Page 221: ...ng Paper Print Head Cleaning If print quality has declined and the nozzle check pattern indicates clogged nozzles you can clean the print head Note You cannot clean the print head if an ink cartridge is expended and may not be able to clean it when a cartridge is low You must replace the cartridge first Cleaning the Print Head Using the Product Control Panel Cleaning the Print Head Using a Compute...

Page 222: ... the cleaning cycle and stays on when the cleaning cycle is finished When the cleaning cycle is finished a nozzle pattern prints Caution Never turn off the product or open the scanner unit during a cleaning cycle or you may not be able to print 5 Check the printed pattern to see if there are gaps in the lines Print head is clean Print head needs cleaning ...

Page 223: ...ee any improvement after cleaning the print head up to 3 times turn the product off using the power button and wait at least 12 hours Then run a nozzle check and try cleaning the print head again if necessary If quality still does not improve run a Power Cleaning Parent topic Print Head Cleaning Related references Where to Get Help Related tasks Checking the Nozzles Using the Product Control Panel...

Page 224: ...ht click Mac In the Apple menu or the Dock select System Preferences Select Print Fax Print Scan or Printers Scanners select your product and select Options Supplies Select Utility and select Open Printer Utility 3 Select Head Cleaning or Print Head Cleaning You see a window like this 4 Select the cleaning cycle you want to run based on the nozzle check pattern and click Next ...

Page 225: ...e and stays on when the cleaning cycle is finished Caution Never turn off the product or open the scanner unit during a cleaning cycle or you may not be able to print 6 When the cleaning cycle is finished you can check to see if the nozzles are clean click Print Nozzle Check Pattern and click Print ...

Page 226: ...to see if there are gaps in the lines Print head is clean Print head needs cleaning Print head needs Power Cleaning If there are no gaps click Finish If there are gaps or the pattern is faint click Clean to clean the print head again ...

Page 227: ... or dark lines or missing nozzles in your printouts even after cleaning the print head several times you can run a Power Cleaning If you do not see improvement after running a Power Cleaning turn off the product and wait at least 12 hours before printing a nozzle check pattern and running another Power Cleaning or Print Head Cleaning If quality still does not improve contact Epson for support Note...

Page 228: ...elp Related tasks Checking the Nozzles Using the Product Control Panel Cleaning the Print Head Using the Product Control Panel Power Cleaning Using a Computer Utility You can run a Power Cleaning using a utility on your Windows or Mac computer Note After running a Power Cleaning you must turn off the product and wait at least 12 hours before printing a nozzle check pattern and running another Prin...

Page 229: ...ck Pattern and follow the on screen instructions to print a nozzle check pattern If the print quality did not improve you must turn off the product and wait at least 12 hours before printing a nozzle check pattern and running another Power Cleaning or Print Head Cleaning If the print quality does not improve after running the Power Cleaning utility multiple times contact Epson for support ...

Page 230: ...l bands you may need to align the print head Note Banding may also occur if your print head nozzles need cleaning 1 Load a few sheets of plain paper in the product 2 Press the home button if necessary 3 Select Maintenance Print Head Alignment 4 If your printout contains misaligned vertical lines or is blurry continue with the next step If your printout contains horizontal banding go to step 6 5 Se...

Page 231: ...he paper guide rollers to remove any excess ink 1 Load plain paper in this size Letter 8 5 11 inches 216 279 mm or A4 8 3 11 7 inches 210 297 mm 2 Press the home button if necessary 3 Select Maintenance Paper Guide Cleaning 4 Follow the on screen instructions to clean the paper guide 5 Repeat these steps as necessary until the paper comes out clean 6 If the paper is still smeared with ink turn off...

Page 232: ...ct Be careful not to trap your hand or fingers when opening or closing the scanner unit 7 Using a cotton swab wipe off any ink smears on the part shown in the illustration below Caution Do not use tissue paper to clean the inside of the product as lint can clog the print head nozzles ...

Page 233: ...er unit Parent topic Adjusting Print Quality Related concepts Print Head Alignment Print Head Cleaning Related tasks Cleaning the Print Head Using a Computer Utility Cleaning the Print Head Path Related topics Loading Paper ...

Page 234: ... product working at its best you should clean it several times a year Caution Do not use a hard brush alcohol or paint thinner to clean the product or you may damage it Do not use oil or other lubricants inside the product or let water get inside it Do not touch the flat white cable or translucent film inside the product 1 Turn off the product using the power button 2 Unplug the power cord 3 Disco...

Page 235: ...235 5 Open the document cover Caution Be careful not to trap your hand or fingers when opening or closing the document cover ...

Page 236: ... or some other hard to remove material try cleaning with a soft cloth moistened with a mild detergent Wipe off any remaining liquid Caution Do not spray glass cleaner directly on the glass and do not press the glass surface with any force Scratches or other damage on the glass surface can decrease the scan quality 7 Close the document cover 8 Open the ADF cover ...

Page 237: ...fiber is recommended moistened with a little water to clean the rollers and the interior of the ADF Caution Do not use a dry cloth to clean the rollers you may damage them Use the ADF after the rollers have dried 10 Open the ADF input tray ...

Page 238: ...ened with a little water If you cannot remove the dirt try cleaning with a soft cloth moistened with a mild detergent Parent topic Cleaning and Transporting Your Product Cleaning the Paper Rollers If you encounter issues with paper feeding from the cassettes clean the paper rollers inside your product 1 Turn off the product using the power button 2 Unplug the power cable 3 Disconnect any connected...

Page 239: ...239 4 Slide out the paper cassette and remove any loaded paper 5 Place the product on its side as shown Warning Be careful not to trap your fingers under the product ...

Page 240: ...Parent topic Cleaning and Transporting Your Product Cleaning the Print Head Path If the print quality has not improved after aligning the print head and cleaning the paper guide the print head path inside the product may be smeared with ink To clean the print head path use the following Several cotton swabs cup 59 ml water containing 2 to 3 drops of mild dish detergent A small flashlight Caution D...

Page 241: ...d cables 4 Lift up the scanner unit until it locks into place Caution Be careful not to trap your hand or fingers when opening or closing the scanner unit 5 Using the flashlight check the translucent film shown here for ink smears ...

Page 242: ...ess moisture Use it to lightly wipe ink off the translucent film Be careful not to touch the ink that has adhered inside the printer Caution Do not press too hard on the film or you may dislocate the anchor springs and damage the product 7 Use a new dry cotton swab to dry the translucent film To prevent the smear from spreading frequently replace the cotton swab with a new one Do not leave any cot...

Page 243: ...port it a long distance prepare it for transportation as described here Caution During transportation and storage follow these guidelines Avoid tilting the product placing it vertically or turning it upside down otherwise ink may leak Leave the ink cartridges installed Removing the cartridges can dry out the print head and may prevent the product from printing Do not carry the product by its contr...

Page 244: ...ight position If the print head does not return to the home position the ink can dry out and your product can be damaged 3 Disconnect any connected cables 4 Remove all the paper from the product and make sure there are no originals on the scanner glass 5 Make sure the document cover is closed and then lift up the scanner unit until it locks into place Caution Be careful not to trap your hand or fi...

Page 245: ...se with tape Caution Do not touch the flat white cable inside the product and do not put tape on the flat white cable otherwise you may damage your product 7 Close the scanner unit Continue to lower the scanner unit even if you feel some resistance ...

Page 246: ...d the product Keep the product level during transportation Be sure to remove the tape from the ink cartridge holder before turning on your product If print quality has declined when you print again clean and align the print head Parent topic Cleaning and Transporting Your Product Related concepts Print Head Nozzle Check Print Head Cleaning Print Head Alignment ...

Page 247: ...hecking for Software Updates It s a good idea to check Epson s support website occasionally for free updates to your product software Visit epson com support U S or epson ca support Canada and select your product Note Your printer is designed to work only with genuine Epson brand ink cartridges Other brands of ink cartridges and ink supplies are not compatible and even if described as compatible m...

Page 248: ...lecting Update Parent topic Solving Problems Product Status Messages You can often diagnose problems with your product by checking the messages on its LCD screen You can also press the help button to see help information and how to instructions on the screen LCD screen message Condition solution Printer error Turn on the printer again See your documentation for more details A fatal error has occur...

Page 249: ...gain If you still see the error message make a note of the error code and contact Epson support No dial tone is detected Make sure the phone cable is connected correctly and the phone line works If you connected the product to a PBX Private Branch Exchange phone line or Terminal Adapter change the Line Type setting to PBX If you still cannot send a fax turn off the Dial Tone Detection setting Turn...

Page 250: ... distribute and contain the ink that is not used on printed pages During the life of your product it may reach a condition where either satisfactory print quality cannot be maintained or the ink pads have reached the end of their usable life The Epson Status Monitor your LCD screen or lights on the control panel will advise you when these parts need replacing If this happens during the standard wa...

Page 251: ... the page prints and the nozzle check pattern is complete the product is operating properly Any operation problem you may have could be caused by your computer cable software or selected settings Check the other solutions in this book or try uninstalling and reinstalling your printer software If the page prints but the nozzle check pattern has gaps clean the print head If the page does not print t...

Page 252: ...ect Yes to reset the selected settings Select No if you want to cancel the operation Parent topic Solving Problems Solving Setup Problems Check these sections if you have problems while setting up your product Product Does Not Turn On or Off Noise After Ink Installation Software Installation Problems Parent topic Solving Problems Product Does Not Turn On or Off If you cannot turn the product on or...

Page 253: ...t the cable and carefully follow the instructions on the Start Here sheet Also make sure your system meets the requirements for your operating system Close any other programs including screen savers and virus protection software and install your product software again In Windows make sure your product is selected as the default printer and the correct port is shown in the printer properties If you...

Page 254: ...s trouble finding or connecting to a wireless router or access point try these solutions Make sure to place your product within contact range of your 2 4 GHz router or access point Avoid placing your product near a microwave oven 2 4 GHz cordless phone or large metal object such as a filing cabinet Note If you are using a 5 GHz wireless router set the router to operate in dual band 2 4 GHz and 5 G...

Page 255: ...essary Turn off the devices you want to connect to the network Wait for about 10 seconds and then turn on the devices in the following order wireless router computer or smart device and then your product Move your product and computer or smart device closer to the wireless router to help with radio wave communication and then try to make network settings again If the IP address assigned to the pro...

Page 256: ... 1 Reset your product s network settings to their factory defaults 2 Windows only Uninstall your product software 3 Restart your router following the instructions in your router documentation Note If you are reading these instructions online you will lose your Internet connection when you restart your router so note the next step before restarting it 4 Download your product software from the Epson...

Page 257: ... product off wait 30 seconds then turn it back on again If you are connecting the product via Wi Fi Protected Setup WPS and the Wi Fi icon on your product s LCD screen is not lit make sure you select one of the WPS options from the product control panel within 2 minutes of pressing the WPS button on your router If you are connecting the product wirelessly via EpsonNet Setup and you do not see the ...

Page 258: ...ck any cable connections and turn your product off and then on again If you are using TCP IP make sure the product s IP address is set correctly for your network If your network does not assign IP addresses using DHCP set the IP address manually Make sure your computer and product are both using the same wireless network If network printing is slow print a network status sheet and check the signal...

Page 259: ...on or a smaller size Parent topic Solving Network Problems Related concepts Uninstall Your Product Software Related references Cannot Scan Over a Network Related tasks Printing a Network Status Sheet Related topics Wi Fi or Wired Networking Cannot Scan Over a Network If you have problems scanning over a network try these solutions If you are scanning a large original at a high resolution a network...

Page 260: ... Related tasks Starting a Scan Using the Product Control Panel Solving Copying Problems Check these solutions if you have problems copying with your product Product Makes Noise But Nothing Copies Product Makes Noise When It Sits for a While Originals Do Not Feed From the Automatic Document Feeder Copies Have Incorrect or Faint Colors Position Size or Margins of Copies are Incorrect Parent topic So...

Page 261: ...ment is not curled or creased Try cleaning the inside of the ADF Do not load originals above the arrow mark on the ADF edge guide Parent topic Solving Copying Problems Related references Document Jams in the Automatic Document Feeder ADF Original Document Specifications Related tasks Placing Originals in the Automatic Document Feeder Cleaning Your Product Copies Have Incorrect or Faint Colors If y...

Page 262: ...he scanner glass make sure the original is placed correctly for scanning Align the corner of the original with the corner indicated by the symbol on the scanner glass If necessary move the original away from the edges of the scanner glass slightly Clean the scanner glass and ADF Make sure the paper is loaded in the correct direction Parent topic Solving Copying Problems Related tasks Cleaning Your...

Page 263: ...recommended number of sheets Make sure your paper meets the specifications for your product If paper jams when you print on both sides of the paper try loading fewer sheets For best results follow these guidelines Use new smooth high quality paper that is not curled creased old too thin or too thick Load paper in the cassette printable side down Follow any special loading instructions that came wi...

Page 264: ... Be careful not to touch the protruding parts to avoid injury 1 Cancel the print job if necessary 2 Remove any jammed paper from the ADF 3 Lift the scanner unit with both hands until it locks Caution Be careful not to trap your hand or fingers when opening or closing the scanner unit Remove the jammed paper carefully or you may damage the product ...

Page 265: ...265 4 Remove the jammed paper Caution Do not touch the flat white cable or the translucent film inside your product Doing so may cause a malfunction ...

Page 266: ... on the LCD screen to clear any error messages If you still see a paper jam message check the other paper jam solutions Parent topic Solving Paper Problems Related references Document Jams in the Automatic Document Feeder Related topics Loading Paper Paper Jam Problems in the Rear Cover If paper has jammed in the rear cover follow the steps here to clear the jam 1 Cancel the print job if necessary...

Page 267: ...267 2 Squeeze the tabs and remove the rear cover 3 Carefully remove any jammed paper from inside the product ...

Page 268: ... solutions Parent topic Solving Paper Problems Related references Paper Jam Problems Inside the Product Document Jams in the Automatic Document Feeder Related topics Loading Paper Document Jams in the Automatic Document Feeder If you have problems with document jams in the automatic document feeder ADF follow the steps here to clear the jam 1 Cancel the print job if necessary 2 Remove your origina...

Page 269: ...269 3 Open the ADF cover 4 Carefully remove any jammed pages from beneath the ADF ...

Page 270: ...270 5 Raise the ADF input tray Caution Make sure the ADF cover is opened before raising the ADF input tray or the ADF may be damaged 6 Remove the jammed paper ...

Page 271: ... its capacity for your paper size Also make sure your originals are not bent folded or curled and do not have tape staples or other materials that could obstruct the feeder 10 Follow the prompts on the LCD screen to clear any error messages If you still see a paper jam message check the other paper jam solutions Parent topic Solving Paper Problems ...

Page 272: ...be damp or too thin Load new paper If you are using letterhead paper select the appropriate paper type setting Clean the roller inside the printer to remove any dust on the paper path Parent topic Solving Paper Problems Related references Paper Jam Problems in the Rear Cover Paper Jam Problems Inside the Product Paper or Media Type Settings Printing Software Paper Type Settings Control Panel Relat...

Page 273: ...ating system If you are printing a high resolution image you may need more than the minimum requirements Print the image at a lower resolution or if necessary increase your system s memory In Windows make sure your product is selected as the default printer and the printer port setting matches the printer connection port In Windows delete all jobs from the Windows Spooler Click Print Queue on the ...

Page 274: ...indows 10 Click and select Settings Devices Printers scanners Select your product name and select Manage Printing preferences Windows 8 x Navigate to the Apps screen and select Control Panel Hardware and Sound Devices and Printers Right click your product name select Printing Preferences and select your product name again if necessary Windows 7 Click and select Devices and Printers Right click you...

Page 275: ...ve or run a defragmentation utility to free up existing space Close any programs you are not using when you print If your product is connected to a USB hub connect it directly to your computer instead If printing becomes slower after printing continuously for a long time the product may have automatically slowed down to protect the print mechanism from overheating or becoming damaged Let the produ...

Page 276: ...s and select your product Select Options Supplies select Options or Driver and enable the Bidirectional printing setting If printing is still slow and you are using Windows 7 or Windows Vista try the following 1 Click and select Computer or My Computer Double click the C drive and open these folders ProgramData EPSON PRINTER Note If you do not see the ProgramData folder open the Organize menu and ...

Page 277: ...ntout Border Appears on Borderless Prints Incorrect Characters Print Incorrect Image Size or Position Slanted Printout Parent topic Solving Problems Related tasks Using AirPrint Inverted Image If your printed image is inverted unexpectedly try these solutions Turn off any mirror or inversion settings in your printing application Turn off the Mirror Image Flip horizontally or Reverse page orientati...

Page 278: ...kip printing it select the Skip Blank Page setting in your printer software if available Run a print head nozzle check to see if any of the nozzles are clogged Then clean the print head if necessary Make sure your product is selected as the printer in your printing program Parent topic Solving Page Layout and Content Problems Related concepts Print Head Nozzle Check Print Head Cleaning Related ref...

Page 279: ...ent Problems Related references Copying Options Related tasks Selecting Basic Print Settings Windows Selecting Basic Print Settings Mac Selecting Page Setup Settings Mac Related topics Loading Paper Placing Originals on the Product Border Appears on Borderless Prints If you see a border on borderless prints try these solutions Make sure you are printing on a compatible borderless paper type and si...

Page 280: ...ue on the Maintenance tab in the printer settings window and cancel any stalled print jobs On a Mac cancel any paused print jobs If your product is connected to a USB hub connect it directly to your computer instead If incorrect characters still appear in your prints try connecting your product using a different cable If your computer entered sleep mode the last time you printed the next print job...

Page 281: ...nlarged and cropped during borderless printing change the Expansion setting You can use the preview option in your printer software to check your margins before you print Parent topic Solving Page Layout and Content Problems Related references Copying Options Related tasks Cleaning Your Product Selecting Additional Layout and Print Options Windows Selecting Basic Print Settings Windows Selecting B...

Page 282: ...ttings are different from those covered in this manual See the Apple website for details White or Dark Lines in Printout Blurry or Smeared Printout Faint Printout or Printout Has Gaps Grainy Printout Incorrect Colors Parent topic Solving Problems Related tasks Using AirPrint Related topics Solving Scanned Image Quality Problems White or Dark Lines in Printout If you notice white or dark lines in y...

Page 283: ...only if you cannot improve print quality by cleaning the print head Parent topic Solving Print Quality Problems Related concepts Print Head Cleaning Print Head Nozzle Check Print Head Alignment Power Cleaning Related references Paper or Media Type Settings Printing Software Related tasks Aligning the Print Head Using the Product Control Panel Selecting Additional Layout and Print Options Windows S...

Page 284: ...rrect direction and slide the edge guides to the edges of the paper If you print on both sides of a sheet of paper smudges may appear on the reverse side of heavily saturated or dark images If one side of a sheet will contain a lighter image or text print that side first Make sure the ink has dried before reloading the paper to print on the other side Adjust the density and or ink drying time sett...

Page 285: ...ace them Make sure the paper type setting matches the type of paper you loaded Make sure your paper is not damp curled old or loaded incorrectly in your product When copying increase the Density setting on the product control panel Align the print head Adjust the print quality in the product software Clean the paper path If you have not used the product for a long time run the Power Cleaning utili...

Page 286: ...l appears place the original at a slightly different angle You may need to increase the image resolution or print a smaller size see your software documentation Note Images from the Internet may be low resolution and not result in a high quality printout If you enlarged the image size in an image editing program you need to increase the image resolution setting to retain a high image quality Incre...

Page 287: ...the colors in your printout need time to set as the ink dries During this time the colors may look different than you expect To speed up drying time do not stack your printouts on top of each other Your printed colors can never exactly match your on screen colors However you can use a color management system to get as close as possible Try using the color management options in your printer softwar...

Page 288: ...if you have problems scanning with your product Note For solutions when using the Epson ScanSmart software see the Epson ScanSmart help utility Scanning Software Does Not Operate Correctly Cannot Start Epson Scan 2 Scanning is Slow Cannot Save a Scan to a Shared Folder Over a Network Parent topic Solving Problems Scanning Software Does Not Operate Correctly If your scanning software does not opera...

Page 289: ...ted concepts Uninstall Your Product Software Related references Windows System Requirements Mac System Requirements Cannot Start Epson Scan 2 If you cannot start Epson Scan 2 try these solutions Make sure your product is turned on and any interface cables are securely connected at both ends If your product is connected to a USB hub connect it directly to your computer instead If you scan at a high...

Page 290: ... 2 installed If you do uninstall both versions and install one version If you upgraded your operating system but did not reinstall Epson Scan 2 try reinstalling it Parent topic Solving Scanning Problems Related concepts Uninstall Your Product Software Related topics Starting a Scan Scanning is Slow If scanning becomes slow try these solutions Scan your original at a lower resolution if possible Ma...

Page 291: ...pe if necessary Be sure to log into your Windows computer as an administrator Note The name of available network types varies in the different Windows versions For details on selecting Windows network sharing settings see Windows help Windows 10 1 Click and select Settings 2 Select Network Internet 3 Click your network type Ethernet or Wi Fi 4 Click your network name 5 Make sure the Make this PC d...

Page 292: ...nnected to a private network so you can save a scan to a shared folder If you need to change the network type click the network type name If you select Public network you cannot save a scan to a shared folder If saving your scan to a shared folder takes a very long time make sure the DNS setting and the DNS domain name are correct Contact your network administrator for instructions Parent topic So...

Page 293: ...surface that extends beyond its base in all directions Adjust these Epson Scan 2 or Epson ScanSmart settings if available and try scanning again Increase the Resolution setting If the Image Type setting is Black White adjust the Threshold setting If the Image Type setting is Color or Grayscale select the Unsharp Mask setting If the Image Type setting is Black White select Text Enhancement If the I...

Page 294: ... settings if available and try scanning again If the Image Type setting is Color or Grayscale adjust the Contrast setting If the Image Type setting is Black White or Grayscale adjust the Color Enhance setting Parent topic Solving Scanned Image Quality Problems Related references Additional Scanning Settings Main Settings Tab Additional Scanning Settings Advanced Settings Tab Related tasks Cleaning...

Page 295: ...Parent topic Solving Scanned Image Quality Problems Related tasks Cleaning Your Product Straight Lines in an Image Appear Crooked If straight lines in an original appear crooked in a scanned image make sure to place your original straight when you scan it If you are scanning from the ADF make sure the ADF edge guide fits against the loaded originals You can also try cleaning the ADF and scanning a...

Page 296: ...an 2 Related topics Placing Originals on the Product Image Colors are Patchy at the Edges If you are scanning a thick or warped original cover its edges with paper to block external light as you scan it Parent topic Solving Scanned Image Quality Problems Ripple Patterns Appear in an Image You may see a ripple pattern called a moiré in scanned images of printed documents This is caused by interfere...

Page 297: ...sible solutions you may need to reset the Epson Scan 2 settings using the Epson Scan 2 Utility 1 Do one of the following to start the Epson Scan 2 Utility Windows 11 Click then search for Epson Scan 2 Utility and select it Windows 10 Click EPSON Epson Scan 2 Utility Windows 8 x Navigate to the Apps screen and select Epson Scan 2 Utility Windows other versions Click or Start and select All Programs...

Page 298: ...s Check Fax Connection to run the automatic fax connection check Try the solutions suggested in the report If you are faxing from a computer use the Epson FAX Utility to send your fax Make sure the recipient s fax machine is turned on and working Make sure the recipient s fax number is correct and entered correctly Make sure paper is loaded correctly in your product Make sure you have set up your ...

Page 299: ... works the problem may be caused by the DSL filter Contact your DSL provider Make sure you installed the FAX driver for your product and that it is not paused The data being sent may be too large Try faxing the originals in batches or by using a connected phone If you are faxing in monochrome enable the Direct Send setting Fax Fax Settings Fax Send Settings Try lowering your product s fax speed se...

Page 300: ...ears in Devices and Printers Printer or Printers and Other Hardware If the product does not appear uninstall and re install the Epson FAX Utility Mac Select System Preferences Printers Scanners or Print Scan or Print Fax and make sure your product appears If your product does not appear click and add your product If the product does appear double click it and make sure it is not paused Note If you...

Page 301: ...product s fax memory is full try these solutions If you set the product to save received faxes in the product s memory or inbox delete any faxes you have already read Note Your product can store up to 100 faxes before its inbox is full If you set the product to save received faxes on a computer turn on the selected computer Once the faxes are saved on the computer they are deleted from the product...

Page 302: ...changing the original type setting on the control panel If you are sending a monochrome fax to a single recipient try sending the fax using the Direct Send feature Note If you send a high resolution monochrome fax without using the Direct Send feature the product may automatically lower the resolution Try enabling the error correction mode ECM setting Parent topic Solving Faxing Problems Related r...

Page 303: ... been set to save received faxes in the product s memory or inbox received faxes are not automatically printed Check the Receive Settings options on the product control panel and change them if necessary Parent topic Solving Faxing Problems Related references Receive Settings Fax Uninstall Your Product Software If you have a problem that requires you to uninstall and re install your software follo...

Page 304: ...dow click Yes or Continue In the next window select your product and click OK Then follow any on screen instructions 5 Do one of the following to uninstall Epson Event Manager then follow any on screen instructions Windows 11 Windows 10 8 x Select Epson Event Manager and click Uninstall Windows 7 Windows Vista Open the Windows Control Panel utility Select Programs and Features In Classic view sele...

Page 305: ...pport Canada and select your product 2 Click Downloads 3 Select your operating system click Utilities locate the Uninstaller utility and click Download 4 Run the file you downloaded 5 Double click the Uninstaller icon 6 In the Epson Uninstaller screen select the checkbox for each software program you want to uninstall 7 Click Uninstall 8 Follow the on screen instructions to uninstall the software ...

Page 306: ... purchase such as a store receipt and date of purchase Computer configuration Description of the problem Then call U S 562 276 4382 7 AM to 4 PM Pacific Time Monday through Friday Canada 905 709 3839 7 AM to 4 PM Pacific Time Monday through Friday Days and hours of support are subject to change without notice Toll or long distance charges may apply Purchase Supplies and Accessories You can purchas...

Page 307: ...ions Printable Area Specifications Automatic Document Feeder ADF Specifications Scanning Specifications Fax Specifications Ink Cartridge Specifications Dimension Specifications Electrical Specifications Environmental Specifications Interface Specifications Network Interface Specifications Safety and Approvals Specifications Windows System Requirements To use your product and its software your comp...

Page 308: ...port Canada select your product and select Downloads Parent topic Technical Specifications Mac System Requirements To use your product and its software your Mac should use one of these operating systems macOS 12 x macOS 11 x macOS 10 15 x macOS 10 14 x macOS 10 13 x macOS 10 12 x OS X 10 11 x OS X 10 10 x OS X 10 9 x Note Mac OS may not support some applications and features the UNIX File System U...

Page 309: ...inches 105 148 mm Letter 8 5 11 inches 216 279 mm Legal 8 5 14 inches 216 356 mm Oficio 9 8 46 12 4 inches 215 315 mm Mexico Oficio 8 5 13 4 inches 216 340 mm 8 5 13 inches 216 330 mm Executive 7 25 10 5 inches 184 267 mm 3 5 5 inches 89 127 mm 4 6 inches 102 152 mm 5 7 inches 127 178 mm 8 10 inches 203 254 mm Half Letter 5 5 8 5 inches 140 216 mm Paper types Plain paper Note Your product also sup...

Page 310: ...Compatible Epson Papers Printable Area Specifications Note When printing borderless quality may decline in the expanded printable area Single sheets borders 1 Top bottom left right margins 0 12 inch 3 mm minimum 2 Reduced print quality area top 1 61 inches 41 mm minimum 3 Reduced print quality area bottom 1 46 inches 37 mm minimum ...

Page 311: ...nt quality area bottom 1 57 inches 40 mm minimum Envelopes 1 Right left margins 0 12 inch 3 mm minimum 2 Top bottom margins 0 12 inch 3 mm minimum 3 Reduced print quality area right 0 71 inch 18 mm minimum 4 Reduced print quality area left 1 61 inches 41 mm minimum Parent topic Technical Specifications ...

Page 312: ...11 7 inches 210 297 mm approximately 30 sheets or 0 13 inch 3 3 mm 8 5 13 inches 216 330 mm and Legal 8 5 14 inches 216 356 mm 10 sheets Auto duplex scanning Not supported Parent topic Technical Specifications Scanning Specifications Scanner type Flatbed Photoelectric device CIS Effective pixels 10200 14040 pixels at 1200 dpi Document size Maximum 8 5 11 7 inches 216 297 mm Scanner glass US letter...

Page 313: ...nt topic Technical Specifications Fax Specifications Fax type Walk up black and white and color fax capability ITU T Super Group 3 Supported lines Standard analog household telephone lines PBX Private Branch Exchange telephone systems Speed Up to 33 6 kbps Compression method Monochrome MH MR MMR Color JPEG Communication standards G3 SuperG3 Transmission speed Approximately 3 seconds A4 ITU T chart...

Page 314: ...idges and ink supplies are not compatible and even if described as compatible may not function properly or at all Epson periodically provides firmware updates to address issues of security performance minor bug fixes and ensure the printer functions as designed These updates may affect the functionality of third party ink Non Epson branded or altered Epson cartridges that functioned prior to a fir...

Page 315: ...e up a cartridge within 6 months of opening the package Parent topic Technical Specifications Related references Ink Cartridge and Maintenance Box Part Numbers Dimension Specifications Height Stored 9 1 inches 231 mm Printing 10 inches 255 mm Width Stored 14 8 inches 375 mm Printing 16 4 inches 417 mm Depth Stored 13 7 inches 347 mm Printing 19 8 inches 503 mm Weight without ink cartridges or powe...

Page 316: ...g 50 to 95 F 10 to 35 C Storage before initial ink charging 4 to 104 F 20 to 40 C Storage after initial ink charging 5 to 104 F 15 to 40 C 1 month at 104 F 40 C Humidity without condensation Operating 20 to 80 RH Storage 5 to 85 RH Parent topic Technical Specifications Interface Specifications Interface type Hi Speed USB Device Class for computers USB 3 0 cables are not supported Parent topic Tech...

Page 317: ...TP Shielded Twisted Pair cable to prevent risk of radio interference IEEE802 3u 100BASE TX IEEE802 3az Energy Efficient Ethernet connected device should be IEEE802 3az compliant Communication mode Auto 10Mbps Full duplex 10Mbps Half duplex 100Mbps Full duplex 100Mbps Half duplex Connector RJ 45 Network Protocols IPv4 IPv6 Network Printing IPv4 EpsonNet Print Windows Epson Email Print Epson Remote ...

Page 318: ...ection requirements resulting from a non recommended modification of the product Operation is subject to the following two conditions 1 this device may not cause harmful interference and 2 this device must accept any interference received including interference that may cause undesired operation of the device To prevent radio interference to the licensed service this device is intended to be opera...

Page 319: ...319 the radiator is kept at least 7 9 inches 20 cm or more away from a person s body excluding extremities hands wrists feet and ankles Parent topic Technical Specifications ...

Page 320: ...creen Safety Instructions Wireless Connection Safety Instructions Telephone Equipment Safety Instructions Parent topic Notices General Product Safety Instructions Be sure to follow all warnings and instructions marked on the product Use only the type of power source indicated on the product s label Use only the power cord that comes with the product Use of another cord may cause fires or shock Do ...

Page 321: ...eave enough space in front of the product for the paper to be fully ejected Avoid locations that are subject to rapid changes in heat or humidity shocks or vibrations or dust Do not place or store the product outdoors Do not place the product near excessive heat sources or in direct sunlight Leave enough room around the product for sufficient ventilation Do not block or cover openings in the case ...

Page 322: ...tridges can dehydrate the print head and may prevent the product from printing Before transporting the product make sure that the print head is in the home far right position and the ink cartridges are in place Before transporting the product make sure that the print head is in the home far right position When storing or transporting the product do not tilt it stand it on its side or turn it upsid...

Page 323: ...t Safety Instructions When using telephone equipment you should always follow basic safety precautions to reduce the risk of fire electric shock and personal injury including the following Do not use the Epson product near water Avoid using a telephone during an electrical storm There may be a remote risk of electric shock from lightning Do not use a telephone to report a gas leak in the vicinity ...

Page 324: ...f devices that may be connected to a line as determined by the total RENs contact the local telephone company For products approved after July 23 2001 the REN for this product is part of the product identifier that has the format US AAAEQ TXXXX The digits represented by are the REN without a decimal point e g 03 is a REN of 0 3 For earlier products the REN is separately shown on the label If this ...

Page 325: ...mission charges In order to program this information into your fax machine click the link below for instructions on entering fax header information According to the FCC s electrical safety advisory we recommend that you may install an AC surge arrester in the AC outlet to which this equipment is connected Telephone companies report that electrical surges typically lightning transients are very des...

Page 326: ...présent produit est conforme aux spécifications techniques applicables d Innovation Sciences et Développement économique Canada L indice d équivalence de la sonnerie IES sert à indiquer le nombre maximal de dispositifs qui peuvent être raccordés à une interface téléphonique La terminaison d une interface peut consister en une combinaison quelconque de dispositifs à la seule condition que la somme ...

Page 327: ...n may commence an arbitration Notice to Epson must be addressed to Epson America Inc ATTN Legal Department 3131 Katella Ave Los Alamitos CA 90720 the Epson Address The Dispute Notice to you will be sent to the most recent address Epson has in its records for you For this reason it is important to notify us if your address changes by emailing us at EAILegal ea epson com or writing us at the Epson A...

Page 328: ... individual claim In some instances the costs of arbitration can exceed the costs of litigation and the right to discovery may be more limited in arbitration than in court The arbitrator s award is binding and may be entered as a judgment in any court of competent jurisdiction You may choose to engage in arbitration hearings by telephone Arbitration hearings not conducted by telephone shall take p...

Page 329: ...ment including without limitation the purchase download installation of the Software or other applicable use of Epson Hardware products and services that specifies i your name ii your mailing address and iii your request to be excluded from the final binding individual arbitration procedure and waiver of class and representative proceedings specified in this Section 1 In the event that you opt out...

Page 330: ...Wi Fi Alliance General Notice Other product names used herein are for identification purposes only and may be trademarks of their respective owners Epson disclaims any and all rights in those marks Parent topic Notices Copyright Notice All rights reserved No part of this publication may be reproduced stored in a retrieval system or transmitted in any form or by any means electronic mechanical phot...

Page 331: ...vided that I the above copyright notices and this permission notice appear in all copies of the software and related documentation and ii the names of Sam Leffler and Silicon Graphics may not be used in any advertising or publicity relating to the software without the specific prior written permission of Sam Leffler and Silicon Graphics THE SOFTWARE IS PROVIDED AS IS AND WITHOUT WARRANTY OF ANY KI...

Page 332: ...ay Times for Power Management for Epson Products This product will enter sleep mode after a period of nonuse This is to ensure that the product meets Energy Star standards of energy efficiency More energy savings can be achieved by setting the time to sleep to a shorter interval Parent topic Copyright Notice Copyright Attribution 2022 Epson America Inc 8 22 CPD 62114 Parent topic Copyright Notice ...

Reviews: