background image

2

Your WorkForce 545/645 Series

Your WorkForce 545/645 
Series

After you set up your WorkForce

® 

545/645 Series (see the 

Start Here

 sheet), turn to this 

Quick Guide

 and your online 

User’s Guide

 for instructions on using your product.

Note: 

The illustrations in this manual show the WorkForce 645. The instructions apply 

to both the WorkForce 545 and WorkForce 645 unless otherwise noted.

Adjusting the Control Panel

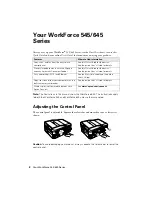
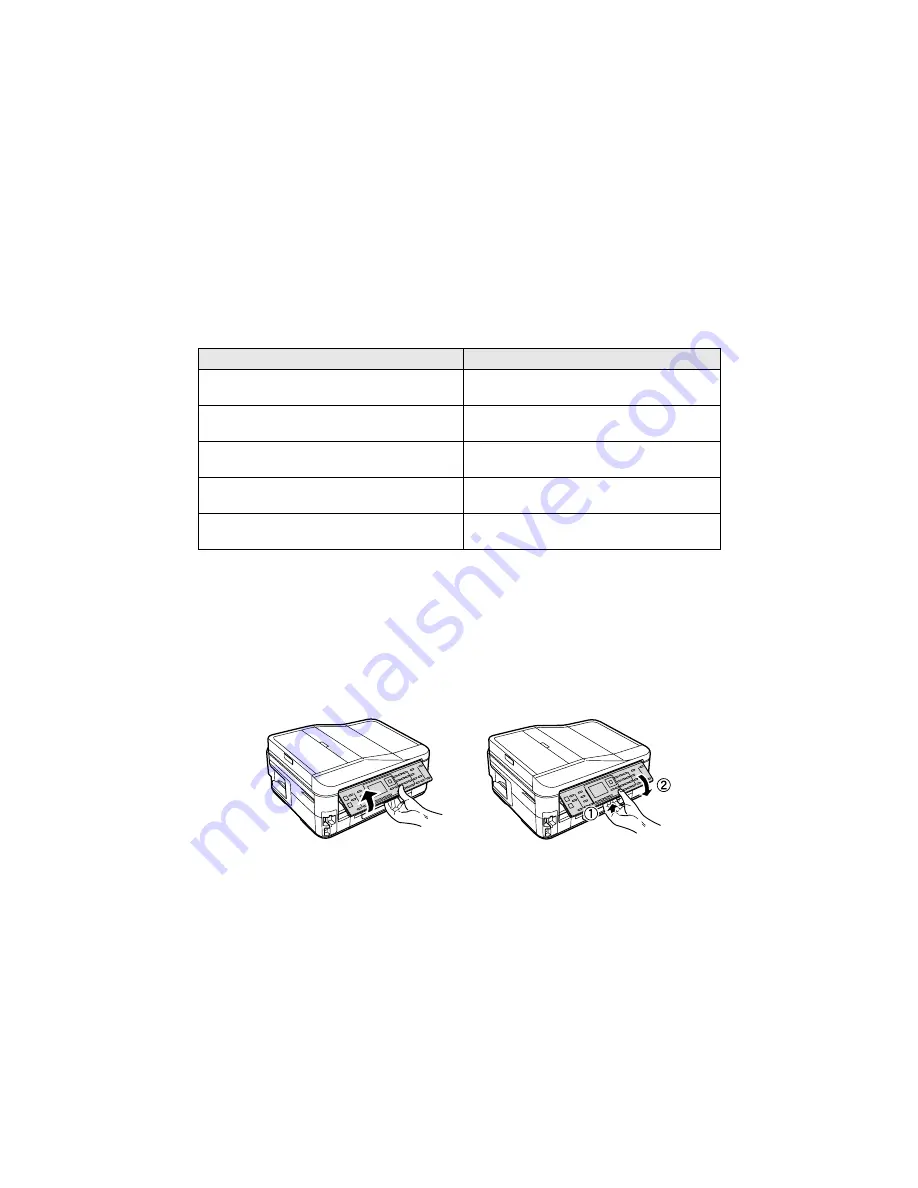
The control panel is adjustable. Squeeze the release bar underneath to raise or lower it as 
shown.

Caution: 

To avoid damaging your product, always squeeze the release bar to lower the 

control panel.

Features

Where to find information

Copy, scan, and fax from the easy-to-use 
control panel

See this 

Quick Guide

 for the basics.

See the online 

User’s Guide 

for details.

Process large documents with the 30-page 
capacity Automatic Document Feeder

See this 

Quick Guide

 for the basics.

See the online 

User’s Guide 

for details.

Easy networking—Wi-Fi and Ethernet

See the 

Start Here

 sheet and the online 

User’s Guide.

Copy files to and from your computer with the 
built-in memory card reader

See the online 

User’s Guide 

for details.

Wireless printing from mobile devices with 
Epson Connect

See 

www.epson.com/connect

.

Summary of Contents for C11CB88201

Page 1: ... Using Special Papers 4 Placing Originals for Copying Scanning or Faxing 6 Copying a Document 8 Printing From a Memory Card 10 Printing From Your Computer 12 Faxing a Document 16 Scanning a Document or Photo 21 Maintaining Your Product 24 Solving Problems 29 Notices 36 ...

Page 2: ...own Caution To avoid damaging your product always squeeze the release bar to lower the control panel Features Where to find information Copy scan and fax from the easy to use control panel See this Quick Guide for the basics See the online User s Guide for details Process large documents with the 30 page capacity Automatic Document Feeder See this Quick Guide for the basics See the online User s G...

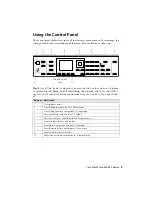
Page 3: ...ect Off If you turn off the sound the dialing sound made when you transmit a fax is also turned off Number Description 1 Turns product on off 2 Press Photo to access the Print Photos menu 3 Press Copy to access your product s Copy mode 4 View menus and status on the LCD screen 5 Use the arrow keys and OK button to navigate menus 6 Enter numbers letters and symbols 7 Press Fax to access your produc...

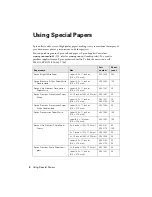
Page 4: ...ided Letter 8 5 11 inches 216 279 mm S042384 150 Epson Ultra Premium Presentation Paper Matte Letter 8 5 11 inches 216 279 mm S041341 50 Epson Premium Presentation Paper Matte 8 10 inches 203 254 mm S041467 50 Letter 8 5 11 inches 216 279 mm S041257 S042180 50 100 Epson Premium Presentation Paper Matte Double sided Letter 8 5 11 inches 216 279 mm S041568 50 Epson Presentation Paper Matte Letter 8 ...

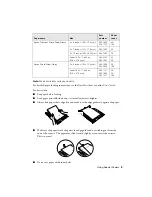
Page 5: ... loaded against the edge guide and not sticking out from the end of the cassette The paper may slide forward slightly as you insert the cassette This is normal Do not use paper with binder holes Epson Premium Photo Paper Glossy 4 6 inches 102 152 mm S041808 S041727 40 100 5 7 inches 127 178 mm S041464 20 8 10 inches 203 254 mm S041465 20 Letter 8 5 11 inches 216 279 mm S042183 S041667 25 50 Epson ...

Page 6: ...ument up to letter size or A4 size on the scanner glass 1 Open the document cover 2 Place your original facedown on the scanner glass with the top against the back left corner 3 Close the cover gently to keep your original in place Using the Automatic Document Feeder You can place up to 30 letter or A4 size sheets or 10 legal size sheets single sided only in the ADF 1 Open the ADF paper support an...

Page 7: ...Faxing 7 3 Insert the originals faceup top edge first The ADF icon appears on the screen Note If you re using the 2 up Copy layout make sure the originals are loaded as shown below 4 Slide the edge guide against the originals but not too tight ...

Page 8: ...sheet feeder 2 Place your original document on the scanner glass or load your documents in the Automatic Document Feeder see page 6 Note When you use the Copy function with originals loaded in the Automatic Document Feeder letter size paper is automatically selected for your printed copies If you copy a legal size document the image will be cropped To copy a full legal size document on letter size...

Page 9: ... on page 7 You can also change the paper type paper size and other print settings Press u or d to select the setting then press OK Press u or d to select an option then press OK Note Not all Paper Type Paper Size Layout and Quality settings may be available depending on the options you choose See the online User s Guide for details 9 After you finish selecting settings press x Menu to exit the set...

Page 10: ...shes then stays lit Now you can view your photos on the LCD screen and print them see page 11 Removing the Card After you finish printing your photos follow these steps to remove the card 1 Make sure the memory card access light is not flashing Caution Do not remove the card or turn off your printer while the memory card access light is flashing you may lose data on the card 2 If the product is co...

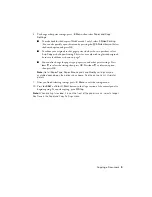
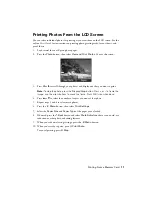
Page 11: ... print Note To crop the photo press the Display Crop button Press or to frame the image use the arrow buttons to move the frame Press OK twice when done 4 Press u or d to select the number of copies you want of that photo 5 Repeat steps 3 and 4 to select more photos 6 Press the x Menu button then select Print Settings 7 Select the Paper Size and Paper Type of the paper you ve loaded 8 If desired p...

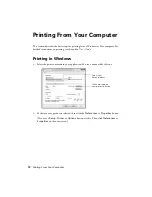
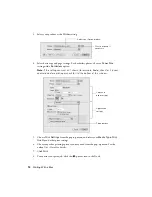
Page 12: ... the online User s Guide Printing in Windows 1 Select the print command in your application You see a window like this one 2 Make sure your product is selected then click the Preferences or Properties button If you see a Setup Printer or Options button click it Then click Preferences or Properties on the next screen Select your Epson product Click here to open your printer software ...

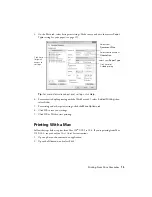
Page 13: ...g and other print settings click the More Options tab 6 Click OK to save your settings 7 Click OK or Print to start printing Printing With a Mac Follow the steps below to print from Mac OS X 10 5 to 10 6 If you re printing from Mac OS X 10 4 see your online User s Guide for instructions 1 Open a photo or document in an application 2 Open the File menu and select Print Select your Paper Type Click ...

Page 14: ...on before printing or check for it at the bottom of this window 5 Choose Print Settings from the pop up menu and select your Media Type Print Quality and other print settings 6 Choose any other printing options you may need from the pop up menu See the online User s Guide for details 7 Click Print 8 To monitor your print job click the printer icon in the Dock Click to expand if necessary Select yo...

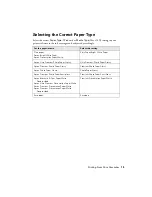
Page 15: ...tte Plain Paper Bright White Paper Epson Ultra Premium Photo Paper Glossy Ultra Premium Photo Paper Glossy Epson Premium Photo Paper Glossy Premium Photo Paper Glossy Epson Photo Paper Glossy Photo Paper Glossy Epson Premium Photo Paper Semi gloss Premium Photo Paper Semi Gloss Epson Brochure Flyer Paper Matte Double sided Epson Ultra Premium Presentation Paper Matte Epson Premium Presentation Pap...

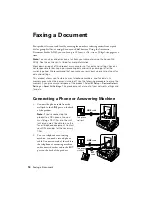
Page 16: ...store names telephone numbers and fax data in its memory even when the power is turned off Use the following procedure to erase the memory if you give away or dispose of the product Select F Setup Restore Default Settings Reset All Settings This procedure will erase all of your network settings and fax data Connecting a Phone or Answering Machine 1 Connect the phone cable from the wall jack to the...

Page 17: ... the number of rings before the fax answers Note To select other settings or use the Epson FAX Utility see the online User s Guide Entering Fax Header Information You should enter your name and phone number in the fax header before sending faxes so that recipients can identify the origin of the fax Note If you leave your product unplugged for a long period of time the date and time settings may ge...

Page 18: ...characters use the l r u or d arrow buttons to highlight a letter on the screen Press OK to select it Use the on screen function buttons to select uppercase AB12 lowercase ab12 symbols or spaces or to delete characters When you re finished highlight Done and press OK Selecting the Number of Rings to Answer If you connected an answering machine and it is set to pick up on the fourth ring you should...

Page 19: ...ou are scanning with the ADF your document is automatically scanned and faxed If you place your document on the scanner glass you can scan additional pages after the first one is sent If the fax number is busy you see a redialing message and the product redials after one minute To redial immediately press Redial Pause To cancel faxing press y Stop at any time Note If you turn off the product the f...

Page 20: ...o turn on the Auto Answer light Note To change the number of rings before the product answers see page 18 If you run out of paper during printing you see an error message Load more paper and press the B W or Color x Start button in the Fax section of the control panel to continue To receive faxes manually if you use a voicemail service provided by the phone company instead of an answering machine ...

Page 21: ...y creates a JPG image and saves it to your computer ideal for scanning photos Scan to PC PDF automatically creates a PDF file and saves it to your computer ideal for scanning documents Scan to PC Email automatically scans a photo resizes it launches your email application and attaches a JPG image to a new outgoing message This works with MAPI type email such as Microsoft Outlook or Windows Live Ma...

Page 22: ...following to start Epson Scan Windows Double click the EPSON Scan icon on your desktop Mac OS X 10 4 and 10 5 Double click EPSON Scan in Applications Epson Software To scan from an application start your application Then open the File menu choose Import or Acquire and select your product 3 Epson Scan opens in Office Mode the first time you use it You can change the scan mode using the Mode selecto...

Page 23: ...r 1 Open an image editing application such as Image Capture select your product if necessary then press the Scan button 2 If you would like to select scan settings such as Color Restoration and file save settings click Show Details 3 Click the Scan button to begin scanning Your image is saved to the folder selected in the Scan To pop up menu ...

Page 24: ... gaps in them some of the nozzles in the print head may be clogged or ink may be running low in one or more of the ink cartridges Follow the steps below to check the print head nozzles 1 Load letter or A4 size paper 2 Press F Setup 3 Press u or d to select Maintenance then press OK 4 Make sure Nozzle Check is selected then press OK 5 Press the B W or Color x Start button 6 Check the nozzle check p...

Page 25: ...e nozzle check pattern to determine which colors need cleaning You can save ink by cleaning only selected colors Cleaning takes a few minutes When it s finished you see a message on the LCD screen Caution Never turn off the product during head cleaning or you may damage it 6 Press 2 to run a nozzle check and confirm that the print head is clean Note If you don t see any improvement after cleaning ...

Page 26: ...27 to replace a cartridge if necessary 4 Press y Back to exit In Windows a window may appear on your computer screen if you try to print when ink is low This window can optionally display ink offers and other updates from Epson Note To disable checking for ink offers or updates from Epson see the instructions in your online User s Guide Purchasing Epson Ink Cartridges You can purchase genuine Epso...

Page 27: ... box Store ink cartridges in a cool dark place If cartridges have been exposed to cold temperatures allow them to warm up to room temperature for at least 3 hours before using them Replacing Ink Cartridges Make sure you have a new ink cartridge before you begin Caution Do not open ink cartridge packages until you are ready to install the ink Cartridges are vacuum packed to maintain reliability Lea...

Page 28: ...e Caution Do not remove any other labels or seals or ink will leak Do not touch the green chip on the front of the cartridge This can damage the ink cartridge 7 Insert the new ink cartridge into the holder and push it down until it clicks into place 8 Once you replace all the cartridges that need replacing close the cartridge cover and push it down until it clicks into place 9 Close the scanner to...

Page 29: ... access restrictions are set register the product s MAC address on the router To obtain the MAC address print a Network Status Sheet see page 31 Then see your router s manual for instructions If your wireless router or access point doesn t broadcast its network name SSID manually enter your wireless network name If your wireless router or access point has wireless security enabled you will also ne...

Page 30: ... the port the product is connected to is on or flashing If the link LED is off try the following Make sure the Ethernet cable is securely connected to both the product and your router access point switch or hub Try connecting to another port on your router access point switch or hub Try connecting the product to another router access point switch or hub Try connecting the product to your router ac...

Page 31: ...nnot restart turn the product off and on and then try again Check the Timeout Setting in EPSON Scan Settings For details see the Epson Scan Help Print a Network Status Sheet 1 Press F Setup 2 Press u or d to select Network Settings then press OK 3 Press u or d to select Confirm Network Settings then press OK 4 Press the B W or Color x Start button to print a network status sheet Printing and Copyi...

Page 32: ...online User s Guide for information on paper loading limits Don t load paper above the tabs on the edge guides If paper has jammed follow the steps on the LCD screen If necessary check the following areas 1 Lift the scanner and carefully remove any paper trapped inside 2 Remove the rear cover from the back of the printer and check for jammed paper Open the cover to remove any paper if necessary 3 ...

Page 33: ...automatically If your phone line includes voice mail answering services calls or faxes may be inadvertently received by your voice mail service If the line has static press Fax press x Menu select Communication and turn off the V 34 and ECM settings If the product is connected to a DSL phone line you must have a DSL filter connected to the phone jack Contact your DSL provider for the filter If you...

Page 34: ...t Support Visit Epson s support website at epson com support U S or epson ca support Canada and select your product for solutions to common problems You can download drivers and documentation get FAQs and troubleshooting advice or e mail Epson with your questions Speak to a Support Representative Before you call Epson for support please have the following information ready Product name WorkForce 5...

Page 35: ...n Supplies Central at www epson com ink3 U S sales or www epson ca Canadian sales You can also purchase supplies from an Epson authorized reseller To find the nearest one call 800 GO EPSON 800 463 7766 Other Software Technical Support ABBYY FineReader Phone 408 457 9777 www abbyyusa com support abbyyusa com ...

Page 36: ...l ampere rating of all devices plugged into the wall outlet does not exceed the wall outlet s ampere rating Always turn off the product using the Ppower button and wait until the Ppower light stops flashing before unplugging the product or cutting off power to the electrical outlet If you will not be using the product for a long period unplug the power cord from the electrical outlet Place the pro...

Page 37: ...maged if liquid has entered the product if the product has been dropped or the case damaged if the product does not operate normally or exhibits a distinct change in performance If damage occurs to the plug replace the cord set or consult a qualified electrician If there are fuses in the plug make sure you replace them with fuses of the correct size and rating When storing or transporting the prod...

Page 38: ... leak If you remove an ink cartridge for later use protect the ink supply area from dirt and dust and store it in the same environment as the product Note that there is a valve in the ink supply port making covers or plugs unnecessary but care is needed to prevent the ink from staining items that the cartridge touches Do not touch the ink cartridge ink supply port or surrounding area Do not store ...

Page 39: ...ipment complies with Part 68 of the FCC rules and the requirements adopted by the ACTA On the back side is a label that contains among other information the FCC registration number and the ringer equivalence number REN for this equipment You must upon request provide this information to your local telephone company The information associated with the services the equipment is to be connected are R...

Page 40: ...transmitted page or on the first page of the transmission the date and time it is sent and an identification of the business or other entity or other individual sending the message and the telephone number of the sending machine or such business other entity or individual In order to program this information into your fax machine follow the instructions in Entering Fax Header Information on page 1...

Page 41: ...subject only to the requirement that the sum of the RENs of all the devices does not exceed five L indice d équivalence de la sonnerie IES sert à indiquer le nombre maximal de terminaux qui peuvent être raccordés à une interface téléphonique La terminaison d une interface peut consister en une combinaison quelconque de dispositifs à la seule condition que la somme d indices d équivalence de la son...

Page 42: ...prints or reimbursement of materials or services required for reprinting This warranty does not cover damage to the Epson product caused by parts or supplies not manufactured distributed or certified by Epson This warranty does not cover ribbons ink cartridges or third party parts components or peripheral devices added to the Epson product after its shipment from Epson e g dealer or user added boa...

Page 43: ...ses incurred by purchaser or third parties as a result of accident misuse or abuse of this product or unauthorized modifications repairs or alterations to this product or excluding the U S failure to strictly comply with Seiko Epson Corporation s operating and maintenance instructions Seiko Epson Corporation shall not be liable for any damages or problems arising from the use of any options or any...

Page 44: ...n are for identification purposes only and may be trademarks of their respective owners Epson disclaims any and all rights in those marks This information is subject to change without notice 2011 Epson America Inc 4 11 CPD 34361 Printed in XXXXXX ...

Reviews: