background image

9

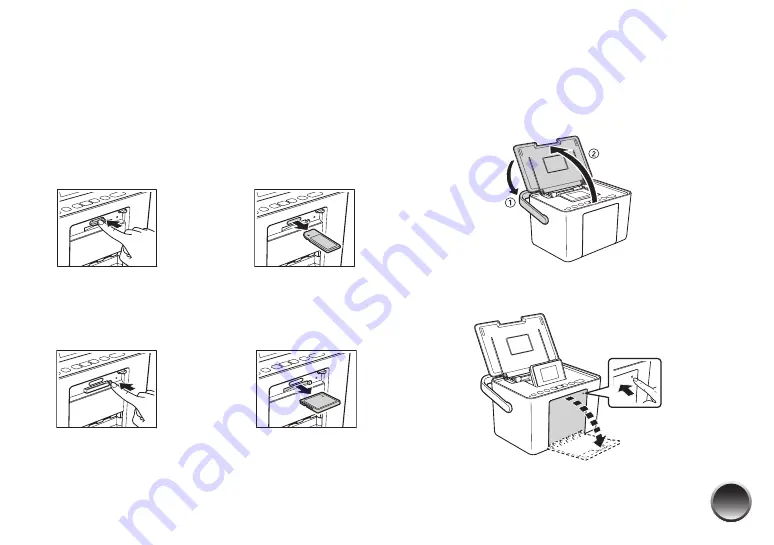
Removing Your Memory Card

When you are ready to remove a memory card, first 
make sure the memory card light is not flashing.

Caution: Do not remove a card while the memory card light is 
flashing; you may lose photos on your card.

Top slot

: Push in the card and release it, then pull it 

straight out of the slot.

Bottom slot

: Push in and release the card release 

button so it pops out. Then push in the button again to 
eject your card and pull it straight out of the slot.

Loading Paper

Caution: Don’t load plain paper; this may damage PictureMate. 

1

Move the handle to the back. Then open the top 
cover and raise the photo viewer screen.

2

Press the corner of the output tray to open it.

Summary of Contents for C11CA56203 - PictureMate Charm PM 225 Color Inkjet Printer

Page 1: ...User s Guide ...

Page 2: ...otos 17 Print From an External Device 23 Print From a Computer 31 Copy Photos to and From Your Computer 26 Replace Print Pack 29 Take PictureMate With You 33 Set PictureMate Preferences 36 Printer Care and Troubleshooting 40 Set Up Network Printing 54 Specifications 74 Notices 58 Index 68 ...

Page 3: ...later for your photos and negatives Since you had negatives you could take them back later if you wanted reprints The digital process is simple too and it gives you complete control Just follow the basic steps shown on the right 1 Review and Delete After you finish taking your photos review them on your digital camera s screen Delete the photos you don t want 2 Print Insert your camera s memory ca...

Page 4: ...s still in your camera When you insert the card into PictureMate you just have to press OK and Print See page 15 If you have a PictBridge enabled camera you can connect the camera to PictureMate and control printing right from your camera See page 23 If you want to print outdoors or in other places without convenient electrical outlets you can buy the optional PictureMate battery See page 34 If yo...

Page 5: ...tcut to the User s Guide is installed from the CD Where to Get a Print Pack and Accessories The PictureMate Print Pack has everything you need to print in one box photo paper and a photo cartridge You can buy a Print Pack wherever PictureMate is sold or from retailers that sell printer supplies The following Print Packs are available You can also buy a Print Pack and other PictureMate accessories ...

Page 6: ...6 PictureMate Buttons Start printing Change the number of photos displayed Turn PictureMate on or off Display optional settings menu Move through photos and menu options Stopprinting or cancel settings ...

Page 7: ...Load paper see page 7 When you finish printing you can remove your memory card see page 9 Inserting Your Memory Card 1 Move the handle to the back Then open the top cover 2 Raise and adjust the photo viewer screen 3 Press the corner of the output tray to open it Prepare to Print ...

Page 8: ... flashing you may lose photos on your card Now you are ready to choose your photos and start printing See page 11 MicrodriveTM CompactFlash Type I and II SDTM Secure Digital and SDHCTM High Capacity miniSDTM and miniSDHC microSD and microSDHC MMCTM MultiMediaCardTM MMCplus MMCmobile and MMCmicro xD Picture CardTM xD Picture Card Type M M and H Sony Memory Stick Memory Stick DuoTM Memory Stick Micr...

Page 9: ... Push in the card and release it then pull it straight out of the slot Bottom slot Push in and release the card release button so it pops out Then push in the button again to eject your card and pull it straight out of the slot Loading Paper Caution Don t load plain paper this may damage PictureMate 1 Move the handle to the back Then open the top cover and raise the photo viewer screen 2 Press the...

Page 10: ...e When you need more paper order a PictureMate Print Pack See page 29 for more information Choosing a Group of Photos If your memory card contains 1000 photos or more PictureMate sorts them by file name and divides them into groups of 999 photos Select the group from which you want to print photos Note The last group may contain less than 999 photos 1 Load paper and a memory card 2 When you see a ...

Page 11: ...c dates see page 14 If your camera supports DPOF Digital Print Order Format you can use it to pre select the photos and copies you want to print PictureMate then prints the selected photos See page 15 To view a slideshow of your photos see page 15 To store and display your printed photos see page 16 Viewing Photos on PictureMate PictureMate s photo viewer screen makes it easy to select the photos ...

Page 12: ...on to turn it back on Printing Individual Photos You can use the photo viewer screen to select the pictures you want to print 1 After inserting a memory card press l or r to view your photos 2 When you see a photo you want press OK to select it for printing You see the number 1 on the photo indicating that one copy will be printed Note If you want to change the layout or edit your photo press Menu...

Page 13: ... then press Print to start printing Tip You can check the total number of sheets on the screen before printing Printing Groups of Photos 1 Press Menu 2 Press l or r to choose Select Photos then press OK 3 Press l or r to choose Select Group then press OK 4 Follow the on screen instructions Printing All Photos You can print all the photos on your camera s memory card and select the number of copies...

Page 14: ...inting more than 20 photos you will need to reload paper while printing Load a maximum of 20 sheets at a time When you see a message that paper is out load more paper and press OK to continue printing If you need to cancel printing press Stop Clear Printing Photos by Date You can print photos taken on specific dates If you have a lot of photos on your memory card this makes it easier to find the o...

Page 15: ...lected photos and displays a message 1 Select Yes then press OK 2 If you want to change any print settings from the defaults press Menu See page 17 for instructions 3 Make sure you have enough paper loaded then press Print Viewing a Slideshow of Your Photos You can have PictureMate display all the photos on your memory card one by one 1 After inserting a card press Menu 2 Press l or r to highlight...

Page 16: ... are completely dry Let photos sit for 24 hours before framing After you print the colors on your photos will take some time to set as the ink dries During this time the colors may look different than you expect Displaying Your Photos To ensure photos will last as long as possible display them under glass or in photo albums Keep photos out of the sun to help prevent fading Storing Unused Paper Ret...

Page 17: ...Note The features described in this section do not change or replace the original digital photo file they customize only the print s you make at that time Getting Help You can learn how to improve print quality or handle memory cards paper or photo cartridges 1 Press Menu 2 Press l or r to highlight Help then press OK 3 Press l or r to highlight Improve print quality or Quick Guide then press OK 4...

Page 18: ...s are automatically expanded and cropped around the edges This may cause part of your image to be cut off You can control the amount of expansion and cropping see page 21 for instructions 5 At the photo selection screen press OK to select the current photo for printing See page 12 To print two or more photos per sheet select multiple copies or multiple photos For example if you want 4 mini wallet ...

Page 19: ...hotos and printing will be slower when you use this feature 1 Select a photo with the red eye problem 2 Press Menu 3 Press l or r to highlight Setup then press OK 4 Press l or r to highlight Advanced Settings then press OK 5 Press l or r to highlight Fix Red Eye then press OK 6 Press l or r to highlight On then press OK Fixing Photos PictureMate lets you correct the color and improve the image qua...

Page 20: ...ages that are too dark too bright or backlit This is the default setting P I M This information helps ensure an accurate image reproduction for files that include P I M PRINT Image Matching or Exif Print data None Prints photos as is or bypasses P I M or Exif Print data Select this setting for the fastest printing 5 Press OK to apply the selected setting Note The setting you select applies to all ...

Page 21: ... Then press OK Read the warning message and press OK If you see white lines on the edges of your photos after printing with the Minimum setting repeat steps 1 to 4 and select Middle or Standard Printing Photos in Black and White or Sepia You can print pictures in black and white or in a sepia tone like an old fashioned photo even when the originals are in color Your original images are not changed...

Page 22: ...s setting is available for borderless photos only 1 Select the photos that have text added by your camera 2 Press Menu 3 Press l or r to highlight Setup then press OK 4 Press l or r to highlight Advanced Settings then press OK 5 Press l or r to highlight Camera Text then press OK 6 Highlight On then press OK Note Before you print make sure the Borderless Layout setting is selected See page 18 for ...

Page 23: ...y not be included with your camera 1 Make sure PictureMate is on but not printing 2 Make sure there are no memory cards in PictureMate s slots Note You must remove your memory card or the printer will read photos from the card not from a camera 3 Turn on your camera 4 Connect your camera s USB cable to your camera and the EXT I F port on the back of PictureMate 5 Use your camera s controls to sele...

Page 24: ...Bluetooth specification it is not guaranteed to work with all devices that have Bluetooth wireless technology Make sure your photos meet the requirements listed on page 5 1 Make sure PictureMate is on but not printing Caution Do not connect or remove the Bluetooth Photo Print Adapter while it is communicating with a device or while PictureMate is printing this may cause PictureMate to malfunction ...

Page 25: ...As See your product s documentation for instructions on setting up Bluetooth file sharing and sending files Printing starts automatically If you see a Bluetooth error message on the PictureMate screen try printing the photo from a memory card or your computer instead Note For instructions on selecting PictureMate s Bluetooth settings see page 37 Disconnecting the Adapter Make sure PictureMate is n...

Page 26: ... in PictureMate and view copy or print files on the memory card as if it were a drive on your computer You can even copy files from your computer to the memory card See Inserting Your Memory Card and Copying Photos on page 26 for instructions Periodically it s a good idea to check Epson s support website at epson com support for free updates to your PictureMate printer software Download instructio...

Page 27: ...e P On button to turn on PictureMate Note If you see a Found New Hardware screen click Cancel and disconnect PictureMate from your computer 2 Insert the PictureMate CD 3 With Windows Vista if you see the AutoPlay window click the option Run SETUP exe When you see the User Account Control screen click Continue 4 When you see this screen click Install 5 Read the license agreement and click Accept Th...

Page 28: ...tureMate software is installed Note If you see a screen like this one remove your memory card and click the X in the corner to close it Note PictureMate is automatically set as your default printer If you have another printer you can change this setting in the Windows Control Panel 7 When you see the Bonus Software Installation screen select the items you want and click Install ...

Page 29: ...te see page 31 Installing Software for Macintosh Before you start make sure PictureMate is NOT connected to your Macintosh and does NOT have a memory card inserted in it 1 Press the P On button to turn on PictureMate 2 Insert the PictureMate CD 3 Double click the Epson icon 4 When you see this screen click Install 5 Read the license agreement and click Accept 6 Follow the on screen instructions to...

Page 30: ... 10 5 x skip to step 10 If you re using Mac OS X 10 3 9 or 10 4 11 continue with the next step 8 When you see this screen click Add Printer 9 Follow the steps on the right side of the screen to add PictureMate 10 Follow the on screen instructions to install the rest of your software and register PictureMate 11 When you re done eject the CD Now you can print photos from your Macintosh on PictureMat...

Page 31: ...omputer You can print photos from an imaging application the Windows Photo Gallery in Windows Vista page 31 or the Picture and Fax Viewer in Windows XP page 34 Printing with the Windows Vista Photo Gallery 1 Locate the photo you want to print on your computer 2 Right click the photo highlight Open With and select Windows Photo Gallery Print icon ...

Page 32: ...g 5 Click Options in the lower right corner of the screen and select Printer Properties You see the printer settings window 6 Choose from the following settings Select Borderless to print a photo without borders Select Borders to print with a white border all around Borderless prints are automatically expanded If too much of your photo edges are cut off set the Expansion slider to Min If you see a...

Page 33: ...elect Digital Camera Correction to minimize common digital flaws Select Enhance Fine Details to bring out the fine details of a particularly intricate photo printing may be slower Select Fix Red Eye to reduce or remove red eye effects in your photo Select Print Preview to see what your photo will look like before you print Select the number of copies you want to print Tip For more information abou...

Page 34: ... you want to print on your computer 2 Right click the photo highlight Open With and select Windows Picture and Fax Viewer 3 Click the Print icon at the bottom of the screen 4 Click Next 5 When you see this screen select the photo s you want to print and click Next Print icon ...

Page 35: ...from the following settings Select Borderless to print a photo without borders Select Borders to print with a white border all around Borderless prints are automatically expanded If too much of your photo edges are cut off set the Expansion slider to Min If you see a white edge on your photo select Mid or Max Printing Preferences Sample image ...

Page 36: ...ack White If your photo was taken with a digital camera select Digital Camera Correction to minimize common digital flaws Select Enhance Fine Details to bring out the fine details of a particularly intricate photo printing may be slower Select Print Preview to see what your photo will look like before you print Select Fix Red Eye to reduce or remove red eye effects in your photo Select the number ...

Page 37: ...d see your photo cartridge status Printing From a Macintosh See the section below for your Mac OS operating system Mac OS X 10 5 1 Start your print program and open the photo you want to print 2 Open the File menu and select Print 3 Select EPSON PictureMate PM225 as the Printer setting 4 Click d to expand the Print window if necessary Cancel ...

Page 38: ... for portrait for landscape facing right or for landscape facing left as the Orientation 7 Select Print Settings from the pop up menu 8 Choose from the following settings Select Enhance Fine Details to bring out the fine details of a particularly intricate photo printing may be slower You can change the Color Option and see the effects on the sample photo the changes don t affect your original Sep...

Page 39: ...ing click the print job and click Delete To pause printing click the print job and click Hold To resume printing click a print job marked Hold and click Resume To pause printing for all jobs click Pause Printer To check photo cartridge status click Utility then select EPSON Status Monitor 12 When you re finished close the window to exit Mac OS X 10 3 and 10 4 1 Start your print program and open th...

Page 40: ...t for portrait for landscape facing right or for landscape facing left as the Orientation 6 Click OK 7 Select Print from the File menu 8 Select Print Settings from the pop up menu Tip To check your photo cartridge status click the maintenance icon For more information about printer settings click 9 Choose from the following settings Select Enhance Fine Details to bring out the fine details of a pa...

Page 41: ...in iPhoto prints 10 Click Print 11 To monitor the progress of your print job click the PictureMate or Print Center icon when it appears in the dock If you clicked the Print Center icon double click your PictureMate model 12 From this window you can do the following To cancel printing click the print job and click Delete To pause printing click the print job and click Hold To resume printing click ...

Page 42: ...ictureMate supports Exif Print image enhancement features See your camera manual to determine if this feature is included on your camera PictureMate does not support progressive scan JPEG or RAW images Inserting Your Memory Card and Copying Photos 1 Press the P On button to turn on PictureMate 2 Insert the memory card into the correct slot as shown on page 7 Insert just one card at a time Note Pic...

Page 43: ...XP Follow the on screen instructions To copy photos from your computer to the card select Open folder to view files and click OK Then drag and drop the photos from your computer folder to the correct folder on your card Make sure the photo files meet the requirements described in Supported Photo Formats on page 26 Note To copy files from Adobe Photoshop save them as RGB images using the standard s...

Page 44: ...en you re done copying photos carefully remove your memory card as described on the right Preparing to Remove a Memory Card Once you re finished copying photos to or from your memory card follow the steps below to remove it Be sure to remove any cards before turning off PictureMate or unplugging its USB cable Note Do not remove a card while the memory card light is flashing or without performing t...

Page 45: ...ckage Caution To ensure good results use a genuine PictureMate photo cartridge and do not refill it Other products may cause ink spills or other damage to your printer not covered by Epson s warranty Buying a Print Pack You can buy a PictureMatePrint Pack wherever PictureMate is sold or from retailers that sell printer supplies The following Print Packs are available You can also buy a Print Pack ...

Page 46: ... the cartridge read the Photo Cartridge Safety Instructions on page 60 1 Make sure PictureMate is on but not printing 2 Open the cartridge door on the back of PictureMate 3 Slide the cartridge lever left to the Release position Caution Do not try to pull out the cartridge without moving the lever 4 Pull out the cartridge and dispose of it properly For appropriate disposal check local resources for...

Page 47: ... other damage to PictureMate not covered by Epson s warranty 5 Remove the new photo cartridge from its package Caution Don t touch the small green circuit board Install the photo cartridge immediately If you leave a cartridge unpacked for a long time before using it normal printing may not be possible 6 Slide the cartridge straight into the slot label side up until it clicks into place Note The ca...

Page 48: ...our Print Pack at any time 1 Press Menu 2 Press l or r to highlight Maintenance then press OK 3 Press l or r to highlight Cartridge Status then press OK You see the status displayed on the photo viewer screen 4 Press OK to exit Note If the screen displays a Photo Cartridge low message you should buy a new PictureMate Print Pack See page 29 for details The gray square represents the ink level ...

Page 49: ... cold PictureMate may be damaged or ink may leak 1 Press the P On button to turn PictureMate off 2 Wait until the On light goes out then unplug the power cable from the power outlet 3 Remove all paper and printed photos 4 Lower the screen then close the paper support and output tray 5 Unplug the power adapter and any connected USB cable or device Place the power cable and adapter in the PictureMat...

Page 50: ...fully charged battery you can print about 100 photos Installing the Battery 1 Make sure PictureMate is turned off 2 Unplug the AC adapter from PictureMate 3 Release the latch and remove the battery cover from the back of the printer 4 Insert the battery as shown until it clicks into place Charging the Battery After you install the battery you need to charge it by connecting the AC adapter and plug...

Page 51: ...een Note If you are running PictureMate with the battery the printer turns off automatically after 15 minutes if it is not being used unless PictureMate is connected to a computer and a memory card is inserted Press the P On button to turn it back on Removing the Battery If there is a problem with your battery or you want to replace it with one that is already charged you need to remove the batter...

Page 52: ...7 Make settings for Bluetooth printing see page 37 Return the settings to their defaults see page 39 Turning Print Preview Off or On When you press the Print button you see a screen that lets you confirm your selected photos and settings for example Then you press Print again to start printing If you don t want to see this screen before printing you can turn it off You will only need to press Prin...

Page 53: ...ging PictureMate s Language You can change the language on PictureMate s screen to French Portuguese or Spanish 1 Press Menu 2 Press l or r to highlight Setup then press OK 3 Press l or r to highlight Language then press OK 4 Press l or r to choose the language you want then press OK Caution If you change the language all the words on the screen will appear in the new language Make sure you select...

Page 54: ... Press l or r to choose a setting for each option Press OK to save the setting and move to the next option Option Settings Description Printer ID 0 to 9 default 1 If multiple Bluetooth enabled printers are in the same communication range you can distinguish them by assigning each a unique number from 0 through 9 Turn PictureMate off and then back on when you re finished Mode Discoverable default T...

Page 55: ...essage 4 Press l or r to select Yes or No then press OK 5 Press OK to exit Encryption On Off default Off Select On to encrypt communication and require that a four digit Passkey be entered into a device before it can print from PictureMate Passkey Any four digit number default 0000 This setting allows you to set a four digit Passkey that must be entered into a device before printing if Pairing is ...

Page 56: ...ligning the print head on page 42 Cleaning Inside PictureMate on page 45 Cleaning Outside PictureMate on page 45 Printing and operation problems on page 46 Software installation problems on page 48 Print quality problems on page 48 Problems with paper feeding on page 50 Miscellaneous printout problems on page 50 Where to get additional help on page 52 Printer Care and Troubleshooting Section Topic...

Page 57: ...d if necessary Note If the screen displays a Photo cartridge low message you may not be able to clean the print head until you replace the photo cartridge 1 Load paper in PictureMate 2 Press Menu 3 Press l or r to highlight Maintenance then press OK 4 Press l or r to select Nozzle Check and press OK 5 Press Print The nozzle check pattern is printed 6 Check the pattern to see if there are any gaps ...

Page 58: ...ur taskbar in the lower right corner of your screen Select Nozzle Check Macintosh Open the Applications folder and select EPSON Printer Utility3 Select PictureMate in the printer list click OK and select Nozzle Check 3 Follow the instructions on the screen to print a nozzle check pattern 4 Check the pattern to see if there are any gaps or missing lines If the pattern is OK click on Finish If the p...

Page 59: ...etermine which one is the most even with no streaks or white lines You may need to use a magnifying glass 7 Press l or r to select the number for the best square 1 to 9 in set 1 Then press OK 8 Press l or r to highlight the number for the best square 1 to 9 in set 2 Then press OK PictureMate aligns the print head and exits the Maintenance menu Note The square you select becomes the middle square 5...

Page 60: ...acintosh Open the Applications folder and select EPSON Printer Utility3 Select PictureMate in the printer list click OK and select Print Head Alignment 3 Follow the instructions on the screen to print the alignment pattern You see a window like this 4 Look at the printed squares to determine which one is the most even with no streaks or white lines You may need to use a magnifying glass 5 Enter th...

Page 61: ...s l or r to select Cleaning Sheet then press OK You see a confirmation message 4 Press OK to feed the paper 5 If the paper is clean select No and press OK to exit If the paper has ink marks select Yes and press OK then press OK again to feed a clean sheet of paper 6 Repeat step 5 until the paper is clean Cleaning Outside PictureMate To keep PictureMate working at its best you should clean it sever...

Page 62: ...f it is not being used Press the P On button to turn it back on The photo viewer screen goes blank The screen shuts off after 13 minutes if PictureMate is not used Press any button except the P On button to turn it back on PictureMate makes an unexpected noise after you install a photo cartridge The first time you install the photo cartridge PictureMate charges its print head for about three and a...

Page 63: ...t and taken with a DCF compliant camera PictureMate cannot read progressive scan JPEG files or RAW files Make sure to format your memory card in your camera If you access the card from your computer and delete pictures the card may not work correctly with your camera Always delete pictures using your camera If you copy files from Adobe Photoshop to a memory card save them as RGB images using the s...

Page 64: ...ftware Don t connect PictureMate to your computer until you are instructed to Close other programs including screen savers and virus protection software and try installing again Make sure your system meets the requirements listed in System Requirements on page 74 To print over a network see Set Up Network Printing on page 54 for instructions on setting up printing Print Quality Problems You see ba...

Page 65: ... in the image The print head may need cleaning See page 41 The photo cartridge may be old or low See page 29 to replace it Make sure your paper isn t damaged old dirty or loaded face down If it is load new paper with the glossy or whiter side up Colors in your photo are wrong or missing Make sure the Color Effect setting is not set to B W or Sepia See page 21 The print head may need cleaning See p...

Page 66: ... paper loaded with the glossy or whiter side up and separate the sheets slightly Load a maximum of 20 sheets Make sure your paper is beneath the arrow on the edge guides Don t load plain paper this may damage PictureMate Use only PictureMate photo paper or Epson Premium Photo Paper Glossy or Semigloss See page 5 Store paper flat to help prevent curling Miscellaneous Printout Problems PictureMate p...

Page 67: ...download site U S downloads or Canadian downloads With Windows you can also click or Start open Programs or All Programs select EPSON and click the PictureMate Driver Update option for printer driver updates Uninstalling From a Windows Computer 1 Click or Start and select Programs or All Programs 2 Select Epson or Epson Printers then select Epson Printer Software Uninstall Note With windows Vista ...

Page 68: ...ou are ready to reinstall the PictureMate software follow the instructions in Installing Software for Macintosh on page 29 Where to Get Help Epson Technical Support Epson provides these technical support services Internet Support Visit Epson s support website U S or Canada and select your product for solutions to common problems You can download drivers and documentation get FAQs and troubleshooti...

Page 69: ...ect to change without notice Toll or long distance charges may apply Purchase Supplies and Accessories You can purchase genuine PictureMate Print Packs and accessories at Epson Supplies Central at www epson com ink3 U S sales or www epson ca Canadian sales You can also purchase supplies from an Epson authorized reseller To find the nearest reseller call 800 GO EPSON 800 463 7766 ...

Page 70: ...nistrators group First you need to set up PictureMate as a shared printer on the computer that it is directly connected to Then you must install the PictureMate software on each computer that will access it through the network Setting Up a Shared Printer Follow these steps to configure your computer to share PictureMate with other computers on a network Note With Windows XP you may need to run the...

Page 71: ...dows Vista Click click Control Panel and click Printer under Hardware and Sound Windows XP Click Start click Control Panel and click Printers and Other Hardware or Printers and Faxes Windows 2000 Click Start click Settings and click Printers 2 Do one of the following Windows Vista Click Add a printer then select Add a network wireless or Bluetooth printer Windows Vista searches for the printer on ...

Page 72: ...k follow the steps below for Mac OS X 10 5 or on the right for Mac OS X 10 3 or 10 4 Mac OS X 10 5 1 Turn on PictureMate 2 Select System Preferences in the Apple menu or dock 3 Select Print Fax 4 Select your printer and click the Share this printer checkbox 5 If you see a message telling you sharing is turned off click the Sharing button and click the Printer Sharing checkbox 6 Close System Prefer...

Page 73: ...p and Windows documentation for more information Accessing a Shared Printer Mac OS X 10 3 or 10 4 Follow the steps in this section to print to PictureMate from other Macintosh computers on your network 1 Turn on the shared PictureMate 2 Print as you normally would choosing your PictureMate model from the Shared Printers list that appears in the Page Setup and Print windows ...

Page 74: ...ws XP Windows XP Professional x64 Edition or Windows Vista USB 1 1 port minimum or USB 2 0 port recommended Shielded USB AB cable up to 6 5 feet 2 meters long Using an improperly shielded USB cable may cause PictureMate to malfunction Macintosh System Requirements Mac OS X 10 3 9 10 4 11 or 10 5 USB 1 1 port minimum or USB 2 0 port recommended Shielded USB AB cable up to 6 5 feet 2 meters long Usi...

Page 75: ...refill it Other products may cause damage to your printer not covered by Epson s warranty Do not use a photo cartridge if the date on the package has expired Do not leave a photo cartridge or PictureMate exposed to heat or direct sunlight Printing method On demand ink jet Nozzle configuration 90 nozzles 4 Colors yellow magenta cyan black Print direction Bidirectional with logic seeking Control cod...

Page 76: ...h 13 5 inches 344 mm Height 10 4 inches 265 mm Weight Approx 4 9 lb 2 2 kg without photo cartridge or AC adapter Printable area Border printing 0 12 inch 3 mm margin on all sides of the paper Borderless printing no margins Input voltage range 100 to 120 V 220 to 240 V Power consumption approximate Printing 11 5 W 11 5 W Sleep mode Standby mode 2 5 W 3 0 W Powered off 0 2 W 0 3 Model A431H Rated vo...

Page 77: ...ype Voltage requirements CompactFlash 3 3 V 3 3 V 5 V combined use Maximum current is 500 mA Microdrive Memory Stick Memory Stick PRO Memory Stick Duo Memory Stick PRO Duo Memory Stick PRO HG Duo Memory Stick Micro MagicGate Memory Stick MagicGate Memory Stick Duo SDHC SD miniSDHC miniSD microSDHC microSD 3 3 V 3 3 V 5 V combined use Maximum current is 500 mA MultiMediaCard MMCplus MMCmobile MMCmi...

Page 78: ...idge compliant devices Mass storage class for external storage Recommended cable length less than 6 5 feet 2 meters Bluetooth optional Ver 2 0 EDR compliant Safety UL 60950 1 CAN CSA C22 2 No 60950 1 EMC FCC part 15 Subpart B class B CAN CSA CIE IEC CISPR22 Class B ...

Page 79: ... or cause ink to leak out Do not remove the memory card or turn off the printer while the computer and the memory card are communicating when the memory card light is flashing The methods for using memory cards vary according to card type Be sure to refer to the documentation packaged with your memory card for details Use only memory cards compatible with the printer see page 8 Place the printer o...

Page 80: ...otocopiers or air control systems that regularly switch on and off Avoid using electrical outlets controlled by wall switches or automatic timers Keep the entire computer system away from potential sources of electromagnetic interference such as loudspeakers or the base units of cordless telephones Do not use a damaged or frayed power cord or the AC adapter or optional battery if damaged If you us...

Page 81: ... a long time before using it normal printing may not be possible Do not use a photo cartridge beyond the date printed on the cartridge carton otherwise it may result in reduced print quality For best results use up the photo cartridge within six months of installing it After bringing a photo cartridge inside from a cold storage site allow it to warm up at room temperature for at least three hours ...

Page 82: ... the battery and operate the printer Do not charge or use the battery with devices other than the specified product Using the battery with other devices may damage the battery or other devices or may cause an explosion To protect against short circuits do not remove the outside case of the battery Do not handle the battery with wet hands or use it near water Do not expose the battery to water or h...

Page 83: ...r 905 709 2567 Canada for warranty repair instructions and return authorization An Epson service technician will provide telephone diagnostic service to determine whether the printer requires service If service is needed Epson will at its option exchange or repair the printer without charge for parts or labor If Epson authorizes an exchange for the defective unit Epson will ship a replacement prin...

Page 84: ...le for the costs incurred THE WARRANTY AND REMEDY PROVIDED ABOVE ARE EXCLUSIVE AND IN LIEU OF ALL OTHER EXPRESS OR IMPLIED WARRANTIES INCLUDING BUT NOT LIMITED TO THE IMPLIED WARRANTIES OF MERCHANTABILITY NON INFRINGEMENT OR FITNESS FOR A PARTICULAR PURPOSE SOME LAWS DO NOT ALLOW THE EXCLUSION OF IMPLIED WARRANTIES IF THESE LAWS APPLY THEN ALL EXPRESS AND IMPLIED WARRANTIES ARE LIMITED TO THE WARR...

Page 85: ...to papers available but most are not formulated to be fully compatible with the PictureMate Photo Cartridge Using other papers may result in poor color reproduction print quality problems or more fading Both a PictureMate Photo Cartridge and some PictureMate Photo Paper were included in the box with your PictureMate printer The included cartridge contains enough ink to allow borderless color print...

Page 86: ...in the box with your PictureMate printer please submit a Fully completed PictureMate Print Pack Satisfaction Guarantee Form b Copy of Original UPC code of PictureMate printer c Copy of PictureMate printer receipt d Remaining paper which was included in the PictureMate printer box Customer claim status inquiries 800 305 7305 Declaration of Conformity According to 47CFR Part 2 and 15 for Class B Per...

Page 87: ...he equipment into an outlet on a circuit different from that to which the receiver is connected Consult the dealer or an experienced radio TV technician for help WARNING The connection of a non shielded equipment interface cable to this equipment will invalidate the FCC Certification of this device and may cause interference levels which exceed the limits established by the FCC for this equipment ...

Page 88: ... may not be as broad as some people assume Contact your legal advisor for any questions regarding copyright law Trademarks Epson PictureMate PRINT Image Matching and the PRINT Image Matching logo are registered trademarks Epson Exceed Your Vision is a registered logomark and PictureMate Charm is a trademark of Seiko Epson Corporation Epson Connection is a service mark of Epson America Inc SD is a ...

Page 89: ... Macintosh 37 39 41 Windows 31 37 Battery charging 50 to 51 installing 50 removing 51 safety instructions 82 to 83 status 51 Black and white printing 21 33 36 38 41 Blank pages 66 Blank screen 12 51 62 Bluetooth connecting adapter 24 disconnecting adapter 25 printing using 24 to 25 Blurry prints 65 Border layout 18 35 38 40 problems 66 Borderless layout 18 35 38 40 problems 66 Borderless expansion...

Page 90: ...24 to 25 Charging battery 50 to 51 photo cartridge 62 Checking nozzles 57 Choosing photos 11 15 Cleaning PictureMate 61 print head 57 to 58 64 Color effects 21 fixing 33 36 problems 65 Computer Bluetooth printing 24 to 25 connecting to PictureMate 30 copying photos to from 42 installing software on 26 41 printing from 31 to 41 software installation problems 64 Copies number of control panel 13 Cus...

Page 91: ...rt 68 Exif Print 20 Expansion borderless 21 35 38 39 41 External device port 23 printing from 23 F Faint prints 65 File formats 42 Fixing photos 33 36 G Gaps in image 57 to 58 65 Grainy prints 64 H Half page photos 18 Help control panel 17 Epson 68 I Icons on screen 51 Image formats 42 quality problems 64 Incorrect colors 65 margins 21 66 Ink see Photo cartridge Instructions control panel 17 Inter...

Page 92: ...uetooth printing 25 cancelling printing 39 41 installing software for 29 to 41 network printing 72 system requirements 74 uninstalling software for 68 Maintenance 56 59 Manuals 5 28 Margins incorrect 21 66 selecting 18 Memory card adapters 8 compatibility 8 light 8 to 9 42 problems 63 removing 9 26 specifications 77 Menu button 17 Missing colors 65 N Network installation 64 Noise PictureMate 62 No...

Page 93: ... 9 49 PDA printing from 24 to 25 Photo choosing 11 15 copying to from computer 42 correction 19 33 36 displaying 16 DPOF 15 fixing 19 33 36 fixing cut off 21 35 38 39 41 formats 42 paper 45 quality problems 64 quality adjusting 33 36 remove red eye 19 slideshow 15 storing 16 viewing 11 15 Photo cartridge buying 5 45 door 46 to 48 information 85 to 86 release lever 46 47 safety instructions 81 stat...

Page 94: ...atching 20 Portrait orientation 38 40 Power battery 50 to 51 82 to 83 problems 62 saving 12 51 turning off 49 79 turning on 27 29 62 Power cable 49 50 Preferences setting 52 to 55 Previewing printing 12 to 15 36 Print preview 12 to 15 36 speed increasing 64 Print head aligning 58 59 60 to 61 cleaning 57 to 58 64 PRINT Image Matching 20 Print Pack buying 5 45 information 85 to 86 replacing 45 statu...

Page 95: ... 15 36 problems 62 to 64 Windows 31 37 wireless 24 to 25 Problems border or layout 66 color 65 memory card 63 paper feeding 66 paper jam 66 photo viewer screen 62 power 62 print quality 64 printing 62 to 64 slow printing 64 software installation 64 Proof Sheet layout 18 Q Quality problems 64 Quality adjusting 33 36 R Red eye reduction 19 Release lever 47 Removing battery 51 Replacing photo cartrid...

Page 96: ...9 Slideshow 15 Slow printing 64 Smeared prints 65 Software installing 26 41 64 Software uninstalling 67 to 68 Speed increasing print 64 Start Here sheet 5 Stopping printing control panel 6 Macintosh 39 41 Windows 33 37 Storing paper and prints 16 Supplies 5 24 45 69 Support paper 10 49 Support technical 68 T Technical support 68 Troubleshooting 56 66 Turning printer on or off 27 29 49 62 79 U USB ...

Page 97: ...Windows basic printing 31 37 Bluetooth printing 25 cancelling printing 37 installing software for 27 to 29 network printing 70 system requirements 74 uninstalling software for 67 Wireless printing 24 to 25 ...

Reviews: