


Custom Printing
2-18
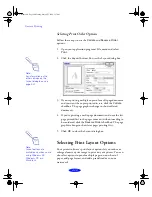
4. Select the direction of printing on the page using the
Orientation
options. To print your document oriented as
shown in one of the following printer graphics, select the
options listed below it.
5. To use the maximum printable area of your selected paper
size, set the Printable Area option to
Maximum
. To center
your image on the page, select
Centered
(this makes all
margins equal and reduces the printable area).
6. If you want to collate multiple copies of a multi-page
document or you want to reverse the order in which pages
are printed, click
OK
. Then see page 2-20 for instructions.
If you’ve finished selecting page size and orientation
options, click
OK
to close the Page Setup dialog box. Then
select
from the File menu to select any other printer
settings you may need and print your document.
Note:
The Rotate by 180° setting
lets you print the lower
portion of a document
first, with a bottom margin
as small as 0.12 inch
(3 mm) and a top margin
as small as 0.55 inch
(14 mm).
Portrait orientation
Rotate by 180°
Landscape orientation
Rotate by 180°
Portrait orientation
Landscape orientation
Custom.fm5 Page 18 Monday, March 23, 1998 5:17 PM