background image

Using the Printer Software with Windows

60

EPSON AcuLaser C3800

User's Guide

4. Select the 

Print the Frame

 check box when you want to print the pages surrounded by 

a frame.

Note:

The Page Order choices depend on the number of pages selected above, and the paper 
orientation (Portrait or Landscape) selected on the 

Basic Settings

 tab.

5. Click 

OK

 to apply the settings and return to the 

Advanced Layout

 tab.

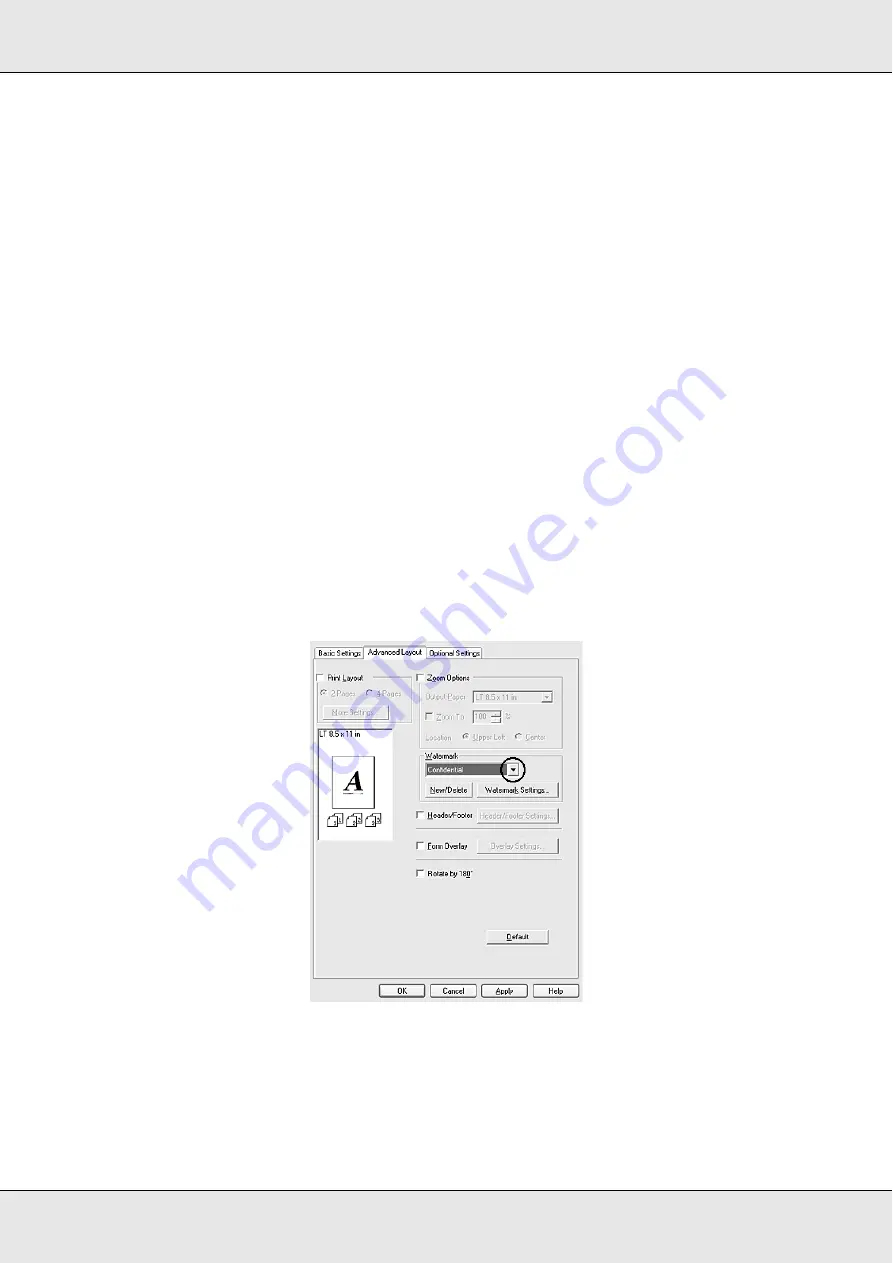
Using a watermark

Follow the steps below to use a watermark on your document. On the 

Advanced Layout


tab or Watermark dialog box, you can select from a list of predefined watermarks, or you 
can make an original watermark with text or a bitmap. The Watermark dialog box also 
allows you to make a variety of detailed watermark settings. For example, you can select 
the size, intensity, and position of your watermark.

1. Click the 

Advanced Layout

 tab.

2. Select a watermark that you want to use from the Watermark drop-down list. If you want 

to make detailed settings, click 

Watermark Settings

. The Watermark dialog box 

appears.

Note:

If you select 

User Name

 or 

Computer Name

 from the Water Mark drop-down list, the login 

account name or computer name is printed.

Summary of Contents for AcuLaser C3800 Series

Page 1: ...EPSON AcuLaser C3800 User s Guide User s Guide NPD2252 00 ...

Page 2: ...n NEST Office Kit Copyright 1996 Novell Inc All rights reserved A part of the ICC Profile contained within this product was created by Gretag Macbeth ProfileMaker Gretag Macbeth is the registered trademark of Gretag Macbeth Holding AG Logo ProfileMaker is the trademark of LOGO GmbH IBM and PS 2 are registered trademarks of International Business Machines Corporation Microsoft and Windows are regis...

Page 3: ...ogo and PostScript3 are trademarks of Adobe Systems Incorporated which may be registered in certain jurisdictions General Notice Other product names used herein are for identification purposes only and may be trademarks of their respective owners Epson disclaims any and all rights in those marks Copyright 2006 Seiko Epson Corporation All rights reserved ...

Page 4: ...ol panel 23 Options and Consumable Products 24 Options 24 Consumable products 24 Chapter 2 Printer Features and Various Printing Options Printer Features 25 High speed tandem printing engine 25 Pre defined color settings in the printer driver 25 Toner save mode 25 Resolution Improvement Technology and Enhanced MicroGray technology 25 Wide variety of fonts 26 Adobe PostScript 3 Mode 26 PCL Emulatio...

Page 5: ...it 36 Output tray 39 Printing on Special Media 40 EPSON Color Laser Paper 40 EPSON Color Laser Transparencies 40 EPSON Color Laser Coated Paper 42 Envelopes 42 Labels 43 Thick paper and extra thick paper 44 Loading a custom paper size 45 Chapter 4 Using the Printer Software with Windows About the Printer Software 46 Accessing the printer driver 46 Making Changes to Printer Settings 47 Making the p...

Page 6: ...onnection 90 Canceling Printing 91 Uninstalling the Printer Software 92 Uninstalling the printer driver 92 Uninstall the USB device driver 94 Sharing the Printer on a Network 95 Sharing the printer 95 Setting up your printer as a shared printer 96 Using an additional driver 97 Setting up clients 100 Installing the printer driver from the CD ROM 104 Chapter 5 Using the Printer Software with Macinto...

Page 7: ...Printer on a Network 147 Sharing the printer 147 For Mac OS X users 147 For Mac OS 9 users 148 Chapter 6 Using the PostScript Printer Driver About the PostScript 3 Mode 150 Hardware requirements 150 System requirements 150 Using the PostScript Printer Driver with Windows 152 Installing the PostScript printer driver for the USB interface 152 Installing the PostScript printer driver for the network ...

Page 8: ... Menu 169 Image Print Menu 171 Tray Menu 172 Emulation Menu 173 Printing Menu 173 Setup Menu 175 Color Regist Menu 179 Reset Menu 179 Quick Print Job Menu 180 Confidential Job Menu 180 USB Menu 180 Network Menu 181 AUX Menu 181 USB Host Menu 181 PCL Menu 182 PS3 Menu 184 Password Config Menu 185 ESCP2 Menu 186 FX Menu 188 I239X Menu 190 Status and Error Messages 192 Printing and Deleting Reserve J...

Page 9: ...module 220 Removing a memory module 224 Interface Card 225 Installing an interface card 225 Removing an interface card 227 Chapter 10 Replacing Consumable Products Replacement Messages 228 Imaging Cartridge 228 Handling precautions 228 Replacing an imaging cartridge 229 Fuser Unit 233 Handling precautions 233 Replacing the fuser unit 233 Transfer Unit 238 Handling precautions 238 Replacing the tra...

Page 10: ...orrectly 262 Transparencies are output blank from the MP tray 262 Color Printing Problems 263 Cannot print in color 263 The printout color differs when printed from different printers 263 The color looks different from what you see on the computer screen 263 Print Quality Problems 264 The background is dark or dirty 264 White dots appear in the printout 264 Print quality or tone is uneven 264 Half...

Page 11: ...n the printout is different from that on the screen 278 The printer fonts cannot be installed 278 The edges of texts and or images are not smooth 278 The printer does not print normally via the USB interface 279 The printer does not print normally via the network interface 279 An undefined error occurs Macintosh only 280 Insufficient memory to print data Macintosh only 280 Appendix A Customer Supp...

Page 12: ... 292 Electrical 292 Standard and approvals 292 Interfaces 294 USB interface 294 Ethernet interface 294 USB Host interface 294 Options and Consumable Products 295 Optional paper cassette unit 295 Duplex Unit 296 Memory modules 296 Imaging cartridge 296 Fuser unit 297 Transfer unit 297 Index ...

Page 13: ...to your equipment Notes contain important information and useful tips on the operation of your printer Safety precautions Be sure to follow the precautions carefully to ensure safe efficient operation Because the printer weighs approximately 31 kg 68 2 lb with consumable products installed one person should not lift or carry it Two people should carry the printer lifting it by the correct position...

Page 14: ...components into place Although the printer is designed to be sturdy rough handling can damage it When handling an imaging cartridge always place it on a clean smooth surface Do not attempt to modify an imaging cartridge or take it apart It cannot be refilled Do not touch the toner Keep the toner away from your eyes Do not dispose of used imaging cartridge or transfer unit in fire as they can explo...

Page 15: ...salty air or corrosive gases such as ammonia Avoid locations subject to extreme or rapid changes in temperature or humidity Be sure to keep consumable components out of the reach of children Do not leave jammed paper inside the printer This can cause the printer to overheat Avoid sharing outlets with other appliances Use only an outlet that meets the power requirements of this printer Important Sa...

Page 16: ...e connectors Each connector has only one correct orientation Inserting a connector in the wrong orientation may damage both devices connected by the cable If you use an extension cord make sure that the total of the ampere ratings on the products plugged into the extension cord does not exceed the extension cord ampere rating Unplug this printer from the wall outlet and refer servicing to a qualif...

Page 17: ...per inside of the printer This can cause the printer to overheat Never push objects of any kind through cabinet slots as they may touch dangerous voltage points or short out parts that could result in a risk of fire or electric shock Never spill liquid of any kind on the printer Except as specifically explained in the printer s documentation do not attempt to service this product yourself Adjust o...

Page 18: ...am The printer head unit is NOT A SERVICE ITEM therefore the printer head unit should not be opened under any circumstances An additional laser warning label is affixed to the inside of the printer Ozone safety Ozone emission Ozone gas is generated by laser printers as a by product of the printing process Ozone is produced only when the printer is printing Ozone exposure limit The recommended expo...

Page 19: ...m ventilation Long continuous printing together with any of the above Printer location The printer should be located so that the exhaust gases and heat generated are Not blown directly into the user s face Vented directly out of the building whenever possible Power On Off Cautions Do not turn off the printer After turning on the printer wait until Ready appears on the LCD panel While the Ready lig...

Page 20: ... need to install this guide from the Network Utilities CD ROM to your computer s hard disk before referring it Paper Jam Guide Provides you with solutions for paper jam problems about your printer you may need to refer to on a regular basis We recommend printing this guide and keeping it near the printer Font Guide Provides you with information on fonts used on the printer You need to copy this gu...

Page 21: ...SON AcuLaser C3800 User s Guide Printer Parts Front view a front cover cover A b control panel c output tray d latch on front cover cover A e USB Host interface f MP tray Multi Purpose tray g standard lower paper cassette g e f a c d b ...

Page 22: ...witch b stopper c controller option expanded aperture plate d interface cover e AC inlet f Ethernet interface connector g Type B interface card slot cover h USB interface connector Inside the printer a fuser unit b paper guide c transfer unit d imaging cartridges b h e d c g f a d c a b ...

Page 23: ...to receive and print data Off when the printer is not ready g Error light Red On or flashes when an error has occurred h Start Stop button When the printer is printing pressing this button stops the printing When the error light is flashing pressing this button clears the error and switches the printer to ready status i Data light Yellow On when print data is stored in the print buffer the section...

Page 24: ...d changing the pre installed RAM to a 512 MB RAM DIMM Note Make sure that the DIMM you purchase is compatible with EPSON products For details contact the store where you purchased this printer or an EPSON qualified service representative Consumable products The life of the following consumable products is monitored by the printer The printer lets you know when replacements are needed Product name ...

Page 25: ...nology Pre defined color settings in the printer driver The printer driver offers many pre defined settings for color printing allowing you to optimize print quality for various types of color documents For Windows see Making the print quality settings on page 47 for more information For Macintosh see Making the print quality settings on page 107 for more information Toner save mode To reduce the ...

Page 26: ...d SPL Shared Printer Language support allow the printer to switch between the PostScript mode and other emulations as print data is received at the printer PCL Emulation Mode The PCL Emulation mode provides you with the ability to print documents in the PCL6 5c printing language with this printer Secure direct printing with USB memory The printer can print files that are in a USB memory via a USB ...

Page 27: ...f paper The following explains the procedure for each type of printing Choose the appropriate one for your printing Double sided printing Duplex printing on page 51 Windows Duplex printing on page 128 Macintosh Lets you print on both sides of the paper Fit to page printing Resizing printouts on page 57 Windows Resizing printouts on page 111 Macintosh Lets you automatically enlarge or reduce the si...

Page 28: ... page 59 Windows Modifying the print layout on page 113 Macintosh Lets you print two or four pages on a single sheet Watermark printing Using a watermark on page 60 Windows Using a watermark on page 115 Macintosh Lets you print text or an image as a watermark on your printout For example you can put Confidential on an important document ...

Page 29: ... and footers on page 126 Macintosh Lets you print a header and footer on the top or bottom of the paper Overlay printing Using an overlay on page 64 Windows Lets you prepare standard forms or template on your printout that you can use as overlays when printing other documents Note The Overlay printing function is not available in the PostScript 3 mode XXXXX XXXXX ...

Page 30: ...form overlay function Using storage form overlay on page 68 Windows Web Page Printing EPSON Web To Page lets you make Web pages fit to your paper size when printing You can also see a preview before printing Note This software is for Windows only Install EPSON Web To Page from the printer software CD ROM to use this function Accessing EPSON Web To Page After you install EPSON Web To Page the menu ...

Page 31: ...you create files with an EPN extension that can be printed directly from USB memory To use this function see USB Memory Print Maker s online help To print directly from a USB Memory see Printing Directly from a USB Memory on page 206 Note This software is for Windows only To install USB Memory Print Maker click Custom Install on the printer software CD ROM ...

Page 32: ... 220 355 6 mm maximum Up to 150 sheets Total thick stack up to 15 mm Semi Thick paper Weight 81 to 105 g m A4 A5 B5 Letter LT Half Letter HLT Executive EXE Government Legal GLG Legal LGL Government Letter GLT Custom size paper 76 2 98 4 mm minimum 220 355 6 mm maximum Up to 15 mm thick stack Envelopes Weight 75 to 105 g m DL ISO B5 C5 Up to 15 mm thick stack Labels A4 Letter LT Up to 15 mm thick s...

Page 33: ...SON Color Laser Transparencies A4 Letter LT Up to 75 sheets Total thick stack up to 15 mm EPSON Color Laser Coated Paper Weight 103 g m A4 Up to 15 mm thick stack Paper Type Paper Size Capacity Plain paper Weight 60 to 105 g m A4 A5 B5 Letter LT Executive EXE Legal LGL Government Legal GLG Up to 550 sheets Total thick stack up to 59 4 mm EPSON Color Laser Paper Weight 82 g m A4 Paper Type Paper Si...

Page 34: ...e To specify a paper source manually specify the paper source you want to use in the Paper Source list For Macintosh Access the printer driver select Printer Settings from the drop down list and click the Basic Settings tab for Mac OS X or open the Basic Settings dialog box for Mac OS 9 Then select Auto Selection from the Paper Source list and click Print Note To specify a paper source manually sp...

Page 35: ... driver s Paper Size setting it can be fed only from the MP tray regardless of the printer driver s Paper Source setting You can change the priority of the MP tray by using the MP Mode setting in the control panel s Setup Menu For details see Setup Menu on page 175 Loading Paper This section describes how to load paper If you use special media such as transparencies or envelopes see also Printing ...

Page 36: ...the back side of previously printed paper use the MP tray The duplex printing cannot be used for this purpose Standard lower paper cassette and optional paper cassette unit The paper sizes and types supported by the optional paper cassette unit are the same as the standard lower cassette unit For more information see 550 sheet Paper Cassette Unit on page 33 The paper loading procedure is the same ...

Page 37: ...t until it stops Then lift up the front of the paper cassette and pull it out 2 Pitch the knob and slide the left and right paper guides to accommodate the paper you are loading 3 Pinch the knob and slide the guide to the position appropriate for the size of paper you want to load ...

Page 38: ...heets from sticking together fan a stack of paper Then tap the edge on a firm surface to line it up Note Straighten the paper before loading it If curled paper is loaded it may not feed correctly 5 Insert the stack into the paper cassette lining it up with both the front and left sides of the paper cassette with the printable surface up 6 Slide the paper guides to fit the paper you are loading ...

Page 39: ... size and type If you have installed and loaded paper into the optional paper cassette unit set the setting for the paper cassette that you are using Output tray The output tray is located on the top of the printer Since printouts are output face down this tray is also referred to as the face down tray Raise the stopper to prevent your printouts from slipping off the printer Note This tray can hol...

Page 40: ...shown below Make settings on the Basic Settings in the printer driver Note Select Plain Back on the Paper Type setting when you print on the back side of paper just after printing on the front side You can also make these settings on the Tray Menu in the control panel See Tray Menu on page 172 EPSON Color Laser Transparencies Epson recommends the use of EPSON Color Laser Transparencies Note Duplex...

Page 41: ...ncies Please note the following when handling this media Hold each sheet by its edges as oil from your fingers may transfer to the surface and damage the printable surface of the sheet The Epson logo appears on the printable side When loading transparencies in the MP tray insert the short edge first as shown below If transparencies are loaded incorrectly the message Check Transparency appears on t...

Page 42: ...appens load it one sheet at a time from the MP tray Envelopes The print quality of envelopes may be irregular because different parts of an envelope have different thicknesses Print one or two envelopes to check the print quality cCaution Do not use window envelopes The plastic on most window envelopes will melt when it comes into contact with the fuser Note Depending on the quality of envelopes t...

Page 43: ... on C5 or ISOB5 size envelopes load them with the short edge first When printing on DL size envelopes load them with the long edge first a C5 or ISO B5 b DL Do not use an envelope that has glue or tape on it Labels You can load up to 15 mm thickness of labels into the MP tray at a time However you may need to feed some labels one sheet at a time or load them manually Note Duplex printing is not av...

Page 44: ...s do not use those labels in your printer You may have to make the setting Thick for Paper Type in the Setup Menu When using especially thick labels set Paper Type to ExtraThk Thick paper and extra thick paper You can load thick paper 106 to 163 g m or extra thick paper 164 to 216 g m into the MP tray When loading thick or extra thick paper you should make paper settings as shown below Duplex prin...

Page 45: ... Setup dialog box 2 Select Custom Page Size from the Settings drop down list 3 Click New 4 Enter the setting s name and specify the paper size and then click OK 5 Click Save For Mac OS X 10 4 follow the steps bellow to save your custom paper size 1 Open the Page Setup dialog box 2 Select Manage Custom Sizes from the Page Size drop down list 3 Click 4 Double click Untitled and enter the setting s n...

Page 46: ...m so you should access the printer driver from your application to make sure that you get the result you want Note The printer driver s online help provides details on printer driver settings From the application To access the printer driver click the Print or Page Setup from the File menu You also need to click Setup Options Properties or a combination of these buttons Windows XP XP x64 Server 20...

Page 47: ...uality of printouts to favor speed or detail There are five quality modes for the color printing mode and three for the black and white printing mode When Automatic is selected on the Basic Settings tab the printer driver takes care of all detailed settings according to the color setting you select Print quality and color are the only settings you have to make You can change other settings such as...

Page 48: ...nt print quality may allow printing to proceed Using the predefined settings The predefined settings are provided to help you optimize print settings for a particular kind of printout such as presentation documents or images taken by a video or digital camera Follow the steps below to use the predefined settings 1 Click the Basic Settings tab 2 Select Advanced You will find the predefined settings...

Page 49: ...settings Customizing print settings If you need to change detailed settings make the settings manually Follow the steps below to customize your print settings 1 Click the Basic Settings tab 2 Click Advanced then click More Settings 3 Choose Color or Black as the Color setting then choose desired printing resolution with the Resolution slider bar Note This screen may vary depending on your operatin...

Page 50: ...t below of Automatic on the Basic Settings tab Note You cannot use a predefined setting name for your custom settings To delete a custom setting click Advanced click Save Settings on the Basic Settings tab select the setting in the Custom Settings dialog box then click Delete You cannot delete predefined settings If you change any setting in the More Settings dialog box when one of your custom set...

Page 51: ...t 1 Click the Basic Settings tab 2 Select the Duplex check box then select Left Top or Right as the Binding position Note The Duplex check box appears only when the Duplex Unit is recognized by the printer driver If you selected Update the Printer Option Automatically on the Optional Settings tab confirm that Duplex Print Unit is set to Installed If you selected Update the Printer Option Manually ...

Page 52: ...the Binding Method check box and make appropriate settings For details about each setting see online help 6 Click OK to apply the settings and return to the Basic Settings tab Doing duplex printing manually models without Duplex Unit only 1 Click the Basic Settings tab 2 Make sure that the Manual Feed check box is off Note The manual feed function is not available when using the manual duplex func...

Page 53: ...x Manual check box then select Left Top or Right as the binding position 4 Click Duplex Settings to open the Duplex Settings dialog box 5 Specify the Binding Margin for the front and back sides of the paper then select whether the front or back side of the paper is to be printed as the Start Page ...

Page 54: ...inting on one side reload the paper into the MP tray with the printed surface face up as shown below Then press the N Start Stop button Note Manual duplex printing may not be completed normally when printing a document for which the paper size orientation or paper source setting is set to change in the document When doing duplex printing manually with collate set on the printer driver the printing...

Page 55: ...the Consumables Info Settings dialog box that appears by clicking the Consumables Info Settings button on the Optional Settings tab Note The driver and EPSON Status Monitor use different methods to measure the amount of toner remaining in the cartridge Because of this the information that is displayed in EPSON Status Monitor and the Basic Settings tab might be different Use EPSON Status Monitor to...

Page 56: ...800 User s Guide Ordering Consumables To order consumables online click the Order Online button on the Basic Settings tab See Order Online on page 88 for details Note The Order Online button is not available when you open this screen from USB Memory Print Maker ...

Page 57: ...utput paper 1 Click the Advanced Layout tab 2 Select the Zoom Options check box then select the desired paper size from the Output Paper drop down list The page will be printed to fit on the paper you have selected 3 Select Upper Left to print reduced page image at upper left corner of the paper or Center to print reduced page image with centering for Location setting 4 Click OK to apply the setti...

Page 58: ...the Advanced Layout tab 2 Select the Zoom Options check box 3 Select the Zoom To check box then specify the magnification percentage in the box Note The percentage can be set between 50 and 200 in 1 increments 4 Click OK to apply the settings If necessary select the paper size to be printed from the Output Paper drop down list ...

Page 59: ...rder automatically resizing each page to fit the specified paper size You can also choose to print documents surrounded by a frame 1 Click the Advanced Layout tab 2 Select the Print Layout check box and the number of pages you want to print on one sheet of paper Then click More Settings The Print Layout Settings dialog box appears 3 Select the Page Order in which the pages are printed on each shee...

Page 60: ...ument On the Advanced Layout tab or Watermark dialog box you can select from a list of predefined watermarks or you can make an original watermark with text or a bitmap The Watermark dialog box also allows you to make a variety of detailed watermark settings For example you can select the size intensity and position of your watermark 1 Click the Advanced Layout tab 2 Select a watermark that you wa...

Page 61: ... the watermark in the foreground of the document or Back to print the watermark in the background of the document for the Position setting 5 Select the location on the page where you want to print the watermark from the Location drop down list 6 Adjust the X horizontal or Y vertical Offset position 7 Adjust the size of the watermark with the Size slider bar 8 Click OK to apply the settings and ret...

Page 62: ...g box also appears by clicking New Delete in the Watermark dialog box 3 Select Text or BMP and type a name for the new watermark in the Name box Note This screen appears when you select Text 4 If you select Text type the watermark text in the Text box If you select BMP click Browse select the BMP file you want to use then click OK 5 Click Save Your watermark will appear in the List box 6 Click OK ...

Page 63: ...te number 1 Click the Advanced Layout tab 2 Select the Header Footer check box then click Header Footer Settings 3 Select the items to be printed for the header and the footer from the drop down list Note If you select User Name or Computer Name from the drop down list the login account name or computer name is printed If you select Collate Number from the drop down list the number of copies is pr...

Page 64: ...rinting Mode in the Extended Settings dialog box from the Optional Settings tab Creating an overlay Follow the steps below to create and save a form overlay file 1 Open your application and create the file that you want to use as an overlay 2 When the file is ready to be saved as an overlay choose Print or Print Setup from the File menu of your application then click Printer Setup Options Properti...

Page 65: ... Data then click Settings The Form Settings dialog box appears 6 Select the Use Form Name check box then click Add Form Name The Add Form dialog box appears Note If the Assign to Paper Source check box is selected the form name is displayed in the Paper Source drop down list on the Basic Settings tab ...

Page 66: ...the Overlay Settings dialog box 12 Print the file saved as overlay data It is possible to save any kind of file as an overlay The overlay data is created Printing with an overlay Follow the steps below to print a document with overlay data 1 Open the file to print with overlay data 2 From the application access the printer driver Open the File menu choose Print or Print Setup then click Printer Se...

Page 67: ...ove 6 Click OK to print the data Different printer settings overlay data The overlay data is made with the current printer settings such as Orientation Portrait If you want to make the same overlay with different printer settings such as Landscape follow the instructions below 1 Re access the printer driver as described in step 2 in Creating an overlay on page 64 2 Make the printer settings and ex...

Page 68: ...g USB memories that have more than 2 GB of memory may take too long If a large numbers of files are in the USB memory accessing the USB memory may take too long If accessing the USB memory takes too long try formatting it to improve the access speed Register the form overlay data on the USB memory Only a network administrator using Windows XP XP x64 2000 Server 2003 or Server 2003 x64 is allowed t...

Page 69: ...Storage dialog box 10 Click OK to close the window Printing with storage form overlay All Windows users can use the registered form data on the USB memory Follow the steps below to print with storage form data 1 Click the Advanced Layout tab 2 Select the Form Overlay check box and click Overlay Settings The Overlay Settings dialog box appears 3 Select No Form name in the Form drop down list and cl...

Page 70: ...ime Environment has been installed 5 Select To Front or To Back to print the form data as foreground or background of the document then click OK to return to the Advanced Layout tab 6 Click OK to print data Delete the form overlay data on the USB memory Only a network administrator using Windows XP XP x64 2000 Server 2003 or Server 2003 x64 is allowed to delete or edit the form overlay data on the...

Page 71: ...ample print out of the form data enter the form name and click the Print Sample button You can use the Browse button if the printer is connected through a network Form names registered to the USB memory are displayed by clicking the Browse button 7 Click Back 8 Click OK to close the dialog box Making Extended Settings You can make various settings in the Extended Settings dialog box To open the di...

Page 72: ...ly from the printer s control panel Follow the instructions in this section to use the Reserve Job function Note You need to keep sufficient RAM disk capacity in order to use the Reserve Job function To enable RAM disk you have to set the RAM Disk setting on the control panel to Normal or Maximum We recommend installing an optional memory to use this function For instructions about increasing your...

Page 73: ...ings dialog box appears Note The Reserve Job Settings button is available only when the RAM Disk is recognized by the printer driver If you selected Update the Printer Option Automatically on the Optional Settings tab confirm that RAM Disk is set to Installed If you selected Update the Printer Option Manually on the Optional Settings tab click the Settings button and select the RAM Disk check box ...

Page 74: ...by the internal print server s IP address in a Web browser 6 Click OK The printer prints your document and stores the print job on the printer s memory To reprint or delete this data using the printer s control panel see Printing and Deleting Reserve Job Data on page 203 for instructions Verify Job The Verify Job option allows you to print one copy in order to verify the content before printing mu...

Page 75: ...e Reserve Job On check box then select Verify Job 5 Enter a user name and job name in the corresponding text boxes Note The OK button becomes available after both the user name and job name have been entered If you want to create a thumbnail of the first page of a job select the Create a thumbnail check box Thumbnails can be accessed by entering http followed by the internal print server s IP addr...

Page 76: ...you selected Update the Printer Option Automatically on the Optional Settings tab confirm that RAM Disk is set to Installed If you selected Update the Printer Option Manually on the Optional Settings tab click the Settings button and select the RAM Disk check box 3 Select the Reserve Job On check box then select Confidential Job 4 Enter a user name and job name in the corresponding text boxes 5 Se...

Page 77: ... install EPSON Status Monitor 1 Make sure that the printer is off and that Windows is running on your computer 2 Insert the printer software CD ROM in the CD ROM drive Note If the language selection window appears select your country If the Epson Installation Program screen does not appear automatically double click the My Computer icon right click the CD ROM icon click OPEN in the menu that appea...

Page 78: ...SON AcuLaser C3800 User s Guide 5 Click EPSON Status Monitor 6 In the dialog box that appears make sure that your printer s icon is selected and click OK 7 When the software license agreement screen appears read the statement and then click Accept ...

Page 79: ... appears Then click OK Note In the dialog box you can set the URL for the site where you can order consumables online See Order Online on page 88 for details Selecting your country or region allows you to change the settings of the URL When you click the Cancel button the Web site s URL does not appear but the EPSON Status Monitor installation continues 9 When the installation is complete click OK...

Page 80: ...age 83 Job Information on page 84 Notice Settings on page 86 Order Online on page 88 and Tray Icon Settings on page 89 Note for Windows XP XP x64 users EPSON Status Monitor is not available when printing from a Remote Desktop connection Note for Netware users When monitoring NetWare printers a Novell Client that corresponds to your operating system must be used Operation is confirmed for the versi...

Page 81: ...n the taskbar and selecting your printer name and About Simple Status The Simple Status window indicates printer status errors and warnings This window appears by right clicking the tray icon on the taskbar then selecting your printer name then clicking Simple Status This window also appears when errors occur according to the Pop up Notice you select in the Notice Settings dialog box If you wish t...

Page 82: ... Note You can see information about jobs or consumables by clicking on the respective tab a Icon Message The icon and message show the printer status b Printer image The image at the upper left shows the printer status graphically c Text box The text box next to the printer image displays the current status of the printer When a problem occurs the most probable solution is displayed d Close button...

Page 83: ...per Displays the paper size the paper type and the approximate amount of paper remaining in the paper source Information on the optional paper cassettes are displayed only if these options are installed The paper cassette icon flashes when the amount of paper remaining in the paper cassette is low b Toner Indicates the amount of remaining toner The toner icon flashes when a toner error occurs or t...

Page 84: ...ting The print job which is printed currently Completed Displays only your jobs that have finished printing Canceled Displays only your jobs that have been canceled printing Held Job is on hold c User Displays the user name d Computer Displays the name of the computer that sent the print job e Job Type Displays the job type The jobs are displayed as Verify Re Print and Confidential respectively Ab...

Page 85: ... only Environments When using the LPR connection in Windows XP XP x64 2000 Server 2003 or Server 2003 x64 When using the Standard TCP IP connection in Windows XP XP x64 2000 Server 2003 or Server 2003 x64 When using the EpsonNet Print TCP IP connection in Windows XP XP x64 Me 98 2000 Server 2003 or Server 2003 x64 Note You cannot use this function in the following situations When using an optional...

Page 86: ...tray icon on the taskbar then selecting your printer name then clicking Notice Settings The Notice Settings dialog box appears a Monitor the printer status check box When this check box is selected EPSON Status Monitor monitors the printer status during a print job is processed b More Settings button Displays the More Settings dialog box to set how to display the tray icon c Pop up Notice Sets the...

Page 87: ...dio button is selected the Order Online window appears automatically once a day when you start printing or display the status by accessing EPSON Status Monitor h Display only when a consumable first becomes low check box When this radio box is selected the Order Online window appears automatically only when a consumable first becomes low i More Settings button Displays the More Settings dialog box...

Page 88: ...er button Connects to the URL where you can place an order and find the dealer nearest you When you click this button a confirmation window asking if you wish to connect to the Web site appears If you do not want this window to appear select the Do not display the confirmation message before connecting check box in the More Settings dialog box The More Settings dialog box appears by clicking the M...

Page 89: ... printing job is being processed depends on the settings you select Follow the steps below to set the tray icon settings 1 Right click the tray icon on the taskbar then select Tray Icon Settings 2 Confirm that your printer is selected Select the menu you wish to display from the Information to display drop down list Then click OK Note You can also access EPSON Status Monitor by right clicking the ...

Page 90: ...mpatible with USB 1 1 USB 1 1 can be used as an interface USB 2 0 is applied for Windows XP XP x64 2000 Server 2003 and Server 2003 x64 operating systems If your operating system is Windows Me or 98 use USB 1 1 interface 1 Access the printer driver 2 For Windows Me or 98 click the Details tab For Windows XP XP x64 2000 Server 2003 or Server 2003 x64 click the Ports tab 3 For Windows Me or 98 selec...

Page 91: ...instructions below to cancel the printing Double click your printer s icon on the taskbar Select the job in the list then click Cancel from the Document menu After the last page is output the Ready green light on the printer turns on The current job is canceled Note You can also cancel the current print job that is sent from your computer by pressing the Cancel Job button on the printer s control ...

Page 92: ...ns 2 Click Start point to Settings then click Control Panel For Windows XP XP x64 Server 2003 or Server 2003 x64 click Start click Control Panel then click Add or Remove Programs 3 Double click the Add Remove Programs icon For Windows XP XP x64 Server 2003 or Server 2003 x64 click the Change or Remove Programs icon 4 Select EPSON Printer Software then click Add Remove For Windows XP XP x64 2000 Se...

Page 93: ...eck box for the printer software you want to uninstall is selected Note If you wish to uninstall only EPSON Status Monitor select the EPSON Status Monitor check box 7 To uninstall click OK Note You can uninstall EPSON Network Utility When the utility is uninstalled you cannot display the printer status from EPSON Status Monitor of other printers 8 Follow the on screen instructions ...

Page 94: ...ther Epson printers connected with a USB interface cable 1 Follow steps 1 through 3 of Uninstalling the printer driver on page 92 2 Select EPSON USB Printer Devices then click Add Remove Note EPSON USB Printer Devices appears only when the printer is connected to Windows Me or 98 with a USB interface cable If the USB device driver is not installed correctly EPSON USB Printer Devices may not appear...

Page 95: ... your printer as a shared printer on page 96 For Windows XP XP x64 2000 Server 2003 or Server 2003 x64 see Using an additional driver on page 97 Setting the clients For Windows Me or 98 see With Windows Me or 98 on page 100 For Windows XP XP x64 or 2000 see With Windows XP XP x64 or 2000 on page 102 Note When sharing the printer be sure to set EPSON Status Monitor so that the shared printer can be...

Page 96: ...er Click OK then follow the on screen instructions When the prompt to restart the computer appears restart the computer then continue with the settings 6 Double click the Printers icon on the control panel 7 Right click your printer s icon then click Sharing in the menu that appears 8 Select Shared As type the name in the Share Name box then click OK Type a Comment and Password if needed Note Do n...

Page 97: ...s Windows XP XP x64 2000 Server 2003 or Server 2003 x64 as the Administrators of the local machine 1 For a Windows 2000 print server click Start point to Settings then click Printers For a Windows XP XP x64 Server 2003 or Server 2003 x64 print server click Start point to Printers and Faxes 2 Right click your printer s icon then click Sharing in the menu that appears For Windows XP XP x64 Server 20...

Page 98: ...ame box Note Do not use spaces or hyphens for the Share name or an error may occur 4 Select the additional drivers Note If the computers of the server and clients use the same OS you do not have to install the additional drivers Just click OK after step3 On the Windows XP XP x64 2000 Server 2003 or Server 2003 x64 print server Click Additional Drivers Select Windows being used for clients then cli...

Page 99: ...XP x64 or Windows Sever 2003 x64 edition Do not select additional drivers other than the drivers listed in the above table The other additional drivers are not available Server Name Client OS Driver Windows 2000 Windows Me or 98 clients Intel Windows 95 or 98 Windows XP or 2000 clients Intel Windows 2000 Windows XP Windows Me or 98 clients Intel Windows 95 98 and Me Windows XP or 2000 clients Inte...

Page 100: ... for assistance This section describes how to install the printer driver by accessing the shared printer from the Printers folder You can also access the shared printer from Network Neighborhood or My Network on the Windows desktop You cannot use the additional driver on the server system OS When you want to use EPSON Status Monitor at a client you have to install EPSON Status Monitor from the CD ...

Page 101: ...the prompt to select the printer driver appears select the printer driver according to the message If the print server s OS is Windows Me or 98 or the additional driver for Windows Me or 98 is installed in the Windows XP XP x64 2000 Server 2003 or Server 2003 x64 print server go to the next step If the additional driver for Windows Me or 98 is not installed in the Windows XP XP x64 2000 Server 200...

Page 102: ...click Start point to Printers and Faxes 2 For Window 2000 double click the Add Printer icon then click Next For Windows XP or XP x64 click Add a printer in the Printer Tasks menu 3 For Windows 2000 select Network printer then click Next For Windows XP or XP x64 select A network printer or a printer attached to another computer then click Next 4 For Windows 2000 type the name of the shared printer ...

Page 103: ...sk the administrator of the network If the printer driver is installed in the client beforehand you need to select either the new printer driver or the current printer driver When the prompt to select the printer driver appears select the printer driver according to the message If the additional driver for Windows XP XP x64 or 2000 is installed in the Windows XP XP x64 2000 Server 2003 or Server 2...

Page 104: ...nt server s OS is Windows Me or 98 and the client s OS is Windows XP XP x64 or 2000 The on screen displays on the following pages may differ depending on the version of Windows OS Note When installing in Windows XP XP x64 or 2000 clients you must access Windows XP XP x64 or 2000 as the Administrator If the additional drivers are installed or the computers of the server and clients use the same OS ...

Page 105: ... Server 2003 or Server 2003 x64 Digital Signature is not found may appear Click Yes for Windows 2000 or Continue Anyway for Windows XP XP x64 Server 2003 or Server 2003 x64 and continue installing The folder name differs depending on the OS being used 3 Select the name of the printer click OK then follow the on screen instructions Client s OS Folder Name Windows Me or 98 Language WIN9X Windows 200...

Page 106: ...OSX 10 3 to 10 4 but you do not have to re install it for minor updates such as 10 3 1 to 10 3 2 Accessing the printer driver To control your printer and change its settings use the printer driver The printer driver allows you to easily make all the print settings including paper source paper size and orientation Mac OS X To access the printer driver register your printer in Printer Setup Utility ...

Page 107: ...detail There are three levels of print output Fast Fine and Super Fine Fine and Super Fine provide high quality precise printing but requires more memory and slows the printing speed When Automatic is selected on the Basic Settings tab the printer driver takes care of all detailed settings according to the color setting you select Color and resolution are the only settings you need to make You can...

Page 108: ...d settings The predefined settings are provided to help you optimize print settings for a particular kind of printout such as presentation documents or images taken by a video or digital camera Follow the steps below to use the predefined settings For Mac OS X users 1 Open the Print dialog box 2 Select Printer Settings from the drop down list and select the Basic Settings tab 3 Select Advanced You...

Page 109: ...own list in the Print dialog box for Mac OS X or in the current settings list on the left of the Basic Settings dialog box for Mac OS 9 Note The printer driver s online help provides details on printer driver settings Customizing print settings Your printer provides for customized print settings if you need more control over the printout want to make the most detailed settings available or just wa...

Page 110: ...x Note For details on each setting see the online help For Mac OS 9 users 1 Open the Basic Settings dialog box 2 Click Advanced then click More Settings The following dialog box appears 3 Choose Color or Black as the Color setting 4 Choose the desired printing resolution with the slider bar Note When making the other settings click the button for details on each setting 5 Click OK to apply the set...

Page 111: ...of Automatic in the Basic Settings dialog box Note To delete a custom setting select Advanced click Save Settings on the Basic Settings dialog box select the setting in the User Settings dialog box then click Delete You cannot delete predefined settings If you change any setting in the Advanced Settings dialog box when one of your custom settings is selected in the Advanced Settings list on the Ba...

Page 112: ...ling settings are a standard feature of Mac OS X 10 4 For Mac OS 9 users Note The enlarging or reducing rate is automatically specified according to the paper size selected in the Paper Setting dialog box 1 Click the Layout icon on the Basic Settings dialog box The Layout dialog box appears 2 Select the Fit to Page check box then select the desired paper size from the Output Paper drop down list T...

Page 113: ...ly resizing each page to fit the specified paper size by using Layout printing You can also choose to print documents surrounded by a frame For Mac OS X users 1 Open the Print dialog box 2 Select Layout from the drop down list 3 Select the number of pages you want to print on one sheet of paper from the drop down list 4 Click Print to start printing Note The Layout settings are a standard feature ...

Page 114: ...t Layout Setting dialog box appears 3 Select the number of pages you want to print on one sheet of paper 4 Select the page order in which the pages are printed on each sheet Note Page Order choices depend on Pages selected above and Orientation 5 Click OK to apply the settings and return to the Layout dialog box 6 Select the Print the Frame check box on the Layout dialog box when you want to print...

Page 115: ...elect a bitmap PICT file or text file as your own custom watermark The Layout dialog box also allows you to make a variety of detailed watermark settings For example you can select the size intensity and position of your watermark For Mac OS X users 1 Open the Print dialog box 2 Select Printer Settings from the drop down list and select the Basic Settings tab 3 Click Stamp Function 4 Select the Wa...

Page 116: ...rotate custom text watermarks by inputting the degrees in the Angle box Or select the Rotate by mouse check box then rotate the text watermark with the pointer on the preview window 9 Click OK to apply the settings For Mac OS 9 users 1 Click the Layout icon on the Basic Settings dialog box The Layout dialog box appears 2 Select the Watermark Settings check box then select a watermark from the Wate...

Page 117: ... Angle box Or select the Rotate by mouse check box then rotate the text watermark with the pointer on the preview window 6 Click OK to apply the settings Making a new watermark You can make a new text or bitmap watermark with the following procedures To make a text watermark For Mac OS X users 1 Open the Print dialog box 2 Select Printer Settings from the drop down list and select the Basic Settin...

Page 118: ...he Printer Software with Macintosh 118 EPSON AcuLaser C3800 User s Guide 4 Select the Watermark check box then click Watermark Settings 5 Click New Delete 6 Click Add Text on the User Stamp Setting dialog box ...

Page 119: ...file name in the Watermark box then click Save Note To edit the saved text watermark select it from the List box then click Edit Text After editing be sure to click OK to close the dialog box To remove the saved text watermark select it from the List box then click Mark Delete After removing it be sure to click Save to close the dialog box 9 Select a custom watermark that has been saved from the W...

Page 120: ...he Basic Settings dialog box The Layout dialog box appears 2 Select the Watermark Settings check box then click New Delete The Custom Watermark dialog box appears 3 Click Add Text on the Custom Watermark dialog box 4 Type the watermark text in the Text box select the Font and Style then click OK on the Text Watermark dialog box ...

Page 121: ...it from the List box then click Edit Text After editing be sure to click OK to close the dialog box To remove the saved text watermark select it from the List box then click Delete After removing it be sure to click Save to close the dialog box 6 Select a custom watermark that has been saved from the Watermark drop down list on the Watermark Setting dialog box and then click OK ...

Page 122: ... watermark Before making a custom watermark you should prepare a bitmap PICT file For Mac OS X users 1 Open the Print dialog box 2 Select Printer Settings from the drop down list and select the Basic Settings tab 3 Click Stamp Function 4 Select the Watermark check box then click Watermark Settings ...

Page 123: ...Using the Printer Software with Macintosh 123 EPSON AcuLaser C3800 User s Guide 5 Click New Delete 6 Click Add PICT on the User Stamp Setting dialog box 7 Select the PICT file then click Open ...

Page 124: ... click Mark Delete After removing it be sure to click Save to close the dialog box 9 Select the saved custom watermark from the Watermark drop down list on the Watermark Setting dialog box then click OK For Mac OS 9 users 1 Click the Layout icon on the Basic Settings dialog box The Layout dialog box appears 2 Select the Watermark Settings check box then click New Delete The Custom Watermark dialog...

Page 125: ...ct the PICT file then click Open 5 Type the file name in the Name box then click Save Note To remove the saved watermark select it from the List box then click Delete After removing it be sure to click Save to close the dialog box 6 Select the saved custom watermark from the Watermark drop down list on the Layout dialog box then click OK ...

Page 126: ...bottom of a page The items that can be printed as a header or footer include user name computer name date date time or collate number For Mac OS X users 1 Open the Print dialog box 2 Select Printer Settings from the drop down list and select Basic Settings tab 3 Click Stamp Function 4 Select the Header Footer check box then click Header Footer Settings ...

Page 127: ...ou select Collate Number from the drop down list the number of copies is printed 6 Click OK to apply the settings For Mac OS 9 users 1 Click the Layout icon on the Basic Settings dialog box The Layout dialog box appears 2 Select the Header Footer check box then click Header Footer Settings 3 Select the items to be printed for the header and the footer from the drop down list ...

Page 128: ...ding edge can be specified as required to produce the desired page order Printing with the Duplex Unit models with Duplex Unit only Follow the steps below to print with the Duplex Unit For Mac OS X users 1 Open the Print dialog box 2 Select Printer Settings from the drop down list and select Basic Settings tab 3 Click Duplex check box select a Binding position from Left Top or Right 4 Click the Du...

Page 129: ...Specify the Binding Margin for the front and back sides of the paper 6 Select whether the front or back side of the paper is to be printed as the Start Page 7 Click OK to apply the settings and return to the Layout dialog box Doing duplex printing manually models without Duplex Unit only For Mac OS X users 1 Open the Print dialog box 2 Select Printer Settings from the drop down list and select the...

Page 130: ...de reload the paper into the MP tray with the printed surface face up as shown below Then press the N Start Stop button Note Straighten the paper before loading it If curled paper is loaded it may not feed correctly For Mac OS 9 users 1 Click the Layout icon on the Basic Settings dialog box The Layout dialog box appears 2 Select the Duplex Manual check box then click Duplex Settings 3 Select a Bin...

Page 131: ... of the paper is to be printed as the Start Page 7 Click OK to apply the settings and return to the Layout dialog box 8 Click Print to start printing 9 After printing on one side reload the paper into the MP tray with the printed surface face up as shown below Then press the N Start Stop button Note Straighten the paper before loading it If curled paper is loaded it may not feed correctly ...

Page 132: ... driver settings Printing a status sheet To confirm the current status of the printer print a status sheet from the printer driver The status sheet contains information about the printer the current settings Follow the steps below to print a status sheet 1 Select Chooser from the Apple menu Click the icon of your printer and then select the USB port that your printer is connected to Click Setup an...

Page 133: ...ion is described in detail later in this section Jobs stored on the printer s memory are handled differently depending on the Reserve Job option Refer to the tables below for details Reserve Job Option Description Re Print Job Lets you print the job now and store it for later reprinting Verify Job Lets you print one copy now to verify the content before printing multiple copies Confidential Job Le...

Page 134: ...ntly printing so that you can reprint it later directly from the control panel Follow the steps below to use the Re Print Job option For Mac OS X users 1 Open the Print dialog box and select Printer Settings from the drop down list then click the Basic Settings tab 2 Click the Reserve Job button 3 Select the Reserve Job On check box then select Re Print Job ...

Page 135: ...hen select Re Print Job 3 Enter a user name and job name in the corresponding text boxes Note If you want to create a thumbnail of the first page of a job select the Create a thumbnail check box Thumbnails can be accessed by entering http followed by the internal print server s IP address in a Web browser 4 Click OK The printer prints your document then stores the print job on the printer s memory...

Page 136: ... document and stores the print job data on the printer s memory For Mac OS 9 users 1 Specify the number of copies to be printed then make other printer driver settings as appropriate for your document 2 Open the Basic Settings dialog box then click the Reserve Job icon The Reserve Job Settings dialog box appears 3 Select the Reserve Job On check box then select Verify Job 4 Enter a user name and j...

Page 137: ...e printer s memory Follow the steps below to store print data using the Confidential Job option For Mac OS X users 1 Open the Print dialog box and select Printer Settings from the drop down list then click the Basic Settings tab 2 Click the Reserve Job button The Reserve Job dialog box appears 3 Select the Reserve Job On check box then select Confidential Job 4 Enter a user name and job name in th...

Page 138: ...dialog box then click the Reserve Job icon The Reserve Job Settings dialog box appears 2 Select the Reserve Job On check box then select Confidential Job 3 Enter a user name and job name in the corresponding text boxes Note The OK button becomes available after both the user name and job name have been entered 4 Set the password for the job by entering a four digit number in the password text box ...

Page 139: ...3 and 10 4 or Configure for Mac OS X 10 2 or below icon in the Printer List dialog box Note You can also access EPSON Status Monitor by clicking the EPSON Status Monitor icon in the Dock For Mac OS 9 users You can access EPSON Status Monitor by selecting the EPSON Status Monitor alias from the Apple menu Note The appropriate printer port must already be selected in the Chooser so that necessary in...

Page 140: ...f error has occurred and offers you a possible solution The window closes automatically once the problem is cleared This window will appear according to the Pop up Notice you select in the Notice Settings dialog box Note The Simple Status window does not appear automatically while the Status tab in the Detailed Status dialog box is displayed Detailed Status You can monitor detailed printer status ...

Page 141: ...e printer image displays the current status of the printer When a problem occurs the most probable solution is displayed d Close button Clicking this button closes the dialog box a Paper Displays the paper size the paper type and the approximate amount of paper remaining in the paper source Information on the optional paper cassettes are displayed only if these options are installed The paper cass...

Page 142: ...pooled Deleting The print job which is being deleted Printing The print job which is printed currently Completed Displays only your jobs that have finished printing Canceled Displays only your jobs that have been canceled printing Held Job is on hold c User Displays the user name d Computer Displays the name of the computer that sent the print job e Job Type Displays the job type When the Reserve ...

Page 143: ...licking this button closes the dialog box h Print button Display the dialog box to print the held status job i Refresh button Clicking this button refreshes the information on this menu j Display settings button Displays the Display settings dialog box to select items to be displayed a Printer drop down list Mac OS X only Select your printer from the drop down list b Monitor the printer status che...

Page 144: ...older on your hard drive then open the Utilities folder and double click the Printer Setup Utility for Mac OS X 10 3 and 10 4 or Print Center for Mac OS X 10 2 or below icon 2 Click Add Printer in the Printer List dialog box 3 Select EPSON USB from the pop up menu Select your printer icon in the Product list then click Add 4 Close Printer Setup Utility for Mac OS X 10 3 and 10 4 or Print Center fo...

Page 145: ...jobs When background printing is on you can use your Macintosh while it is preparing a document for printing 3 Close Chooser Canceling Printing If the printouts are not what you expected and display incorrect or garbled characters or images you may need to cancel printing When a print job continues on the computer follow the instruction below to cancel printing For Mac OS X users Open Printer Setu...

Page 146: ...ur computer by pressing the Cancel Job button on the printer s control panel When canceling the print job be careful not to cancel print sent by other users Uninstalling the Printer Software When you wish to reinstall or upgrade the printer driver be sure to uninstall the current printer software beforehand For Mac OS X users 1 Quit all applications on the computer 2 Insert the EPSON printer softw...

Page 147: ...he upper left then click Uninstall Follow the on screen instructions Sharing the Printer on a Network Sharing the printer This section describes how to share the printer on an AppleTalk network The computers on the network can share the printer that is directly connected to one of them The computer that is directly connected to the printer is the print server and the other computers are the client...

Page 148: ...Chooser from the Apple menu then click your printer s icon Select USB port or FireWire port in the Select a printer port box on the right then click Setup The Printer Setup dialog box appears Note Make sure On is selected under Background Printing 3 Under Printer Sharing Set Up click Printer Sharing Setup 4 The Printer Sharing dialog box appears Select the Share this Printer check box then type th...

Page 149: ...then select the name of the shared printer in the Select a printer port box on the right You can only select from the printers connected to your current AppleTalk zone Note Make sure On is selected under Background Printing 3 Click Setup enter the password for the printer then click OK The Printer Setup dialog box appears Under Printer Sharing Set Up click Shared Printer Information 4 The followin...

Page 150: ... meet your printing needs System requirements Your computer must meet the following system requirements to be able to use the Adobe PostScript 3 printer driver For Windows To use the Adobe PostScript 3 printer driver your computer must be running Microsoft Windows XP XP x64 Me 98 or 2000 See the following table for details Windows XP XP x64 or 2000 There are no restrictions for these systems Windo...

Page 151: ...n the PS3 Menu on the control panel If you use the printer with a local connection you cannot use binary data Mac OS 9 Note To use binary data Epson recommends that you use AppleTalk for the printer s network connection If you use a local connection or a protocol other than AppleTalk for the network connection you cannot use binary data cCaution The Adobe PostScript 3 printer driver cannot be used...

Page 152: ...ver and the Adobe PS driver for Epson printers with a USB connection have already been installed on your computer skip the step 3 to 6 in the installation procedure below If you have not installed an Epson USB printer driver on your computer follow all the steps below Installing the printer software for Windows XP XP x64 or 2000 may require administrator privileges If you have problems ask your ad...

Page 153: ...ocal printer then click Next Note For Windows XP XP x64 or 2000 do not select the Automatically detect and install my Plug and Play printer check box 10 Select USB as the port the printer is connected to then click Next 11 Click Have Disk and specify the following path for the CD ROM If your CD ROM drive is D the path will be D ADOBEPS ENGLISH Folder Name PS_SETUP Then click OK Note Change the dri...

Page 154: ...and click Add a printer in the Printer Tasks menu For Windows 2000 click Start point to Settings and click Printers Then double click the Add Printer icon 3 The Add Printer Wizard appears Then click Next 4 Select Local printer then click Next Note Do not select the Automatically detect and install my Plug and Play printer check box 5 Select the Create a new port check box and select Standard TCP I...

Page 155: ...ny Windows applications override the setting made when the printer driver is accessed from the operating system so you should access the printer driver from your application to make sure that you get the result you want From the application To access the printer driver click the Print or Page Setup from the File menu You also need to click Setup Options Properties or a combination of these buttons...

Page 156: ...alk protocol Use SelecType to set the Emulation Mode Network item to PS3 Using the default Auto setting will cause an extra unneeded page to be printed On the Device Settings sheet of the printer s Properties dialog box make sure that SEND CTRL D Before Each Job and SEND CTRL D After Each Job are set to No TBCP Tagged binary communications protocol cannot be used as the Output Protocol setting On ...

Page 157: ...d 10 4 if the Authenticate window appears enter the user name and password for an administrator 6 When installation is done click Close For Mac OS 9 users 1 Insert the printer software CD ROM into your CD ROM drive 2 Double click the CD ROM icon 3 Double click Mac OS 9 then double click English 4 Double click AdobePS 8 7 and double click AdobePS Installer Then follow the on screen instructions 5 S...

Page 158: ...he actual setting name varies by application but is often called Encoding or Data 1 Open the AdobePS Components folder in your hard disk then double click the Desktop Printer Utility 2 The New Desktop Printer dialog box appears Select AdobePS from the With pop up menu click Printer USB in the Create Desktop list then click OK 3 Click Change in USB Printer Selection 4 The USB Printer dialog box app...

Page 159: ... sure to select AppleTalk Do not select EPSON AppleTalk because it cannot be used with the PostScript 3 printer driver Note for IP Printing users Make sure to select IP Printing Do not select EPSON TCP IP because it cannot be used with the PostScript 3 printer driver After selecting IP Printing enter the IP address for the printer then make sure to select the Use default queue on server check box ...

Page 160: ...he Printer List Then quit Printer Setup Utility for Mac OS X 10 3 and 10 4 or Print Center for Mac OS X 10 2 For Mac OS 9 users Follow the steps below to select the printer 1 Select Chooser from the Apple menu 2 Make sure that AppleTalk is active 3 Click the AdobePS icon and select the network to be used in the AppleTalk Zone box Your printer appears in the Select a PostScript Printer box Note By ...

Page 161: ...tScript printer settings in the PostScript printer driver Balloon help is available to help you with the printer driver settings Using Balloon Help Follow the steps below to use Balloon Help 1 Click the Help menu then select Show Balloons 2 Place your cursor over the item that you need help with Information on that item is displayed inside a floating balloon Changing the printer setup settings You...

Page 162: ... list 3 Select Show Info from the Printers menu The Printer Info dialog box appears 4 Make necessary changes to the settings then close the dialog box 5 Quit Printer Setup Utility for Mac OS X 10 3 and 10 4 or Print Center for Mac OS X 10 2 For Mac OS 9 users Follow the steps below to change the settings 1 Access the printer driver 2 Click the Printing menu then select Change Setup 3 Change the se...

Page 163: ... on the specifics of the job being printed System requirements Your computer must meet the following system requirements to be able to use the PCL6 PCL5 printer driver To use the PCL6 PCL5 printer driver your computer must be running Microsoft Windows XP or have installed the 2000 Service Pack 3 or later For Windows XP or 2000 Minimum memory Recommended memory 128 MB for a simple print job at 600 ...

Page 164: ...ver Consult the customer support in your region regarding how to get the printer driver Note The PCL6 PCL5 printer driver and EPSON Status Monitor cannot be used at the same time Minimum Recommended Computer IBM PC series or IBM compatible with Intel EM64T or AMD 64 CPU Hard Disk 10 25 MB free for driver installation Memory 256 MB 512 MB Display Super VGA supporting 640 480 Super VGA supporting 80...

Page 165: ...ade from the printer driver and do not need to be made using the control panel In fact printer driver settings override settings made using the control panel so use the control panel menus only to make settings you cannot make in your software or printer driver including the following Changing the emulation modes and selecting the IES Intelligent Emulation Switching mode Specifying a channel and c...

Page 166: ...setting and return to the previous level Press the l Back button to return to the previous level without changing the setting Note You need to turn the printer off and then on to activate some settings For details see Control Panel Menus on page 166 6 Press the N Start Stop button to exit the control panel menus Control Panel Menus Press the u Up and d Down buttons to scroll through the menus The ...

Page 167: ...tting is set to On Status Sheet AUX Status Sheet Prints a sheet showing the current printer settings and installed options These sheets can be useful to confirm whether options have been installed correctly Toner Check Sheet Prints a sheet showing the printing patterns using the currently installed imaging cartridges Item Settings default in bold Status Sheet Toner Check Sheet Reserve Job List 1 F...

Page 168: ...nts a sheet showing information about the PS3 mode such as the PS3 version PS3 Font List PCL Font Sample ESCP2 Font Sample FX Font Sample I239X Font Sample Prints a sample of the fonts available for your selected printer emulation Cyan C Toner Magenta M Toner Yellow Y Toner Black K Toner Transfer Fuser Displays the amount of toner left in the imaging cartridges as shown below Total Pages Displays ...

Page 169: ...r is turned off 3 Available only for the models with Duplex Unit Print Start Prints an index of the files Page Size Specifies the paper size for printing the index Duplex Specifies the duplex setting for printing the index When Duplex Long is selected duplex printing is done with long edge binding When Duplex Short is selected duplex printing is done with short edge binding Document Print Menu Thi...

Page 170: ...s with Duplex Unit 4 Available only for EPN and PDF files File Select Select a file to print Print Start Prints the selected file Copies Designates the number of copies to be printed from 1 through 999 Page Size Specifies the paper size for the document printing If Auto is selected the paper size is determined based on the size of the first page that is printed Duplex Specifies the duplex setting ...

Page 171: ...lect files to print Print Start Prints the selected files Copies Designates the number of copies to be printed from 1 through 999 Page Size Specifies the paper size for the image printing Layout Config Specifies the print layout This setting enables you to print multiple pages onto a single page Duplex Specifies the duplex setting for the document printing When Duplex Long is selected duplex print...

Page 172: ...ing to the country of purchase 2 Available only when the optional paper cassette unit is installed MP Tray Size Select your paper size from this menu Cassette 1 Size Cassette 2 Size Displays the paper size loaded in the standard and optional paper cassettes MP Type Lets you set the paper type loaded in the MP tray Cassette 1 Type Cassette 2 Type Lets you select the paper type loaded in the standar...

Page 173: ...er to make these settings whenever you can since settings made on your computer always override these settings 1 Default setting varies according to the country of purchase 2 Custom size paper is 76 2 98 4 mm at the minimum and 220 355 6 mm at the maximum but EPSON recommends printing on paper that is not wider than 215 9 mm 3 Not available in PS3 mode 4 Not available in PS3 and PCL mode Item Sett...

Page 174: ...ters The characters are outlined in full black on the right and lower edges Image Optimum When this mode is on the quality of graphics is reduced It reduces the amount of graphics data when the data reaches the memory limit allowing complex documents to be printed Top Offset Makes fine adjustments to the vertical printing position of the page cCaution Make sure that the printed image does not exte...

Page 175: ...ror handling You can also use this menu to select the LCD panel display language Item Settings default in bold Language English Français Deutsch Italiano ESPAÑOL SVENSKA Dansk Nederlands SUOMI Português Norsk Time to Sleep 5 15 30 60 120 Min Time Out 0 5 to 60 to 300 in increments of 1 Paper Source Auto MP Cassette 1 Cassette 2 1 MP Mode Normal Last Manual Feed Off 1st page Each Page Copies 1 to 9...

Page 176: ...aces are being switched automatically The time before a time out occurs is the length of time from the point when no data is being received from an interface until the point of switching the interface If the printer has a print job when switching the interface the printer prints the print job Paper Source Specifies whether paper feeds into the printer from the MP tray or the optional paper cassett...

Page 177: ...ts the printing speed according to this setting The printing speed is reduced when Thick Extra Thk or Trnsprnc is selected Page Side Select Front when printing on the front of plain paper Plain semi thick paper Semi Thick or thick paper Thick Select Back when printing on the back of plain paper Plain Back semi thick paper Semi Thick Back or thick paper Thick Back Skip Blank Page Enables you to ski...

Page 178: ...mory reserved for processing data so your computer may take longer to send the print job but it will allow you to print complex jobs Page Protect usually works best when Auto is selected You will need to increase your printer s memory if memory errors continue to occur Note Changing the Page Protect setting reconfigures the printer s memory which causes any downloaded fonts to be deleted Convert t...

Page 179: ...Clears all warning messages that appear on the LCD panel Reset Stops printing and clears the current job received from the active interface You may want to reset the printer when there is a problem with the print job itself and the printer cannot print successfully Reset All Stops printing clears the printer memory and restores the printer settings to their default values The print jobs received f...

Page 180: ...ation between the printer and the computer when using the USB interface 1 After this item is changed the setting value takes effect after a warm boot or after the power is turned on again While it is reflected in the Status Sheet and EJL read back the actual change takes effect after a warm boot or after the power is turned on again 2 Available only when USB I F is set to On 3 Available only when ...

Page 181: ...ting data If Maximum is selected more memory is allocated for receiving data If set to Minimum is selected more memory is allocated for printing data Note To activate Buffer Size settings you must turn off the printer for more than five seconds then turn it back on Or you can perform a Reset All operation as explained in Reset Menu on page 179 Resetting the printer erases all print jobs Make sure ...

Page 182: ...ble only when downloaded fonts are available 2 Available only when the optional font ROM module is installed 3 Depending on the font that has been selected 4 Depending on whether Letter 60 or A4 64 paper has been selected Item Settings default in bold FontSource Resident Download 1 ROM A 2 Font Number 0 65535 depending on your settings Pitch 3 0 44 10 00 99 99 cpi in 0 01 cpi increment Height 3 4 ...

Page 183: ...set If the font you selected in Font Source and Font Number is not available in the new SymSet setting the Font Source and the Font Number settings are automatically replaced with the default value IBM US Form Selects the number of lines for the selected paper size and orientation This also causes a line spacing VMI change and the new VMI value is stored in the printer This means that later change...

Page 184: ...ression when On is selected Lossy compression refers to a data compression technique in which some amount of data is lost Binary Specifies the data format Select On for the Binary data and select Off for the ASCII data Note Binary can only be used with network connection You do not have to select On when using AppleTalk To use the Binary data make sure your application supports Binary data and tha...

Page 185: ... Changes the password Enter the old password first and then enter the new password twice To enter the password press the d Down or u Up button to select the character and press the Enter button to determine the character After all characters are determined select and press the Enter button Limitation Changes the restriction range When Interface is selected the password is required to change the se...

Page 186: ...Orator S Sans H Script OCR A OCR B Pitch 10 12 15 cpi Prop Condensed Off On T Margin 0 40 0 50 1 50 inches in 0 05 inch increments Text 1 62 66 81 lines CGTable PcUSA Italic PcMultilin PcPortugue PcCanFrenc PcNordic PcTurkish2 PcIcelandic PcE Europe BpBRASCII BpAbicomp Roman 8 PcEur858 ISO Latin1 8859 15ISO PcSI437 PcTurkish1 8859 9 ISO Mazowia CodeMJK PcGk437 PcGk851 PcGk869 8859 7 ISO PcCy855 Pc...

Page 187: ... characters in each country s symbol set Auto CR Specifies whether the printer performs a carriage return line feed CR LF operation whenever the printing position goes beyond the right margin If you select Off the printer does not print any characters beyond the right margin and does not perform any line wrapping until it receives a carriage return character This function is handled automatically ...

Page 188: ...can also choose proportional spacing Condensed Turns condensed printing on or off Item Settings default in bold Font Courier Prestige Roman Sans serif Script Orator S Pitch 10 12 15 cpi Prop Condensed Off On T Margin 0 40 0 50 1 50 inches in 0 05 inch increments Text 1 62 66 81 lines CGTable PcUSA Italic PcMultilin PcPortugue PcCanFrenc PcNordic PcTurkish2 PcIcelandic PcE Europe BpBRASCII BpAbicom...

Page 189: ... characters in each country s symbol set Auto CR Specifies whether the printer performs a carriage return line feed CR LF operation whenever the printing position goes beyond the right margin If you select Off the printer does not print any characters beyond the right margin and does not perform any line wrapping until it receives a carriage return character This function is handled automatically ...

Page 190: ...g of the font in fixed pitch measured in cpi characters per inch You can also choose proportional spacing Code Page Selects the character tables Character tables contain the characters and symbols used by different languages The printer prints text based on the selected character table Item Settings default in bold Font Courier Prestige Gothic Orator Script Presentor Sans serif Pitch 10 12 15 17 2...

Page 191: ... return character This function is handled automatically by most applications Auto LF If you select Off the printer does not send an automatic line feed LF command with each carriage return CR If On is selected a line feed command is sent with each carriage return Select On if your text lines overlap Alt Graphics Turns the Alternate Graphics option on or off Bit Image The printer is able to emulat...

Page 192: ...ff the printer Cancel All Print Job The printer is canceling all print jobs in the printer memory including jobs the printer is currently receiving or printing This message appears when the Cancel Job button has been pressed down for more than 2 seconds Cancel Print Job The printer is canceling the current print job This message appears when the Cancel Job button has been pressed and released with...

Page 193: ... transparencies when the Paper Type setting in the printer driver is Transparency or transparencies are loaded when the Paper Setting in the printer driver is not set to Transparency Completely blank pages are output To clear the error see Transparencies are output blank from the MP tray on page 262 Check Paper Size The paper size setting is different from the size of paper loaded in the printer C...

Page 194: ...rinter prints only on the front and ejects the paper To clear this error follow the instructions below If Off is selected as the Auto Cont setting on the control panel s Setup Menu press the N Start Stop button to print on the back of the next sheet or press the Cancel Job button to cancel the print job If On is selected as the Auto Cont setting on the control panel s Setup Menu printing continues...

Page 195: ...control panel s Reset Menu See How to access the control panel menus on page 165 for instructions Turn the Image Optimum setting off on the control panel s Printing Menu if you do not want the printer to automatically lower the print quality to continue printing You may need to increase the amount of printer memory to be able to print at the desired print quality for your document For more informa...

Page 196: ...ors Cyan Magenta Yellow and Black respectively Install the indicated cartridges See Imaging Cartridge on page 228 Invalid AUX I F Card This message means that the printer cannot communicate with the installed optional interface card Turn off the printer remove the card then reinstall it Invalid Data The spool file on the driver is deleted while printing or the data is abnormal Press the N Start St...

Page 197: ...Network utility Refer to Password Config Menu on page 185 or the Network Guide for information Need Memory The printer has insufficient memory to complete the current print job To clear this error message select Clear Warning from the control panel s Reset Menu See How to access the control panel menus on page 165 for instructions To prevent this problem from happening again add more memory to you...

Page 198: ... memory module may be corrupted or incorrect Replace it with a new one Paper Jam WWWW The location where the paper jam occurred is displayed at WWWWW WWWWW indicates the location of the error If a paper jam occurs at two or more locations simultaneously the corresponding multiple locations are displayed Location Description Paper Jam MP C1 A Paper is jammed at the MP tray or standard paper cassett...

Page 199: ...or details Please wait for print Printing cannot start because the previous job is being processed Try again after a few seconds Printer Open The front cover is open To clear this error close the front cover Print Overrun The required time to process the print data exceeded the print engine speed because the current page is too complex Press the N Start Stop button to resume printing or press the ...

Page 200: ...u can cancel the print job by pressing the Cancel Job button Replace Transfer Unit The transfer unit has reached the end of its service life and needs to be replaced When the error light turns on you cannot continue printing Turn off the printer then replace the transfer unit with a new one See Transfer Unit on page 238 for instructions The error clears automatically after you replace the unit and...

Page 201: ...ation Service Req Cffff Service Req Exxx A controller error or a print engine error has been detected Turn off the printer Wait at least 5 seconds then turn it back on If the error message still appears write down the error number listed on the LCD panel Cffff Exxx turn off the printer unplug the power cord then contact a qualified service representative Sleep The printer is currently in the power...

Page 202: ...rning message and continue printing select Clear All Warnings from the control panel s Reset Menu For instruction about accessing the control panel menus see How to access the control panel menus on page 165 Worn Transfer Unit This message warns you that the transfer unit is near the end of its service life You can continue to print until the Replace TransferUnit message appears Prepare a new tran...

Page 203: ...tion To enable RAM disk you have to set the RAM Disk setting on the control panel to Normal or Maximum We recommend installing an optional memory to use this function For instructions about increasing your printer s memory see Installing a memory module on page 220 Using the Quick Print Job Menu Follow the steps below to print or delete Re Print Job and Verify Job data 1 Make sure the LCD panel di...

Page 204: ...n 4 Enter your four digit password by using the corresponding buttons as shown below Note Passwords are always four digits Passwords consist of numbers from 1 through 4 If no print jobs have been saved with the password you entered Wrong Password appears briefly on the LCD panel then the printer exits the control panel menus Confirm the password and try again 5 Use the d Down or u Up button to scr...

Page 205: ... shows Ready or Sleep 2 Press the Enter button three times The printer prints a status sheet 3 Confirm that the information about the installed options is correct If the options are installed correctly they appear under Hardware Configurations If the options are not listed try reinstalling them Note If the status sheet does not list your installed options correctly make sure that they are securely...

Page 206: ...twork Note If the USB Host setting on the control panel is set to OFF this function cannot be used Confirm the setting is set to ON in advance If the printer is in the sleep mode the USB memory may not be detected automatically In that case press any button on the control panel We recommend using a USB memory that has less than 2 GB of memory Accessing USB memories that have more than 2 GB of memo...

Page 207: ...Print File is displayed on the control panel printable files were not detected in the USB memory 2 Press the d Down button several times to select Index Print menu then press the Enter button 3 Confirm that Print Start is selected and press the Enter button to start printing Note You can change the settings such as paper size before starting printing See Index Print Menu on page 169 for details ab...

Page 208: ...select the file then press the Enter button 5 Press the d Down button to select Print Start then press the Enter button to start printing Note You can change the settings such as paper size before starting printing See Document Print Menu on page 169 for details about the settings The printer supports PDF 1 3 Acrobat 4 Other versions of PDF files may not print In that case open the files with Adob...

Page 209: ... is displayed on the control panel printable files were not detected in the USB memory 2 Press the d Down button several times to select Image Print menu then press the Enter button 3 Confirm that File Select is selected and press the Enter button 4 Press the u UP or d Down button to select the file then press the Enter button Note To select multiple files select another file and press the Enter b...

Page 210: ... button cancels the currently printing job Pressing the Cancel Job button for more than two seconds deletes all jobs from the printer memory including jobs the printer is currently receiving or printing Using the Reset menu Selecting Reset from the control panel s Reset Menu stops printing clears the print job being received from the active interface and clears errors that may have occurred at the...

Page 211: ...fications see Optional paper cassette unit on page 295 Handling precautions Always pay attention to the following handling precautions before installing the option The printer weighs about 31 0 kg 68 2 lb One person should never attempt to lift or carry it alone Two people should carry the printer lifting it from the positions shown below wWarning To lift the printer safely you must hold it in the...

Page 212: ... the steps below to install the optional 550 sheet paper cassette unit 1 Remove the interface cover on the back of the printer 2 Turn the printer off and unplug the power cord and all the interface cables OFF cCaution Make sure to unplug the power cord from the printer to prevent getting an electrical shock ...

Page 213: ...er cassette unit Remove the protective materials from the unit Keep all protective materials in case you want to ship the optional paper cassette unit in the future 4 Carefully grasp the printer at the position indicated below and lift it carefully with two people 5 Align the corners of the printer and the unit then lower the printer gently onto the unit so that the four pins on top of the unit fi...

Page 214: ... into an electrical outlet 12 Turn on the printer To confirm that the option is installed correctly print a Status Sheet See Printing a Status Sheet on page 259 Note for Windows users If EPSON Status Monitor is not installed you have to make settings manually in the printer driver See Making Optional Settings on page 71 Note for Macintosh users When you have attached or removed printer options you...

Page 215: ...ocedure in reverse Duplex Unit For specifications or details about the paper types and sizes that you can use with the Duplex Unit see Duplex Unit on page 296 Installing the Duplex Unit Follow the steps below to install the optional Duplex Unit 1 Turn off the printer OFF 2 Press the latch on the front cover and open the cover ...

Page 216: ...more than five minutes to avoid exposing the imaging cartridges to light Do not expose the imaging cartridges to sunlight at all 3 Remove the cap from the connector 4 Pull up the blue tabs on both sides of the transfer unit cCaution Do not touch the transfer belt on the transfer unit to avoid damaging it ...

Page 217: ...17 EPSON AcuLaser C3800 User s Guide 5 Raise the transfer unit 6 Take the Duplex Unit out of its package 7 Insert the tabs on the Duplex Unit into the printer align the arrow marks and push it down to connect the connector ...

Page 218: ...ers If EPSON Status Monitor is not installed you have to make settings manually in the printer driver See Making Optional Settings on page 71 Note for Macintosh users When you have attached or removed printer options you need to delete the printer using Print Setup Utility for Mac OS X 10 3 and 10 4 Print Center for Mac OS X 10 2 or below or Chooser for Mac OS 9 and then re register the printer Fo...

Page 219: ...the optional Duplex Unit 1 Turn off the printer 2 Press the latch on the front cover and open the cover 3 Pull up the blue tabs on both sides of the transfer unit 4 Raise the transfer unit 5 Grasp the handle to unlock the Duplex Unit and remove it from the printer 6 Pull down the transfer unit 7 Turn on the printer ...

Page 220: ...l memory if you are having difficulty printing complex graphics Installing a memory module Follow the steps below to install an optional memory module cCaution Before you install a memory module be sure to discharge any static electricity by touching a grounded piece of metal Otherwise you may damage static sensitive components wWarning Be careful when working inside the printer as some components...

Page 221: ...User s Guide 2 Turn the printer off and unplug the power cord and all the interface cables OFF cCaution Make sure to unplug the power cord from the printer to prevent getting an electrical shock 3 Loosen the two screws on the back of the printer ...

Page 222: ...ler option expanded aperture plate 5 Identify the memory slots These positions are shown below a Optional memory slot b Standard memory slot Note To replace the pre installed memory module remove the memory that is installed on the standard memory slot and install a new one a b ...

Page 223: ... stops Then press both sides of the memory module down Confirm that the notch on the memory module matches that of the memory slot notch cCaution Do not apply too much force Be sure to insert the memory facing the correct way Do not remove any modules from the circuit board Otherwise the printer will not work 7 Reattach the controller option expanded aperture plate ...

Page 224: ...ally in the printer driver See Making Optional Settings on page 71 Note for Macintosh users When you have attached or removed printer options you need to delete the printer using Print Setup Utility for Mac OS X 10 3 and 10 4 Print Center for Mac OS X 10 2 or below or Chooser for Mac OS 9 and then re register the printer Removing a memory module cCaution Before you remove a memory module be sure t...

Page 225: ... Installing an interface card Follow the steps below to install an optional interface card cCaution Before you install the interface card be sure to discharge any static electricity by touching a grounded piece of metal Otherwise you may damage static sensitive components 1 Remove the interface cover on the back of the printer 2 Turn the printer off and unplug the power cord and all the interface ...

Page 226: ... safe place You will need to reattach it if you remove the interface card later 4 Slide and push the interface card into the slot firmly then fasten the screws as shown below 5 Reconnect all the interface cables and the power cord 6 Reattach the interface cover 7 Plug the printer s power cord into an electrical outlet 8 Turn on the printer To confirm that the option is installed correctly print a ...

Page 227: ...de Removing an interface card cCaution Before you remove an interface card be sure to discharge any static electricity by touching a grounded piece of metal Otherwise you may damage static sensitive components Perform the installation procedure in reverse ...

Page 228: ...or other consumable products Imaging Cartridge Handling precautions Always observe the following handling precautions when replacing the consumable products Installing a genuine imaging cartridge is recommended Using a non genuine imaging cartridge may affect print quality Epson shall not be liable for any damages or problems arising from the use of consumable products not manufactured or approved...

Page 229: ...e products in fire as they may explode and cause injury Dispose of them according to local regulations If toner is spilled use a broom and dustpan or a damp cloth with soap and water to clean it up Because the fine particles can cause a fire or explosion if they come into contact with a spark do not use a vacuum cleaner Replacing an imaging cartridge Follow the steps below to replace an imaging ca...

Page 230: ...rounding areas If the printer has been in use the fuser and the surrounding areas may be very hot If you must touch one of these areas wait 30 minutes to allow the heat to subside before doing so cCaution Do not touch the transfer belt on the transfer unit to avoid damaging it 4 Take the new imaging cartridge out of its package and gently shake it from side to side and front to back to distribute ...

Page 231: ...ts 231 EPSON AcuLaser C3800 User s Guide 5 Remove the cartridge seal pulling straight from the imaging cartridge Make sure to pull the tape slowly to avoid tearing it 6 Insert the new imaging cartridge all the way until it stops ...

Page 232: ...Replacing Consumable Products 232 EPSON AcuLaser C3800 User s Guide 7 Remove the orange plastic cover by pinching the center of the cover and pulling it 8 Close the front cover ...

Page 233: ...ay impair print quality wWarning The fuser unit can be very hot if the printer has been in use Turn the printer off and wait for 30 minutes until the temperature has subsided before replacing the fuser unit Keep the consumable products out of the reach of children Replacing the fuser unit Follow the steps below to replace the fuser unit 1 Turn off the printer and wait with the front cover closed f...

Page 234: ...t cover and open the cover cCaution Do not leave the front cover open for more than five minutes to avoid exposing the imaging cartridges to light Do not expose the imaging cartridges to sunlight at all 3 Take the light shielding paper from the new fuser unit s package and attach it to the printer ...

Page 235: ...fuser unit 6 Pull the fuser unit towards you and then lift it out of the printer wWarning Be careful not to touch the fuser which is marked CAUTION HIGH TEMPERATURE or the surrounding areas If the printer has been in use the fuser and the surrounding areas may be very hot If you must touch one of these areas wait 30 minutes to allow the heat to subside before doing so ...

Page 236: ...ackage and remove the protective materials 8 Lower the new fuser into the printer making sure that the notch on the right side of the fuser unit into the post of the printer 9 Lock the lock levers on both sides of the fuser unit Note Make sure that the lock levers are completely back to the locked position ...

Page 237: ...Replacing Consumable Products 237 EPSON AcuLaser C3800 User s Guide 10 Close the paper guide on the top front of the printer 11 Remove the light shielding paper from the printer 12 Close the front cover ...

Page 238: ...ispose of the used consumable products in fire as it may explode and cause injury Dispose of it according to local regulations Keep the consumable products out of the reach of children Replacing the transfer unit Follow the steps below to replace the transfer unit 1 Press the latch on the front cover and open the cover cCaution Do not leave the front cover open for more than five minutes to avoid ...

Page 239: ...e printer 3 Pull up the blue tabs on both sides of the transfer unit wWarning Be careful not to touch the fuser which is marked CAUTION HIGH TEMPERATURE or the surrounding areas If the printer has been in use the fuser and the surrounding areas may be very hot If you must touch one of these areas wait 30 minutes to allow the heat to subside before doing so ...

Page 240: ...e the new transfer unit from its package 6 Lower the transfer unit inside the printer making sure that the posts on the transfer unit into the guides then pull down the transfer unit 7 Remove the protective material from both sides of the transfer unit cCaution Do not touch the transfer belt on the transfer unit to avoid damaging it ...

Page 241: ...Replacing Consumable Products 241 EPSON AcuLaser C3800 User s Guide 8 Remove the protective material on the transfer unit 9 Remove the light shielding paper from the printer 10 Close the front cover ...

Page 242: ... printer s outer case is dirty or dusty turn off the printer and clean it with a soft clean cloth moistened with a mild detergent cCaution Never use alcohol or paint thinner to clean the printer cover These chemicals can damage the components and the case Be careful not to get water onto the printer mechanism or any electrical components Cleaning the pickup roller 1 Turn off the printer OFF ...

Page 243: ...rting the Printer 243 EPSON AcuLaser C3800 User s Guide 2 Pull the paper cassette unit out 3 Gently wipe the rubber parts of the pickup roller inside the printer with a well wrung wet cloth 4 Insert the paper cassette unit ...

Page 244: ... a 95 mm b 140 mm c 100 mm d 100 mm e 100 mm To install and use any of the following options you will need the indicated amount of additional space The 550 sheet paper cassette unit adds 138 mm 5 4 in to the bottom of the printer In addition to space considerations always heed the following precautions when finding a place to locate the printer Place the printer where you can easily unplug the pow...

Page 245: ... plug Do not use an adapter plug Only use an outlet that meets the power requirements for this printer For long distances Repacking the printer If you need to transport your printer for long distances carefully repack it using the original box and packing materials Follow the steps below to repack your printer 1 Turn off the printer and remove the following items Power cord Interface cables Loaded...

Page 246: ...distances If you are moving the printer on its own two people should lift and carry the printer Follow the steps below to move the printer for short distances 1 Turn off the printer and remove the following items Power cord Interface cables Loaded Paper Installed options 2 Be sure to lift the printer by the correct positions as shown below cCaution When moving the printer always keep it horizontal...

Page 247: ...be difficult to remove and might cause other paper jams Pull it gently in order to avoid tearing Always try to remove jammed paper with both hands to avoid tearing it If jammed paper is torn and remains in the printer or if paper is jammed in a place not mentioned in this section contact your dealer Make sure that the paper type that is loaded is the same as the Paper Type setting in the printer d...

Page 248: ...ansfer belt wWarning Be careful not to touch the fuser which is marked CAUTION HIGH TEMPERATURE or the surrounding areas If the printer has been in use the fuser and the surrounding areas may be very hot Do not insert your hand deep into the fuser unit as some components are sharp and may cause injury Paper Jam MP C1 A 1 Remove all the paper from the MP tray a b ...

Page 249: ...49 EPSON AcuLaser C3800 User s Guide 2 Close the MP tray 3 Remove the standard paper cassette gently pull out any sheets of paper and reinstall the paper cassette 4 Press the latch on the front cover and open the cover ...

Page 250: ...C3800 User s Guide 5 Close the front cover Paper Jam C1 A Note If the MP tray opens remove all the paper and then close the MP tray 1 Remove the standard paper cassette gently pull out any sheets of paper and reinstall the paper cassette ...

Page 251: ...n the front cover and open the cover 3 Gently pull out any sheets of paper cCaution Do not touch the transfer belt and light sensitive drums to avoid damaging them 4 Gently pull out any sheets of paper on the transfer unit cCaution Be careful not to damage the transfer belt ...

Page 252: ...800 User s Guide 5 Close the front cover Paper Jam C2 C1 A Note If the MP tray opens remove all the paper and then close the MP tray 1 Remove the optional paper cassette gently pull out any sheets of paper and reinstall the paper cassette ...

Page 253: ... EPSON AcuLaser C3800 User s Guide 2 Remove the standard paper cassette gently pull out any sheets of paper and reinstall the paper cassette 3 Press the latch on the front cover and open the cover 4 Close the front cover ...

Page 254: ... remove all the paper and then close the MP tray 1 Press the latch on the front cover and open the cover 2 Gently pull out any sheets of paper on the transfer unit cCaution Be careful not to damage the transfer belt Do not touch the transfer belt and light sensitive drums to avoid damaging them ...

Page 255: ... marked CAUTION HIGH TEMPERATURE or the surrounding areas If the printer has been in use the fuser and the surrounding areas may be very hot If you must touch one of these areas wait 30 minutes to allow the heat to subside before doing so 4 Gently pull out any sheets of paper straight towards you 5 Raise the fuser paper guide on the fuser unit and pull out any sheets of paper ...

Page 256: ...Troubleshooting 256 EPSON AcuLaser C3800 User s Guide 6 Lower the outer green knobs on the fuser unit to close the paper path 7 Close the front cover ...

Page 257: ...ve all the paper and then close the MP tray 1 Press the latch on the front cover and open the cover 2 Pull up the blue tabs on both sides of the transfer unit then raise the transfer unit and set it against the printer cCaution Do not touch the transfer belt on the transfer unit to avoid damaging it ...

Page 258: ...Troubleshooting 258 EPSON AcuLaser C3800 User s Guide 3 Gently pull out any sheets of paper under the transfer unit 4 Pull down the transfer unit and lock it 5 Close the front cover ...

Page 259: ...lems The Ready light does not turn on The printer does not print Ready light off Cause What to do The power cord may not be properly plugged into the electrical outlet Turn off the printer check the power cord connections between the printer and the electrical outlet then turn the printer back on The electrical outlet may be controlled by an outside switch or an automatic timer Make sure that the ...

Page 260: ...e image resolution of your document in the application software or install more memory in your computer if you can Cause What to do For Windows users EPSON Status Monitor is not installed For Macintosh users you do not re register the printer For Windows users You have to install EPSON Status Monitor or make settings manually in the printer driver See Making Optional Settings on page 71 For Macint...

Page 261: ...not be plugged in securely Make sure that both ends of the interface cable are plugged in securely You may not be using the correct interface cable If you are using the USB interface use a Revision 2 0 cable The emulation setting for the port may not be correct Specify the emulation mode by using the printer s control panel menus See Emulation Menu on page 173 Cause What to do The page length and ...

Page 262: ... Paper Type setting in the printer driver is set to Transparency do not load any other type of paper except transparencies Cause What to do The registration position of each color may have shifted while the printer was being shipped or moved to a new location Adjust the color registration alignment See Adjusting Color Registration on page 206 for instructions Cause What to do The printer emulation...

Page 263: ...rinter driver then print again If you still do not get the printouts you expect adjust the color using the slide bar for each color For details about the More Settings dialog box see the printer driver s online help Cause What to do Printed colors do not exactly match the colors on your monitor since printers and monitors use different color systems monitors use RGB red green and blue while printe...

Page 264: ... the printer may be dusty Clean internal printer components by printing three pages with only one character per page Cause What to do The paper path inside the printer may be dusty Clean internal printer components by printing three pages with only one character per page Cause What to do Your paper may be moist or damp Do not store paper in a humid or damp environment One of the imaging cartridges...

Page 265: ...l when printing graphics For Windows users on the Basic Settings tab in the printer driver click the Advanced tab and select the More Settings button Then select the Halftoning For Mac users on the Basic Settings tab in the printer driver click More Settings select the Enh MG button then select Smooth The setting above can be set only when printing in black and white Cause What to do Your paper ma...

Page 266: ...tridges may be near the end of its service life If the message on the LCD panel or in EPSON Status Monitor indicates that the amount of toner is low replace the imaging cartridge See Imaging Cartridge on page 228 You can also check the amount of toner remaining in the cartridge by looking at the Basic Settings tab in the printer driver The problem may be with your application or interface cable Pr...

Page 267: ...and click the More Settings Deselect the Toner Save check box in the More Settings dialog box for Windows users or in the Advanced dialog for Mac users One of the imaging cartridges may be near the end of its service life If the message on the LCD panel or in EPSON Status Monitor indicates that the amount of toner is low replace the imaging cartridge See Imaging Cartridge on page 228 You can also ...

Page 268: ...panel you can increase the available memory space by changing this setting to Off Cause What to do The printer has insufficient memory for current task Add more memory for a permanent solution or lower print quality temporarily in the printer driver If RAM Disk is set to Maximum or Normal on the control panel you can increase the available memory space by changing this setting to Off Cause What to...

Page 269: ...o the selected paper source The size of loaded paper differs from the control panel or printer driver settings Make sure that the correct paper size and paper source are set in the control panel or printer driver Too many sheets may be loaded in the MP tray or paper cassettes Make sure that you have not tried to load too many sheets of paper For the maximum paper capacity for each paper source see...

Page 270: ...e sure that you have not tried to load too many sheets of paper For the maximum paper capacity for each paper source see MP tray on page 32 Standard lower paper cassette on page 33 and 550 sheet Paper Cassette Unit on page 33 The paper size is not set correctly Make sure to set the paper guides in the optional paper cassette correctly Cause What to do The paper is jammed at the optional paper cass...

Page 271: ...ndows Me 98 2000 Server 2003 or Server 2003 x64 and upgraded to Windows XP or XP x64 You may not be able to install or run the USB printer driver on a computer that does not meet these specifications or that is not equipped with a built in USB port For details about your computer contact your dealer Printer software installation Incorrect or incomplete software installation can lead to USB problem...

Page 272: ...ter software again For Windows XP XP x64 Server 2003 or Server 2003 x64 if the Software Installation dialog box appears during the installation process click Continue Anyway If you click STOP Installation you will have to install the printer software again Checking printer software in Windows Me or 98 If you canceled the plug and play driver installation in Windows Me or 98 before the procedure wa...

Page 273: ...me is displayed in the Print to the following port drop down list then the USB printer device driver and printer software are installed correctly If the correct port is not displayed proceed to the next step 2 Right click the My Computer icon on your desktop then click Properties ...

Page 274: ...USB Printer Devices should appear on the Device Manager menu If EPSON USB Printer Devices does not appear on the Device Manager menu click the plus sign beside Other devices to view the installed devices If USB Printer or your printer name appears under Other devices the printer software is not installed correctly Proceed to step 5 ...

Page 275: ...ed that these items appear proceed to step 5 4 Under Other devices select USB Printer or EPSON AL CXXXX click Remove then click OK When the following dialog box appears click OK then click OK to close the System Properties dialog box 5 Uninstall the printer software as explained in Uninstalling the Printer Software on page 92 Turn the printer off restart your computer then reinstall the printer so...

Page 276: ...ns see Canceling Printing on page 210 Printing in the PostScript 3 Mode Problems The problems listed in this section are those that you may encounter when printing with the PostScript driver All procedural instructions refer to the PostScript printer driver The printer does not print correctly in the PostScript mode Cause What to do The printer s emulation mode setting is incorrect The printer is ...

Page 277: ...x Mac OS X only Clear the Save as File check box on the Output Option sheet in the Print dialog box An incorrect printer driver is selected Make sure that the PostScript printer driver that you are using to print is selected For Mac OS 9 users only The Unlimited Downloadable Fonts check box on the PostScript Options setup option page in the Page Setup dialog box is selected Clear the Unlimited Dow...

Page 278: ...ts are not correctly specified on the Device Settings sheet of the printer s Properties dialog box For Windows XP XP x64 or 2000 If the Send TrueType fonts to printer according to the font Substitution Table setting on the Fonts sheet of the printer s Properties dialog box is turned on TrueType fonts are replaced by the printer fonts before they are printed Specify the appropriate substitution fon...

Page 279: ...a Format setting which is accessed by clicking Print from the File menu is set to ASCII Cause What to do The Data Format setting is different from the data format setting specified in the application except on Mac OS X If the file is created in an application that allows you to change the data format or encoding such as Photoshop make sure that the setting in the application matches that in the pr...

Page 280: ... Use the Binary protocol See PS3 Menu on page 184 for details Cause What to do The version of the Mac OS that you are using is unsupported This printer s driver can only be used on Macintosh computers running Mac OS 9 version 9 1 or later and Mac OS X version 10 2 x or later Cause What to do The Macintosh printer driver uses available memory in the system to process print data Try one of the follo...

Page 281: ... number label is usually on the back of the product Product model Product software version Click About Version Info or similar button in the product software Brand and model of your computer Your computer operating system name and version Names and versions of the software applications you normally use with your product Help for Users in Australia Epson Australia wishes to provide you with a high ...

Page 282: ...red here The Helpdesk numbers are We encourage you to have all the relevant information on hand when you ring The more information you prepare the faster we can help solve the problem This information includes your Epson product documentation type of computer operating system application programs and any information you feel is required Help for Users in Singapore Sources of information support an...

Page 283: ...wing over the phone Sales enquiries and product information Product usage questions or problem Enquiries on repair service and warranty Help for Users in Vietnam Contacts for information support and services are Help for Users in Indonesia Contacts for information support and services are World Wide Web http www epson co id Information on product specifications drivers for download Frequently Aske...

Page 284: ...arta Mangga Dua Mall 3rd floor No 3A B Jl Arteri Mangga Dua Jakarta Phone Fax 62 21 62301104 Bandung Lippo Center 8th floor Jl Gatot Subroto No 2 Bandung Phone Fax 62 22 7303766 Surabaya Hitech Mall lt IIB No 12 Jl Kusuma Bangsa 116 118 Surabaya Phone 62 31 5355035 Fax 62 31 5477837 Yogyakarta Hotel Natour Garuda Jl Malioboro No 60 Yogyakarta Phone 62 274 565478 Medan Wisma HSBC 4th floor Jl Dipon...

Page 285: ... access our World Wide Web home page at http www epson com hk Technical Support Hotline You can also contact our technical staff at the following telephone and fax numbers Help for Users in Malaysia Contacts for information support and services are World Wide Web http www epson com my Information on product specifications drivers for download Frequently Asked Questions FAQ Sales Enquiries question...

Page 286: ...epson co in Information on product specifications drivers for download and products enquiry are available Epson India Head Office Bangalore Epson India Regional Offices Phone 603 56288222 Phone 603 56288333 Phone 30515000 Fax 30515005 30515078 Mumbai Phone 28261516 17 Fax 28257287 Delhi Phone 26447201 02 03 04 07 09 Fax 26447205 Chennai Phone 28203940 41 28218658 59 Fax 28272463 Kolkata Phone 2283...

Page 287: ... Corporation at the telephone and fax numbers and e mail address below World Wide Web http www epson com ph Information on product specifications drivers for download Frequently Asked Questions FAQ and E mail Enquiries are available Epson Helpdesk Phone 63 2 813 6567 Our Hotline team can help you with the following over the phone Sales enquiries and product information Product usage questions or p...

Page 288: ...n using extra thick paper set the Paper Type setting in the printer driver to Extra Thick Paper type Description Plain paper Weight 60 to 80 g m Recycled paper is acceptable 1 Semi Thick Paper Weight 81 to 105 g m Recycled paper is acceptable 1 Envelopes No paste and no tape No plastic window unless specifically designed for laser printers Labels The backing sheet should be covered completely with...

Page 289: ...fer printers Carbon paper carbonless paper thermal sensitive paper pressure sensitive paper acid paper or paper that uses high temperature sensitive ink around 190 C Labels that peel easily or labels that do not cover the backing sheet completely Coated paper or special surface colored paper Paper that has binder holes or is perforated Paper that has glue staples paper clips or tape on it Paper th...

Page 290: ...photographic process Print Quality 4800 RIT 1 Resolution 600 600 dpi 1200 1200 dpi Continuous printing speed 2 A maximum of 25 pages per minute black and white printing on A4 size paper A maximum of 20 pages per minute color printing on A4 size paper Paper feed Automatic or manual feed Paper feed alignment Center alignment for all sizes Input paper supply MP tray Up to 150 sheets of plain paper 60...

Page 291: ...tter LT Executive EXE Government Legal GLG Legal LGL EPSON Color Laser Paper A4 Printer language ECP Page printer language ESC P 2 24 pin printer emulation ESC P 2 mode ESC P 9 pin printer emulation FX mode IBM Proprinter emulation I239X mode Adobe PostScript3 PS3 mode PCL6 PCL5 emulation PCL mode Resident fonts 84 scalable fonts and 7 bitmap fonts for ESC Page 93 scalable fonts and 7 bitmap PCL5c...

Page 292: ...4 lb with Duplex Unit Approx 26 0 kg about 57 2 lb without Duplex Unit Excluding consumables and options 120 V Model KEAS 1 220 240 V Model KEBS 1 Rated voltage 110 V 120 V 10 220 V 240 V 10 Rated frequency 50 Hz 60 Hz 3 Hz 50 Hz 60 Hz 3 Hz Rated current Up to 8 A Up to 4 A Power consumption During printing Average Color printing 376 W 361 W Average Black and white printing 354 W 347 W MAX 750 W w...

Page 293: ...ed within protective housings and external covers the laser beam cannot escape from the machine during any phase of user operation CDRH regulations The Center for Devices and Radiological Health CDRH of the U S Food and Drug Administration implemented regulations for laser products on August 2 1976 Compliance is mandatory for products marketed in the United States The label shown below indicates c...

Page 294: ...r to the printer Since USB 2 0 is fully compatible with USB 1 1 USB 1 1 can be used as an interface USB 2 0 can be used with Windows XP XP x64 2000 Server 2003 and Server 2003 x64 operating systems If your operating system is Windows Me or 98 use a USB 1 1 interface Ethernet interface You can use an IEEE 802 3 100BASE TX 10 BASE T straight through shielded twisted pair interface cable with an RJ45...

Page 295: ...xecutive EXE Legal LGL Government Legal GLG Paper weight 60 to 105 g m 16 to 28 lb Paper feed One paper cassette mounted Automatic feed delivery system Cassette capacity up to 550 sheets Paper types Plain paper Semi Thick paper EPSON Color Laser Paper Power supply DC 24V 1 0 A and DC 3 3 V 0 2 A supplied by the printer Model KEA 2 Dimensions and weight Height 138 mm 5 4 in Width 400 mm 15 7 in Dep...

Page 296: ...eed Automatic feed delivery system Paper types Plain paper Semi Thick paper Thick paper EPSON Color Laser Paper Power supply DC 24V 1 0 A and DC 3 3 V 0 2 A supplied by the printer Model KEA 3 Dimensions and weight Height 80 mm 3 1 in Width 283 mm 11 1 in Depth 320 mm 12 6 in Weight 1 1 kg 2 4 lb Memory size 128 MB 256 MB or 512 MB Product code High Capacity Imaging Cartridge Yellow 1124 High Capa...

Page 297: ...36 EEC Storage humidity 15 to 80 RH Model High Capacity Imaging Cartridge Yellow 1124 High Capacity Imaging Cartridge Magenta 1125 High Capacity Imaging Cartridge Cyan 1126 High Capacity Imaging Cartridge Black 1127 Standard Capacity Imaging Cartridge Yellow 1128 Standard Capacity Imaging Cartridge Magenta 1129 Standard Capacity Imaging Cartridge Cyan 1130 Product code 3026 110 120 V 2025 220 240 ...

Page 298: ...169 emulation 173 ESCP2 186 FX 188 how to access 165 image print 171 index print 169 information 166 network 181 panel settings 165 password config 185 PCL 182 printing 173 PS3 184 quick print job 180 203 reserve job data 203 reset 179 setup 175 tray 172 USB 180 USB host 181 Custom paper size printer settings 45 D Document Print menu 169 Duplex printing manually Macintosh 129 Duplex printing manua...

Page 299: ...cations 297 FX menu 188 G Guides Font Guide 20 Network Guide 20 Online Help 20 Paper Jam Guide 20 Setup Guide 20 User s Guide 20 H Headers and footers how to use Macintosh 126 how to use Windows 63 Help Epson 281 I Image Print menu 171 Imaging cartridge 228 specifications 296 Index Print menu 169 Information menu 166 Installing options duplex unit 215 installing a memory module 220 installing an i...

Page 300: ...nit 33 selecting a paper source control panel 34 selecting a paper source printer driver 34 standard lower cassette 33 Password config menu 185 PCL menu 182 PCL printer driver about the PCL Mode 163 hardware requirements 163 system requirements 163 PostScript printer driver Accessing the PostScript printer driver Macintosh 160 Accessing the PostScript printer driver Windows 155 hardware requiremen...

Page 301: ...w watermark Windows 62 Making Extended Settings Macintosh 132 Making Extended settings Windows 71 Making Optional settings Windows 71 Printing with an overlay Windows 66 Printing with storage form overlay Windows 69 Printing with the Duplex Unit Macintosh 128 Printing with the Duplex Unit Windows 51 print layout Macintosh 113 print layout Windows 59 print quality Macintosh 107 print quality Window...

Page 302: ... Windows 97 Standard lower cassette available paper 33 loading paper 36 Status and error messages 192 Status sheet how to print 205 259 Storage from overlay how to delete Windows 70 how to print Windows 69 how to register Windows 68 how to use Windows 68 T Thick paper and extra thick paper printer settings 44 Transfer unit specifications 297 Transparencies printer settings 40 Transporting the prin...

Reviews: