

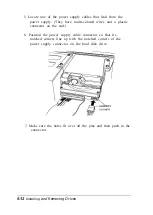


5. If you installed a hard disk drive in one of the external bays,
replace the faceplate. Insert one side of the plate, then
gently press on the other side until it snaps into place.
After you have installed the drive in the external bay, you must
replace the internal mounting bracket and reconnect the cables
to the drives it contains. See page 5-7 for instructions.
Removing a Drive from an External Bay
To remove a drive from an external drive bay, follow these
steps:
1. Remove the drive mounting bracket. See page 5-2 for
instructions.
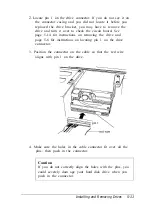
2. Disconnect both the ribbon cable connector and the power
cable connector from the drive you are removing from the
external bay.
3. Remove the screws securing the drive on both sides.
Installing and Removing Drives
5-21
Summary of Contents for ActionPC 6000
Page 1: ......
Page 24: ...1 10 Setting Up Your System ...
Page 42: ...2 18 Running SETUP and Installing Drivers ...
Page 121: ...Hard Disk Drive Types Hard disk drive types Specifications A 9 ...
Page 125: ...Hardware Interrupts System I O Address Map Specifications A 13 ...
Page 126: ...System I O address map continued A 14 Specifications ...
Page 128: ...A 16 Specifications ...
Page 140: ...8 Index ...