background image

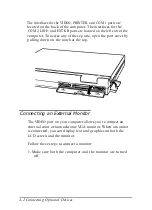
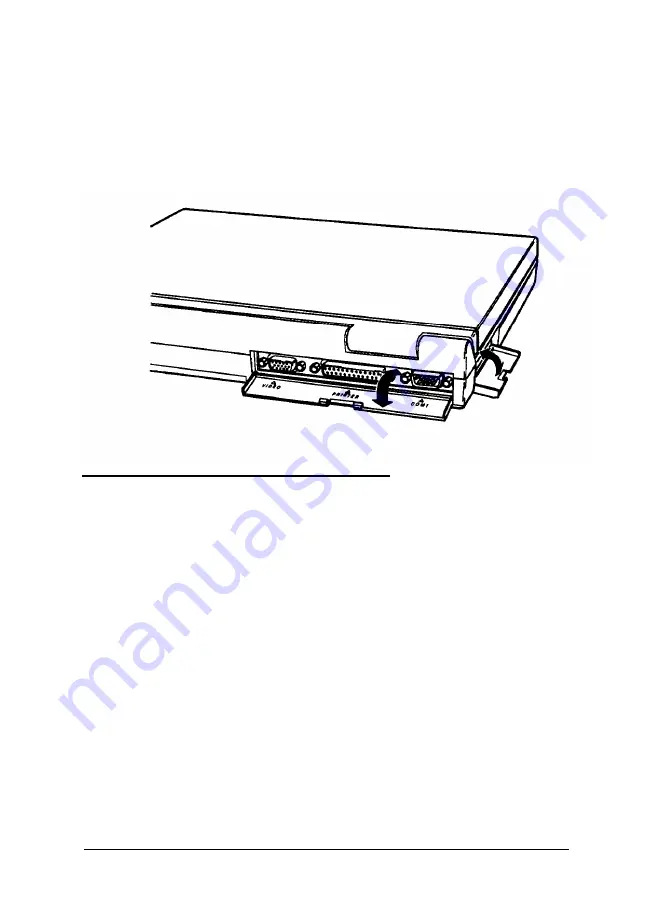
The interfaces for the VIDEO, PRINTER, and COM 1 ports are
located on the back of the computer. The interfaces for the

COM 2, LINE, and EXT KB ports are located on the left side of the
computer. To access any of these ports, open the port cover by
pulling down on the notch at the top.

Connecting an External Monitor

The VIDEO port on your computer allows you to connect an
external color or monochrome VGA monitor. When a monitor
is connected, you can display text and graphics on both the

LCD screen and the monitor.

Follow these steps to connect a monitor:

1. Make sure both the computer and the monitor are turned

off.

4-2 Connecting Optional Devices

Summary of Contents for ActionNote 4SLC-33

Page 1: ......

Page 2: ...circuit different from that to which the receiver is connected Consult an experienced radio TV technician for help WARNING The connection of a non shielded equipment interface cable to this equipment will invalidate the FCC Certification of this device and may cause interference levels that exceed the limits established by the FCC for this equipment It is the responsibility of the user to obtain a...

Page 3: ...r transmitted in any form or by any means electronic mechanical photocopying recording or otherwise without the prior written permission of Epson America Inc No patent liability is assumed with respect to the use of information contained herein Nor is any liability assumed for damages resulting from the use of the information contained herein Further this publication and features described herein ...

Page 4: ... or heat register Operate the computer using the type of power source indicated on its label If you plan to operate the computer in Germany observe the following safety precaution To provide adequate short circuit protection and over current protection for this computer the building installation must be protected by a 16 Amp circuit breaker Beim Anschluß des Computers an die Netzversorgung muß sic...

Page 5: ...e computer yourself Refer all servicing to qualified service personnel 14 Unplug the computer from the wall outlet and refer servicing to qualified service personnel under the following conditions A B C D E When the power cord or plug is damaged If liquid has entered the computer If the computer does not operate normally when the operating instructions are followed Adjust only those controls that ...

Page 6: ...mais les bloquer Ne pas placer l ordinateur près d une source de chaleur directe Le fonctiomement de l ordinateur doit s effectuer conformément au type de source d alimentation indiquée sur l étiquette Lorsqu on désire utiliser l ordinateur en Allemagne on doit observer les normes sécuritaires qui suivent Afin d assurer une protection adéquate à l ordinateur contre les court circuits et le survolt...

Page 7: ...ervice de cet appareil à un technician qualifié Débrancher l ordinateur de la prise murale et confier le service au personnel de service qualifié selon les conditions qui suiventi A B C D E Lorsque Ie cordon d alimentation ou la prise sent endommagés Lorsqu un liquide s est infiltré dans l ordinateur Lorsque l ordinateur refuse de fonctiomer normalement même en suivant les instructions N ajuster q...

Page 8: ...Front View Rear Panel and Left Side Connecting the AC Adapter Opening the Screen Turning On the Computer 1 2 1 3 1 3 1 6 1 8 1 10 1 11 CHAPTER 2 USING YOUR COMPUTER Taking Care of the Computer Copying the Reference Diskette Utilities Using the Password Function Typing the Password Using the Keyboard Special Keys Using F11 and F12 Using the Embedded Numeric Keypad Stopping a Command or Program 2 2 ...

Page 9: ... 2 17 CHAPTER 3 POWERING THE COMPUTER Using the AC Adapter 3 1 Using the Battery Pack 3 2 Replacing the Battery Pack 3 2 Recharging the Battery 3 5 Low Battery Indicator 3 6 Using the Suspend ResumeSwitch 3 7 Using Setup to Conserve Battery Power 3 8 CHAPTER 4 CONNECTING OPTIONAL DEVICES Connecting an External Monitor 4 2 Connecting a Parallel Printer 4 4 Connecting a Serial Device 4 5 Checking th...

Page 10: ...5 3 Automatically Configuring Your System 5 4 Saving Your Selections 5 4 Changing the Standard CMOS Setup 5 5 Changing the Advanced CMOS Setup 5 7 Changing the Advanced Chipset Setup 5 10 Changing the Password 5 12 Hard Disk Utility 5 13 Hard Disk Format 5 14 Auto Interleave 5 15 Media Analysis 5 15 CHAPTER 6 RUNNING SYSTEM DIAGNOSTICS Starting the Program 6 2 Deleting Tests 6 3 Adding Tests 6 4 R...

Page 11: ... Problems AC Adapter Problems The LCD Screen Is Blank The External Monitor Screen is Blank The Computer Locks Up Password Problems Diskette Problems Diskette Drive Problems Hard Disk Problems Software Problems Printer Problems Memory Module Problems Numeric Coprocessor Problems CMOS Battery Problems APPENDIX B FAX MODEMCOMMAND SET A 2 A 3 A 3 A 4 A 5 A 6 A 6 A 7 A 8 A 9 A 10 A 10 A 11 A 12 A 13 A ...

Page 12: ...Summary B 12 Result Code Summary B 13 Appendix C Specifications Main Unit Controllers Keyboard Mass Storage LCD Display Power Supply Physical Dimensions Environmental Requirements Power Source Requirements Glossary C 1 C 2 C 3 C 3 C 3 C 3 C 4 C 4 C 5 Index xi ...

Page 13: ...re Its standard features include the following 2MB 4MB or 8MB of RAM random access memory expandable to a maximum of 8MB 640 x 480 dpi dots per inch VGA video graphics array backlit monochrome LCD liquid crystal display screen which emulates VGA color with 32 shades of gray Internal hard disk drive One 3 inch 1 44MB diskette drive Parallel port for a parallel printer Two serial ports for serial de...

Page 14: ...bo 25 or 33 MHz and Normal 8 MHz Suspend mode to save battery power Carrying case with room for the computer AC adapter power cable diskettes and manuals Depending on the configuration you purchased your computer may also include the following Internal 9600 2400 fax modem Logitech Trackman trackball or other pointing device MS DOS operating system including diskettes and manuals Microsoft Windows ...

Page 15: ... computer in the United States Epson America provides local customer support and service through a nationwide network of Authorized Epson Service Centers Epson also provides support services through the Epson Connection at 1 800 922 8911 Call the Epson Connection for the following Technical assistance with the installation configuration and operation of Epson products Sales of accessories manuals ...

Page 16: ...Note package should contain a packet describing the program If a packet is not included call the Epson Connection for information For your convenience there is a sticker located on the bottom of your computer with the number to call for product support and On Site Warranty Service If you purchased your computer outside the United States please contact your Epson dealer or the marketing location ne...

Page 17: ... battery It also describes ways to conserve battery power Chapter 4 describes how to connect optional devices Chapter 5 describes how to run the Setup program this is necessary if you want to set a password or you change the configuration of your computer Chapter 6 gives instructions for running the System Diagnostics program to test system devices Chapter 7 describes the VGA utilities provided wi...

Page 18: ... down the key marked and then press the letter or hold down the key marked and then press the key C DOS Text as it appears on the screen DISKCOPY A B Text that you type exactly as shown path filename Words printed in lowercase Italics represent optional parameter names here you would type the actual path and filename such as WORK CONTACT COM 1 Name of hardware elements 6 Introduction ...

Page 19: ...ng the computer Identifying the system parts Connecting the AC adapter Opening the screen Turning on the computer Instructions for installing optional equipment such as a memory module or a numeric coprocessor or connecting external equipment such as a trackball monitor or printer are provided in Chapter 4 Setting Up the Computer 1 1 ...

Page 20: ...htweight carrying case Depending on the configuration you purchased your computer package may also include the following MS DOS diskettes and manuals Windows diskettes and manuals Logitech Trackman trackball diskette and manual If your configuration includes the internal fax modem your package may include Data communications program diskette and manual Fax transmission program diskette and manual ...

Page 21: ...ts Before getting started refer to the illustrations below to identify the different parts of your computer Front View The main components on the front and right side of the ActionNote are shown below Setting Up the Computer 1 3 ...

Page 22: ...to its previous state Brightness switch This switch controls the brightness of the LCD screen Slide the switch to the right to lighten the screen and to the left to darken it Contrast switch This switch controls the contrast on the LCD screen Slide the switch to the right to lighten the screen and to the left to darken it Keyboard area This is where you type commands and enter data For a full desc...

Page 23: ...the battery is fully charged blinks when the AC adapter is connected and charging the battery Suspend mod Indicates the computer is in Suspend mode Hard disk drive Indicates the computer is accessing the hard disk drive Num Lock Indicates that Num Lock is set on the keyboard This activates the embedded numeric keypad on the keyboard Caps Lock Indicates that Caps Lock is set on the keyboard Scroll ...

Page 24: ... to eject a diskette from the drive Diskette drive Your computer comes with a 3 inch 1 44MB diskette drive For instructions on using diskettes see Chapter 2 Drive light This light is on when the computer is accessing the diskette drive Rear Panel and Left Side The components on the rear panel and left side of the computer are shown below 1 6 Setting Up the Computer ...

Page 25: ...CD screen and an external monitor at the same time Parallel port PRINTER You can connect a parallel device such as a printer to this port See Chapter 4 for instructions Serial port COM 1 This port supports a serial RS 232C device See Chapter 4 for more information Serial port COM 2 This port supports a serial RS 232C device See Chapter 4 for more information Note that when the internal fax modem i...

Page 26: ...an operate in the ranges 100 240 VAC 50 60 Hz Caution Use only the AC adapter model number AP 3S25 supplied with the computer If you are using the adapter in a country other than the one where you purchased your ActionNote make sure you have the correct power cable for the electrical socket See the power cable specifications in Appendix C for details You may need to connect the AC adapter to charg...

Page 27: ... computer 1 2 3 Connect the AC adapter plug to the DC input port on the right side of the computer Connect the power cable to the AC adapter Connect the other end of the power cable to a grounded earthed electrical outlet Setting Up the Computer 1 9 ...

Page 28: ...o open the LCD screen 1 2 3 Place the computer on a level surface Turn the computer so its front is facing you Slide the release latches on the front sides of the computer toward the sides and lift up the screen 1 10 Setting Up the Computer ...

Page 29: ... printer monitor or pointing device See Chapter 4 for information about installing optional devices Then press the power button on the top of the computer to turn it on The computer displays copyright information and then performs a series of power on diagnostics that check the circuit boards memory ports keyboard and disk drives The computer displays several messages during the diagnostics includ...

Page 30: ... any key to continue the startup process Because your computer was set up at the factory the configuration information should be accurate If you have changed the computer s setup so that this information does not match your configuration run the Setup program described in Chapter 5 to correct it Depending on your configuration your computer may come with MS DOS and Microsoft Windows installed on t...

Page 31: ... computer has been setup If you plan to use another operating system you need to install it now See the documentation that came with your operating system for installation instructions The procedures described in this manual assume you are using MS DOS If you are using another operating system see your documentation for instructions on how to perform the various procedures Setting Up the Computer ...

Page 32: ... following procedures Taking care of the computer Copying utilities from the Reference diskette Using the password function Using the keyboard Stopping a command or program Resetting the computer Turning off the computer Changing the CPU speed Using the LCD screen Using diskettes Using the hard disk Using memory Using Your Computer 2 1 ...

Page 33: ...uter even if it is closed to prevent damage to the LCD display When you are not using the external device connectors keep the covers closd to prevent damage to the ports Always operate the computer with the battery pack installed to maintain a full battery charge Occasionally clean the exterior of the computer with a soft damp cloth Occasionally clean the LCD display using glass cleaner on a soft ...

Page 34: ...t Windows VGA drivers see Chapter 7 for details WP WordPerfect VGAdrivers see Chapter 7 for details You may want to copy the VGA utility program in the UTILS directory to your hard disk If so you may want to create a directory called UTILS on the hard disk You can easily copy the files using the MS DOS COPY command See your MS DOS documentation for details on creating directories and copying files...

Page 35: ...rompts you for the password after it completes its power on diagnostics If you enable the Setup password you must enter it before you can use the Setup program The computer prompts you for the password after you press to start Setup Typing the Password You see this prompt when the password feature is activated Enter CURRENT password Type the correct password and press To protect your password the ...

Page 36: ...ze keyboard has a separate numeric keypad you can use for both numeric entry and cursor control The ActionNote has an embedded numeric keypad that you access using the and keys in the same way you use the key to enter uppercase characters Using the embedded numeric keypad is described later in this section Note The keyboard on the ActionNote is available with different layouts for different langua...

Page 37: ...llowing illustration shows the 84 key US keyboard layout This section describes how to use the following features on your keyboard Special keys The and keys The embedded numeric keypad 2 6 Using Your Computer ...

Page 38: ... part of the keyboard are not affected Produces uppercase characters or the top symbols on the keys when used with the main character keys Produces lowercase characters when the Caps Lock function is on Note Use this key to reactivate the system when it is in Suspend mode Controls functions on the embedded numeric keypad as well as other special functions Works with other keys to perform special c...

Page 39: ...he current operation Terminates the current operation when used with Turns the insert function on and off Deletes the character marked by the cursor The keys work as toggles press them once to turn on the function and again to turn it off When the function is on the corresponding LED above the keyboard is lit Using F11 and F12 The keys perform special functions within application programs You acti...

Page 40: ...to to enter the alphabetic character on the key press plus the key to enter the alphabetic character in uppercase When Num Lock is off you can generate the numeric character by pressing plus the key Stopping a Command or Program You may sometimes need to stop a command or program while it is running Many programs provide a command you can use to cancel or even undo an operation If you have entered...

Page 41: ...t respond to your keyboard entries you can reset it to reload the operating system and try again Caution Resetting the computer erases any data in memory you have not saved so do not use the reset function unless necessary Also some programs classify and store new data when you exit them properly so do not reset the computer before you exit a program if possible To reset the computer the operating...

Page 42: ...processor can operate at two speeds Turbo 25 or 33 MHz or Normal 8 MHz At the higher speed the computer performs all tasks faster You may need to select the slower speed however to run some copy protected programs or a program that has a specific timing requirement Whenever you turn on or reset the computer it starts up in Turbo speed To change the speed you must turn on the Num Lock feature If ne...

Page 43: ...ght to lighten the brightness and to the left to darken the brightness Slide the contrast switch to the right to lighten the contrast and to the left to darken the contrast Using Diskettes Be sure to purchase high quality diskettes to ensure reliability For the 3 inch 1 44MB diskette drive in your ActionNote you can use either of the following types of diskettes 720KB double sided double density u...

Page 44: ...to place When you want to remove the diskette make sure the drive light is off then press the release button When the diskette pops out remove it and store it properly Caution Never remove a diskette or reset or turn off the computer while the drive light is on You could lose data Also be sure to remove all diskettes before you turnoff the computer Using Your Computer 2 13 ...

Page 45: ...ins If you try to change data stored on a write protected diskette you see an error message To write protect a 3 inch diskette turn the diskette over so you are looking at the underside Slide the switch in the lower left corner toward the edge of the diskette until it clicks into position exposing a hole To remove the write protection slide the switch toward the center of the diskette until the ho...

Page 46: ...tions Using a Single Diskette Drive System MS DOS expects a computer to have at least two diskette drives A and B and displays prompts and messages accordingly Your ActionNote has one 3 inch diskette drive this is drive A MS DOS uses the one drive as two by displaying alternate prompts for the source and target diskettes For example if you need to make a copy of a diskette you can insert the diske...

Page 47: ...ect your hard disk from damage and to avoid losing data Never turn off or reset the computer when the hard disk drive light is on This light indicates that the computer is copying data to or from the hard disk After turning the power off wait 20 seconds before moving the computer This allows the disks in the drive to stop spinning and the hard disk read write heads to lock in place so you do not d...

Page 48: ...nt to leave it turned on See Using the Suspend Resume Switch in Chapter 3 Note To reactivate the system from Suspend mode press the key Using Memory Your computer comes with 2MB 4MB or 8MB of memory and you may have installed an optional expansion memory module to increase the total amount This section describes how the memory in your computer works Also be sure to see your MS DOS manual for compl...

Page 49: ... 640KB and has addresses in the range 0 to 640KB Reserved memory is memory in the range 640KB to lMB The system enhances its performance by using 128KB of this memory as shadow RAM and the remaining memory is available Extended memory is memory with addresses in the range 1MB to 8MB and is used only by the following Certain operating systems such as OS 2 Some MS DOS interfaces such as Windows Some...

Page 50: ...managers have been tested and proven reliable Most MS DOS commands and application programs cannot use extended memory directly They need to use expanded memory which uses a portion of reserved memory as a window to access RAM beyond lMB This type of memory allows some MS DOS applications to get around the 640KB size limitation You control expanded memory with a memory manager such as EMM386 EXE w...

Page 51: ...ectrical outlet When the computer runs on the AC adapter it draws power from the adapter instead of using the battery Whenever the AC adapter is connected it recharges the battery pack The AC adapter is ideally suited for travel to foreign countries It is designed to operate in 100 240 VAC ranges with a frequency of 50 60 Hz All you need is an appropriate plug for the electrical socket see Appendi...

Page 52: ... charge To increase the amount of time you can use the computer without electrical power you can purchase additional battery packs Maintaining a supply of charged battery packs allows you to replace a low battery and continue your work Note Use only the battery pack designed for use with the ActionNote model number 8KR 1700AE Replacing the Battery Pack Follow these steps to install the battery pac...

Page 53: ...cover and slide the cover toward you 5 Pull up on the cloth tab and lift out the low battery 6 Slide the fully charged battery pack into the slot Insert the right side with contacts first then press on the left side to secure the battery Powering the Cornputer 3 3 ...

Page 54: ...the slots on the computer s cover Press the cover from the back side until it snaps closed Note When you replace the battery pack make sure the new battery is fully charged otherwise you ll need to recharge it befpre you can use it Turn the computer right side up 3 4 Powering the Computer ...

Page 55: ... completely discharged battery pack If the battery still has some charge left when you start charging the time will be less If you have additional battery packs it is a good idea to keep them fully charged so you can use them to replace the battery pack in your computer when it runs low This is especially useful if you are traveling and will need to run the computer off the battery an extra batter...

Page 56: ...d to recharge the battery as described above before you can use it again to power the computer without the AC adapter If your AC adapter is not available follow these steps 1 Complete your current activity 2 Save your data 3 Exit the program you are using 4 Turn off the computer You have approximately two minutes to save your data If the batteries run out suddenly you will lose any data you have n...

Page 57: ...vity when you do not need to use your computer for short periods of time The screen goes dark and the computer suspends power to its components and devices it continues to supply power to the RAM If you are not going to use the computer for a longer time 20 minutes or more for example turn it off To resume activity slide the switch to the left or press the key The computer resumes normal operation...

Page 58: ...unctions of the computer so you don t waste power on devices you are not using The power mamgement options are available from the ADVANCED CHIPSET SETUP portion of the Setup program You can specify timeout periods for the LCD display the hard disk drive and or the system For a complete description of these options and the Setup program see Chapter 5 3 8 Powering the Computer ...

Page 59: ...gitech trackball mouse or other pointing device or an external keyboard Internal 9600 2400 fax modem Expansion memory modules Numeric coprocessor Make sure the computer is turned off before you install or connect any of these devices This is a safety precaution and is also necessary for the computer to recognize that you connected a new device Connecting Optional Devices 4 1 ...

Page 60: ...pen the port cover by pulling down on the notch at the top Connecting an External Monitor The VIDEO port on your computer allows you to connect an external color or monochrome VGA monitor When a monitor is connected you can display text and graphics on both the LCD screen and the monitor Follow these steps to connect a monitor 1 Make sure both the computer and the monitor are turned off 4 2 Connec...

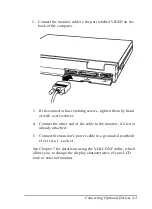
Page 61: ... with a screwdriver Connect the other end of the cable to the monitor if it is not already attached Connect the monitor s power cable to a grounded earthed electrical socket See Chapter 7 for details on using the VGACONF utility which allows you to change the display characteristics of your LCD and or external monitor Connecting Optional Devices 4 3 ...

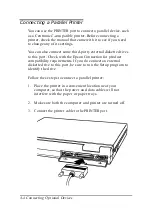
Page 62: ... Check with the Epson Connection for product compatibility requirements If you do connect an external diskette drive to this port be sure to run the Setup program to identify the drive Follow these steps to connect a parallel printer 1 2 3 Place the printer in a convenient location near your computer so that the power and data cables will not interfere with the paper or paper trays Make sure both ...

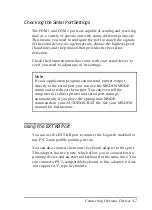
Page 63: ...ted when you turn on the ActionNote the computer automatically configures the port as the primary parallel port Connecting a Serial Device You can use the COM 1 and or COM 2 port to connect serial devices such as a serial printer or plotter You could also connect a modem or pointing device such as a trackball or mouse Note You cannot use the COM 2 port if the internal fax modern is installed Follo...

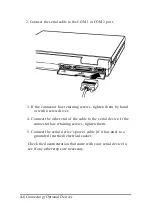
Page 64: ...r 4 Connect the other end of the cable to the serial device If the connector has retaining screws tighten them 5 Connect the serial device s power cable if it has one to a grounded earthed electrical socket Check the documentation that came with your serial device to see if any other steps are necessary 4 6 Connecting Optional Devices ...

Page 65: ...t directly to the serial port you can use the MS DOS MODE command to redirect the output You can even tell the computer to redirect printer and serial port settings automatically if you place the appropriate MODE commands in your AUTOEXEC BAT file See your MS DOS manual for instructions Using the EXT KB Port You can use the EXT KB port to connect the Logitech trackball or any PS 2 compatible point...

Page 66: ...e to access the diskette drive while the trackball is attached Before you can use an optional device you must install special software called a device driver The device driver allows the operating system and your application software to recognize the device The device driver for the Logitech trackball has already been installed on your hard disk so the ActionNote will recognize the trackball as so...

Page 67: ...it See the documentation supplied with the device for instructions Also before using a pointing device attached to the EXT KB port you must enable the PS 2 Mouse Support option in the ADVANCED CMOS SETUP portion of the Setup program See Chapter 5 for details on using the Setup program Connecting an External Keyboard If you are typing for extended periods of time you may want to connect an optional...

Page 68: ...aded on your hard disk drive See the documentation that came with these applications for details on how to use them Appendix B provides a summary of the modem s internal command set You need to use the fax modem s built in set of commands only if you are not using a telecommunications software package Each communications program provides its own set of commands that you will use to control the mod...

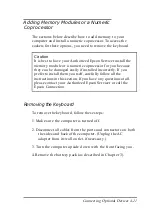
Page 69: ... you prefer to install them yourself carefully follow all the instructions in this section If you have any questions at all please contact your Authorized Epson Servicer or call the Epson Connection Removing the Keyboard To remove the keyboard follow these steps 1 Make sure the computer is turned off 2 Disconnect all cables from the ports and connectors on both the sides and back of the computer U...

Page 70: ... on the front edge of the computer s case Turn the computer right side up Open the top cover Carefully detach the keyboard by lifting up on the front and sides of the keyboard Then pull it toward you 4 12 Connecting Optional Devices ...

Page 71: ... computer comes with 2MB 4MB or 8MB of memory 2MB are soldered directly onto the system board You can increase your memory up to a maximum of 8MB by adding either a 2MB or 6MB memory module If your computer comes with 4MB of memory a 2MB memory module is already installed in the computer as shown above You can increase your memory to 8MB by replacing the 2MB memory module with a 6MB memory module ...

Page 72: ...ribed above 2 If the 2MB memory module is installed remove the screw that attaches the memory module to the system board memory module 3 Gently disconnect the memory module from its socket by sliding the module toward the front of the computer 4 14 Connecting Optional Devices ...

Page 73: ...n your left 6 Carefully press the module straight into the socket The connector and socket are designed so they fit together only if you have aligned them correctly so do not force them If you have trouble remove the module and try again 7 When the connector is firmly attached to the socket replace the screw on the left side of the module 8 Replace the keyboard as described later in this chapter C...

Page 74: ...et for a numeric math coprocessor You can install either a Cyrix Cx387SLC or an Intel 387SX multifrequency coprocessor Installing a numeric coprocessor speeds up your computer s numeric calculations and graphic displays when you are using certain application software The coprocessor chip can be easily damaged and is expensive to replace so if you don t feel confident about installing it yourself a...

Page 75: ...section The computer automatically detects when a coprocessor is installed When you turn on the computer the system configuration screen shows that a numeric coprocessor is present Caution If you need to remove the math coprocessor do not try to do it yourself This procedure requires a special extraction tool Contact your Authorized Epson Servicer Connecting Optional Devices 4 17 ...

Page 76: ... off the top of the computer turn it right side up and align it over the front of the computer Make sure the keyboard cables are not twisted 2 Carefully press the keyboard forward until the tabs on the keyboard fit into the slots on the computer s cover 3 Press down on the front of the keyboard until it is securely in place 4 18 Connecting Optional Devices ...

Page 77: ... down with the front facing you and replace the three screws on the front side of the cover 5 Turn the computer right side up 6 Connect any optional devices that you may have installed previously Connecting Optional Devices 4 19 ...

Page 78: ...rify or change the following settings Standard CMOS settings such as the current date and time and drive types Advanced CMOS settings such as typematic rates startup functions and password checking Advanced chipset settings such as power management functions The configuration you define through the Setup program is stored in a special area of memory called CMOS RAM This memory is backed up by a ba...

Page 79: ...press to start the Setup program If you have already enabled the Password function for the Setup program you will be prompted to enter it now You see the first menu screen Press or to move from one menu item to the next The screen displays a brief description of the highlighted menu item When the correct procedure is highlighted press to start the operation 5 2 Running Setup ...

Page 80: ... on that screen Their functions are described in the following table Each screen lists the keys available use only the keys listed for that screen Key s Function I Cancels the current screen and returns to the previous menu Move between options on the screen I I Change the value of an option on the STANDARD CMOS SETUP screen Change the value of an option on the or ADVANCED CMOS SETUP or ADVANCED C...

Page 81: ...y configure your system to the default settings When you select this option the program asks you to confirm that you want to load the defaults Saving Your Selections The changes you make in the Setup program are temporary until you save them This is important to remember in case you change any settings by mistake and want to return to your previous settings Whenever you want to save your new setti...

Page 82: ...s Press and The system restarts with the previous configuration settings Changing the Standard CMOS Setup When you select the STANDARD CMOS SETUP option from the main menu you see this screen Press or to select the option you want to change The Setup program displays information about each option as you highlight it Use or to change the value of an option Press to return to the main menu Running S...

Page 83: ...les daylight savings Hard disk C type Identifies the hard disk drive installed in the computer this setting is accurate for the factory installed hard disk do not change it Hard disk D type Always set to Not Installed Floppy drive A Identifies the diskette drive which is 1 44MB 3 inch do not change this setting Floppy drive B Always set to Not Installed unless you install an optional external disk...

Page 84: ... When an option is highlighted you can press to display information about the option including the possible settings Use or to change the value of an option Press to return to the main menu The options on the ADVANCED CMOS SETUP screen are described in the following table Note that the Setup program displays the possible settings for each option when the option is highlighted and you press the key...

Page 85: ...above 1MB Memory Test during system startup disabling this option speeds up the startup process Memory Test Enables or disables an audible ticking sound as Tick Sound memory Is tested during system startup Hit Del Enables or disables the message that prompts you to Message Display run the Setup program if you disable this message you will not see Hit Del If you want to run Setup you can still star...

Page 86: ...tain operations faster LCD Contrast Enables or disables the LCD contrast enhancement Enhancement feature to enable this feature you can specify foreground background or both Full Height Enables or disables a full height cursor the normal Cursor cursor is an underscore _ the full height cursor Is a rectangle Internal cache Enables or disables the 1KB Internal memory cache memory built into the micr...

Page 87: ...When you select the ADVANCED CHIP SET SETUP option from the main menu you see this screen Press or to select the option you want to change When an option is highlighted you can press to display information about the option including the possible settings Use or to change the value of an option Press to return to the main menu 5 10 Running Setup ...

Page 88: ... computer goes Into Suspend mode Enables or disables a timeout period for the hard disk drive if enabled and the hard disk drive Is not accessed for the specified period of time the computer goes Into Suspend mode Enables or disables a timeout period for the system if enabled and the system is not accessed for the specified period of time the computer goes into Suspend mode Highlight the option yo...

Page 89: ...rd Type the current password When you enable a password for the first time the current password is AMI You see the following prompt Enter NEW password Type your password using up to six characters To protect your password the screen does not display what you type After typing the password press Then you see the following prompt Re Enter NEW Password Type the same password again and press This conf...

Page 90: ...r operating system The physical formatting of a hard disk is a separate step that is usually done at the factory by the disk manufacturer Caution Physically formatting a hard disk erases any data it contains Be sure to back up any data on your hard disk before you format it If you are unsure whether formatting is necessary contact your Authorized Epson Servicer or call the Epson Connection 1 800 9...

Page 91: ...rd Disk Format The hard disk in your computer has already been formatted for you You need to reformat this hard disk only if you have a serious problem with the drive However before formatting a disk with data on it try every other recovery procedure described in your operating system manuals Then if possible back up all the data on the disk before you begin You must still partition and format the...

Page 92: ...you format the disk the format program analyzes the surface of the hard disk to determine the bad tracks Auto Interleave This option is available for service personnel only You should never select this option Media Analysis This test identifies the bad tracks on the hard disk by analyzing the surface of the disk to find them The program uses three different bit patterns formatting the disk marking...

Page 93: ...llowing devices using System diagnostics See the table on page 6 7 for a list of the tests available for each device Note The Write read checks for the hard disk drive and diskette drive destroy data on the disk Be sure to backup any data on your hard disk or insert a blank formatted diskette before you run this test Also be sure to do this if you select Run all above checks Running System Diagnos...

Page 94: ... root directory of your Reference diskette You see a menu bar at the top of the screen with Items Detected highlighted Press You see a list of all the testable devices the computer detects in your system Check to be sure the list is correct If the list is not correct press to select Quit and press Run the Setup program to make sure any missing devices are configured properly See Chapter 5 for inst...

Page 95: ...meric Coprocessor System Memory Diskette Drive A Hard Disk Drive 1 Serial Port C O M 1 Serial Port COM2 Printer Port LPT1 Video Adapter Test Keyboard Test Press or to highlight the device you want to delete and press The device is removed from the Delete menu You can delete as many devices as you want When you are finished deleting devices press to select Execute and see Running Tests on page 6 5 ...

Page 96: ...vices that the computer has not detected as Enabled in your system You also see any devices that you deletd from the Delete menu in case you want to be able to test them Press or to highlight the device you want to add and press The device is removed from the Add menu and added to the Execute list You can add as many devices as you want When you are finished adding devices press to select Execute ...

Page 97: ...ighlight the device you want to test and press You see the Repeat prompt How often to repeat test 1 3 If you want to run the test once press To run the test more than once type the number of times and press 4 If there is only one test for a device the program begins testing immediately If there is more than one test for the device you see a submenu such as the following HARD DISK DRIVE S AND CONTR...

Page 98: ...exit System diagnostics press to select Quit and press You return to the operating system command prompt Resuming From an Error If an error prevents a test from running you see a Runtime Error information box Follow the instructions on the screen to solve the problem If an error occurs during a test the test stops and an error message appears Follow the instructions on the screen to print the mess...

Page 99: ...e Drive s check selected diskette drive requires A or B Random seek check a formatted dskette for some Write read check tests Disk change check Run all above checks Hard Disk Seek check Tests the operation of the Drive Write read check internal hard disk drive Read verify check Run all above checks Serial Port s Tests the selected serial port COM1 or requires a loop back connector COM2 Printer Por...

Page 100: ... a blank formatted diskette before running this test Error Messages The following table lists all the error messages that may appear during System diagnostic testing System diagnostic error messages Error code System board 0101 0102 0103 0104 0105 0105 0106 0107 0108 0108 0108 0109 0110 0111 Message CPU error ROM checksum error Timer counter register error Timer counter error Refresh error DMA con...

Page 101: ...arity error Keyboard is non standard or defective Diskette drive controller error Sequential seek error Random seek error Write error Read error Remove error Insert error Coprocessor not installed Coprocessor initialize error Coprocssor invalid operation mask error Coprocessor st field error Coprocessor comparison error Coprocessor zero divide mask error Coprocessor addition error Coprocessor subt...

Page 102: ...System diagnostic error messages continued Error Code Message Hard disk drive 1701 Seek error 1702 Write error 1703 Read error 6 10 Running System Diagnostics ...

Page 103: ...ypes of monitors the VGA drivers identify your display adapter and monitor for the software These drivers are files your software uses to communicate with your display adapter and monitor A utility is a program that supports the processes of a computer The utilities on your VGA diskette allow you to change the system s default graphic configuration and enhance your system operation by setting vari...

Page 104: ...olors Lotus 1 2 3 version 2 x 100 x 60 text Microsoft Windows version 3 0 640 x 480 16 800 x 600 16 WordPerfect version 5 1 800 x 600 16 Note These drivers and utilities are designed for systems running MS DOS If you are using another operating system see the documentation that came with it for information about the VGA drivers you can use If you are displaying data simultaneously on both the LCD ...

Page 105: ...the Reference diskette to this directory At the command prompt type the following and press COPY A LOTUS L100X60 DRV Type INSTALL and press to run the Lotus installation program From the main menu select Advanced options and press Then select Add new drivers to library and press When the program finishes adding drivers to the library select Modify current driver set and press Select Text display t...

Page 106: ...d your driver 100 x 60 SET you would type the following and press 123 100 x 60 Microsoft Windows Version 3 0 The Microsoft Windows driver supports a resolution of 800 x 600 with 16 colors Note Even though this driver is specific to Windows 3 0 you can use it with Windows version 3 1 Check with the Epson Connection for the availability of the Windows 3 1 driver To install the driver follow these st...

Page 107: ...iver you want and press Remove the Reference diskette from drive A Complete the Windows Setup WordPerfect Version 5 1 The WordPerfect driver supports high resolution text and graphics WordPerfect allows text and graphics drivers to be set up separately so be sure to install both of these drivers Follows these steps 1 Log onto the WordPerfect directory on your hard disk This directory is normally c...

Page 108: ...it Your selection is saved and used for displaying text and the print preview and graphics functions of WordPerfect Using the VGACONF Utility Program The Reference diskette includes the utility program VGACONF This program is located in the UTILS directory You may have copied the program to a directory on your hard disk if so log onto that directory before running the program This utility allows y...

Page 109: ...o highlight the selection you want and press The Display Status option displays the current settings For example Press any key to return to the main menu Select option allows you to change the current settings You see this screen Using the VGA Utilities 7 7 ...

Page 110: ...een and a VGA monitor panel refers to the LCD screen The following table shows the display modes available for each option Option Display mode I Reverse SimulSCAN panel Bold Panel Contrast enhancement Panel Expand SimulSCAN panel Vertical position I Panel Display CRT SimulSCAN panel Bus width CRT SimulSCAN panel Inhibit font CRT SimulSCAN panel Cusor Panel RGB Panel Standby Timer allows you to set...

Page 111: ... enter M the LCD panel will enter standby mode if video memory is not accessed for the specified number of minutes Press to initiate the timer The standby mode initiated by the VGACONF utility is exactly the same as Suspend mode You can reactivate the system at any time by pressing the key Select Quit to exit the VGACONF program and return to the operating system prompt Using VGACONF From the Comm...

Page 112: ... and graphics reverse video DTEG Disable text and enable graphics reverse video BOLD Enable bold mode NOBOLD Disable bold mode ATTREMUL Disable Automap NOATTREMUL Enable Automap BKGND Enable background enhancement FRGND Enable foreground enhancement BKFRGND Enable background and foregound enhancement EXPAND Enable expand mode NOEXPAND Disable expand mode I CENTER Center the screen on the panel TOP...

Page 113: ...lect RGB weighting 5 2 9 W295 Select RGB weighting 2 9 5 W592 Select RGB weighting 5 9 2 W925 Select RGB weighting 9 2 5 W952 Select RGB weighting 9 5 2 You can abbreviate any of the VGACONF options by typing only the first three characters of the option name The following examples show how to enter the VGACONF command with the options parameters VGACONF VGACONF VGACONF VGACONF VGACONF VGACONF SIM...

Page 114: ...h the following problem solving sections The computer won t start Battery problems AC adapter problems The LCD screen is blank The external monitor screen is blank The computer locks up Password problems Diskette problems Diskette drive problems Hard disk problems Software problems Printer problems Memory module problems Math coprocessor problems CMOS battery problems Troubleshooting A 1 ...

Page 115: ...s of disk drives and options and the names and version numbers of any software programs you are using You can find the serial number on the underside of the computer If you are able to use your computer follow these steps to obtain information about your configuration as well as the version numbers of your system BIOS and MS DOS 1 2 3 4 Turn on your computer or to restart it As the computer perfor...

Page 116: ...initialization The error message remains on the screen and the computer locks up If this happens contact your Authorized Epson Servicer as soon as possible to report this information and the error message The Computer Won t Start If your computer does not start when you press the power button try the following 1 Check the power light If it is on the computer is on and you should follow the steps u...

Page 117: ...t of power 4 If you replace the battery pack and the computer does not work properly the new battery may not be fully charged Recharge this battery until it reaches its maximum capacity 5 If the power light still does not come on connect the AC adapter to the computer and plug the adapter into an electrical outlet Turn on the computer and see if it works using the AC adapter If the computer works ...

Page 118: ...ck on If the power light is still off go to step 2 Check the connections make sure the AC adapter cable is securely connected to the computer and that the power cable is properly connected to both the AC adapter and an electrical outlet If the connections are good then check the electrical outlet to make sure it is supplying power For example plug a portable lamp into the socket and turn it on If ...

Page 119: ...ume switch is set to the left The computer may just be in Suspend mode 4 If you have connected an external monitor to your computer and you are using it you should not have any problem displaying information on both screens at the same time Check your VGACONF settings see Chapter 7 for details The External Monitor Screen is Blank If you are using an external monitor and no image appears on its scr...

Page 120: ...ks and an image still does not appear on your monitor when you turn on the computer contact your Authorized Epson Servicer The Computer Locks Up If the computer locks up and does not respond to your keyboard entries try the following 1 Wait a few minutes to see if the computer really is disabled Some operations take longer than others to perform For example a spreadsheet program takes longer to re...

Page 121: ...lected in Setup either whenever you start or reset the computer or whenever you start the Setup program If you have trouble using your password try the following 1 2 3 If you type the password and then see an x type it again and press If you type it wren three times the computer locks up Press to reset the computer and try again If you know the current password but you want to change it see Chapte...

Page 122: ...witch to remove the write protection Ordinarily it s a good idea to leave program diskettes write protected but some programs don t work properly using write protected diskettes 4 Is the diskette formatted A new diskette must be formatted before you can store data on it See your operating system manual for instructions 5 Is the diskette damaged Use your backup copy of the diskette and repeat the o...

Page 123: ...blems If you have problems with your hard disk drive check the following 1 2 3 Check the hard disk drive light If you enter commands such as COPY to access the hard disk the light should be on when the computer accesses the drive If the light is blinking there may be a problem with the hard disk Contact your Authorized Epson Servicer if this occurs If you have set a time out for the hard disk in t...

Page 124: ...orrect directory If you are using a program on a diskette make sure you have inserted the correct diskette in the correct drive 2 Your computer can run at either Turbo speed 25 or 33 MHz or Normal speed 8 MHz While almost all programs work properly at the faster speed some must run at the slower speed Check your software manual to see if this is the case and change the CPU speed if necessary See C...

Page 125: ...ical support Printer Problems You can solve most printer problems by following the instructions in your printer manual If you have just connected the printer first check that the printer has power and is correctly connected to the computer See Chapter 4 for instructions on connecting a printer The printer manual also gives instructions on cable connections If you have a serial printer or if you ha...

Page 126: ...nual for more information Numeric Coprocessor Problems If you have installed a numeric coprocessor but it doesn t seem to be operating properly check the documentation that came with it for troubleshooting information and for any diagnostic procedures you can perform Contact your Authorized Epson Servicer or call the Epson Connection if you cannot solve the problem Caution Do not attempt to remove...

Page 127: ...ry should last more than a year before you need to replace it When this battery s life is exhausted you see a message similar to the following System battery is dead Replace and run Setup Contact your Authorized Epson Servicer to install a new battery for you or call the Epson Connection for referral information A 14 Troubleshooting ...

Page 128: ...n set You need the information in this appendix only if you are not using a telecommunications software program and need to use the fax modem s built in set of commands When to Issue Commands Your fax modem has two operating states command state and on line state The fax modem must be in command state to receive commands from you in on line state your keystrokes are passed directly to the telephon...

Page 129: ...g up immediate H1 Off hook ready to dial 0 Returns modem s product ID code I 1 Returns modem s ROM checksum I 2 Tests modem s internal memory I 3 Speaker volume high I MO Speaker always off Ml Speaker on until carrier is detected M2 Speaker always on M3 Speaker on after last digit dialed off when carrier is detected O0 Return on line O1 Return on line and initiate equalizer retrain 2400 bps Q0 Res...

Page 130: ... Software reset recalls user configuration 0 Z1 Software reset recalls user configuration 1 C0 DCD signal always on C1 DCD signal on when carrier present I D0 Ignore DTR signal I D1 Returns to command mode when an on to off DTR transition occurs I D2 I Hangs up and returns to command mode when an on to off DTR transition occurs I D3 Resets when an on to off DTR transition occurs I F Loads factory ...

Page 131: ...user configuration 0 on power up Y1 Load user configuration 1 on power up Zn x Store phone number x in location n n 0 3 Dial Modifiers Modifier Description Hookflash 0 5 seconds Pause 2 seconds Return to command state after dialing Wait for 5 seconds if silent answer P Pulse dialing R Reverse to answer mode S Dial stored number T Touchtone dialing W Wait 30 seconds for second dialtone B 4 Fax Mode...

Page 132: ...P level 5 reliable link connection G0 Disable modem port flow control G1 Enable modem port flow control J0 Disable speed adjust at serial Port J1 Enable speed adjust to match serial port K1 Empty data buffers and immediately send a break to the remote system K3 Send a break to the remote modem in sequence with data I K5 Send a break to the remote terminal or computer in sequence with any data rece...

Page 133: ...5 I Unidirectional keep CTS off until connection established Q6 Kept CTS off until connection for bidirectional hardware flow control established S Display on line modem status T0 Inactivity timer Disables timer Tn Sets timer to number n up to 90 minutes U Accept a reliable link request Independent of whether or not the modem originated or answered the call V0 Disable extended MNP and V 42 result ...

Page 134: ...auto reliable fallback character n 0 to 127 Disable data compression Enable NMP5 data compression Hang up without clearing buffer Clear the receive buffer before hanging up Maximum string length n 6 to 250 default 32 Set dictionary size to 512 entries and one two way mode BTLZ Set dictionary size to 1024 entries and one two way mode BTLZ Set dictionary size to 2048 entries and one two way mode BTL...

Page 135: ... sec 002 S7 Wait time before carrier 1 255 1 sec 030 S8 Dial pause duration 0 255 1 sec 002 S9 Carrier response time 1 255 1 10 sec 006 S10 Carrier loss disconnect 1 255 1 10 sec 014 S11 Tone duration and 10 255 1 1000 sec 095 spacing S12 Escape guard time 0 255 1 50 sec 050 S13 Reserved S14 Option register None AAH see below S15 Reserved S16 Self test register S17 Reserved S18 Self test timer val...

Page 136: ...ct speed Default 07H 005 I 40H I Option Registers S14 Bit mapped configuration register bit 0 Unused bit 1 0 Command echo disabled E0 I 1 Command echo enabled default E1 bit 2 0 Result codes enabled default Q0 1 Result codes disabled Q1 bit 3 0 Digit result codes V0 1 Word result codes default V 1 bit 4 Unused bit 5 0 Tone dial T 1 Pulse dial default P bit 6 Unused bit 7 0 Answer mode 1 Originate ...

Page 137: ...ON C0 1 DCD tracks the actual state of the data carrier default C1 bit 6 Unused bit 7 0 Long Space Disconnect disabled default Y0 1 Long Space Disconnect enabled Y1 S22 Bit mapped configuration register bit 01 00 Speaker volume low L0 01 Speaker volume low L1 10 Speaker volume medium default L2 11 Speaker volume high L3 bit 23 00 Speaker disabled M0 01 Speaker on until carrier detected default M1 ...

Page 138: ...Bit mapped configuration register bit 0 Unused bit 123 000 Communications rate 300 bps 001 Communications rate 600 bps 010 Communications rate 1200 bps 011 Communications rate 2400 bps 100 Communications rate 4800 bps 101 Communications rate 9600 bps I bit 45 00 Even parity selected AT entered in even parity 01 Space parity selected AT entered in space parity 10 Odd parity selected AT entered in o...

Page 139: ...V 42 then MNP 5 connection if fail negotiate MNP 2 4 with constant terminal speed S46 Protocol selection 136 Execute LAPM protocol with no BTLZ compression 138 Execute LAPM protocol with BTLZ compression S48 V 42 negotiation action 0 Disable the negotiation process remote modem must be configured the same 3 Half duplex negotiation your modem remains silent during detection 7 Enable negotiation I 1...

Page 140: ...RIER ERROR 3 4 5 Carrier lost or not detected Command entry error Connect at 1200 bps CONNECT 1200 NO DIALTONE BUSY NO ANSWER CONNECT 2400 CONNECT 1200 REL 4 CONNECT 1200 REL 5 CONNECT 2400 REL 4 CONNECT 2400 REL 5 CONNECT 1200 V 42 CONNECT 2400 V 42 2 Telephone is ringing 6 No dial tone detected 7 Called line was busy 8 Called Iine did not answer 10 C o n n e c t a t 2 4 0 0 b p s 22 MNP Class 4 ...

Page 141: ...tical notify the customer that temporary discontinuance of service may be required however where prior written notice is not practical the telephone company may discontinue service forthwith if such action is reasonable in the circumstances You will be informed of your right to file a complaint with the FCC The telephone company may make changes in its communications facilities equipment operation...

Page 142: ...t interference will not occur in a particular installation If this equipment does cause interference to radio or television reception which can be determined by turning the equipment off and on the user is encouraged to try to correct the interference by one or more of the following measures Reorient or relocate the receiving antenna Increase the separation between the equipment and receiver Conne...

Page 143: ...andable to a maximum of 8MB the first 640KB is conventional memory and 128KB is used for shadow RAM the rest can be used as extended or expanded memory ROM BIOS 128KB on a single one time PROM includes system BIOS VGA BIOS and the Setup program Numeric Socket for optional Cyrix Cx387SLC or coprocessor Intel 387SX multifrequency numeric coprocessor Clock Real time clock calendar and CMOS calendar R...

Page 144: ...D sub female connector for analog VGA or SVGA monitor maximum resolution of 800x 600 dots Centronics compatible 25 pin D sub female connector standard 8 bit parallel RS 232C programmable asynchronous 9 pin D sub male connector 6 pin mini DIN connector for a PS 2 type pointing device or for the mouse keyboard adapter which allows you to connect both a pointing device and an external keyboard Built ...

Page 145: ...of gray 0 3 mm high contrast two film paper white backlit by one cooled cathode fluorescent tube CCFT continuous brightness and contrast controls power saving feature brightness and contrast enhancement 15 5VDC 2 4A continuous AC adapter with international voltage input 50 60 Hz Rechargeable internal NiCad battery pack 8 cell 9 6 volt 1 7AH 16 3W Caution Use only the AC adapter and battery designe...

Page 146: ...C 4 to 140 F Humidity Operating 30 to 90 non condensing Non operating 5 to 95 non condensing Acoustical 35dB 1 meter Noise Altitude Operating 61 to 3048 m 200 to 10 000 feet Non operating 261 to 10 668 m 200 to 35 000 feet Caution When travelling by airplane be sure to take your computer into the passenger compartment as carry on luggage to prevent it from being stored in an unpressurized storage ...

Page 147: ... 3AWG or HAR 300V 10A or 13A AC plug Plug type Europe 240V 10A to 16A UK 240V 10A Australia 240V 10A Reference standards Power cord CEE 7 7 HAR IEC 83 1 00 mm2 IEC 127 300V 10A HD 21 BS 1362 HAR BS 1363A 1 00 mm2 IEC 83 300V 10A IEC 127 HD 21 EN 60320 1 ASTA mark AS C112 HAR IEC 127 1 00 mm2 HD 21 300V 10A North America 240V 15A ANSI C73 20 UL CSA Listed NEMA 6 15 P Type SJT IEC 83 No 18 3AWG UL 1...

Page 148: ...he central processing unit CPU of your ActionNote which controls all the processing of your computer AC adapter The device that converts AC voltage from a wall outlet into the proper DC voltage to power your ActionNote The AC adapter also charges the battery pack while it is in the computer Address A number or name that identifies the location of each piece of information in the computer s memory ...

Page 149: ...t The internal fluorescent illumination of the computer s LCD screen LCD screens that are not backlit are difficult to see without an external source of light Backup A copy of a program data file or disk kept in case the original is damaged or lost Base memory See Conventional memory Batch file A type of file that allows you to execute a series of MS DOS commands by typing one command Batch files ...

Page 150: ...OS Bif A binary digit 0 or 1 The smallest unit of information a computer can store Byte A sequence or group of eight bits that represents one character of data in the ASCII encoding system Character Any number letter punctuation mark or graphic symbol which can be represented by one byte of data Chip A hardware component of your system formally known as an integrated circuit Examples of chips incl...

Page 151: ... CMOS RAM is backed up by a battery and is not erased when you turn off the computer Code A system of symbols for representing data or instructions Also any software program or part of a program COM1 The name that MS DOS uses to identify the primary serial port COM2 The name that MS DOS uses to identify the secondary serial port Command An instruction you give the computer to direct it to perform ...

Page 152: ...file to customize your system by installing device drivers setting limits for files and buffers and specifying MS DOS commands to be run during startup Configuration The particular arrangement of the hardware components installed in or attached to your computer For example your configuration might include the built in 3 inch diskette drive a hard disk a trackball and an internal modem Control code...

Page 153: ...you to leave the program diskette in the diskette drive while you are using it Some also require the computer to be running at low speed instead of high speed CPU Central Processing Unit The integrated circuit chip responsible for integrating program instructions performing calculations and controlling all input and output operations CPU speed The speed at which the CPU can execute commands The Ac...

Page 154: ...s Data diskette A formatted diskette you use to store data files Data file A file you create using an application program for example a memo created by a word processor as opposed to a file containing program code Default A value or setting that takes effect when you turn on or reset the computer Also the response to a command that the system uses unless you provide a different response Device A p...

Page 155: ...articular area on a disk part of a structure for organizing files into groups Disk A general term meaning either a diskette or a hard disk See also Diskette and Hard disk Disk drive The physical device that allows the computer to read from and write to a disk A diskette drive has a slot into which you insert a diskette A hard disk is permanently sealed inside its own container Diskette A flat piec...

Page 156: ... equipment in the system Examples of drivers include expanded memory managers display drivers printer drivers and mouse drivers Embedded numeric keypad See Numeric keypad EMS or Expanded memory Memory that can be used by applications and programs conforming to version 4 0 of the Lotus Intel Microsoft LIM Expanded memory Specification EMS Expanded memory does not have addresses like conventional or...

Page 157: ...drive File A group of related pieces of information sometimes called records or entries stored together on a disk Text files consist of words and sentences Program files consist of codes which computers use to perform instructions Floppy disk See Diskette Fn A key provided on the ActionNote keyboard to access alternate key functions for the embedded numeric keypad and the and keys Format To prepar...

Page 158: ...tem commonly used by programmers Any decimal number between 0 and 255 can be represented by a two digit hexadecimal number in the range O through FF High density A type of diskette format A 3 inch high density diskette has a capacity of 1 44MB Input Output I O port See Port Integrated circuif See Chip Interface A hardware or software connection used to transmit data between equipment or programs G...

Page 159: ... portable computers LED Light Emitting Diode An indicator light such as those used for the ActionNote power disk drives and keyboard settings LIM EMS 4 0 Lotus Intel Microsoft Expanded Memory Specification version 4 A standard that enables certain applications to use more than 640KB of memory Main memory See Base memory Math coprocessor See Coprocessor Megabyte A unit used to measure storage space...

Page 160: ...t remains in RAM so you can access it while another program is running MHz Megahertz A unit used to measure the oscillation frequency of a computer s internal timing clock One megahertz is one million cycles per second Microprocessor A CPU chip such as the 486SLC See CPU Modem Modulator Demodulator A serial device that allows the computer to send and receive data over the telephone lines Monitor A...

Page 161: ...e either by turning on the Num Lock function or by holding down the keys Operating speed See CPU speed Operating system A collection of programs for example MS DOS that control the operation of a computer The operating system determines how programs run on the computer and supervises all input and output See also MS DOS Parallel Away of organizing communications between two pieces of computer equi...

Page 162: ...ame The list of directories the MS DOS operating system must search through to locate a file For example the pathname for a file named CONTRACT TXT that is located in the BUSINESS subdirectory is BUSINESS CONTRACT TXT Peripheral device An external device such as a printer or mouse connected to the computer Port An input output connection on a computer to which you can attach a peripheral device Po...

Page 163: ...skette or hard disk See also ROM Read To copy data from one area to another For example when you open a text file stored on disk the computer reads the data from the disk and displays it on the screen Read write head The physical device inside a disk drive that reads and records data on the magnetic surface of a disk Real time clock A battery powered clock in the computer that keeps track of the c...

Page 164: ...l other directories are subdirectories of the root directory or of other subdirectories RS 232C A standard serial interface The ActionNote has a connector that lets you attach an RS 232C compatible device to your computer Sector A contiguous section of a disk track that provides an address at which the computer can access data Self tests See Power on diagnostics Serial A way of organizing communic...

Page 165: ...m the root directory Suspend mode The power saving mode your computer enters after you slide the suspend resurne switch to the right or it detects a standby timeout period specified in the Setup program Switch An option you can add to a command that modifies the way the command works Switches are usually preceded by a forward slash For example if you add the S switch to the FORMAT command MS DOS i...

Page 166: ...A type of program designed to allow you to change computer settings and perform useful applications The utility programs for your ActionNote are included on the Reference diskette VGA Video Graphics Array A type of high resolution display adapter The VGA capabilities of the ActionNote can display resolutions up to 640 x 480 on the LCD screen and up to 800 x 600 on an external VGA monitor Write To ...

Page 167: ...iskettes 2 15 Basic input output system 5 1 C 1 Battery compartment cover 1 7 Battery pack s disposal 3 6 extra Intro 3 problems A4 recharging 3 5 6 replacing 3 2 specifications C 3 unpacking 1 2 using 3 2 Battery power saving Intro 2 2 17 Baud rate serial port 4 6 BIOS 5 1 C 1 Break key 2 8 Brightness control 2 12 switch 1 4 2 12 Built in VGA adapter 7 1 C Caps Lock LED 1 5 carrying case 2 Centro...

Page 168: ...l 2 7 Cyrix Cx387SLC coprocessor 2 3 4 16 C 1 D Dallas clock chip A 14 C 1 Data communications software Intro 2 4 10 DC input port 1 6 1 9 key 2 8 5 2 Device drivers 4 8 9 DIAG BAT batch file 2 3 6 2 Diagnostics see System diagnostics Dial modifiers fax modem B 4 Dimensions physical CA Directories Reference diskette 2 3 Diskette drive s 1 6 2 13 2 15 16 C 3 controller C 2 error messages 6 9 extern...

Page 169: ...tate B 1 connecting 4 5 4 9 10 controller C 2 dial modifiers B 4 FCC information B 14 15 issuing commands B 1 MNP command summary B 5 7 MNP register summary B 12 13 on line state B 1 option registers B 9 12 result code summary B 13 FCC information modem B 14 15 key 2 7 8 G Graphic configuration 7 6 H Hard disk drive auto interleave 5 15 backing up 2 16 controller C 2 error messages 6 9 format 5 14...

Page 170: ...gers 2 19 specifications C 1 system 4 13 using 2 17 19 Memory module adding 4 11 15 installing 4 13 16 problems A 13 Microprocessor Intro 1 C 1 Microsoft Windows 2 3 7 2 745 MNP command summary fax modem B 5 7 MNP register summary fax modem B 12 13 Modem see Fax modem Modem FCC information B 14 15 Mouse keyboard adapter Intro 1 1 2 4 7 4 9 MS DOS application programs 2 7 keyboard layouts 2 5 memor...

Page 171: ... 9 controller C 2 enabling 4 9 Ports 1 7 8 Power button 1 6 A 3 cable 1 2 1 9 LED 1 5 management 3 8 5 10 11 source requirements C 5 supply C 3 Power on diagnostics 1 11 A 2 3 Powering computer 3 1 8 Primary parallel port 4 5 PRINTER port 1 7 4 2 4 4 Printer problems A 12 Processing speeds 2 Program stopping 2 9 Protocol serial ports 4 7 key 2 8 PS 2 compatible keyboard Intro 3 4 7 mouse 4 9 point...

Page 172: ...3 7 Simultaneous display 7 2 7 8 Single diskette drive system using 2 15 16 Software data communications 4 10 fax transmission 4 10 Lotus 1 2 3 2 3 7 2 4 problems A 11 12 Windows 1 2 1 13 WordPerfect 2 3 7 2 7 5 6 Speaker controller C 2 Special keys 2 7 8 Specifications C l 5 Speed Intro 2 Standard CMOS setup changing 5 5 6 settings 5 1 5 6 Standard configuration Intro l 2 Standard VGA monitor 7 2...

Page 173: ...bo speed Intro 2 2 11 Turning off computer 2 11 Turning on computer 1 11 13 Typing password 2 4 5 U Unpacking computer 1 2 US keyboard 2 6 Utilities 2 3 7 1 11 V VGA adapter built in 7 1 BIOS C 1 display characteristics 4 3 monitor 4 2 7 1 7 8 resolutions Intro 1 1 4 VGA drivers applications 7 2 installing 7 3 6 Reference diskette 2 3 using 7 1 VGA utilities program 2 3 using 7 1 11 VGACONF utilit...

Page 174: ...e 886 080 211172 Fax 886 2 712 9164 Telex 785 24444 Epson U K Ltd Business Management Dept PC Campus 100 Maylands Avenue Hemel Hempstead Hertfordshire HP27EZ UK Phone 044261144 Free phone linkline 0800289622 Fax 0422227227 Epson France S A B P 320 68 Bis Rue Marjolin 92305 Levallois Perret Cedex France Phone 33 1 4737 3333 Telex 42 10657 Epson Italia s p a V le F lli Casiraghi 427 20099 Sesto S Gi...

Reviews: