background image


2. Structure design 

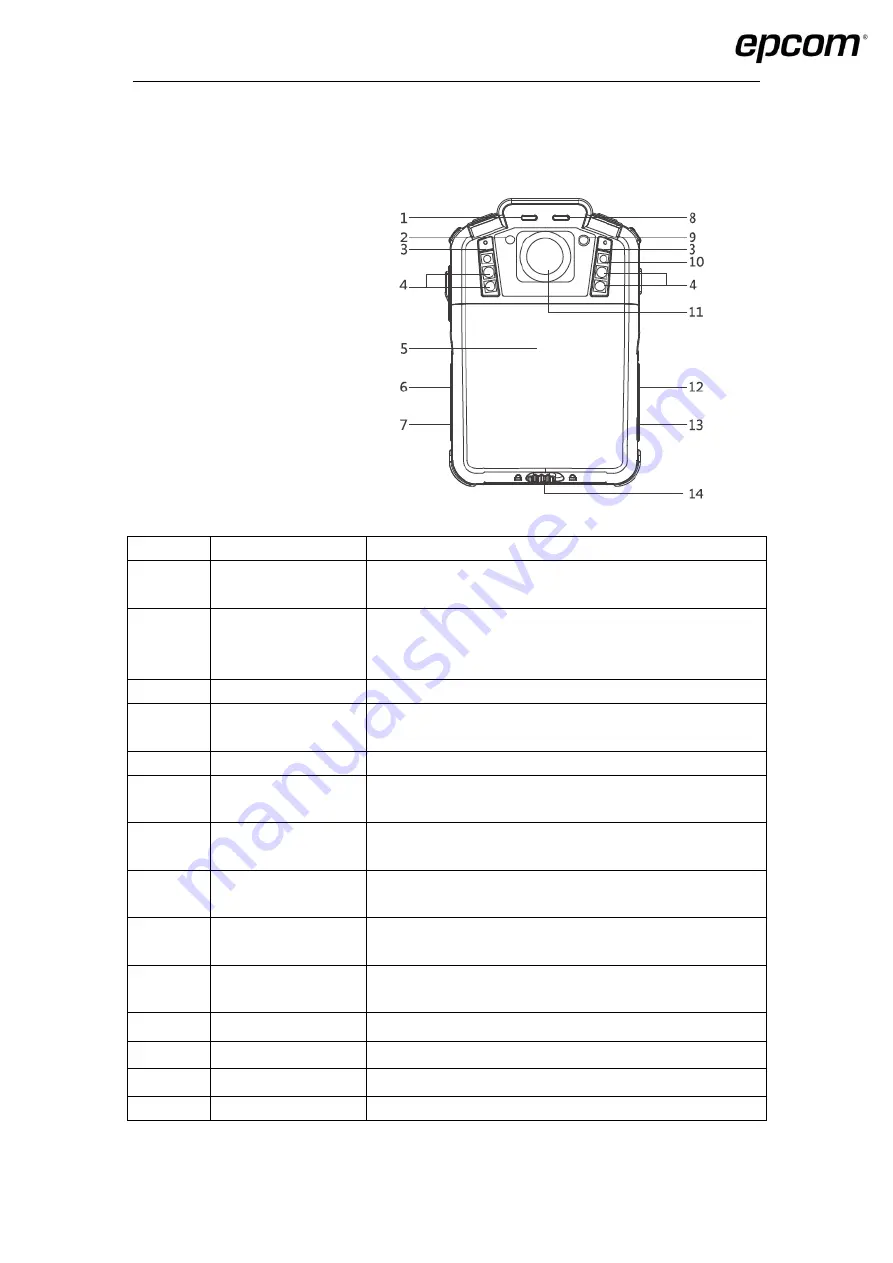
2.1 Front view 


Item 

Name 

Description 

Charge indicator 

Solid red means camera is recharging, solid green means 

camera recharged well. 

IR Sensor 

The sensor will detect the brightness of the environment, 

and then activate the IR light and switch to night vision 

mode. 

Microphone 

Capture the environment voice during the recording mode. 

IR light 

Record clear image in HD in low light situations. 10 meters 

visible. 

Battery cover 

Remove the cover and replace the built-in battery. 

Menu button 

Press the button to enter into the configure menu to modify 

the parameters. 

Playback button 

Press the button to enter into the playback interface during 

the live view mode, review video, image and audio files. 

Status indicator 

Red blinking means video recording, yellow blinking means 

audio recording, solid green means standby. 

Laser light 

Pinpointing an object from a distance, solid or blinking 

mode 

10 

Lighting light 

Short press the power on/off button to enable the light for 

auxiliary lighting. 

11 

Camera 

High definition camera, 140 view angle. 

12 

Audio REC button 

Press the button to start the audio recording only. 

13 

ON/OFF button 

Press this button to start up camera or turn off camera. 

14 

Battery lock 

Slip the lock before open the battery cover. 


Summary of Contents for XMRX5

Page 1: ...XMRX5 User manual...

Page 2: ...Content 1 Introduction 1 2 Structure design 2 2 1 Front view 2 2 2 Back view 3 3 Device operation 4 3 1 Live view window 4 3 2 Main menu 5 4 Device using 10...

Page 3: ...esolution still image capture visible on the LCD screen for instant playback with wide angle swappable battery The rugged design is resilient to withstand demanding work environments faced by law enfo...

Page 4: ...o enter into the configure menu to modify the parameters 7 Playback button Press the button to enter into the playback interface during the live view mode review video image and audio files 8 Status i...

Page 5: ...utomatically 18 Clip locker The place to install different clips 19 Snapshot button Press this button to start capture the snapshots even during video recording mode 20 Line hole Put a line into the h...

Page 6: ...ording icon Yellow means recording 2 Snapshot icon Yellow means snapshot success 3 Recording resolution The resolution that camera recording 4 Storage size The current size of the storage 5 Battery st...

Page 7: ...F 5sec 10sec 30sec 1min 2min 5min 10min Photo pixel 5M 8M 10M 12M 16M 21M 32M Snapshot 2 PCS 3 PCS 5 PCS 10 PCS 15 PCS 20 PCS LCD brightness 1 2 3 4 5 6 7 8 9 10 Screen off OFF 30sec 1min 3min 5min Vi...

Page 8: ...nly is used for video recording invalid for audio recording Sub option Auto 10 minutes 20 minutes 30 minutes auto means it will create a file in almost 2GB size and the time is about one hour depends...

Page 9: ...Screen off Switch off the screen after a certain time if there is any operation which will save the power consumption 10 Video loop When you create one new video recording file if the file size is mor...

Page 10: ...light can be activated in this option auto means when the video recording starts the laser light will flash 1 minute one time For manual mode short press the PTT button to active it When it is in aut...

Page 11: ...turn security password ON or OFF When it is ON it will require the password when the users go to playback mode and menu mode and the default password is 000000 24 IR Sensitive It will help the camera...

Page 12: ...ne Touch Snapshot In power off status long press to turn on the camera and a photo will be taken The status indicator will turn red and flash The photo will be saved in JPG format automatically 5 Reco...

Page 13: ...manual mode In preview mode or during recording a video long press to switch to IR mode Long press again to exit from IR mode 10 White light White light is used for auxiliary illumination when the br...

Page 14: ...connect this camera to power supply for battery charging 1 Charge the camera Connect this camera and adapter via USB cable and connect adapter to power supply to charge the battery In charging status...

Page 15: ...camera for a long time please recharge it every 3 months 15 Replace the built in battery Step1 Drag the battery lock from the left side to the right side and then the cover will be unlock And keep the...

Reviews: