Actual product appearance and functionality may vary from photographs, illustrations and descriptions included in this manual.
OWNER’S
MANUAL
PB175
Page 1: ...Actual product appearance and functionality may vary from photographs illustrations and descriptions included in this manual OWNER S MANUAL PB175 ...
Page 2: ...ons and Usage Statements 1 3 Parts List 4 Base and Remote Overview 5 Quick Reference Guide 6 Installation Guide 7 8 Connecting Strap 9 Syncing Two Bases 10 Headboard Brackets 11 Troubleshooting 12 Notes 13 Español 14 17 Français 18 21 ...
Page 3: ...or under the bed Children should not operate the bed base without adult supervision PACEMAKERS Some products contain Neodymium MAGNETS which may interfere with devices such as pacemakers ICD s and any other device sensitive to magnetic fields It is STRONGLY recommended that owners of such medical devices consult their physician prior to using products that contain Neodymium MAGNETS It is also poss...
Page 4: ...ocess to ensure bases will operate within these standards during normal operating use Normal operating use is defined as the following Adjustable foundation is to be operated with a mattress and load Testing procedures require lifetime cycle tests with up to 120kg distributed load The angle designated α in figure 1 between the back section and the flat section for various configurations of the mat...
Page 5: ...sistent marks remain visible after cleaning seek professional advice PRODUCT RATINGS The lift motors are not designed to operate continuously for more than 2 minutes in an 18 minute time period or approximately 10 duty cycle Attempting to circumvent or exceed this rating will shorten the life expectancy of the product and may void the warranty The massage motors are not designed to operate continu...
Page 6: ...otector Headboard Bracket Components I Headboard Bracket 2 J T Bracket 2 K Spacer 2 L Long Bolts 8 M Short Bolts 10 N Nuts 18 These items are attached to the base for shipping purposes Carefully remove from base and set aside Only included in Twin Long and Cal King Split bases This is an optional item and can be purchased by calling 1 844 534 3676 Before discarding the packing materials ensure all...
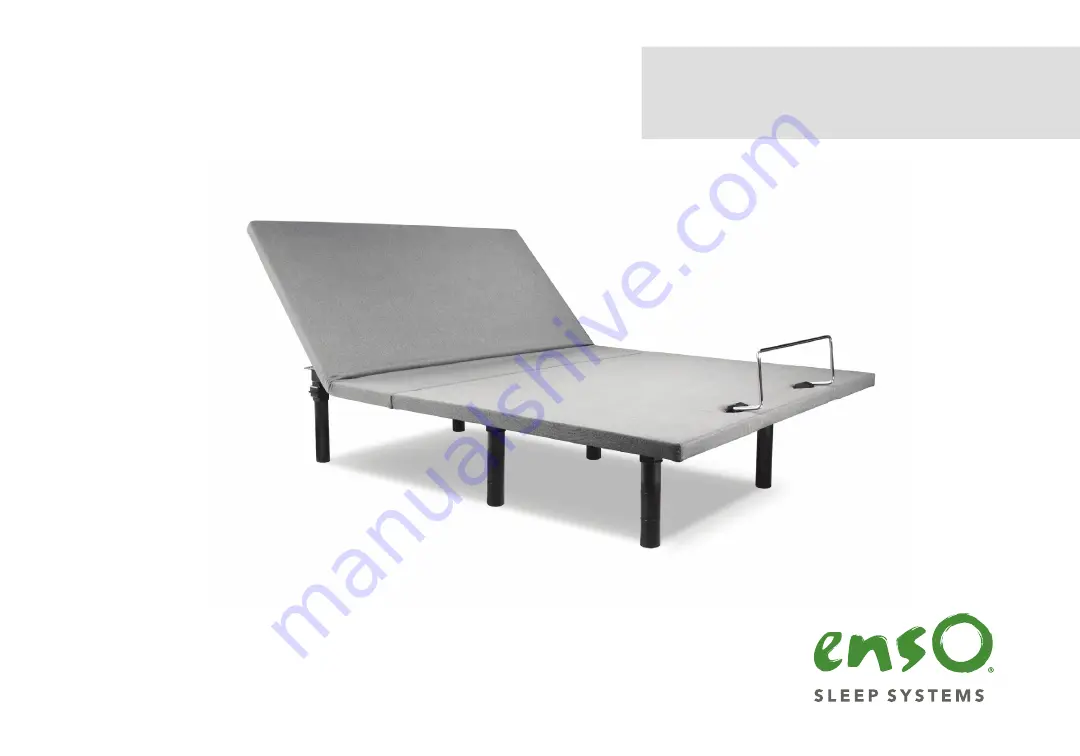
Page 7: ...5 base and remote overview Head Motor Lowers head portion of the base Lifts head portion of the base ...
Page 8: ...erence guide Not to scale For illustration purposes only Read all instructions before beginning installation ELECTRONICS OVERVIEW If installing a split unit see pages 9 10 Remote Head Motor Power Cord Power Supply ...
Page 9: ...Remove the binding straps and packing materials making sure not to puncture the box with any sharp objects Remove the bed base from the box keeping the bottom of the base facing upwards STEP 3 To install the legs unscrew the spacer on the four bed leg hole sites thread the washer over the bolt of the leg with the recessed side facing the leg and tighten by hand Do not over tighten 9 inch leg 9 inc...
Page 10: ...se to a flat position before placing the mattress on top Setup is now complete Test all functions on remote Slide the left side of the mattress retainer bar into the bracket Pull the retainer bar to the opposite bracket and secure the right side For customer support visit www ergomotion com or call 1 844 534 3676 STEP 4 STEP 5 Uncoil power connection cord from the head actuator and plug into Power...
Page 11: ... strap and connect side b to the leg bolt Secure the strap by shifting to the left Re tighten legs Do not over tighten Use the remaining strap and repeat on other end of the base STEP 2 STEP 1 STEP 3 connecting strap optional a b If a split setup is being installed optional plastic connecting straps can be used to help secure the bases together To purchase optional accessories please call 1 844 53...
Page 12: ... connected to the motor Plug end of y cord into wired control plug Repeat for other end of cord and wired control plug from second motor Once the remote has been connected to the control box with the y cord plug bases into power outlet and test all functions Plug remote into Y Cord Unplug bases from power source STEP 3 STEP 2 STEP 1 STEP 4 syncing two bases optional Remote Y Cord Motor Bed A Motor...
Page 13: ...ll the spacer and attachment plate to accommodate the headboard b To install the plastic spacer and attachment plate you will need 2 long bolts and 2 nuts Place the spacer and attachment plate in the desired location and slip the bolts through the holes with the head of the bolt facing outward Position the bolts diagonally on the spacer Use the 9 16 14 mm socket and wrench to tighten the bolts You...
Page 14: ...power cords are properly connected Unplug the base for 1 hour to reset the electronic components Plug bed base into a different electrical outlet or test current outlet with another working appliance a grounded electrical surge protector is recommended If issue is not resolved by following the instructions above locate serial number on warranty card or back of remote and call Ergomotion Customer S...
Page 15: ...13 notes ...
Page 16: ...tía visite www ergomotion com o lea la tarjeta de garantía incluida en la base Uso doméstico y renuncia de responsabilidad legal por uso en hospitales Las camas de base ajustable de Enso están diseñadas solamente para uso doméstico Esta cama no fue diseñada para su uso en hospitales y no está diseñada según las normas de los hospitales No use esta cama con equipos como cámaras para terapia de oxíg...
Page 17: ... Antes de eliminar los materiales de empaque verifique que tiene todos los componentes Todas las partes electrónicas y los componentes que necesitan instalarse están en cajas debajo de la base o adheridos al marco A Wired Remote Control 1 Con cables Contro Remoto 1 B Mattress Retainer Bar 1 Barra de retención del colchón 1 C Legs 6 Patas 6 D Power Cord 1 Cable eléctrico 1 E Power Supply 1 Fuente d...
Page 18: ...tas para verificar la instalación correcta antes de colocar el colchón en la base Vuelva la base de una posición plana antes de colocar el colchón en la parte superior PASO 10 Deslizar el lado izquierdo de la barra de retención en el soporte de colchón Tire de la barra de retención en el soporte opuesto y lograr la derecha La configuración habrá finalizado Pruebe todas las funciones de control rem...
Page 19: ...fijación en la ubicación deseada y el deslizamiento de los pernos a través de los agujeros con la cabeza del perno hacia afuera Coloque los tornillos en diagonal sobre el separador Utilice la opción toma y llave de 9 16 para apretar los tornillos PASO 3 Ahora puede conectar el cabecero de las placas de fijación usando los tornillos cortos restantes y tuercas para fijarlo a los soportes Las cabezas...
Page 20: ...ables de Enso sont créés pour l utilisation individuelle à la maison Cette base n est pas créée pour l utilisation comme lit d hôpital et elle ne satisfait pas les critères d hôpital N utilisez pas cette base avec l équipement de l oxygénothérapie ou près des gazes explosives Les animaux domestiques et les enfants Jetez immédiatement les matériaux d emballage parce qu ils posent un risque d asphyx...
Page 21: ...sont prises en compte Tous les composants électriques qui doivent être installés se trouvent dans les boîtes sous la base ou sont attachés à la charpente A Wired Remote Control Télécommande filaire 1 B Mattress Retainer bar Barre de soutiens du matelas 1 C Legs Pieds 6 D Power Cord Cordon d alimentation 1 E Power supply Alimentation électrique 1 F Y Cord Cordon en Y Pièces Divers non inclus G Conn...
Page 22: ...ns le support Tirez la barre de soutiens du matelas dans le support opposé et attachez le côté droite L installation Élémentaire Est Complète Pour service consommateurs allez au site web www ergomotion com ou appelez le numéro vert 1 844 534 3676 Pg 9 Joindre deux Lits en option Si une configuration partagée est en cours d installation de sangles en plastique de connexion optionnels peuvent être u...
Page 23: ...es boulons diagonalement sur la cale d espacement Utilisez le 9 16 socket et la clé à molette pour serrer les boulons Étape 3 Maintenant vous pouvez attacher le dosseret aux plaques d attachement en utilisant les boulons courts et les écrous pour l attacher dans les équerres Les têtes des boulons doivent être vers l extérieur Utilisez le 9 16 socket et la clé à molette pour serrer les boulons Pg 1...
Page 24: ...Nationwide Customer Service Phone 1 844 534 3676 Fax 1 805 979 9399 Email info ergomotion com Web www ergomotion com 2016 Ergomotion Inc V001_07 2016 Serial Number ...