Electrical Installation
WirelessHART Fieldgate SWG70
24
E Hauser
8. Switch on the power supply. The green power LED should light up immediately.
9. Tighten the cable gland with appropriate torque. See Chapter 5.5 "Cable glands and
5.3
Connecting to Ethernet
WARNING!
• If Fieldgate SWG70 is installed in a hazardous area Zone 2, you may only connect or
disconnect the antenna and cables in the absence of any potentially explosive atmosphere
or if the Fieldgate is not connected to the power supply.
NOTICE!
• Keep in mind that an access point of the Ethernet network has to be available. The
maximum length of the cable running from the Fieldgate to the access point is 100 m,
depending on the cable type and communication speed.
• Please note that older computers, hubs, switches or routers might not feature automatic
TX/RX detection. In this case, use a crossover cable.
• Ensure adequate strain relief for the cables.
• Pay attention to the bending radii of the cables. Do not drop below the permitted bending
radii.
5.3.1
Connecting the "Modbus" or " OPC" versions to
Ethernet
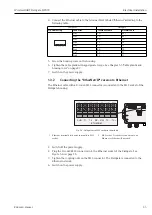
The Ethernet cable is connected directly to the Ethernet terminal block in the Fieldgate.
Fig. 5-3: Fieldgate with 5 cable entries and Ethernet terminal block
1. Switch off the power supply.
2. Unscrew the screws of the housing cover and remove the housing cover. See Figure 4-5
3. Route the Ethernet cable through the cable gland in the middle of the Fieldgate
housing. The permissible cable diameter is between 6 mm and 10 mm.
KL7
KL8
KL9
KL10
+24V
+24V
0V
0V
LINE1
LINE2
A
B
SHD
RS485
T1
T2
RX– RX+ TX– TX+
ON
OFF
SHD
A
B
SHD
RS485
ETHERNET
T1
T2
RX– RX+ TX–
TX+
SHD
ETHERNET
KL11
KL12
KL13
.


