background image

– 27 –

EN

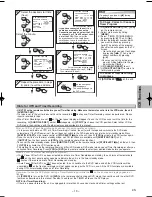
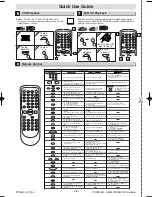
Quick Use Guide

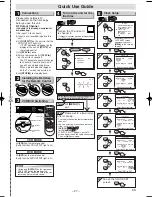
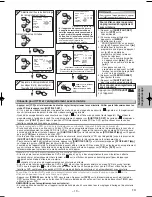
Please refer to “Basic TV
Connection” on the front page
befor you use this unit.

RF Output Channel

If channel 3 is already occupied for
broadcasting,

1)Set your TV to channel 4.
2)Insert a pre-recorded tape into this

unit.

3)Hit 

[OUTPUT] 

on the unit so that the

VCR OUTPUT light is lit.

• If “VCR” light does not appear on the

display of this unit, hit 

[VCR/TV] 

on

the remote control.

4)Hit 

[PLAY

B

]

once.

5)After a few seconds, hit 

[PLAY

B

]

on the unit for 3 seconds.

• The RF output channel will change

to channel 4 from channel 3 and
you will see a playback picture.

• When a picture does not appear

on the TV screen, report step 4).

6)Hit 

[STOP

C

]

to stop playback.

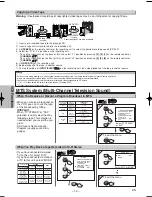
Connections

1

Clock Setup

5

VCR/DVD Switching

3

Installing the Batteries
for the Remote Control

2

Turn on the unit for the
first time

4

2

3

1

VCR

OUTPUT

DVD

POWER

DISPLAY

VCR

DVD

PAUSE

SLOW

VCR/TV

SKIP/CH.

PLAY

STOP

REC/OTR

MENU

SETUP

TOP MENU

MODE

ZOOM

SUBTITLE

T-SET

ANGLE

ENTER

RETURN

SEARCH

MODE

REPEAT

A-B

OPEN/CLOSE

    /EJECT

SPEED

AUDIO

CLEAR/

C. RESET

1

2

3

4

5

6

7

8

9

0

+10

OUTPUT button

DVD OUTPUT 
light

VCR OUTPUT
light

DVD button

VCR button

C

A

B

CA

D

E

B

I

L

K

POWER

REW

F.FWD

PLAY

VCR

OUTPUT

OPEN/CLOSE

REC/OTR

PLAY

STOP

STOP/EJECT

VIDEO

AUDIO

L

R

DVD

CHANNEL

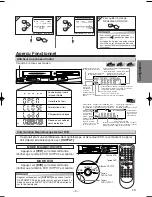
Hit 

[VCR]

on the remote control.

(Verify that the VCR OUTPUT light is lit.)

VCR MODE

Hit

[DVD]

on the remote control.

(Verify that the DVD OUTPUT light is lit.)

DVD MODE

2

2

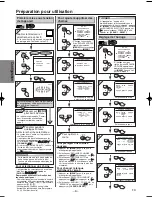
LANGUAGE SELECT

B

ENGLISH

[ON]

FRANCAIS

ESPAÑOL

1

1

Turn on the TV and set it
to channel 3.

• If channel 3 is already occupied for broadcasting,

see“RF Output Channel” section.

3

3

CH 01

AUTO SET UP

No   

No   

Please wait for a few minutes.

After scanning...

• The tuner stops on the lowest memorized

channel.

• You can select only the channels memo-

rized in this unit by using

[SKIP/CH.

G

G

/

K

K H

H

/

L

L

]

(or 

[CHANNEL 

K

K

/

L

L

]

).

• If “AUTO SET UP” appears on the TV

screen again, check the cable connections.
Then, hit 

[

B

]

once again.

Y

Y

es

es

Hit 

[MENU]

to

exit.

Do you connect the cable from the cable box or
the satellite box to the unit’s ANT-IN jack?

YES

NO

TV Screen

Remote Control

VCR

VCR

VCR

VCR

VCR

1

1

- M E N U -

TIMER PROGRAMMING
AUTO REPEAT [OFF]
CHANNEL SET UP

B

CLOCK SET
LANGUAGE SELECT
AUDIO OUT
TV STEREO

[ON]

SAP

CLOCK SET

MONTH  DAY

YEAR

1 0   /   – –

– – – –

HOUR  MINUTE

AM/PM

– –   : – –

– –

CLOCK SET

MONTH  DAY

YEAR

1 0   /   0 3  

– – – –

HOUR  MINUTE

AM/PM

– –   : – –

– –

Select the current month.

Select the current day.

• If the clock is not set, the

CLOCK SET screen
appears when you hit

[MENU]

. In this case, go

to step 2).

VCR

VCR

VCR

VCR

VCR

CLOCK SET

MONTH  DAY

YEAR

1 0   /   0 3

2 0 0 5

HOUR  MINUTE

AM/PM

– –   : – –

– –

CLOCK SET

MONTH  DAY

YEAR

1 0   /   0 3  MON  2 0 0 5

HOUR  MINUTE

AM/PM

0 5   : – –

– –

CLOCK SET

MONTH  DAY

YEAR

1 0   /   0 3  MON  2 0 0 5

HOUR  MINUTE

AM/PM

0 5   : 4 0

– –

CLOCK SET

MONTH  DAY

YEAR

1 0   /   0 3  MON 2 0 0 5

HOUR  MINUTE

AM/PM

0 5   : 4 0

P M AM

B

PM

Select the current year.

Select “AM” or “PM”.

8   

8   

To exit the CLOCK SET
screen

Select the current hour.

Select the current minute.

2

2

3

3

4

4

5

5

6

6

7

7

Hint

Hint

• Hitting only 

[OUTPUT]

on the front panel

DOES NOT switch the mode of the
remote control. You MUST select the cor-
rect mode on the remote control.

or

POWER

MENU

or

or

or

or

or

or

or

 H9803CD_EN.qx3  05.1.31 3:18 PM  Page 27

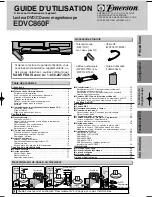
Summary of Contents for EDVC860F

Page 1: ...d Delete Channels 8 Clock Setup 8 Function Overview 9 Front Panel Display 9 VCR DVD Switching 9 Remote Control 10 Installing the Batteries for the Remote Control 10 VCR Functions Playback 11 Other Operations 11 Index Search 11 Time Search 11 Auto Repeat 12 Recording 12 Recording OTR One Touch Recording 12 Timer Recording 12 Hints for OTR and Timer Recording 13 Copying a Video Tape 14 MTS System Mu...

Page 2: ...NG This equipment may generate or use radio frequency energy Changes or modifications to this equipment may cause harmful interference unless the modifications are expressly approved in the man ual The user could lose the authority to operate this equipment if an unauthorized change or modification is made CAUTION TO PREVENT ELECTRIC SHOCK MATCH WIDE BLADE OF PLUG TO WIDE SLOT FULLY INSERT ATTENTI...

Page 3: ...na Grounding If an outside antenna or cable system is connected to the video product be sure the antenna or cable system is grounded so as to provide some protection against voltage surges and built up static charges Article 810 of the National Electrical Code ANSI NFPA No 70 provides information with regard to proper grounding of the mast and supporting structure grounding of the lead in wire to ...

Page 4: ... alco hol spirits ammonia or abrasive CLEANING DISCS When a disc becomes dirty clean it with a cleaning cloth Wipe the disc from the center out Do not wipe in a circular motion Do not use solvents such as benzine thinner commercial ly available cleaners detergent abrasive cleaning agents or antistatic spray intended for analog records CLEANING THE DISC LENS If this unit still does not perform prop...

Page 5: ...ay not play them back Even if they are played back the sound or video quality will be compromised 7 You may play back the unfinalized DVD R RW disc recorded in the video format on our brand s DVD recorder However depending on the recording status of a disc the disc may not be played back at all or normally the picture or sound may not be smooth etc In this case you need to finalize the disc with t...

Page 6: ...the display of this unit hit VCR TV on the remote control 4 Hit PLAY B once 5 After a few seconds hit PLAY B on the unit for 3 seconds The RF output channel will change to chan nel 4 from channel 3 and you will see a play back picture When a picture does not appear on the TV screen repeat step 4 6 Hit STOP C to stop playback RF Output Channel Connections Please refer to Basic TV Connection on the ...

Page 7: ...V VCR 00 90 91 92 93 Hitachi INPUT AUX JVC A V CHANNEL INPUT1 SVIDEO INPUT2 Kenwood AUX LXI Series 00 Magnavox AUX CHANNEL Panasonic TV VIDEO RCA INPUT TV VCR 00 90 91 92 93 Samsung TV VIDEO Sanyo VIDEO Sharp 00 Sony VIDEO1 VIDEO2 VIDEO3 Toshiba TV GAME Zenith 00 ANT IN jack Connect your antenna or cable box here ANT OUT jack Connect the supplied RF cable to the antenna input jack on your TV DVD V...

Page 8: ...OUR MINUTE AM PM Select the current month Select the current day If the clock is not set the CLOCK SET screen appears when you hit MENU In this case go to step 2 VCR VCR VCR VCR VCR or or or or or MANUAL SET UP CHANNEL 30 CATV ADD To Add Delete Channels 1 1 M E N U TIMER PROGRAMMING AUTO REPEAT OFF B CHANNEL SET UP CLOCK SET LANGUAGE SELECT AUDIO OUT TV STEREO ON SAP MENU 2 2 CHANNEL SET UP AUTO S...

Page 9: ...CA D E B I L K POWER REW F FWD PLAY VCR OUTPUT OPEN CLOSE REC OTR PLAY STOP STOP EJECT VIDEO AUDIO L R DVD CHANNEL GROUP P SCAN DVD CD Lights up when the inserted disc is being played back Displays a type of the disc which is inserted on the tray DVD DVD disc CD Audio CD MP3 Lights up when the inserted disc comes to a pause Lights up when the A B repeat function is on Lights up when the repeat fun...

Page 10: ...e tape playback or recording To stop playback To stop playback To stop playback or recording To skip chapters To skip tracks To return to the top file of the highest hierarchy in the program and file list MP3 To change channels To adjust the tracking manually during playback To begin disc playback To begin disc playback To begin tape playback To call up the DVD setup menu To call up the index or t...

Page 11: ...inutes for LP mode and 3 minutes for SLP mode To rewind To fast forward Hints f Hints for Inde or Index Sear x Searc ch h Time Sear Time Searc ch h These functions are not available during recording Hit STOP C C to stop the search If a tape ends during a search your search will be cancelled and the tape will rewind to the beginning PLAYB Time Search You can search backward and for ward a specific ...

Page 12: ...REW F FWD PLAY OPEN REC OTR STOP EJECT VIDEO AUDIO L R CHANNEL 1 1 5 5 6 6 2 2 4 4 Recording OTR One Touch Recording 1 1 M E N U TIMER PROGRAMMING B AUTO REPEAT OFF CHANNEL SET UP CLOCK SET LANGUAGE SELECT AUDIO OUT TV STEREO ON SAP This function will playback a tape repeatedly from the beginning when the tape reaches to the end VCR VCR VCR VCR VCR Auto Repeat or MENU 2 2 M E N U TIMER PROGRAMMING...

Page 13: ...ing hit SUBTITLE T SET so that disappears Hit VCR TV to choose the VCR position Select either VCR or DVD mode then continue with the other features as described in this manual After an OTR or a Timer Recording has been set this unit operates as follows If a tape runs out before an OTR or a Timer Recording is finished the unit ejects the tape and switches to the DVD mode automatically If the DVD po...

Page 14: ...ct 1 Audio Video cables supplied RF cable supplied Back of TV Back of Recording DVD VCR Back of another source or 2 Connect Front input jacks are also available 1 1 M E N U TIMER PROGRAMMING AUTO REPEAT OFF CHANNEL SET UP CLOCK SET LANGUAGE SELECT B AUDIO OUT TV STEREO ON SAP MTS System Multi Channel Television Sound 2 2 To exit the menu CLEAR C RESET 2 2 AUDIO OUT B HIFI ON MONO Select HIFI or MO...

Page 15: ...ed Refer to pages 20 21 Hint Hint Slow forward or reverse speed is different depending on the disc Approximate speed is 1 1 16 2 1 8 3 1 2 Set STILL MODE to FIELD in the Display menu if pictures in the slow playback mode are blurred Refer to pages 20 21 Zoom 1 Hit ZOOM during playback 2 Hit ZOOM repeatedly to select the required zoom factor x2 x4 or OFF 3 Press K L s B to slide the zoomed picture ...

Page 16: ... MP3 MP3 MP3 DISPLAY DISPLAY DISPLAY DISPLAY TRACK 01 1 36 0 01 15 T The name of the file currently in play will be displayed Current repeat setting if active T Track repeat G Group folder repeat A Disc repeat Elapsed playing time of the current track PROGRAM RANDOM or TR Track Current track number Total tracks Current playback status 1 1 2 2 3 3 4 4 Only when you are playing a disc in PROGRAM or ...

Page 17: ...ck is less than 10 minutes Hit CLEAR C RESET to erase the incor rect input at step 2 Hint Hint The Marker display will disappear in about 30 seconds when there is no output To clear a marker select the marker to be cleared at step 2 in the section To set a marker or To return to the marker later and then hit CLEAR C RESET Opening the disc tray or turning off the power will erase all markers Select...

Page 18: ...er track or group Repeat playback are not available with all discs or during repeat A B playback Hint Hint Hit CLEAR C RESET at step 2 to erase the most recently entered track To erase all programmed tracks at once select ALL CLEAR and hit ENTER at step 2 While a program is being played back STOP C C works as follows Hit STOP C C and PLAY B B next so that the programmed playback restarts CD playba...

Page 19: ...LE ON OFF Black Level Setting Adjust the Black Level Setting to make the dark areas of the TV picture brighter DVD DVD V DVD V Virtual Surround You can enjoy stereophonic virtual world on your existing 2 channel stereo system DVD MP3 MP3 MP3 CD CD CD DVD V DVD V 2 2 OFF ON Makes the dark areas brighter OFF Shows the original picture as recorded 3 3 2 2 1 1 Natural effect 2 Emphasized effect OFF No...

Page 20: ...PECT or DOLBY DIGITAL section on page 20 or 21 SETUP MENU Confirm that QUICK is selected You can select the PLAYER MENU TV ASPECT or DOLBY DIGITAL from the QUICK SETUP menu quickly ENTER ENTER ENTER Select the desired language AUDIO ORIGINAL ENGLISH FRENCH SUBTITLE OFF ENGLISH FRENCH DISC MENU ENGLISH FRENCH SPANISH PLAYER MENU ENGLISH FRANÇAIS ESPAÑOL A LANGUAGE menu P20 Step 5 P21 Step 5 P21 Ste...

Page 21: ...ting or STILL MODE Default AUTO See Hint to the right TV ASPECT 4 3 LETTERBOX STILL MODE AUTO STILL MODE AUTO FIELD FRAME Select the desired setting or 5 5 6 6 To exit the menu SETUP SETUP DRC Dynamic Range Control Default ON Set to ON to compress the range between soft and loud sounds DOLBY DIGITAL Default BITSTREAM Set to BITSTREAM when the unit is connected to a Dolby Digital receiver BITSTREAM...

Page 22: ... password Enter your desired four digit password except for 4737 or SETUP PARENTAL PASSWORD Please enter a 4 digit password PARENTAL menu 5 5 OTHERS Setting You can change the other functions Follow the steps 1 to 3 in the CUSTOM Menu section on page 20 4 4 Select the desired item E OTHERS menu 6 6 To exit the menu ANGLE ICON Default ON Set to ON to show the angle icon when multiple camera angles ...

Page 23: ...ing may be necessary Refer to AUTO HEAD CLEANING audio is OK Make sure the VCR is not in the Menu mode No or poor playback picture Change the RF output channel to CH4 Then select the same channel on the TV Fine tune your TV TV programs cannot be seen Re check the ANT IN and ANT OUT connections See pages 1 and 6 normally Hit VCR Hit VCR on the remote control to activate it in the VCR mode Check if ...

Page 24: ...ya 6164 Oromo Afan 6159 Panjabi 6247 Pashto Pushto 6265 Persian 5247 Polish 6258 Portuguese POR 6266 Quechua 6367 Rhaeto Romance 6459 Romanian RUM 6461 Russian RUS 6467 S Samoan 6559 Sangho 6553 Sanskrit 6547 Scots Gaelic 5350 Serbian 6564 Serbo Croatian 6554 Sesotho 6566 Setswana 6660 Shona 6560 Sindhi 6550 Singhalese 6555 Siswat 6565 Slovak 6557 Slovenian 6558 Somali 6561 Spanish SPA 5165 Sundan...

Page 25: ...assette tapes compact discs This warranty shall in addition not apply to damages due to handling transportation unpacking set up installation customer adjustments that are covered in the instruction book repair or replacement of parts supplied by other than the EMERSON authorized service depot any malfunction or failure caused by or resulting from abnormal environmental conditions improper unautho...

Page 26: ... 26 MEMO EN ...

Page 27: ...AIS ESPAÑOL 1 1 Turn on the TV and set it to channel 3 If channel 3 is already occupied for broadcasting see RF Output Channel section 3 3 CH 01 AUTO SET UP No No Please wait for a few minutes After scanning The tuner stops on the lowest memorized channel You can select only the channels memo rized in this unit by using SKIP CH G G K K H H L L or CHANNEL K K L L If AUTO SET UP appears on the TV sc...

Page 28: ...rkers CD To remove status number in program input To clear the numbers entered incorrectly To cancel the point for A B repeat To clear the numbers entered incorrectly To cancel the point for A B repeat CD To exit the VCR Menu To reset the tape counter To search forward backward through a disc To begin slow forward reverse playback during the pause mode To search forward backward through a disc To ...

Page 29: ...anneau frontal 9 Commutation Magnétoscope lecteur DVD 9 Télécommande 10 Mise en place des piles de la télécommande 10 Fonctions de magnétoscope Lecture normale 11 Autres opérations 11 Recherche par index 11 Recherche horaire 11 Répétition automatique 12 Enregistrement 12 Enregistrement et OTR enregistrement instantané 12 Enregistrement avec minuterie 12 Conseils pour OTR et l enregistrement avec m...

Page 30: ...ons radio Il n est cependant pas garanti que des interférences ne seront pas produites dans une installation particulière Si cet appareil cause des interférences préjudiciables à la réception de la radio ou de la télévision ce qui peut être déterminé en le mettant hors puis à nouveau sous tension il est recommandé à l utilisateur de corriger ces interférences en appliquant une ou plusieurs des mes...

Page 31: ...x endroits où les câbles sortent des appareils 13 MISE À LA MASSE D UNE ANTENNE EXTÉRIEURE Si une antenne extérieure ou un réseau de câblodistribution est raccordé à cet appareil veiller à ce que l antenne ou le câble du réseau de câblodistribution soit relié à la terre pour éviter une surtension du raccordement et des surcharges statiques L article 810 du Code national de l électricité CNE ANSI N...

Page 32: ...u centre vers sa périphérie Ne jamais nettoyer par mouvements circulaires Ne pas utiliser de solvants par exemple du benzène du diluant des produits de nettoyage disponibles dans le commerce du détergent des produits de nettoyage abrasifs ou des sprays antistatiques utilisés sur les disques analogiques NETTOYAGE DE LA LENTILLE LASER Si le lecteur ne fonctionne toujours pas correctement en se référ...

Page 33: ...nt les logos ci dessus Si vous utilisez des disques non standard il est possible que l appareil ne puisse pas les lire Il est également fort probable que l image ou le son soit fortement déformé en cas de lecture 7 Il est possible de lire un disque DVD R RW non finalisé en format vidéo sur un enregistreur DVD de notre marque Mais selon l état d enregistrement du disque il peut ne pas être lu du to...

Page 34: ...ffectuer ces réglages se reporter aux pages 20 21 Conseil Conseil La piste audio comprise sur les disques enregistrés au format Dolby Digital 5 1 ambiophonique ne pourra pas être enregistrée sur une platine MD ou DAT Il est également possible d obtenir un son numérique de haute qualité Dolby Digital à 5 1 canaux digne d un cinéma en connectant cet appareil à un décodeur Dolby Digital multicanaux L...

Page 35: ...e qualité d image Sélectionner la Méthode 3 de raccordement ci dessus et le mode de balayage progressif Pour régler le mode maintenir PLAY B B pressé au moins 5 secondes sur le panneau frontal de sorte que P SCAN s affiche sur cet appareil Le balayage progressif n est pas disponible en mode VCR Si le téléviseur n est pas compatible avec le balayage progressif Utiliser cet appareil en mode entrelac...

Page 36: ...nner la chaîne à ajouter ou supprimer Si l horloge n est pas réglée l écran REGLAGE HORLOGE apparaît à la pression de MENU Dans ce cas appuyer à nouveau sur MENU ou ou ou 5 5 Pour quitter ce menu 4 4 Sélectionner AJOUT ou ANNUL REGLAGE MANUEL CHAINE 30 CATV ANNUL ou CLEAR C RESET Préparation pour utilisation 2 2 LANGUAGE SELECT ENGLISH B FRANCAIS ON ESPAÑOL 1 1 Allumer le téléviseur et sélectionne...

Page 37: ...tionnel Commutation Magnétoscope lecteur DVD C A B CA D E B I L K POWER REW F FWD PLAY VCR OUTPUT OPEN CLOSE REC OTR PLAY STOP STOP EJECT VIDEO AUDIO L R DVD CHANNEL GROUP P SCAN DVD CD S allume lorsque le disque inséré est en cours de lecture Affiche le type de disque inséré dans le tiroir DVD Disque DVD CD CD audio MP3 S allume lorsque le disque inséré est en pause S allume lorsque la fonction d...

Page 38: ...a lecture du disque Pour mettre en pause la lecture ou l enregistrement d une cassette Pour arrêter la lecture Pour arrêter la lecture Pour arrêter la lecture ou l enregistrement Pour sauter des chapitres Pour sauter des pistes Pour changer les canaux Pour régler manuellement l alignement pendant la lecture Pour commencer la lecture du disque Pour commencer la lecture du disque Pour démarrer la le...

Page 39: ...i la bande arrive à sa fin pendant la recherche la recherche sera annulée et la bande sera réenroulée jusqu à son début LECTURE B Recherche horaire Il est possible de rechercher en avant et en arrière pendant une longueur de temps spécifique sur une bande Introduire une cassette dans l appareil VCR VCR VCR VCR VCR 1 1 SEARCH MODE 2 2 Sélectionner la durée d avance ou de retour rapide Appuyer deux ...

Page 40: ...mmager la bande et la tête vidéo VCR VCR Enregistrement et OTR enregistrement instantané 1 1 M E N U PROGRAMMATION B REP AUTO A REGLAGE CHAINES REGLAGE HORLOGE SELECTION LANGUE SORTIE AUDIO TV STEREO M SAP Cette fonction lira une cassette à répétition depuis son début quand la bande arrivera à sa fin VCR VCR VCR VCR VCR Répétition automatique ou MENU 2 2 M E N U PROGRAMMATION B REP AUTO M REGLAGE ...

Page 41: ...rte que disparaisse Appuyer sur VCR TV pour choisir la position VCR Sélectionner le mode VCR ou DVD puis continuer avec les autres fonctions comme expliqué dans ce manuel Après le réglage d un OTR ou d un enregistrement avec minuterie l appareil fonctionne comme suit Si une cassette arrive à sa fin avant la fin d un OTR ou d un enregistrement avec minuterie l appareil éjecte la cassette et passe a...

Page 42: ... Un lecteur de disque vidéo un récepteur satellite ou un autre composant audio vidéo avec sorties A V est utilisable à la place du magnétoscope lecteur La chaîne L1 ou L2 se trouve juste avant la première chaîne mémorisée CH02 par exemple Les jacks d entrée L2 se trouvent sur l avant du lecteur Copie d une vidéocassette 1 1 M E N U PROGRAMMATION REP AUTO A REGLAGE CHAINES REGLAGE HORLOGE SELECTION...

Page 43: ...ages 20 21 Conseil Conseil La vitesse d avance inversion lente est différente pour chaque disque Les vitesses disponibles sont 1 1 16 2 1 8 3 1 2 Placer le paramètre ARRÊT SUR IMAGE sur TRAME au niveau du menu d affichage si l image est floue en mode figé Se reporter aux pages 20 21 Zoom 1 Appuyer sur ZOOM pendant la lecture 2 Appuyer plusieurs fois sur ZOOM pour sélectionner le facteur zoom requi...

Page 44: ... quand il existe dans le DVD 2 2 STOP Lecture MP3 Insérer un disque en format MP3 puis appuyer sur MENU pour appeler la liste des fichiers à l écran du téléviseur DVD MP3 MP3 MP3 1 1 folder name 4 folder name 1 folder name 3 folder name 2 folder name 1 DISC NAME FILE LIST FOLDER MP3 ENTER PLAY file name 3 file name 2 file name 1 1 2 ENTER ENTER ENTER À la sélection d un dossier Appuyer sur B B pou...

Page 45: ...T pour effacer l entrée incorrecte à l étape 2 Conseil Conseil L affichage Marqueur disparaîtra au bout d environ 30 secondes s il n y a pas de sortie Pour effacer un marqueur en particulier sélectionner ce dernier au niveau de l étape 2 du paragraphe Pour créer un marqueur ou Pour retourner sur un marqueur puis appuyer sur CLEAR C RESET L ouverture du plateau des disques ou le fait d éteindre l a...

Page 46: ...pétition n est pas disponible sur tous les disques ou pendant la répétition A B Conseil Conseil Appuyer sur CLEAR C RESET à l étape 2 pour effacer le dernière piste enregistrée Pour effacer tous les pistes enregistrées à la fois sélectionner ANNUL TOUT et appuyer sur ENTER à l étape 2 STOP C C fonctionne de la façon suivante pendant un programme Appuyer sur STOP C C puis sur PLAY B B pour reprendr...

Page 47: ...u du menu AUTRES l icône ne s affichera jamais Se reporter aux pages 20 22 DVD DVD V DVD V 1 1 1 8 ANGLE EF HF Réglage du niveau des noirs Il est possible de régler le niveau des noirs afin d éclaircir les zones les plus sombres de l image affichée sur le téléviseur DVD DVD V DVD V Mode de son ambiophonique virtuel Il est possible d obtenir un son ambiophonique virtuel sur un système à 2 voies sté...

Page 48: ...aux paragraphes MENU DU LECTEUR ASPECT TV ou DOLBY DIGITAL pages 20 à 21 MENU DE CONFIGURATION Vérifier que l option RAPIDE est sélectionnée Il est possible de sélectionner le MENU DU LECTEUR ASPECT TV ou DOLBY DIGITAL à partir du menu de CONF RAP ENTER ENTER ENTER Sélectionner la langue désirée SON ORIGINAL ANGLAIS FRANCAIS SOUS TITRE HF ANGLAIS FRANCAIS MENU DU DISQUE ANGLAIS FRANCAIS ESPAGNOL M...

Page 49: ...Par défaut AUTO Voir le conseil ci contre ASPECT TV 4 3 LETTER BOX ARRÊT SUR IMAGE AUTO ARRÊT SUR IMAGE AUTO TRAME IMAGE Sélectionner la valeur voulue ou 5 5 6 6 Pour quitter ce menu SETUP SETUP DRC Contrôle de Gamme Dynamique Par défaut EF Mettre ce paramètre sur EF pour comprimer l espace compris entre les sons doux et forts DOLBY DIGITAL Par défaut TRAIN BINAIRE Mettre ce paramètre sur TRAIN BI...

Page 50: ...ot de passe à quatre chiffres que vous avez choisi mis à part le 4737 ou RÉGLAGE PARENT MOT DE PASSE Entrez un mot de passe 4 chiffres Menu PARENT 5 5 Réglage AUTRES Les autres fonctions sont modifiables Suivre les étapes 1 à 3 de la section Menu PERSONNAL à la page 20 4 4 Sélectionner l élément désiré E Menu AUTRES 6 6 Pour quitter ce menu ICÔNE DE L ANGLE Par défaut EF Mettre ce paramètre sur EF...

Page 51: ...des têtes est nécessaire Voir NETTOYAGE AUTOMATIQUE DES TÊTES son correct Vérifier que le magnétoscope n est pas en mode Menu Pas d image ou image de Passer à CH4 pour la chaîne de sortie RF Puis sélectionner la même chaîne sur le téléviseur mauvaise qualité Ajuster précisément le téléviseur Les émissions de télévision ne Revérifier les raccordements ANT IN et ANT OUT Voir les pages 1 et 6 sont pa...

Page 52: ...fan Omoran 6159 Oriyen 6164 Ouzbèque 6772 Panjabi 6247 Perse 5247 Polonais 6258 Portugais POR 6266 Pushtu pushto 6265 Quechuan 6367 Romanche 6459 Roumain RUM 6461 Russe RUS 6467 S Samoan 6559 Sangho 6553 Sanscrit 6547 Serbe 6564 Serbo croate 6554 Sesotho 6566 Setswanais 6660 Shonan 6560 Sindhi 6550 Singhalais 6555 Siswat 6565 Slovaque 6557 Slovène 6558 Somalien 6561 Soudanais 6567 Suédois SWE 6568...

Page 53: ... par ou survenus lors de la manipulation le transport le déballage l installation les réglages effectués par le client et mentionnés dans le manuel d instructions les réparations ou le remplacement des pièces fournies par un service autre que le Centre de Service et de Réparations de EMERSON à tout mauvais fonctionnement ou toute panne causé par ou résultant de conditions environmentales anormales...

Page 54: ... 26 FR MÉMO ...
Page 55: ...asser à l étape 2 VCR VCR VCR VCR VCR 8 8 Pour quitter l écran de REGLAGE HORLOGE 7 7 Conseil Conseil Le fait d appuyer uniquement sur OUTPUT sur le panneau avant NE COMMUTE PAS le mode de la télécommande Vous DEVEZ sélectionner le mode correct sur la télécommande or STANBY ON MENU ou ou ou ou ou ou ou Sélectionner A M ou P M REGLAGE HORLOGE MOIS JOUR ANNÉE 1 0 0 3 LUN 2 0 0 5 HEURE MINUTE AM PM 0...

Page 56: ...er le point de répétition A B Pour effacer les chiffres entrés de manière incorrecte Pour annuler le point de répétition A B CD Pour sortir du menu VCR Pour réinitialiser le compteur de cassette Pour faire une avance un retour rapide dans un disque Pour commencer un ralenti avant arrière en mode pause Pour rechercher vers l avant l arrière sur un disque Pour avancer rembobiner une cassette Pour av...

Reviews: