background image

Chapter 2: Checking Out Your Computer

6

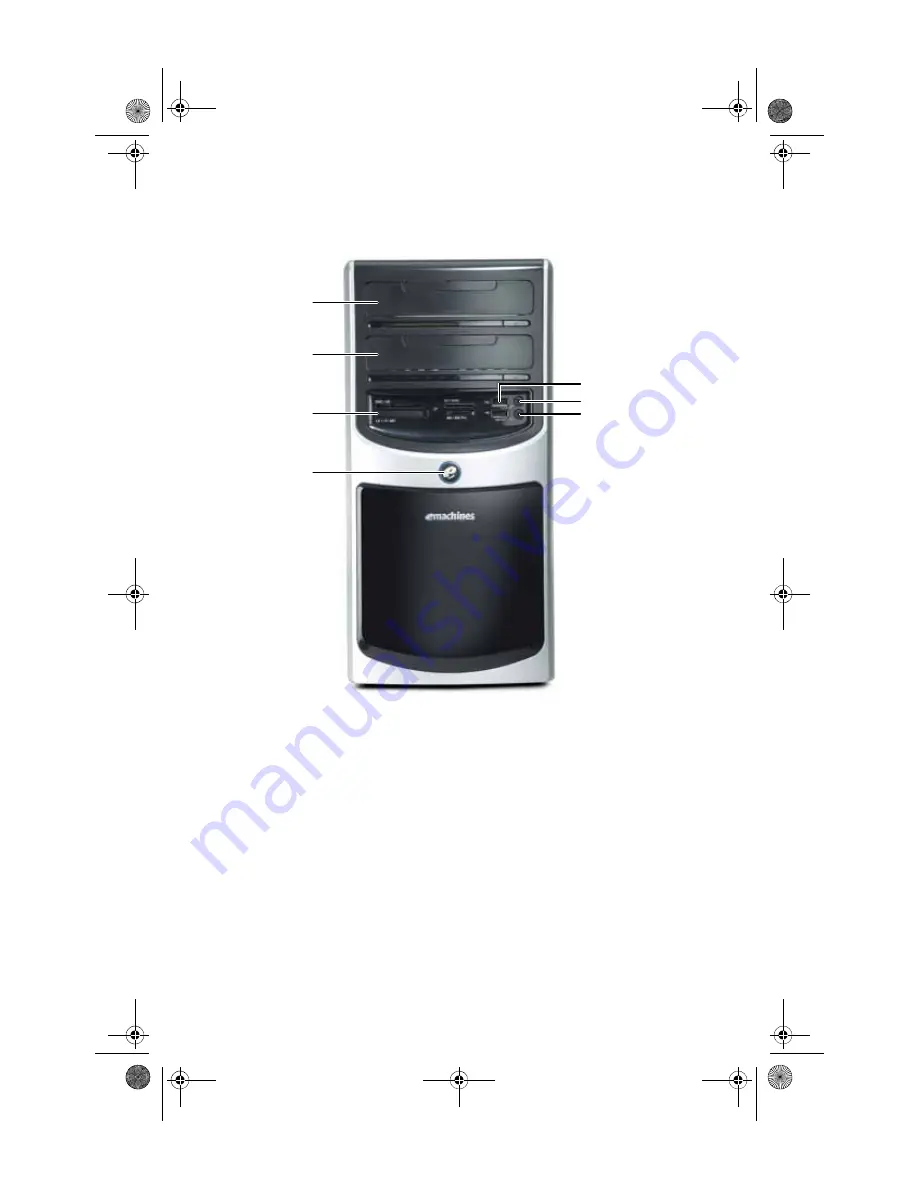
Front

Memory card reader

(optional)

DVD/CD drive

Power button/

power indicator

USB ports

DVD/CD drive

(optional)

Microphone jack
Headphone jack

8512042.book  Page 6  Monday, December 18, 2006  10:15 AM

Summary of Contents for E4264

Page 1: ...Computer Reference Guide 8512042 book Page a Monday December 18 2006 10 15 AM...

Page 2: ...8512042 book Page b Monday December 18 2006 10 15 AM...

Page 3: ...etitive strain 14 Preparing power connections 14 Protecting from power source problems 14 Checking the voltage selection 15 Connecting to a broadband modem or network 16 Connecting a dial up modem 16...

Page 4: ...nce schedule 50 Caring for your computer 50 Cleaning your computer 51 Cleaning the exterior 52 Cleaning the keyboard 52 Cleaning the monitor 53 Cleaning the mouse 53 Cleaning optical discs 53 Updating...

Page 5: ...Modem dial up 79 Monitor 82 Mouse 84 Networks 84 Passwords 84 Power 84 Printer 85 Sound 86 Recovering your system 87 Recovering pre installed software and drivers 88 Using Microsoft System Restore 90...

Page 6: ...Contents iv 8512042 book Page iv Monday December 18 2006 10 15 AM...

Page 7: ...About This Reference About this guide Accessing the online User Guide eMachines contact information Microsoft Certificate of Authenticity For more information 8512042 book Page 1 Monday December 18 2...

Page 8: ...ress shown on your computer s label The Support page also has links to additional documentation and detailed specifications Accessing the online User Guide In addition to this guide the User Guide has...

Page 9: ...all for assistance Microsoft Certificate of Authenticity The Microsoft Certificate of Authenticity label found on the back or side of your computer includes the product key code for your operating sys...

Page 10: ...Chapter 1 About This Reference 4 8512042 book Page 4 Monday December 18 2006 10 15 AM...

Page 11: ...Chapter 2 5 5 Checking Out Your Computer Front Back 8512042 book Page 5 Monday December 18 2006 10 15 AM...

Page 12: ...ing Out Your Computer 6 Front Memory card reader optional DVD CD drive Power button power indicator USB ports DVD CD drive optional Microphone jack Headphone jack 8512042 book Page 6 Monday December 1...

Page 13: ...ice into the memory card reader Power button power indicator Press this button to turn the power on or off You can also configure the power button to operate in Standby Resume mode or Hibernate mode T...

Page 14: ...t PS 2 keyboard port Voltage switch Power connector Ethernet network jack Audio in side speaker jack Case cover thumbscrew Headphone front speaker jack Microphone jack Surround L R speaker jack Center...

Page 15: ...device on page 27 S PDIF output jack optional Plug an optical cable from an amplifier or entertainment system into this jack for digital sound Microphone jack pink plug Plug a microphone into this jac...

Page 16: ...ion see Configuring the audio jacks on page 26 Audio in side speaker jack blue plug OR Side speaker jack This jack is user configurable for one of the following Stereo in Plug an external audio input...

Page 17: ...broadband modem or network Connecting a dial up modem Starting your computer Turning off your computer Restarting rebooting your computer Using the keyboard Using the mouse Adjusting the volume Confi...

Page 18: ...lel to the floor Adjust the screen so it is perpendicular to your line of sight and the top of the screen is no higher than eye leve Place your feet flat on the floor or on a footrest Keep ventilation...

Page 19: ...is the appropriate height and the chair helps you maintain good posture Select a flat surface for your computer desk Adjust the height of the computer desk so your hands and arms are positioned parall...

Page 20: ...your computer can increase to far above normal levels and cause data loss or system damage Protect your computer and peripheral devices by connecting them to a surge protector which absorbs voltage s...

Page 21: ...slide the voltage selection switch to the correct voltage position The switch is located on the back of your computer near the power cable connector For the location see Back on page 8 Caution If you...

Page 22: ...e to connect to the internet or fax documents To connect the modem 1 Insert one end of the modem cable into the modem jack on the modem at the back of your computer For the location see Back on page 8...

Page 23: ...r files For more information on using your computer s menus see Using Windows Vista and Customizing Windows in the online User Guide Waking up your computer When you have not used your computer for se...

Page 24: ...omputer press a key on the keyboard or press the power button To turn off your computer 1 Click Start click the arrow next to the lock icon then click Shut Down The computer turns off 2 To completely...

Page 25: ...click Restart Your computer turns off then turns on again 2 If your computer does not turn off press and hold the power button until the computer turns off about five seconds then press it again to t...

Page 26: ...Windows keys Application key Directional keys Numeric keypad Editing buttons Internet buttons Audio playback buttons Navigation keys Function keys Indicators Windows keys Application key Directional k...

Page 27: ...beginning of a line to the end of a line up the page down the page to the beginning of a document or to the end of a document Indicators Show if your NUM LOCK CAPS LOCK or SCROLL LOCK keys are activa...

Page 28: ...ce that controls the pointer movement on the computer display This illustration shows the standard mouse As you move the mouse the pointer arrow on the display moves in the same direction Scroll wheel...

Page 29: ...the mouse pad then continue moving the mouse Select an object on the computer display Position the pointer over the object Quickly press and release the left mouse button This is called clicking Start...

Page 30: ...u are using external speakers turn the knob on the front of the speakers OR Use the mute and volume control buttons on the keyboard For more information see Using the keyboard on page 19 To adjust the...

Page 31: ...rner of the window to close it Tip Adjust the Windows Sounds slider to change system sounds volume independently of general volume such as the volume used for music and game sounds Help For more infor...

Page 32: ...o configure the audio jacks 1 Connect your audio device s to the computer audio jack s 2 Click Start then click Control Panel The Control Panel window opens 3 Click Hardware and Sound Sound the Playba...

Page 33: ...you plug it into the appropriate port When you use an IEEE 1394 or USB device for the first time your computer will prompt you to install any software the device needs After doing this you can disconn...

Page 34: ...Chapter 3 Setting Up and Getting Started 28 8512042 book Page 28 Monday December 18 2006 10 15 AM...

Page 35: ...osing the case Installing memory Replacing the system battery Adding or replacing an optical disc drive Adding or replacing a hard drive Replacing the heat sink and processor Adding or replacing an ex...

Page 36: ...istatic bags only when you are ready to use them Do not lay components on the outside of antistatic bags because only the inside of the bags provide electrostatic protection Always hold expansion card...

Page 37: ...device cables 3 Press the power button for ten seconds to drain any residual power from your computer 4 Loosen the two captive thumbscrews on the back edge of the side panel These screws cannot be rem...

Page 38: ...front bezel 1 Remove the side panel by following the instructions in Removing the side panel on page 31 2 Press the three bezel retention tabs then swing the left side of the bezel away from the compu...

Page 39: ...slots on the left side of the computer 3 Press the left side of the bezel firmly until the release tabs snap into place Replacing the side panel To replace the side panel 1 Make sure that all of the...

Page 40: ...type of memory module for your computer Your computer uses DIMM memory To install or replace DIMM memory 1 Remove the side panel by following the instructions in Removing the side panel on page 31 2...

Page 41: ...s the module firmly into the bank The tabs on the sides of the memory module should secure the memory module automatically When the module is secure you hear a click 6 Replace the side panel by follow...

Page 42: ...y then go to Step 8 For the location of the screws see the photo in Step 6 4 If you are replacing an existing drive disconnect the cables from the drive noting their locations and orientation You will...

Page 43: ...rive then replace the two drive retention screws 9 Reconnect the drive cables using your notes from Step 4 or according to the manufacturer s instructions 10 Replace the front bezel by following the i...

Page 44: ...ing the side panel on page 31 2 Disconnect and label all hard drive cables noting their locations and orientation You will reconnect the cables after you install the new drive 3 Disconnect the hard dr...

Page 45: ...are replacing a drive note any jumper settings on the old drive and set the jumper on the new drive to be the same OR If you are adding a new drive set the jumper as instructed by the drive s user gui...

Page 46: ...e using the new hard drive as your primary drive install Windows using the operating system DVD that came with your computer For more information on restoring your system see Recovering your system on...

Page 47: ...wn lift it completely up then lift the processor retention bracket 6 Remove the processor from the system board 7 Install the new processor onto the system board Make sure that Pin 1 on the processor...

Page 48: ...nect the heat sink fan cable to the system board 11 Replace the side panel by following the instructions in Replacing the side panel on page 33 Adding or replacing an expansion card To add or replace...

Page 49: ...u have just replaced an expansion card reconnect the expansion card cables if any using your notes from Step 2 If you have added a new expansion card connect its cables according to its user guide 7 P...

Page 50: ...press and hold the F1 key The main menu of the BIOS Setup utility opens 3 Write down all values in the menus and submenus then exit from the utility 4 Shut down your computer Warning Danger of explosi...

Page 51: ...usually the side that the battery type and model number are etched into then press the battery into the socket until it snaps into place 10 Replace the side panel by following the instructions in Repl...

Page 52: ...nnect all the power and data cables from the system board noting their locations and orientation You will reconnect the cables after you install the new board 5 Remove the four screws that secure the...

Page 53: ...page 40 then install them into the new system board by following the directions in the same procedure 10 Slide the power supply back into the case then install the four screws to secure the power supp...

Page 54: ...Chapter 4 Upgrading Your Computer 48 8512042 book Page 48 Monday December 18 2006 10 15 AM...

Page 55: ...ing up a maintenance schedule Caring for your computer Cleaning your computer Updating Windows Using BigFix Managing hard drive space Scheduling maintenance tasks Moving from your old computer 8512042...

Page 56: ...mmend that you put it in the original packaging materials Keep your computer away from magnetic fields Magnetic fields can erase data on hard drives Never turn off your computer when the drive indicat...

Page 57: ...ork environments Dust and dirt can clog the internal mechanisms and can lead to permanent damage to the computer Do not block the ventilation fan slots If these slots are blocked your computer may ove...

Page 58: ...s Cleaning the keyboard You should occasionally clean the keyboard to remove dust and lint trapped under the keys To clean the keyboard 1 Use an aerosol can of air with a narrow straw like extension t...

Page 59: ...ouse pointer begins moving erratically across the computer screen or becomes difficult to control precisely cleaning the mouse will likely improve its accuracy To clean the mouse Wipe the bottom of th...

Page 60: ...te can also be controlled through the Windows Security Center For more information see Protecting Your Computer in the online User Guide Using BigFix BigFix monitors your computer for problems and con...

Page 61: ...eck hard drive space delete unnecessary files defragment files and back up files Checking hard drive space To check hard drive space 1 Click Start then click Computer The Computer window opens Shortcu...

Page 62: ...necessary files Delete unnecessary files such as temporary files and files in the Recycle Bin to free hard drive space To delete unnecessary files 1 Click Start All Programs Accessories System Tools t...

Page 63: ...awed areas on the hard drive so Windows does not use them If you use your computer several hours every day you probably want to run Error checking once a week If you use your computer less frequently...

Page 64: ...tored on the drive can improve hard drive performance While Disk Defragmenter is running do not use your keyboard or mouse because using them may continuously stop and restart the defragmenting proces...

Page 65: ...hem from the hard drive frees space for new files on the hard drive It also protects you from losing important information if the hard drive fails or you accidentally delete files You should back up y...

Page 66: ...then click the Tools tab 3 Click Backup Now then click Run a file backup now 4 Follow the on screen instructions to select a backup storage location and the files and folders to back up Help For more...

Page 67: ...alog box opens 2 Click Create Basic Task for basic tasks or click Create Task for more complex tasks then follow the on screen instructions to finish setting up and scheduling the task Important Your...

Page 68: ...the new computer before running Windows Easy Transfer Windows Easy Transfer copies only the software s settings not the software itself to the new computer 2 Click Start All Programs Accessories Syst...

Page 69: ...window opens and displays many of your saved personal data files Go to Step 4 OR In Windows 98 Windows Me or Windows 2000 double click the My Computer icon on the desktop Go to the next step 2 Double...

Page 70: ...k Start Find or Search then click For Files or Folders The Search Results window opens 2 Type the filename you want to search for then press ENTER The search results are displayed 3 To learn about mor...

Page 71: ...Chapter 6 65 65 Troubleshooting Safety guidelines First steps Troubleshooting Recovering your system Telephone support 8512042 book Page 65 Monday December 18 2006 10 15 AM...

Page 72: ...the exact message The message may help Customer Care in diagnosing and fixing the problem Warning Never remove your computer case cover while your computer is turned on and while the modem cable netwo...

Page 73: ...ent disc Occasionally discs are flawed or become scratched and cannot be read by the CD or DVD drive If you are trying to play a DVD make sure that you have a DVD drive To identify your drive type see...

Page 74: ...d off For more information see Adjusting the volume on page 24 Make sure that the speaker cables are connected correctly and securely Shut down and restart your computer Clean the disc For more inform...

Page 75: ...iskette or you see the message disk is full or write protected Make sure that the write protection tab on the upper right corner of the diskette is down unprotected Delete unnecessary files on the dis...

Page 76: ...rnet cable is plugged into the Ethernet jack on your computer Make sure that the other end is plugged into a router Make sure that all computers are plugged into a powered electrical outlet and turned...

Page 77: ...onents should be standard Ethernet 10 Mbps Fast Ethernet 100 Mbps or 10 100 Mbps or Gigabit Ethernet 1000 Mbps or 10 100 1000 Mbps A mixture of Ethernet Fast Ethernet and Gigabit Ethernet components w...

Page 78: ...ive If the hard drive is full copy any files not regularly used to backup media then delete them from the hard drive You see a Data error message This may be the result of a defective area on the hard...

Page 79: ...l support for help Make sure that you do not have a problem with your modem For more information Modem dial up on page 79 You see an Unable to locate host message and are unable to browse the Internet...

Page 80: ...ternet service provider ISP is set up correctly Contact your ISP for technical support Keyboard The keyboard does not work Make sure that the keyboard cable is plugged in correctly For more informatio...

Page 81: ...Other types of display devices including retail TVs may provide lower quality video If you did not order a display device when you purchased your Media Center computer a progressive scan display devic...

Page 82: ...solution of your computer and may shift scramble or scroll the picture For a better picture on a TV display you may need to lower the Media Center screen resolution to 800 600 or 640 480 For more info...

Page 83: ...rlacing This results in a fuller sharper picture and better display quality for viewing and using the Media Center computer functions The progressive scan picture is also brighter and easier on your e...

Page 84: ...e DVD player You get a Download Error message when the Media Center tries to update the Program Guide You must be connected to the Internet to update the Program Guide Make sure that your Internet acc...

Page 85: ...lephone wall jack If you have additional telephone services such as call waiting call messaging or voice mail make sure that all messages are cleared and call waiting is disabled before using the mode...

Page 86: ...for noise or low line levels Try another telephone line either a different telephone number in your house or a telephone line at a different location If you can connect on this line call your telepho...

Page 87: ...modem cable that came with your computer Some telephone cables do not meet cable standards and may cause problems with the connection Shut down and restart your computer Run Windows modem diagnostics...

Page 88: ...k the modem you want to adjust then click Properties 4 Click the Modem tab then adjust the Speaker volume control 5 Click OK twice to close the Phone and Modem Options dialog box Monitor The screen re...

Page 89: ...allows more light to pass through the screen for brighter colors and greater luminescence The damper wire is a critical part of the overall monitor design and does not negatively affect the monitor s...

Page 90: ...ebris Networks You cannot connect to your company network Every network is unique Contact your company computer department or network administrator for help For more information about setting up a net...

Page 91: ...t it is connected to the correct port Make sure that the printer is online Many printers have an online offline button that you may need to press so the printer can start printing Press the button to...

Page 92: ...ional memory You see a Printer is out of paper error message After adding paper make sure that the printer is online Most printers have an online offline button that you need to press after adding pap...

Page 93: ...drive or if your hard drive is completely erased or corrupted your only option for system recovery may be to reinstall Windows from the Windows DVD then recover your pre installed software and device...

Page 94: ...u should create a set of discs for recovering your pre installed software and device drivers in case you will need to use them later for a complete system recovery Your computer must have a recordable...

Page 95: ...lled click Programs then click Application recovery 3 To recover device drivers that were pre installed click Hardware then click Device driver recovery Important Use a permanent marker to label each...

Page 96: ...o recover then click Next OR To recover pre installed device drivers click Device driver recovery click the type of driver you want to recover then click Next 3 If the software or driver is not shown...

Page 97: ...el System and Maintenance then click Backup and Restore Center The Backup and Restore Center opens 2 On the left side of the window click Repair Windows using System Restore then click Next The Choose...

Page 98: ...lly creating a restore point To manually create a restore point 1 Click Start Control Panel System and Maintenance then click Backup and Restore Center The Backup and Restore Center opens 2 On the lef...

Page 99: ...r then click eMachines Recovery Center The eMachines Recovery Center opens b Click Recovery then click Next Your computer restarts 2 If you cannot run Windows a Turn on or restart your computer b Whil...

Page 100: ...e format your original hard drive you must recover your system using the Windows Vista operating system DVD You will also need to recover your computer s pre installed software and device drivers To c...

Page 101: ...ork make sure that all cables are plugged in securely If you have recently installed hardware or software make sure that you have installed it according to the instructions provided with it If you did...

Page 102: ...s nearby at the time of your call The technician may have you follow troubleshooting steps eMachines contact information The label on the side of your computer case contains information that identifie...

Page 103: ...any cases additional product information and online documentation for eMachines supplied hardware can be found in our Web site s Documentation Library This Reference Guide and the online User Guide Th...

Page 104: ...Chapter 6 Troubleshooting 98 8512042 book Page 98 Monday December 18 2006 10 15 AM...

Page 105: ...Appendix A 99 99 Legal Notices Important safety information Regulatory compliance statements Environmental information Notices 8512042 book Page 99 Monday December 18 2006 10 15 AM...

Page 106: ...ovidedfor ventilation Do not block or cover these openings Make sure you provide adequate space at least 6 inches 15 cm around the system for ventilation when you set up your work area Never insert ob...

Page 107: ...ables and modem cables from the wall outlets before cleaning the system Unplug the system from the wall outlet and refer servicing to qualified personnel if The power cord or plug is damaged Liquid ha...

Page 108: ...aration between the equipment and receiver Connectthe equipmenttoanoutletonadifferentcircuitfromthattowhichthereceiver is connected Consult the dealer or an experienced radio TV technician for help Co...

Page 109: ...service Connection to party line service is subject to state tariffs Contact the state public utility commission or public service commission for information When programming or making test calls to e...

Page 110: ...ponents are classified as Class 1 Laser Products under a US Department of Health and Human Services DHHS Radiation Performance Standard Should the unit ever need servicing contact an authorized servic...

Page 111: ...uch power lines or circuits Warning When installing or realigning an outside antenna system extreme care should be taken to keep from touching such power lines or circuits Contact with them could be f...

Page 112: ...ng and using the energy saving features of this product where applicable recycling the inner and outer packaging including shipping containers this product was delivered in and by disposing of or recy...

Page 113: ...port the following paragraph applies This product incorporates copyright protection technology that is protected by method claims of certain U S patents and other intellectual property rights owned by...

Page 114: ...Appendix A Legal Notices 108 8512042 book Page 108 Monday December 18 2006 10 15 AM...

Page 115: ...replacing 33 Blu ray 7 broadband connection connecting 10 C cable modem 16 connecting 10 Caps Lock indicator 21 cards adding expansion 42 replacing expansion 42 troubleshooting add in card 67 trouble...

Page 116: ...menting hard drive 58 deleting files and folders 56 digital audio out 9 digital camera locating USB port 7 9 digital video camera locating IEEE 1394 port 9 DIMM See memory directional keys 21 Disk Cle...

Page 117: ...folders 56 replacing 38 scanning for errors 57 troubleshooting 72 HD DVD drive 7 headphone jack 7 9 heat sink replacing 40 Hibernate mode 7 I IEEE 9 IEEE 1394 port 9 27 indicators Caps Lock 21 Num Loc...

Page 118: ...ng 78 memory card reader locating 6 microphone jack 7 9 Microsoft Certificate of Authenticity 3 modem cable 16 connecting 16 DSL 16 jack 16 troubleshooting 79 modem jack 10 monitor troubleshooting 82...

Page 119: ...sponsive 19 opening 23 PS 2 port keyboard 9 mouse 9 R RAM See memory rebooting computer 19 recordable drive 7 removing files and folders 56 resetting computer 19 restarting computer 19 Resume mode 7 r...

Page 120: ...70 DVD CD drive 67 70 Ethernet network 70 faxes 81 files 71 general guidelines 66 hard drive 72 Internet connection 73 80 keyboard 74 LCD panel 70 82 memory 78 memory card reader 78 modem 79 monitor...

Page 121: ...hines com troubleshooting 75 Windows Product Key Code 3 Windows Update 54 wired Ethernet troubleshooting 70 working safely 12 Z Zip drive 59 Zip drive port 9 8512042 book Page 115 Monday December 18 2...

Page 122: ...116 Index 8512042 book Page 116 Monday December 18 2006 10 15 AM...

Page 123: ...8512042 book Page 117 Monday December 18 2006 10 15 AM...

Page 124: ...MAN ECOOPER HW REF R1 12 06 8512042 book Page 118 Monday December 18 2006 10 15 AM...

Reviews: