background image


User MP500/xx 

27 


5.3 

CONFIGURATION MENU 


5.3.1 

Camera configuration 


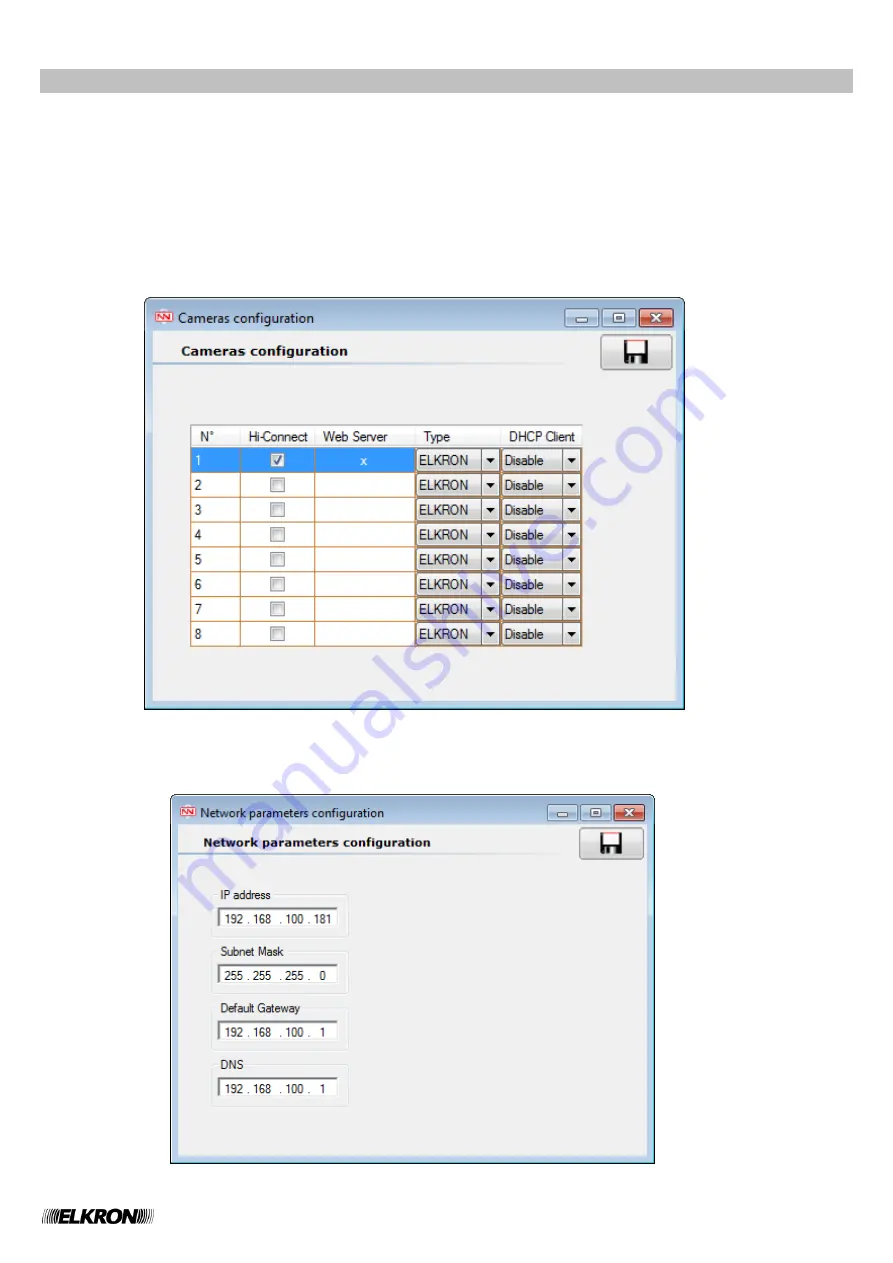
This section can be used to configure the cameras on the same network as the Web Server (maximum permitted number of cameras = 8). 


Select the 

“Hi-Connect” checkbox to enable management of each camera. 

An enabled camera can be programmed in the Programming/Camera section.  

An 

X

 will appear in the in the Web Server column if the camera is connected and already associated to the Web Server. 


Select the camera type in the “Type” list box: OTHERS / ELKRON. 

Use the “DHCP Client” list box to indicate whether to enable the camera DHCP Client (IP address assigned by the network router) or 
disable it (fixed IP address). 


5.3.2 

Network parameters 

This  section can  be  used  to  edit  the  IP  Address,  Subnetmask  and  Default  Gateway  parameters  previously  set  during  initialisation  of 
you Web Server. 


Summary of Contents for HI-Connect MP500/4

Page 1: ...he website www elkron com you may find updated information relating to the documentation provided with the product DS80SW24 034B LBT80906 GB User Manual Hi Connect MP500 4 Systems MP500 8 MP500 16 MP500 4N ...

Page 2: ...so contain references to or information about products hardware or software or services that are not yet on the market These references or information in no way mean that the company intends to market such product or services Elkron is a trademark of URMET S p A All the brands cited in the document belong to their respective owners All rights reserved The partial or total reproduction of this docu...

Page 3: ...ts setting 18 4 INTERACT WITH THE CONTROL PANEL MENU 19 4 1 EVENT LOG FILE SYSTEM LOG FILE 19 4 1 1 Actions available 20 4 2 Arm disarm system 21 4 3 INPUTS ISOLATION 21 4 4 ENABLE DISABLE KEYS 22 4 5 ENABLE DISABLE USERS 22 4 6 INPUTS STATUS 23 4 7 ENABLE DISABLE OUTPUTS 24 4 8 NOTES 24 5 WEB SERVER MANAGEMENT it500web 25 5 1 MENU STRUCTURE 25 5 2 FIRST CONNECTION 25 5 2 1 Start and parameter ali...

Page 4: ... appearing screen will have the same structure as the one below The top panel 1 contains management data for connection to the control panel and or Web Server The left panel 2 contains the function selection menu and the dates of some important operations carried out with the control panel On the lower status bar 3 it is possible to read the information about the connection state the data exchange...

Page 5: ...disarmed the download will be completed In all the configuration screens the actions available are saves the configuration of the current screen prints the configuration of the current screen In the Peripheral screen prints the configuration of the entire system Note the functions Load data from control panel and Download programming into Control panel are not available in the following screens In...

Page 6: ...mote Access choose Enable in Hi Connect manage the modem connected to the telephone line on which you want to be called o In the Start Up Screen In Connections move under Telephone Connections the icon associated with the COM port connected to the modem In the appearing pop up choose the modem model connected to the computer between the available ones and do not remove the flag at Enable modem to ...

Page 7: ...ve and close button In control panel enable Type A Countercall o From the keypad by entering with Installer Code In Telephone Dialer Advanced Return call select Ret Call Type A o In Hi Connect In Managements System select the system and press Open in management From the system management screen choose the Telephone Trx Telephone Parameters node and in the Countercall GSM Countercall box select Typ...

Page 8: ... Mode select the number and choose Modem o From Hi Connect optional 1 From the system management screen choose the Telephone Trx Telephone Numbers node and set one of the free numbers with the parameters Telephone number Number on which you want to be called Vector type GSM Sending mode Modem then confirm with the Save button Store in Hi Connect the number of the SIM in the control panel o In the ...

Page 9: ...s The Adj parameter shown in the Countercall selection pop up usually should not be modified In case of troubles with the GSM Countercall verify the GSM module installed on the control panel If the module is not Sierra marked try to set the parameter at 2 If the module is Sierra marked try to set the parameter at 2 Normally greater values are not required After having sent the Countercall command ...

Page 10: ...he menu has the following structure and is split into various nodes and sub nodes for the sake of clarity Each node contains various pages for programming the Control panel An icon represents each node and screen The green arrow means that the node has been selected ...

Page 11: ...figuration is aligned and it is possible to continue with the programming Answering No the connection is interrupted because no operation is possible with a hardware misalignment It is also possible the manual selection of the peripherals before the connection see 3 1 1 This operation is useful for an offline configuration This check is performed at every connection to the control panel In case of...

Page 12: ...ows up It is also possible to proceed in the opposite direction PC control panel continuing without aligning data and by clicking on the download button see 2 3 3 This operation is useful for an offline configuration and later align control panel data The programming misalignment information is provided by displaying a warning icon next to each programming block ...

Page 13: ...Hi Connect The data changes from Hi Connect are reported on the menu with the bold character Just the nodes and the sub nodes involved in the change are showed with the different character To confirm the data change in the control panel press the button Download programming into control panel The downloaded data depends on the selection in the menu Node Programming selected all the changes are sen...

Page 14: ...rol panel Modified node selected only the changes in the sub nodes are uploaded from the control panel Modified sub node selected only the changes in the sub node are uploaded from the control panel 2 3 3 Smart data uploading and downloading The total uploading and downloading uploading and downloading with the Programming node selected does not imply the transfer of the whole programming but only...

Page 15: ...User MP500 xx 15 In the following images the windows showing the different possibilities ...

Page 16: ...ociation a new mode that allows the direct association to areas thus to all partitions belonging to the area has been developed At the opening of a screen standard association mode is showed The status of the buttons related to the partitions reflects the association if the button is highlighted the related partition is associated otherwise if the button IS NOT highlighted the related partition IS...

Page 17: ... will change its status from not highlighted to highlighted Similarly to remove an association simply press the button related to the area that will change its status from highlighted to not highlighted To show the name of an area and all partitions belonging to it simply point the mouse cursor over the related button and wait the appearance of the label The None button allows to remove all associ...

Page 18: ...onfigure the number and type of present peripheral units through some ticking off fields The peripheral unit address column No must correspond to that assigned by the control panel during acquisition For the keypads tick off the field in the Service column if it is a service keypad only KP no 8 can be Service IMPORTANT The peripheral units configuration is allowed only when the control panel is di...

Page 19: ...the events stored in the control panel logs For further information about the content differences between the Event log file and the System log file consult the systems manuals It is possible to use a filter to optimize the search and display of the events by clicking the Change Filter button a window with the parameters is shown ...

Page 20: ...ding date time To confirm the filter changes select the button To reset all the filter values select the button To close the mask select the button 4 1 1 Actions available print the list of events displayed delete the list of events selected export to file the list of events displayed select all the elements displayed ...

Page 21: ...s screen displays where it is possible to Arm or disarm the whole System or enable disable the single Partitions 4 3 INPUTS ISOLATION This screen displays a table where it is possible isolate or include configured inputs by the Isolate buttons ...

Page 22: ...een displays a table where it is possible to enable or disable the configured keys through the Status column 4 5 ENABLE DISABLE USERS This screen displays a table where it is possible to enable or disable the configured users through the Status column ...

Page 23: ...h this screen it is possible to display the status of the configured inputs In addition it is possible to set on the top right hand side the automatic screen refresh by the button to obtain the status in real time To disable it press button ...

Page 24: ...or about 2 seconds then they revert to Disable 4 8 NOTES The screens Arm disarm system Exclude include inputs Enable disable Users and Inputs status require the alignment respectively of Partitions and Areas Users and Peripheral units Devices In presence of the warning icon a windows with the following message will be showed To access the screen and make changes select the button which will align ...

Page 25: ... e g Local to display and press the button to establish a connection between Hi Connect and Web Server The following message will appear if there are differences between the configuration on Hi Connect and the configuration on the Web Server The nodes sub nodes in which differences are present will appear on the tree in bold print Answer Yes to copy the Web Server configuration to Hi Connect Answe...

Page 26: ...Hi Connect Their parameters were modified together with the Web Server general parameters Press to send the changes made to the data to the Web Server IMPORTANT All changes made must be saved to Hi Connect by pressing BEFORE transferring to the Web Server The following message will appear The Web Server will be restarted The procedure will automatically reconnect to Hi Connect at the end of the pr...

Page 27: ... Camera section An X will appear in the in the Web Server column if the camera is connected and already associated to the Web Server Select the camera type in the Type list box OTHERS ELKRON Use the DHCP Client list box to indicate whether to enable the camera DHCP Client IP address assigned by the network router or disable it fixed IP address 5 3 2 Network parameters This section can be used to e...

Page 28: ...ographs 3 photographs before the burglar event and 5 after Technician s email 1 The technician s first email sending the control panel Fault Anomaly Tampers indications Technician s email 2 The technician s second email sending the control panel Fault Anomaly Tampers indications Select an ID of the system in the Device Name field this will be used as sender of the emails sent by the Web Server Up ...

Page 29: ...ect the respective checkboxes to associate three event types which cause the sending of an email Burglar Arm Disarm Partitions System Tamper 5 4 3 Event customisation In this section for each type of event that causes the sending of an email to the addresses programmed you can fill in the text that will be used as the subject of the email message maximum 48 characters ...

Page 30: ...parameters must be set for cameras made by OTHERS to be retrieved from the camera manual These URLS locate from where the photographs can be retrieved Description max 48 characters to describing name or location of the camera for example This description will be used in notification emails by the Web Server for recording burglar events Assigned inputs up to 16 control panel inputs can be associate...

Page 31: ...on 5 5 2 Connection test This section can be used to start a test procedure The procedure checks correct operation of the VPN connection to the portal and which sends a test email to all the programmed mailboxes Make sure that the result is positive and the sent emails have been received IMPORTANT Check that the emails did not end up in the SPAM folder if they are not received 5 5 3 Web Server Inf...

Page 32: ...2 User MP500 xx ELKRON Tel 39 011 3986711 Fax 39 011 3986703 www elkron com mail to info elkron it ELKRON is a trademark of URMET S p A Via Bologna 188 C 10154 Torino TO Italy www urmet com MADE IN ITALY ...

Reviews: