5.
Follow the same procedure with regard to fixing the corner bracket/angle base leg as detailed
on the rear end assembly.
6.
The long block glazing bars have 2 continuous bolt channels. Slide 2 bolts into the channel
closest to the corner bar and 2 bolts into the channel closest to the door opening. The top bolt
is secured to the prefabricated hole in the roof corner bar. Do not put a nut on the bolt closest
to the door opening. Attach the horizontal brace to the 1st pre-inserted bolt of the block glaz-
ing bars, and then to the
top bolt
of the gusset plate.
(Key point).
7.
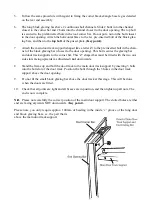
Attach the main door track support (shaped like a letter Z) to the pre inserted bolt in the chan-
nel of the block glazing bar (closest to the door opening). This bolt secures the glazing bar
and door track supports to the corner bar. This ‘Z’ shaped bar must be fitted with the two out-
side slots facing upwards (as illustrated)
not
downwards.
8.
Stand the frame up and bolt the door track to the main door track support by inserting 3 bolts
into the bolt slot of the door track. Position the bolts through the 3 holes in the door track
support above the door opening.
9.
Do not fit the small block glazing bar above the door track at this stage. This will be done
when the doors are fitted.
10. Check that all joints are tight and all braces are in position, and then tighten up all nuts. The
end is now complete.
N.B.
Please note carefully the correct position of the main door support. The slotted holes at either
end are facing skywards NOT downwards. (
Key point).
Please note, you only require approx. 100mm of beading in the inside ‘v’ groove of the long door
end block glazing bars, i.e. the part that is
above the main door track support.
Summary of Contents for 7'5" WIDE TITAN
Page 1: ......
Page 2: ......
Page 3: ......
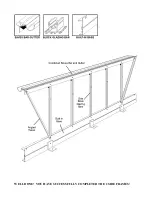
Page 9: ...WELL DONE YOU HAVE SUCCESSFULLY COMPLETED THE 2 SIDE FRAMES ...
Page 11: ...REAR END ASSEMBLY ...
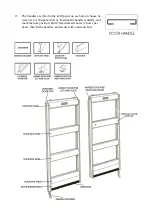
Page 16: ...DOOR END ASSEMBLY ...
Page 32: ...ELITE 1806 ...


