


Jupiter
EVM
Getting
Started
Rev
C01
:
05/17/2007
Copyright
Elevate Semiconductor 2012
Page 12 of 22
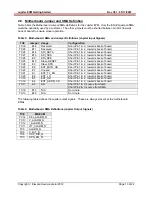
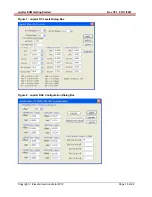
2.5 Jupiter Loadboard Jumper Definitions
Table 5 lists the Jupiter Loadboard Jumper definitions. These jumpers provide different remote sense
options, the ability to isolate analog pins for low current leakage measurements, and other test options.
Important Note: Extreme caution should be used when configuring for different feedback options. Always
ensure there is a proper feedback so the DPS op-amp isn’t open loop.
Table 4: Jupiter Loadboard Jumper Definitions
Jumper
Description
Default Configuration
E1
Connect VFORCE
Installed (for ExtDAC)
E2
FORCE_A to TEST_NODE Installed
E3
FORCE_A to SENSE
Open
E4
SENSE to TEST_NODE Installed
E5
Slave FORCE_B to TEST_NODE
Installed (for Ganging)
E7
FORCE_B to TEST_NODE Installed
E8
FORCE_B to SENSE
Open
E9
Use DPS_EN to control FORCE_A select switch
Installed
E10
Use EVM Latch to control FORCE_A select switch
Open
E11
Slave FORCE_A to TEST_NODE
Open
E12 Fan
PWR
TBD
E13 Fan
PWR
TBD