background image

Summary of Contents for EW30ES65GBG

Page 1: ...O0_OOi EN ELECTRIC SLIDEqN RANGE USE AND CARE GUIDE 318205832 rev A 12 01 ...

Page 2: ...door care instructions 48 Changing oven lights 48 The oven door with Luxury Hold TM hinges 49 Cooktop cleaning and maintenance 50 Recommendations for ceramic glass 50 51 Broiler pan cleaning tips 51 Solutions to Common Problems 52 54 Warranty 55 Thank you for choosing Etectrolux the new premium brand in home appliances This Use Care Guide is part of our commitment to customer satisfaction and prod...

Page 3: ...upplied with your range for proper installation Remove all tape and packaging wrap before using the appliance Destroy the carton and plastic bags after unpacking the appliance Never allow children to play with packaging material Proper installation Be sure your appliance is properly installed and grounded by a qualified technician in accordance in United States with the National Fuel Gas Code ANSi...

Page 4: ...he cooktop the oven vent openings and surfaces near these openings oven door and window to cool Among these areas are the cooktop surfaces facing the cook top the oven vent openings and surfaces near these openings oven door and window Wear Proper Apparel Loose fitting or hanging garments should never be worn while using the appliance Do not let clothing or other flammable materials contact hot su...

Page 5: ...ed on the decorative cover will become hot and possibly melt Burns will occur if the hot covers are touched Damage may also be done to the cooktop Do Not Clean or Operate a 8token Cooktop If cooktop should break cleaning solutions and spiltovers may penetrate the broken cooktop and create a risk of electric shock Contact a qualified technician immediately Avoid scratching the cooktop glass with sh...

Page 6: ...sils stored in the oven Do not clean the oven door gasket The door gasket is essential for a good seal Care should be taken not to rub damage or move the gasket Do not use oven cleaners No oven cleaner or oven liner protective coating of any kind should be used in or around any part of the oven Remove oven racks Oven racks will be damaged if left in the oven during a self cleaning cycle CAUTION Th...

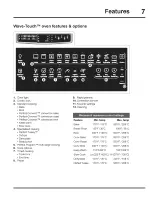
Page 7: ...gram TM multi stage cooking 6 Cook options 7 Timed cooking Cook time End time 8 Probe 9 Rapid preheat 10 Convection convert 11 Favorite settings 12 Cleaning Feature Min temp Max temp Bake 170 F 76 C 550 F 288 C Bread Proof 85 F 30 C 100 F t 38 C Broil 300 F 148 C 550 F 288 C Conv Bake 170 F 76 0 550 F 288 C Conv Roast 170 F 76 C 550 F 288 C Conv Broil 300 F 148 C 550 F 288 C Keep Warm 150 F 66 C 1...

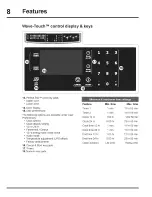
Page 8: ...tting Clock 24 hr 0 00 hr Clock display setting 12 hr 24hr Cooktime 12 hr 1 min Fahrenheit Celsius Cook time 24 hr 1 min 12 Hr energy save mode on off Audio mode End time 12 hr 1 00 hr Temperature adjustment UPO offset End time 24 hr 0 00 hr Factory default reset Clean duration Lite 2 hr 16 Cancel Start key pads 17 Timers 18 Numeric key pads Max time 11 hr 59 mln 11 hr 59 rain 12 hr 59 mln 23 hr 5...

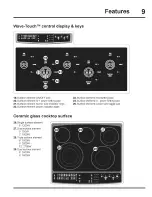
Page 9: ...ings 22 Surface element power indicator digits 23 Surface element med setting pad 24 Surface element Io power setting pad 25 Surface element burner size toggle pad Ceramic glass cooktop surface 26 Single surface element 6 1200W 27 Duat surface element 5 750W 7 1800W 28 Triple surface element 6 1000W 9 2000W 12 2700W 29 Dual surface element 6 1600W 9 3000W ...

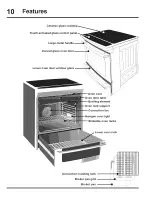
Page 10: ... control panel Large metal Curved glass oven door Lower oven door window glass Oven door latch Broiling element Oven rack support Convection fan Halogen oven light Slideable oven racks Lower oven rack Convection roasting rack Broiler pan grid Broiler pan _ ...

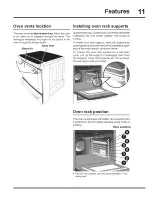
Page 11: ...S COOL To install oven rack support insert the supports by pushing them downward into the two brackets on each side of the oven interior as shown below To remove the oven rack support for a self clean cycle pull up the support to disengage them from the brackets If the rack supports are not removed the self clean cycle won t start Oven rack position This oven is equipped with ladder rack supports ...

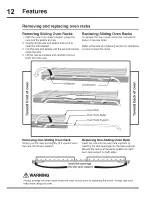
Page 12: ...order Refer to the care and cleaning section for directions on how to clean the racks I st Bracket 2nd Bracket Oven Rack Oven Rack Slider Oven Rack Support Removing Non Sliding Oven Rack Simply pull the rack and slightly tilt it upward when the rack hits its stop position Replacing Non Sliding Oven Rack insert the rack into the oven rack supports by inserting the rack openings into the rack suppor...

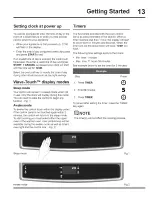
Page 13: ...ontrol to begin any function Fig 1 Awake mode To awake the control touch within the display panel tfthe control panel is not touched again within 2 minutes the control will return to the sleep mode To start cooking you must select either the upper oven or the warmer oven User preferences will be available during the awake mode as well as timers oven light and the control lock Fig 2 The two timers ...

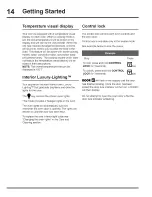
Page 14: ...ting TM that gradually brightens and dims the lights for the oven The Q key controls the interior oven lights This model includes 2 halogen lights in the oven The oven lights will automatically turn ON whenever the oven door is opened The lights will remain on until the door has been shut To replace the over interior light bulbs see Changing the oven lights in the Care and Cleaning section The con...

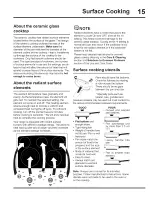
Page 15: ...food quicker and in larger volumes increases as the element wattage increases NOTE Radiant elements have a limiter that allows the element to cycle ON and OFF even at the HI setting This helps to prevent damage to the ceramic glass cooktop Cycling at the HI setting is normal and can also occur if the cookware is too small for the radiant element or if the cookware bottom is not flat Please read de...

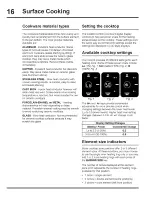
Page 16: ... ceramic cooktop surfaces because it may scratch the glass The cooktop control provides 5 digital display windows to help set power levels for the heating zones located on the cooktop These settings work the same way as normal knob settings except the settings are displayed in LCD style displays Available cooktop settings Your control provides 25 different settings for each heating zone Some of th...

Page 17: ...g Suggested cooktop power settings Use the chart below to determine the suggested setting for the type of food you are preparing when using the cooktop Setting High Hi Medium high 8 9 5 Medium 6 Medium Low 4 5 Recommended surface setting chart Type of Cooking Start most foods bring water to a boil and pan broiling Continue a rapid boil frying deep fat frying Maintain a stow boil thicken sauces and...

Page 18: ...cess To add or change any cook settings after this feature has started Select the UPPER oven Make temperature changes using the or keys Each press of or will adjust the temperature by 5 F or 2 C If changing cooking times select the cooktime or end time keys needed to make the changes For best results Single oven rack cooking ONLY Use in oven rack positions 2 or 3 Step Press I Press UPPER OVEN PP O...

Page 19: ...ss If your recipe requires a different baking temperature than the auto suggested default temperature example below shows lower oven temperature set for 425 F 218 C Step Press 1 Press UPPER OVEN uPP_ OVEN 2 Press BAKE 3 Enter 425 F 42 5 4 Press START _ To add or change any cook settings after this feature has started o Select the UPPER OVEN Make temperature changes using the or keys Each press of ...

Page 20: ...erfect turkey NOTE You may press CANCEL at any time when setting the control or during the cooking process See example below to set the oven for bake starting immediately with preheating to the auto suggest default setting of 350 F 176 C and then to automatically turn off after 30 minutes Step Preheat the oven if necessary 1 Press UPPER OVEN 2 Press BAKE 3 Press START 4 Press COOK OPTIONS Press UP...

Page 21: ...to automatically shut off at 5 30 Step Press I PressUPPER OVEN _PpE OVEN 2 Press BAKE r_ 3 Enter 375 F 3 7 5 4 Press COOK OPTIONS 5 Press COOK TIME 6 Enter 50 minutes 50 7 Press START _ _ 8 Press END TIME 1 9 Enter 5 30 530 10 Press START _I Once START is pressed the oven will calculate the start time at which the oven will begin heating The oven wilt continue to maintain this temperature for the ...

Page 22: ...ement and to prevent grease splattering do not use the roasting rack when broiling t _ For best results Use the recommended pans and oven rack positions for the type of meat being prepared Figs I 2 For optimum browning results allow the oven to preheat 5 6 minutes before placing the food in the oven See example below to set broil or convection broil for the upper oven starting immediately with the...

Page 23: ...s or move the broiling pan to a different rack position to suit for doneness If the food you are broiling is not listed in the table follow the instructions provided in your recipe and watch the item closely Insert Broil pan Fig 1 Food Rack position Steak 1 thick 7th 7th 7th Pork chops 3 4 thick 7th Chicken bone in 5th Chicken boneless 7th Fish 7th Shrimp 5th Hamburger I thick 7th Temp Cook time i...

Page 24: ...v bake may be set with the following options Conv convert Cook time or cook time with end time Probe Rapid preheat Step Press I PressUPPER OVEN uPP_ OVEN 2 Press CONV BAKE 3 Press START Ii_ Once START is pressed the oven will begin heating The oven display shows PRE HEATING during this time Benefits of convection bake Superior multiple oven rack performance Some foods cook up 25 to 30 faster savin...

Page 25: ...OUmay press CANCEL at any time when setting the control or during the cooking process Setting convection convert See the example below to set conv bake starting immediately with the auto suggest default setting of 350 F 176 C and adding the conv convert option Step Press 1 Press UPPER OVEN _ _ OVEN 2 Press CONV BAKE 3 Press COOK OPTIONS 4 Press CONV CONVERT _ 5 Press START Once START is pressed th...

Page 26: ...pans or bakeware required For best results Preheating is not necessary for most meats and poultry Place food items using the recommended rack positions for the type of food being prepared o When placing multiple food items in the oven allow 2 4 5 10cm of space between the food items for proper air circulation Be sure to carefully follow your recipe s temperature and time recommendations or refer t...

Page 27: ...he insert Do not cover the insert with aluminum foil 4_ Position food fat side up on the roasting rack Fig 1 5 Place prepared food on oven rack in the oven Roasting rack Insert Broil pan Fig 1 Standing rib roast Beef Rib eye roast Tenderloin roast Turkey whole Turkey whole _ Poultry Turkey whole Chicken Ham roast fresh Shoulder blade roast Pork Loin Pre cooked ham 4 to 6 tbs 350 F 4 to 6 lbs 350 F...

Page 28: ...r joint For dishes such as meat loaf or casseroles insert the probe into the center of the food To find the center of the food visually measure with the probe Fig 3 M_en cooking fish insert the probe just above the gill For whole poultry or turkey insert the probe into the thickest part of the inner thigh below the leg Fig 1 iMPORTANT Use only the probe supplied with your appliance any other may r...

Page 29: ...ER OVEN _PPER OVEN 4 Press CONV ROAST 5 Enter 325 325 6 Press START 7 Press PROBE twice 8 Enter 180 180 9 Press START You may skip steps 7 9 if you choose to use the default internal target temperature of 170 F for the probe By the default your oven will adjust to the keep warm setting once the probe has reached the set temperature NOTE When the meat probe is connected to the receptacle and a cook...

Page 30: ...cause bacteria to grow which can result in food poisoning or sickness NOTE You may press CANCEL at any time when setting the control or during the cooking process Setting keep warm See example below to set keep warm for the upper oven to start immediately with the auto suggest default setting Step Press 1 Press UPPER OVEN uPP_ OVEN 2 Press KEEP WARM rT 3 Press START Ii To add or change any cook se...

Page 31: ...cooking Do not open the oven door often or leave the door open when checking foods The more heat that is lost the longer the food will need to cook Cover the foods to keep them moist or use a loose or vented type cover to allow foods to turn crisp or brown Roasts may be left uncovered so browning can occur Cook times wilt vary depending on the weight fat content bone the shape of the roast Preheat...

Page 32: ...d to the receptacle and perfect turkey is started the display will show the current temperature reported by the meat probe Any time during the cooking process you may press _ to see or modify the target tempe ratu re It is not recommended to modify the perfect turkey settings once cooking has started Doing so may not provide the best results Setting Perfect Turkey TM See the example below to use p...

Page 33: ...efault setting 120 F 48 0 Min dehydrate setting 100 F 38 0 Max dehydrate setting 225 F 108 C Dehydrate may be set with the following options Cook time Cook time with end time Step Press 1 Place food in oven and press _ U PPER OVEN own 2 Press DEFROST _ 3 Press START NOTE You may press CANCEL any time when setting the control or during the cooking process This feature is not meant for thawing froze...

Page 34: ...perature settings apply to the bread proof feature Auto suggest default setting 100 F 38 C o Min_ bread proof setting 85 F 30 C Max bread proof setting 100 F 38 C Bread proof may be set with the following options Cook time Cook time with end time Setting bread proof See example below to set bread proof for 85 F 30 C Step Press 1 Press UPPER OVEN u_p_ OVEN 2 Press BRF AD PROOF 3 Enter 85 85 4 Press...

Page 35: ...OVEN Input the cooking instructions using the control keypads and any additional options you wish to save and later recall 3 Press START 4 Press and hold the available 2 MY FAVORITE for 3 seconds 5 Press CANCEL off You will hear a beep and a red light will display above the selected favorite to indicate that your favorite recipe has been stored If you wish to store the cooking instructions but not...

Page 36: ...Broil conv broil 10 minutes max Conv roast Keep warm Setting multi stage See the example to program a multi stage feature for a casserole For stage 1 bake at 400 F for 1 hr For stage 2 to brown broil for at 500C Ffor 4 minutes Step Stage 2 8 Press BROIL 9 Enter 500 F 10 Press START 11 Enter 4 minutes 12 Press START enter a total of 2 times to program only 2 stages and begin cooking Press 500 4 Ste...

Page 37: ...utes For stage 3 keep warm for 15 minutes Step Press 1 Press UPPEROVEN oPP_R OVEI _ 2 Press MULTI STAGE Stage t 3 Press BAKE 4 Enter 350 F 5 Press START 6 Enter 60 minutes 7 Press START Stage 2 8 Press BROIL 9 Enter 500 F 10 Press START 11 Enter 4 minutes 350 6O 500 Step Stage 3 13 Press KEEP WARM 14 Enter 170 F 15 Press START 16 Enter 15 minutes 17 Press START Press 170 4 15 12 Press START _ ...

Page 38: ... mode is active the oven light will remain on until the Sabbath mode is turned off and the oven lights are turned off The oven door will not activate the oven interior lights when the oven door is opened or closed It is recommended that any oven temperature modification made within an active Sabbath mode be followed with 2 presses of the START key This will insure the oven remains ON even if an at...

Page 39: ...ode SAb Fig 1 wilt show in the oven display until the Sabbath mode is cancelled Fig 1 Step Press and hold both the LO and Hi keys together for 3 seconds a beep will sound and release Press Io hi 2 All cooking features previously set will automatically cancel once Sabbath mode has ended NOTE The only keys available once the appliance is set for the Sabbath mode are hi I0 You may change the oven tem...

Page 40: ...cess For best results The lower oven rack must always be in place when cooking or warming Be sure that the rack is placed with the down turned sides into the drawer This will provide for some air space between the drawer and the food o When placing food in the lower oven always use a baking sheet or pan with 4 raised sides to prevent food from sliding off DO NOT LINE THE OVEN DRAWER WITH FOIL OR C...

Page 41: ...Io to increase or decrease numeric values You may also use the numeric keys to input precise values o Press START _ _ to accept a new option entry USER PREF I_ to advance to the or press next preference Press CANCEL _ to exit the preferences mode Step Press 1 Press and continue to press USER PREF until you reach the preset clock display mode Fig 2 2 Use the hi 1oto toggle to the CLO off option Fig...

Page 42: ...y is Fahrenheit See the example below to change the default temperature display to Celsius Step Press Step Press 1 Press and continue to press USER PREF until you reach the preset clock display mode Fig 1 1 Press and continue to press _ _ USER PREF until you reach the Fahrenheit Celsius mode Fig I 2 Use the hi Io to toggle to the 24hr option Fig 2 hi or I0 3 Press START to accept or press CANCEL t...

Page 43: ...12hr energy saving mode Fig 1 Setting audio mode The audio mode allows you to control the audio for the oven control You may turn the audio off and later return to operating with all the normal audible sounds and alerts See the example below when changing the audible settings Step 1 Press and continue to press USER PREF until you reach the pre set audio mode Press 2 Use the hi or o to choose _ _ t...

Page 44: ...n Step Press t Press and continue to press USER PREF until you reach the user preference offset mode Fig 1 2 Press hi to adjust the temperature higher Fig 2 3 Use hi to advance to 10 Fig 2 4 Press START to accept or press CANCEL to reject To set the temperature lower use the Io key hi 4 Factory default reset You may choose to restore your factory settings This will erase all settings or favorites ...

Page 45: ...moving all the oven racks and supports Remove any excessive spiilovers in the oven cavity before starting a self clean cycle To clean use hot soapy water and a cloth Large spiltovers can cause heavy smoke or fire when subjected to high temperatures Clean any soil from the oven frame the door liner outside the oven door gasket and the small area at the front center of the oven bottom with soap and ...

Page 46: ...avy m_l 4 Press START After pressing start the motorized oven door latch wilt automatically lock the door The DOOR lock icon will flash Fig 1 Once the door has locked the DOOR lock icon will remain on through the entire self clean cycle After self clean the oven may take about 30 40 minutes to cool and unlock A Not message Fig 2 will display during this period During cooling the DOOR lock icon wil...

Page 47: ... clean sponge or cloth Rinse with clean water and dry with a soft clean cloth Do not use harsh scrubbing cleaners Only use kitchen cleaners that are especially made for cleaning Stainless Steel Always be sure to rinse the cleaners from the surface as bluish stains may occur during heating that cannot be removed Gent e scoUiing witha Soapy scouiing pad wiii iemove most Spots broiler pan and insert ...

Page 48: ... glass Never clean the oven door gasket The oven door gasket should always clean during the Self clean cycle CAUTION Be sure the range is unplugged and all parts are COOL before replacing oven light Wear a leather4aced glove for protection against possible broken glass or burns The upper oven light bulbs are located on both side of the oven cavity and both are covered with a glass shield The glass...

Page 49: ...ing them up and away from the oven frame until they stop unlocked position Fig 2 If needed use a small flat bladed screwdriver to assist with loosening the door hinge locks 3 Firmly grasp both sides of oven door Fig 3 4 Before completing this step be prepared to hold the whole weight of the door while grasping the sides of the oven door with both hands Hold midway down the oven door sides Close th...

Page 50: ...ontrols are turned to OFF and the cooktop is COOL WARNING DO NOT use a cooktop cleaner on a hot cooktop The fumes can be hazardous to your health and can chemically damage the ceramic glass surface For light to moderate soil Apply a few drops of CookTop Cleaning Creme directly to the cooktop Use a paper towel to clean the entire cooktop surface Make sure the cooktop is cleaned thoroughtyl leaving ...

Page 51: ...ust be taken when aluminum pots or pans are used on the cooktop If allowed to boil dry not only will the utensil be destroyed but it may fuse to break or mark the ceramic glass surface permanently damaging the cooktop surface Do not use abrasive cleaners and scouring pads such as metal and some nylon pads They may scratch the cooktop making it more difficult to clean Do not use harsh cleaners such...

Page 52: ...r Service wiring not complete Contact your dealer installing agent or authorized servicer Power outage Check house lights to be sure Call your local electric company Short in cord plug Replace cord plug Controls are not set properly See instructions to set the controls o House fuse has blown or circuit breaker has tripped immediately following instal lation House fuse may not be fully engaged Chec...

Page 53: ... longer cleaning time Surface element iNo power to appiiance checkJieset breaker orrep ace fuse if the piObiem isa does not heat circuit over oad or impr0pe connection of the armored cable SUpplied with the appliance have this situati0n Cor ected by a qualifie d electrician_ Incorrect control ison Be sure to use correct control for the element needed Surface element too hot or not hot enough Incor...

Page 54: ...than recommended Cakes not done in Oven too hot Set oven temperature 25 F 12 C lower the center than recommended Incorrect pan size Use pan size suggested in recipe Pan not centered in oven Use proper rack position and place pan so there is 5 1cm to 10 2cm 2 to 4 of space on all sides of pan Cakes not level Range not level_ Place a marked glass measuring cuu filled with water on the center of the ...

Page 55: ...eas including the state of Alaska 13 Damages to the finish of appliance or home incurred during transportation or installation including but not limited to floors cabinets walls etc 14 Damages caused by services performed by unauthorized service companies use of parts other than genuine Electrolux parts or parts obtained from persons other than authorized service companies or external causes such ...

Page 56: ...www etectrolux store com ...

Reviews: