background image

grilling guide

grilling hints

WARNING

 warning

Note: Always clean the grill/oven dish after every use. 

Excessive fat build up may cause a fire.

depending on your model of appliance you will grill:

•    With the door open, if you are grilling in the separate grill 

wall-oven compartment.

•    With the drawer approximately two finger widths ajar, 

if you are grilling in the separate grill underbench 

compartment.

•    With the door open or closed, if you are grilling in the 

oven compartment.

As a method of cooking, grilling can be used to:

•    Enhance the flavours of vegetables, fish, poultry and meat.
•    Seal the surface of the food and retain the natural juices.
•    You can grill with the door open or closed.
This table shows how to grill different types of meat:

Beef

You can use tenderloin, rump, sirloin.  
Brush with oil or melted butter, especially if the  
meat is very lean.

Lamb

You can use loin chops, shortloin chops, chump 
chops, and forequarter chops.  
Remove skin or cut at intervals to stop curling.  
Brush with oil or melted butter.

Sausages

Prick sausages to stop skin from bursting.

Poultry

Divide into serving pieces. 
Brush with oil.

Fish

Brush with oil or melted butter and lemon juice.

Bacon

Remove rind. 
Grill flat and make into rolls.

guide to better grilling

No definite times can be given for grilling because this 

depends on your own tastes and the size of the food. These 

times should only be used as a guide and remember to turn 

the food over halfway through the cooking process.

Steak

15 – 20 minutes

Chops

20 – 30 minutes

Fish

8 – 10 minutes

Bacon

4 – 5 minutes

For better grilling results, follow these easy instructions:
1.   Remove oven/grill dish and smokeless grill insert and 

preheat grill for about 5 minutes.

2.   Choose only prime cuts of meat or fish. If the cut is less 

than 5mm thick it will dry out. If the cut is more than 

40mm thick, the outside may burn whilst the inside 

remains raw.

3.   Do not place aluminium foil under the food as this 

prevents fats and oils from draining away, which could 

result in a fire.

4.   Baste the food during cooking with butter, olive oil or 

marinade. Grilled food is better if marinated before cooking.

5.   Use tongs to turn food as a fork pierces the surface and 

will let juices escape.

turbo grill (Multifunction models only)

If your appliance has Turbo grill as a function, this will assist 

the grilling process by circulating the heat evenly around the 

food. The recommended temperature setting is 180°C for all 

fan grilling functions.
1.   Use the smokeless grill insert and oven dish for all  

Turbo grilling.

2.   Position the dish in the lower half of the oven, for best 

results.

3.   Wipe off any oil or fat which spatters while the oven is 

still warm.

There is no need to turn the meat as both sides are cooked  

at the same time which means that the food is succulent.

Built-in Cooking  GRILLING GUIDE  13

Summary of Contents for 63K906

Page 1: ...BUILT IN COOKING APPLIANCES User Manual Models EOC617 EOC627 63K906 EXC617 EGC627 EXC627 EOC647 63K914 ...

Page 2: ... reference please store this booklet in a safe place This appliance complies to the requirements of Australian Standard AS 60335 2 6 contents Description of your appliance 4 EOC617 4 EOC627 4 63K906 4 EXC617 4 EGC627 4 EXC627 4 EOC647 4 63K914 4 Before operating your appliance for the first time 5 Setting the time 5 Preparing your appliance for the first time 5 Installing your oven accessories 5 O...

Page 3: ... inserted into the appliance in accordance with the instructions Do not use the door as a shelf Do not push down on the open oven door Grill warnings DO NOT leave grill on unattended The grill door must be left fully open whilst grilling in a separate grill wall oven The grill drawer must be left approx two finger widths ajar whilst grilling in a separate grill underbench oven Always turn the gril...

Page 4: ...re Selector Grill Temperature Selector One Hour Timer Oven Indicator Light Grill Indicator Light Oven Indicator Light Grill Indicator Light Oven Temperature Selector Grill Temperature Selector One Hour Timer Function Selector 3 Button Programmable Timer Oven Grill Temperature Selector Model EGC627 EXC627 Separate Grill Underbench Fan Forced Separate Grill Wall Oven Fan Forced Oven Grill Temperatur...

Page 5: ...nt run grill on maximum for 15 minutes with grill door open Installing your oven accessories The type of oven furniture you receive is dependant on the model you have purchased 1 Side racks Separate grill wall ovens come with side racks that are to be fitted to the smaller grill cavity These can be attached to either side in the following manner Insert the largest peg into rear access hole provide...

Page 6: ...ion Select the desired oven function and temperature The oven indicator light will glow and the heating source will come on Press the MODE button until the cook time indicator begins flashing Set the cooking duration you want by using the and buttons Five seconds after the last change the cook time indicator will stop flashing and the time of day will be displayed To stop beeper press any button N...

Page 7: ...or you want is flashing To cancel delayed start press the mode button until end time symbol starts flashing Press and hold the button until the clock no longer reverses you will hear a beep If you have left the temperature and function knobs at a setting the oven will start once the end time indicator stops flashing To cancel auto shut off press the mode button until cook time indicator starts fla...

Page 8: ...ral juices of steak chops etc for a better flavour You can slide your grill dish into either of the 2 spaces within the upper pairs of support rails Maxi Grill Maxi grill directs radiant heat from 2 powerful upper elements onto the food You can use the maxi grill function for tender cuts of meat steak chops sausages fish cheese toasties and other quick cooking foods Grill with the oven door closed...

Page 9: ...ection Do not force it right round in a clockwise direction as this will result in damage to the thermostat Note For multifunction ovens the desired cooking function must be selected before the oven will operate Once the desired function has been selected use the temperature selector to set the required temperature Pre heating your appliance Pre heating your oven is recommended in cooking and gril...

Page 10: ...sh custards or to dry bread Do not use a lot of cooking oil when roasting This will prevent splattering oil on the sides of the oven and the oven door Polyunsaturated fats can leave varnish like residue which is very difficult to remove For sponges and cakes use aluminium bright finished or non stick utensils Oven shelf location Your oven comes with formed easy clean runners that allow five positi...

Page 11: ... 15 Rolled biscuits Spooned biscuits Shortbread biscuits 170 2 150 Any 10 15 190 2 180 Any 12 15 160 1 or 2 150 Any 30 35 Hard individual meringues Soft individual meringues Pavlova 6 eggs 110 2 100 Any 90 180 2 165 Any 15 20 110 1 100 Any 75 Patty cakes Sponge 4 eggs Shallow butter cake Rich fruit cake 190 3 180 Any 15 20 180 2 170 Any 20 30 180 2 170 Any 25 40 140 2 130 Any 180 Shortcrust cornis...

Page 12: ...he meat is carved The table shows temperatures and cooking times for different kinds of meat These may vary depending on the thickness or bone content of the meat Roasting poultry and fish 1 Place the poultry or fish in an oven set at a moderate temperature of 180 C 2 Place a layer of foil over the fish for about three quarters of the cooking time The table shows temperatures and cooking times for...

Page 13: ... on your own tastes and the size of the food These times should only be used as a guide and remember to turn the food over halfway through the cooking process Steak 15 20 minutes Chops 20 30 minutes Fish 8 10 minutes Bacon 4 5 minutes For better grilling results follow these easy instructions 1 Remove oven grill dish and smokeless grill insert and preheat grill for about 5 minutes 2 Choose only pr...

Page 14: ...tat Remove grill tray from oven on bake modes Cakes have a cracked thick crust Baking temperature too high Lower the temperature Food too high in oven Cook one shelf lower Cake batter over mixed Mix just long enough to combine the ingredients Baking tin too deep Check size of tin and use recommended size Baking tins dark Change to shiny light tins Baked products are pale flat and undercooked Bakin...

Page 15: ...se proof or baking paper 2 Preheat oven to moderate 180ºC 170ºC fan forced and ensure oven shelf is in the centre position of oven 3 Cream softened butter and sugar until light in colour 4 Add vanilla essence 5 Then eggs one at a time beating well after each addition 6 Sift flour and salt into the mixture and beat until well combined 7 Add milk and beat or stir to combine 8 Spoon mixture equally b...

Page 16: ...rolux Service or Spares See back cover Note Make sure you follow the polish or brushing lines in the steel Glass Glass surfaces on doors are best cleaned immediately after soiling A damp cloth may help remove baked on food deposits Oven cleaners can be used to remove stubborn marks and stains Painted Control Panel Door Trim Wash with soapy water and rinse with clean water Wipe dry with a soft lint...

Page 17: ...obe should be used This can be purchased from the Electrolux Customer Care Centre WARNING warning Important Make sure the appliance is turned off before you remove or replace parts to avoid the possibility of electric shock Releasing the grill element Retaining wire models We have designed the upper element with a hanger clip to help you reach your oven roof for cleaning Retaining wire models Lift...

Page 18: ...against the stirrups about 45O Grasp the oven door with a hand each side of the door and remove it from the oven by pulling it towards you Lay the oven door with the outer side facing downwards on something soft and flat for example a blanket on a kitchen table to prevent scratches Removing oven door top trim Take hold of the grid embossed sections of the door trim at each end and press inwards to...

Page 19: ... polish with a soft cloth and ensure the glass is dry before reassembly Bottom trim on selected models The bottom trim may be removed for cleaning by snapping out and lifting away from the glass Re assembling bottom trim Push down to snap each side of bottom trim back into door columns Re assembling door glass panels Insert the smaller clear glass panel when fitted first from above and at an angle...

Page 20: ...ght and firm against the glass panel Fitting the oven door Take hold of the oven door with a hand on each side and with the door at an angle of 45º position the recesses at the bottom of the door onto the hinge arms of the oven Let the door slide down the hinge arms as far as it will go Open the door fully to access the hinges then rotate the stirrups highlighted in the image on both hinges back t...

Page 21: ...l the Electrolux Customer Care Centre Oven not heating enough Foil or trays on bottom of oven Oven not working Timer is in AUTO mode Refer to timer operating instructions Household fuse has blown Note If the household fuse continues to blow call the Electrolux Customer Care Centre Timer flashing on display Power failure or interruption Note Reset time of day and any cooking functions you were usin...

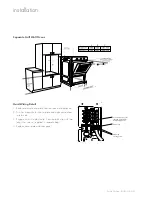
Page 22: ...upply cable where fitted does not kink To prevent tipping use the screws supplied to secure your oven into the cupboard Use just 2 screws for single cavity ovens and 4 screws for dual cavity Remove the bottom door in dual cavity ovens to provide access to the bottom 2 screwing points See illustration page 23 For appliances fitted with a supply flexible cord if the cord is damaged it must be replac...

Page 23: ...ll panel may have to be added if the cooktop placed above the benchtop is too deep Refer to cooktop installation instructions for required clearance between cooktop and oven Oven Dimensions Figure A Flush fit top view Figure B Proud fit top view Underbench Oven 595 x 595 x 567mm HxWxD Separate Grill Underbench Oven 725 x 595 x 567mm HxWxD Separate Grill Wall Oven 888 x 595 x 567mm HxWxD Cleat Figu...

Page 24: ...is installed directly above the appliance a minimum clearance distance of 10mm must be allowed for between the bottom of the cooktop and the top of the Separate Grill Underbench Oven 720mm Module s Bench top 720mm Module s Kick Panel Infill panel 2 Cleat 2 Cooker platform 8mm Supporting shelf 8mm below door line to give perfect alignment of cooker cupboard kickboard notched to suit ...

Page 25: ...f appliance 2 Fit wires through hole in cover plate and make connections to terminals 3 Engage wires into plastic clip Secure plastic clip with two long silver screws supplied in separate bag 4 Replace cover plate onto rear panel Plastic clip securing points Plastic clips Second active wire only required optional for multi phase products ...

Page 26: ...26 NOTES Built in Cooking notes ...

Page 27: ...correct power supply v incomplete or improper installation vi incorrect improper or inappropriate operation vii insect or vermin infestation viii failure to comply with any additional instructions supplied with the Appliance b the Appliance is modified without authority from Electrolux in writing c the Appliance s serial number or warranty seal has been removed or defaced d the Appliance was servi...

Page 28: ...installation information call into your Retailer phone or email our Customer Care team or visit our website Australia phone 1300 363 640 fax 1800 350 067 email customercare electrolux com au website www chef com au New Zealand phone 0800 234 234 fax 0800 363 600 email customercare electrolux co nz website www simpson co nz Top service Top Service encompasses the after sales service provided by The...

Reviews: