background image

5


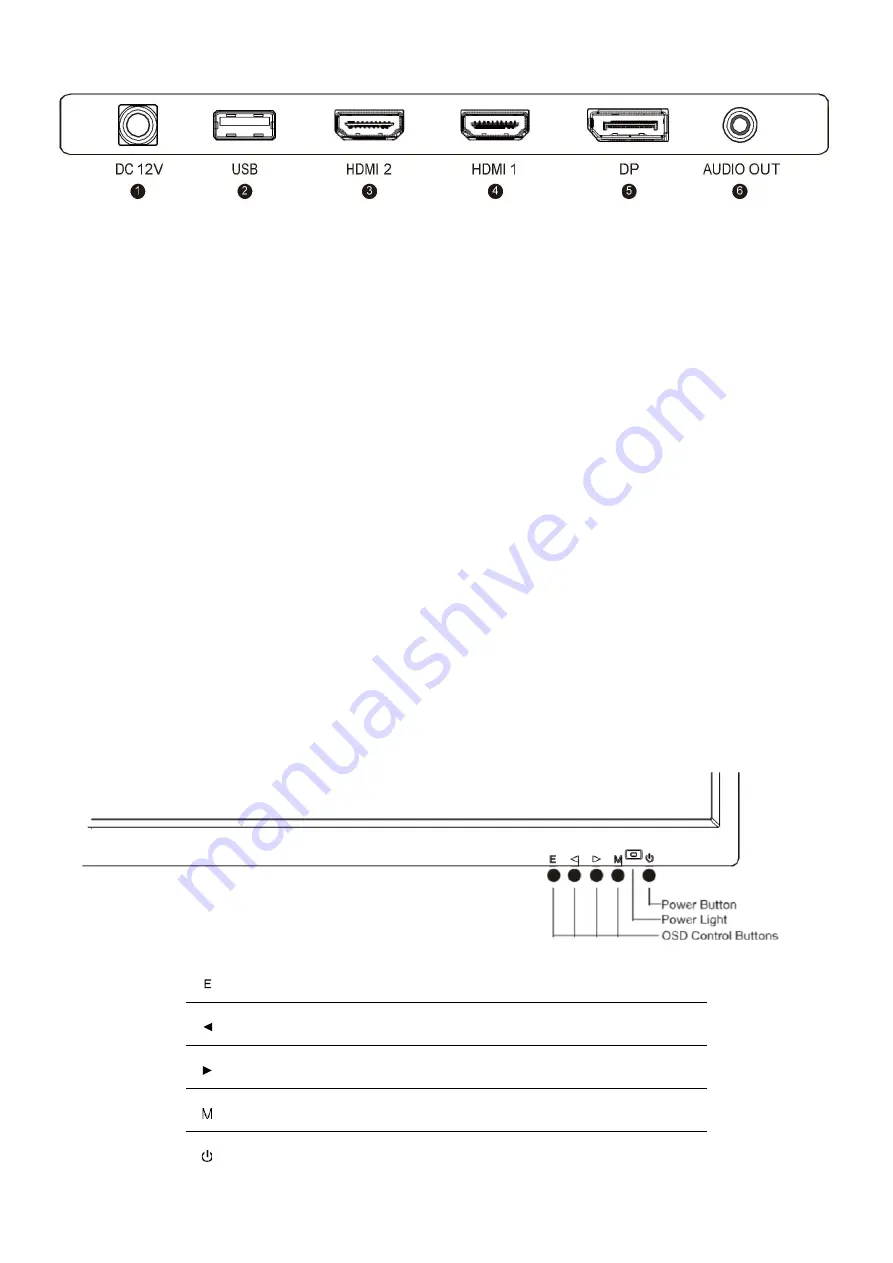
CONNECTIONS AVAILABLE ON THE MONITOR


1.


1

POWER


2.


2

USB (Firmware updates)


3.


HDMI 2 (HDMI 1.4, 75Hz, Free Sync)


4.


HDMI 1 (HDMI 2.0, 144Hz, Free Sync)


5.


DP (Display Port 1.2, 144Hz, Free Sync)


6.


AUDIO OUT


WALL MOUNTING


The monitor is provided with mounting holes for a VESA approved wall mounting bracket (not supplied). 


The VESA mounting pattern is: 100x100mm and the size of the screws is 4 x M6 x 10 (not supplied)  


Do not use screws longer than specified or damage will occur to the internal components. 
 

NOTE

: As the monitor is considered heavy, please consult with a professional wall mount installer to perform the 

installation. 


GETTING STARTED 

MONITOR CONTROLS


Select signal source or Exit the menu


Go Up within the Main Menu or increase the value of the selected 
item


Go Down within the Main Menu or decrease the value of the selected 
item


Enter the Main OSD Menu and Select submenu


Turn the monitor on or Off


Summary of Contents for eiQ-30CVWF200VAFSGH

Page 1: ...ONITOR eiQ 30CVWF200VAFSGH Thank you for choosing electriQ Please read the user manual before using this monitor and keep it safe for future reference Visit www electriQ co uk to view our entire range...

Page 2: ...le on the Monitor 5 Wall Mounting 5 Shortcut Key Guide 6 Initial Setup 6 Menu Options 6 Input Source 7 Brightness Contrast 7 Color Settings 8 Picture Quality Settings 8 Display Settings 9 Audio Settin...

Page 3: ...bracket or table specified by the manufacturer or sold with the apparatus When a cart or stand is used use caution when moving it to avoid any injuries or damage from it tipping over Unplug the appara...

Page 4: ...rom the information provided within the manual WARNING To reduce the risk of fire or electric shock do not expose this apparatus to rain or moisture The apparatus shall not be exposed to dripping or s...

Page 5: ...4 WHAT S INCLUDED USER MANUAL POWER SUPPLY POWER CABLE HDMI...

Page 6: ...and the size of the screws is 4 x M6 x 10 not supplied Do not use screws longer than specified or damage will occur to the internal components NOTE As the monitor is considered heavy please consult wi...

Page 7: ...or to turn it on The indicator will be blue 2 Connect the relevant cable to the corresponding input on the monitor The source will be automatically detected 3 To change between inputs press the E butt...

Page 8: ...al input or select the source DP HDMI1 HDMI2 BRIGHTNESS CONTRAST Brightness Adjust the brightness of the display between 0 and 100 Contrast Adjust the contrast of the display between 0 and 100 DCR Tur...

Page 9: ...ly between 0 and 100 Low Blue Light Change the blue light emitted by the display between0 and 100 Hue Change the Hue value between 0 and 100 Saturation Change the Saturation of the display between 0 a...

Page 10: ...off to mute and unmute the audio output Volume Adjust the output volume between 0 and 100 Audio Source Chose which source the audio is output from DISPLAY Aspect Ratio Change the image aspect ratio to...

Page 11: ...and PBP modes between Top Right Top Left Bottom Right and Bottom Left SWAP Swap the Primary and Secondary inputs on screen OSD Language Change the OSD Menu display language between English Chinese Ko...

Page 12: ...e Sync On or Off HDR Turn HDR On requires HDMI 2 0 input MPRT Turn MPRT On or Off Cross Turn cross on and off Reset Restore factory default setting Firmware Update Update the monitor firmware with pro...

Page 13: ...350 cd m Response Time 20ms GTG Viewing Angle 176 170 CR 10 Display Colours 16 7M Video Compatibility Multi Standard for NTSC PAL Aspect Ratio 21 9 Speaker Multimedia Speakers 2x3W Sound Demodulation...

Page 14: ...g facilities are now available for all customers at which you can deposit your old electrical products Customers will be able to take any old electrical equipment to participating civic amenity sites...

Page 15: ...14...

Reviews: