■
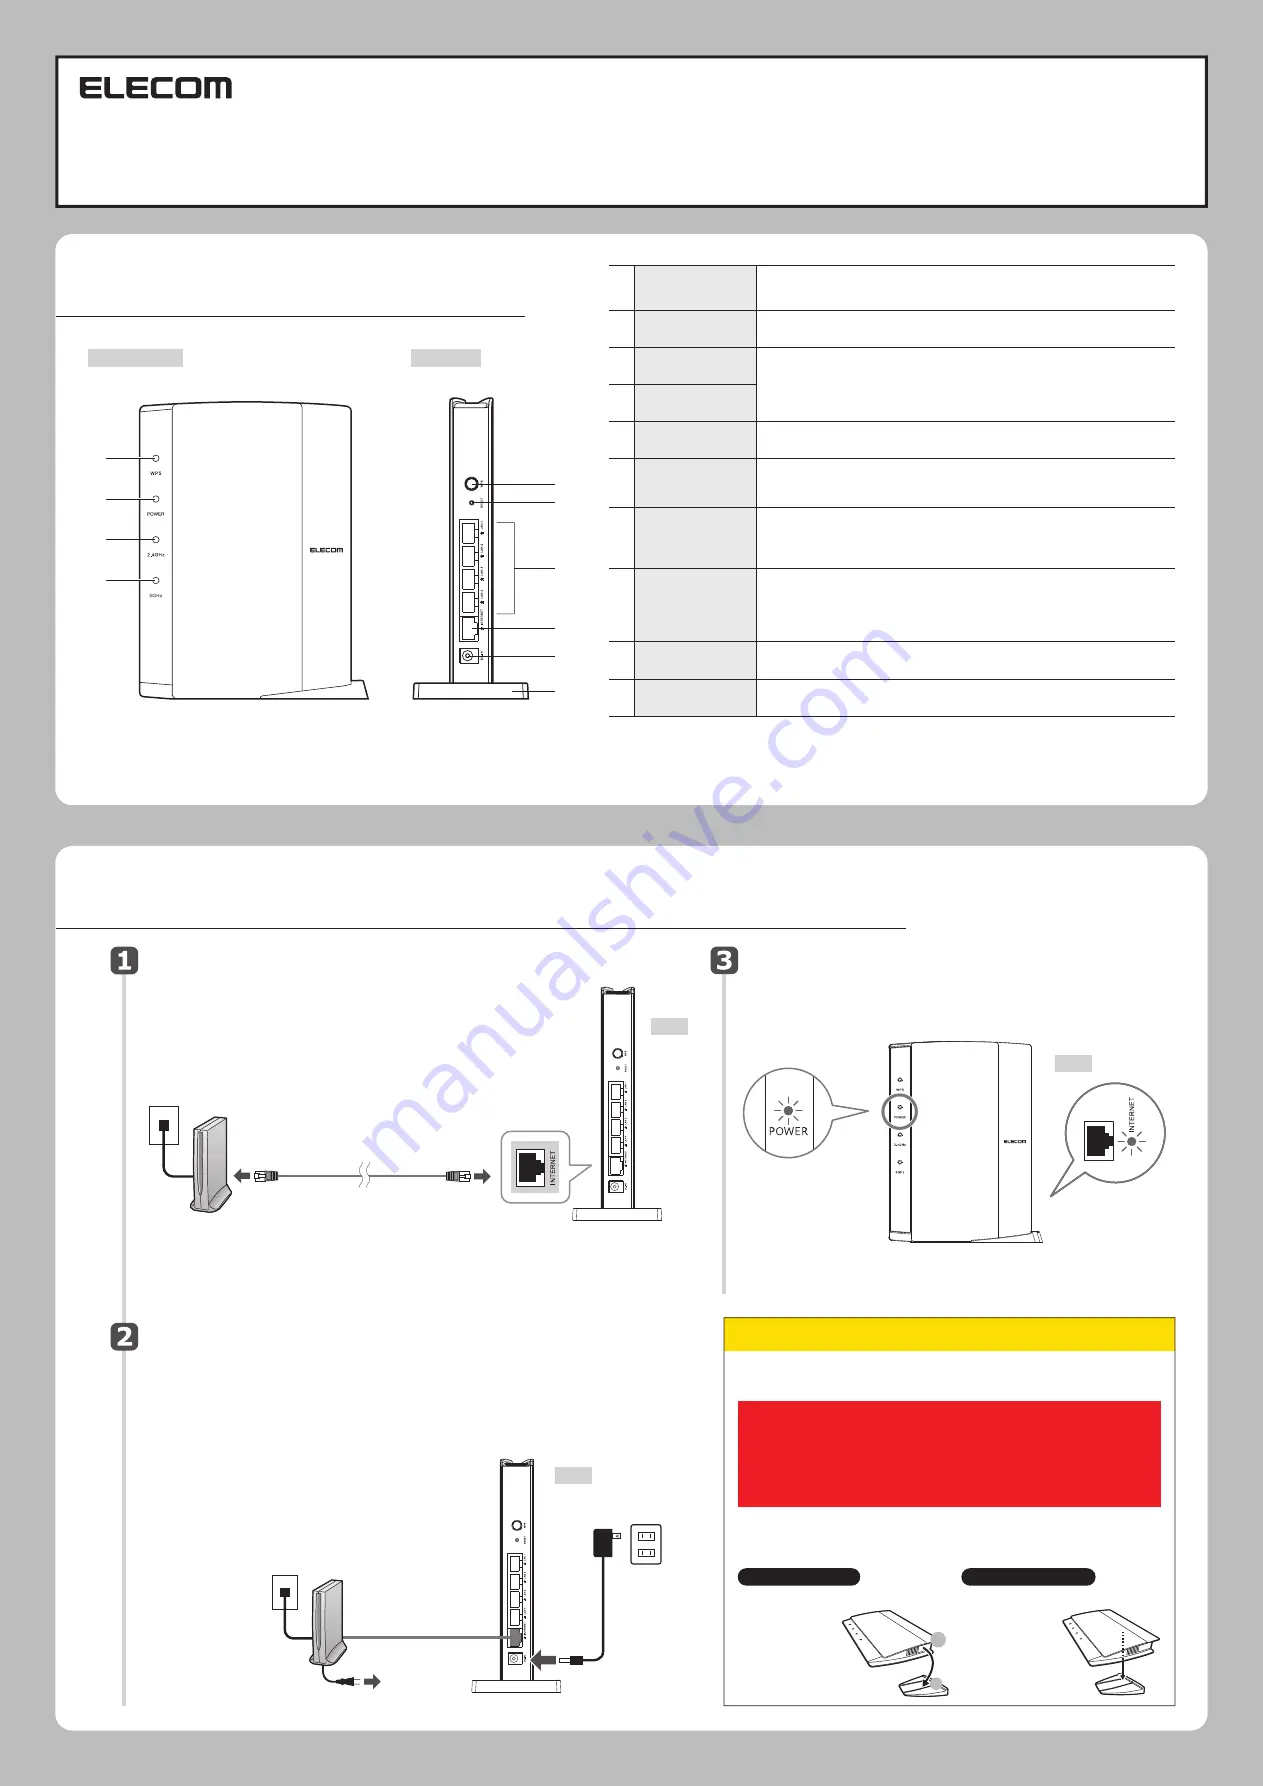
Names and Functions of Parts
Check that the lamp is lit.
Connect the equipment.
Turn on the terminal device and this product.
■
Installation of the product (router)
Setup Guide
Back
Back
Back
Left side view
Back view
WRC-1167G
E
BK-S
INTERNET:
Lit or blinking
This manual provides a summary of and the specifications for thi
s product as well as explains this product's usage
precautions.
It also contains an FAQ that explains actions you can take if you have problems such as the product malfunctioning.
⑤
①
②
③
④
⑥
⑦
⑧
⑨
⑩
• Whether in a horizontal or vertical position, the product should not be placed
in a location such as between a wall and a desk but in a well-ventilated area.
Do not place this product so as to overlap network equipment such as a
modem or terminal device.
• The stand is not secured to the product. Place the product on the stand after
connecting the cables to the product.
* Be sure to follow the installation method described below and use this product
correctly.
As dropping this product or yanking a cable during operation could lead to damage or data
loss, be sure to stabilize the product by placing it on the stand included and take measures
to prevent dropping or yanking.
Vertical placement
Horizontal placement
• Face the side with the LED lamp forward.
• Refer to the
illustration to set
the back side of the
product on the
provided stand in a
way that it fits
snuggly in the
groove.
• Face the side with the LED lamp upward.
• Place the product
on the center rear
of the provided
stand so that the
body does not
wobble.
Check that the lamps on the modem, etc and this
product are lit correctly.
Use the illustration as a reference for wiring various
devices.
①
Connect the power cable of the
terminal device.
If there is a power switch, turn on
the switch.
②
Connect the AC adapter included
with the product.
①
②
③
④
⑤
⑥
⑦
⑧
⑨
⑩
WPS lamp (red)
Power lamp
(white)
2.4G WLAN lamp
(white)
5G WLAN lamp
(white)
WPS setting
button
RESET button
LAN ports/LAN
lamps 1 - 4
(white)
INTERNET port/
INTERNET lamp
(white)
DC IN
(power supply jack)
Stand
Blinking: WPS setting button is pressed and WPS function is running.
Blinking continues at 0.5-second intervals for approximately 2 minutes.
Not lit: WPS function is not running.
This is used to connect to a wireless device with WPS function (such as a wireless LAN adapter).
To use this, press the button for 2 seconds or more.
When this button is pressed continuously for more than 10 seconds, the WPS lamp
blinks and the product’s settings are initialized (returned to the factory default settings).
Do not turn off the power during the WPS lamp is blinking.
Connect the AC adapter included with the product. Do not connect any AC adapter other
than the one included with the product.
For instructions on how to use the stand, please read the attachment “Installation
method and precautions”.
This indicates the connection status of 2.4 GHz band (11n/g/b) and 5GHz band (11ac/n/a).
Lit:
Wireless LAN connection is established.
Blinking: Wireless LAN connection is underway.
Not lit: Wireless LAN connection is not established.
These ports are used to connect PCs and network equipment to this product with a LAN cable.
Lit:
LAN cable connection with PC or network equipment is established.
Blinking: Data is being transferred.
Not lit: Cable is not connected.
Connect the cable of the WAN (Internet)-side devices of various types of modems (ONU,
CTU, etc.). An LED lamp is located next to the port.
Lit:
Connection with WAN-side device is established.
Blinking: Data is being transferred.
Not lit: Cable is not connected.
Lit: Power of this product is on
Not lit: Power of this product is off
POWER:Lit
LAN cable
AC outlet
To AC outlet
INTERNET port (blue)
①
To AC outlet
②
Terminal device
(cable TV modem,
ONU, CTU, ADSL)
Installation method and precautions


