background image

9

Chapter 1


Introduction

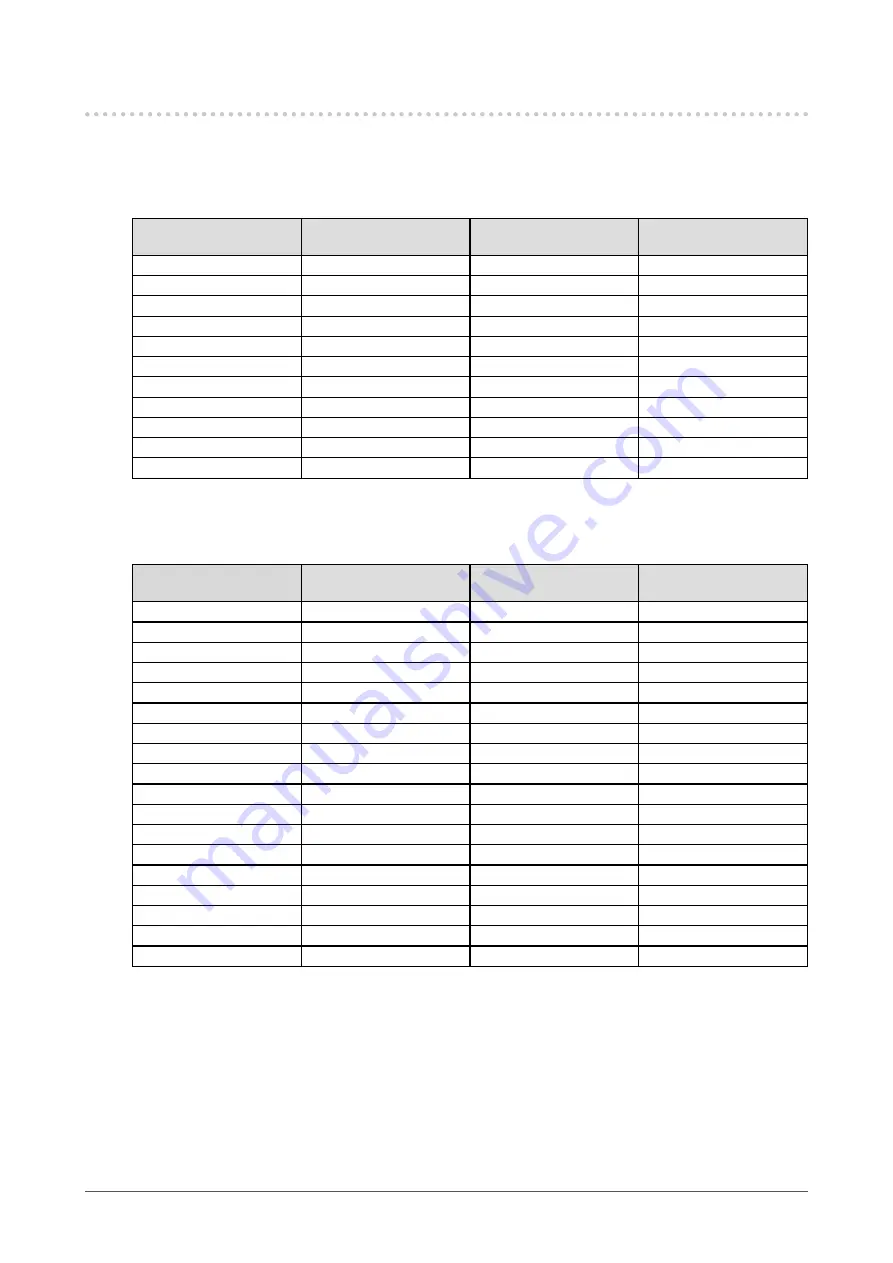
1-3.  Supported Resolutions

The monitor supports the following resolutions.


When using digital signal input (DVI-D, DisplayPort, HDMI: PC 

signal)

Resolution

Dot Clock

Horizontal Scan 

Frequency

Vertical Scan 

Frequency

640 x 480

25.175 MHz

31.469 kHz

59.940 Hz

720 x 400

28.322 MHz

31.469 kHz

70.087 Hz

800 x 600

40.000 MHz

37.879 kHz

60.317 Hz

1024 x 768

65.000 MHz

48.363 kHz

60.004 Hz

1280 x 960

108.000 MHz

60.000 kHz

60.000 Hz

1280 x 1024

108.000 MHz

63.981 kHz

60.020 Hz

1600 x 1200

162.000 MHz

75.000 kHz

60.000 Hz

1680 x 1050

119.000 MHz

64.674 kHz

59.883 Hz

1680 x 1050

146.250 MHz

65.29 kHz

59.954 Hz

1920 x 1080

138.500 MHz

66.587 kHz

59.934 Hz

1920 x 1200 

*1

154.000 MHz

74.038 kHz

59.950 Hz

*1  Recommended resolution


When using digital signal (HDMI: Video signal 

*2

)

Resolution

Dot Clock

Horizontal Scan 

Frequency

Vertical Scan 

Frequency

640 x 480

25.200 MHz

31.500 kHz

60.000 Hz

720 (1440) x 480i (4:3)

27.027 MHz

15.750 kHz

60.000 Hz

720 (1440) x 480i (16:9)

27.027 MHz

15.750 kHz

60.000 Hz

720 x 480p (4:3)

27.027 MHz

31.500 kHz

60.000 Hz

720 x 480p (16:9)

27.027 MHz

31.500 kHz

60.000 Hz

720 (1440) x 576i (4:3)

27.000 MHz

15.625 kHz

50.000 Hz

720 (1440) x 576i (16:9)

27.000 MHz

15.625 kHz

50.000 Hz

720 x 576p (4:3)

27.000 MHz

31.250 kHz

50.000 Hz

720 x 576p (16:9)

27.000 MHz

31.250 kHz

50.000 Hz

1280 x 720p

74.250 MHz

37.500 kHz

50.000 Hz

1280 x 720p

74.250 MHz

45.000 kHz

60.000 Hz

1920 x 1080i

74.250 MHz

28.125 kHz

50.000 Hz

1920 x 1080i

74.250 MHz

33.750 kHz

60.000 Hz

1920 x 1080p

74.250 MHz

27.000 kHz

24.000 Hz

1920 x 1080p

74.250 MHz

28.125 kHz

25.000 Hz

1920 x 1080p

74.250 MHz

33.750 kHz

30.000 Hz

1920 x 1080p

148.500 MHz

56.250 kHz

50.000 Hz

1920 x 1080p

148.500 MHz

67.500 kHz

60.000 Hz

*2 

To display video signals by HDMI signal input, you must change the monitor settings beforehand. (See 

“Signal Format” (page 26)

)

Summary of Contents for ColorEdge CS2410

Page 1: ...familiarize yourself with safe and effective usage Refer to the Setup Guide for information on the installation connection of the monitor For the latest product information including the User s Manua...

Page 2: ...smitted in any form or by any means electronic mechanical or otherwise without the prior written permission of EIZO Corporation EIZO Corporation is under no obligation to hold any submitted material o...

Page 3: ...f time To remove such a phenomenon change the image or keep the power turned off for several hours If the monitor displays continuously over a long period of time dark smudges or burn in may appear To...

Page 4: ...ever use thinner benzine wax or abrasive cleaner as they may damage the cabinet or LCD panel surface Note It is recommended that ScreenCleaner available as an option be used to clean the cabinet and L...

Page 5: ...ness 14 Chapter 3 Advanced Adjustments Settings 15 3 1 Basic Operation of the Setting Menu 15 3 2 Setting Menu Functions 16 Color 16 Signal 19 Preferences 22 Languages 24 Information 24 Chapter 4 Admi...

Page 6: ...patible with color management software ColorNavigator 7 which enables you to calibrate monitor characteristics and generate color profiles Equipped with a USB Hub function that supports USB 3 1 Achiev...

Page 7: ...switch to display its menu The switch indicators are lit white when you turn on the power 2 Power switch Turns the power on or off Touch the switch to turn the power on The switch indicator is lit whe...

Page 8: ...d angle tilt and swivel of the monitor 8 Cable holder Covers the monitor cables For details on attaching the cable holder see 6 3 Attaching Detaching the Cable Holder page 32 9 Main power switch Turns...

Page 9: ...zontal Scan Frequency Vertical Scan Frequency 640 x 480 25 200 MHz 31 500 kHz 60 000 Hz 720 1440 x 480i 4 3 27 027 MHz 15 750 kHz 60 000 Hz 720 1440 x 480i 16 9 27 027 MHz 15 750 kHz 60 000 Hz 720 x 4...

Page 10: ...he scaling menu 7 When after changing these settings a message is displayed that prompts you to sign out sign out once and then sign in again Windows 8 1 Windows 7 For Windows 8 1 click the Desktop ti...

Page 11: ...ed If it is selected clear it 4 Select the Display tab and confirm that Default for display of Resolution is selected If it is not selected select it This sets the correct resolution Close the System...

Page 12: ...g menu see Chapter 3 Advanced Adjustments Settings page 15 2 1 Switch Operation Method 1 Displaying the operation guide 1 Touch any switch except The operation guide appears on the screen 2 Setting 1...

Page 13: ...ust color using the monitor s Setting menu You can also adjust the monitor s display using color management software ColorNavigator 7 Custom Select for configuring color settings according to your pre...

Page 14: ...14 Chapter 2 Basic Adjustments Settings 2 4 Adjusting the Brightness The brightness of the screen can be adjusted to suit the installation environment or personal preference Settings 0 to 100...

Page 15: ...tting menu For the basic setting functions using the switches on the front of the monitor see Chapter 2 Basic Adjustments Settings page 12 3 1 Basic Operation of the Setting Menu 1 Menu display 1 Touc...

Page 16: ...r status 3 2 Setting Menu Functions Color When the screen is displayed in Standard Mode Custom sRGB you can adjust the color settings of each color mode according to your preference Attention The same...

Page 17: ...ws you to perform more advanced adjustment When gain is changed the color temperature is changed to User The gain preset values are set for each color temperature setting value Gamma 1 6 to 2 7 sRGB A...

Page 18: ...lor gamut defined in the standard move to a range that can be displayed by the monitor This allows the closest colors displayable by the monitor to be displayed Color gamut displayable by the monitor...

Page 19: ...19 Chapter 3 Advanced Adjustments Settings Signal The signal settings are used to configure advanced settings for input signals such as the screen display size and color format...

Page 20: ...When using video signal 480p i 576p i input the image will be displayed in full screen while maintaining the 16 9 aspect ratio Aspect Ratio Displays an image in full screen However since aspect ratios...

Page 21: ...actual contrast ratio of the monitor Auto The monitor automatically recognizes the brightness range of input signals and displays images appropriately Full The input signal brightness range is not ext...

Page 22: ...e select the input signal to display using the operation switch on the front of the monitor Note When the main power is turned on off the signal is detected automatically regardless of the setting for...

Page 23: ...an external device connected to it The monitor changes to power saving mode about 15 seconds after signal input ceases to be detected When the monitor has shifted to power saving mode images are not...

Page 24: ...Note Not all modes can be set to Skip Monitor Reset OK Cancel Restores all settings to their default values except for the settings in the Administrator Settings menu Languages The display language fo...

Page 25: ...ministrator Settings Menu 1 Menu display 1 Touch to turn off the monitor 2 While touching the leftmost switch touch for more than 2 seconds to turn on the monitor The Administrator Settings menu appea...

Page 26: ...power save mode while the PC is connected via the DisplayPort connector windows or icons may have shifted position In such cases set this function to Off DUE Priority Uniformity Brightness This produ...

Page 27: ...le specified by EIZO turn off the monitor and then turn it on again 2 The message below appears This message appears when the signal is not input correctly even though the monitor is functioning prope...

Page 28: ...ymptom may disappear 5 Noise appears on the screen When inputting HDCP system signals normal images may not be displayed immediately 6 For DisplayPort signal input When you switch the power back on or...

Page 29: ...Only the peripheral device will not work Try changing to a different USB port on the external device Try changing to a different USB port on the monitor Reboot the external device If the peripheral de...

Page 30: ...nd stand are heavy dropping them may result in injury or equipment damage 1 To prevent damaging the panel surface lay the monitor with its panel surface facing down on a soft cloth spread on a stable...

Page 31: ...ables When using an arm or stand attach it to meet the following tilt angles of the monitor Up 45 down 45 Connect the cables after attaching an arm or stand Since the monitor and arm or stand are heav...

Page 32: ...cables connected to the monitor Attachment procedure 1 Pass the cables through the cable holder 2 Close the cable holder 3 In this state insert the cable holder into the stand Note The cable holder c...

Page 33: ...33 Chapter 6 Reference Detachment procedure 1 Close the cable holder 2 In this state pull the cable holder from the stand...

Page 34: ...during setup can be detached using the following procedures 1 To prevent damaging the panel surface lay the monitor on a soft cloth spread on a stable surface with the panel surface facing down 2 Rais...

Page 35: ...stand base can be attached to the monitor again with the following procedures 1 To prevent damaging the panel surface lay the monitor on a soft cloth spread on a stable surface with the panel surface...

Page 36: ...36 Chapter 6 Reference 3 Turn the stand base clockwise until it makes a clicking sound Click...

Page 37: ...DVI D DVI D Note The input signal changes each time the operation switch on the front of the monitor is touched For more information see 2 2 Switching Input Signals page 13 The connector through which...

Page 38: ...ed devices even in the power saving mode When the main power switch of the monitor is off a device connected to the USB downstream port will not operate When the USB CHARGE Port setting in Preferences...

Page 39: ...deo mode 23 Hz to 61 Hz HDMI PC mode 23 Hz to 63 Hz HDMI for 720 x 400 69 Hz to 71 Hz DVI 23 Hz to 63 Hz For 720 x 400 69 Hz to 71 Hz Frame Synchronization mode 23 75 Hz to 30 5 Hz 47 5 Hz to 61 0 Hz...

Page 40: ...ut Stand Approx 5 1 kg Height adjustment 155 mm at tilt of 0 Tilt Up 35 down 5 Swivel 344 Vertical rotation 90 clockwise Operating Environment Requirements Temperature 0 C to 35 C Humidity 20 to 80 R...

Page 41: ...or other countries Microsoft and Windows are registered trademarks of Microsoft Corporation in the United States and other countries Adobe is a registered trademark of Adobe Systems Incorporated in t...

Page 42: ...adio communications However there is no guarantee that interference will not occur in a particular installation If this equipment does cause harmful interference to radio or television reception which...

Page 43: ...Copyright 2019 EIZO Corporation All rights reserved 03V27723A1 UM CS2410 1st Edition March 2019...

Reviews: