4
Transport case
Outside dimensions:
60 x 48 x 40 cm
Sprinkler
Dimensions:
330 x 330 mm
Capillair
Length:
10 mm ± 1 mm
Diameter:
0.6 mm ±0.08 mm
Material:
Glass
Adjustable support
Two waterlevels included, dimension: 305 x 305 mm
Ground frame
Aluminium
Dimension: 345 x 320 mm
Soil wetting jar
Diameter:
14 cm, height: 5.5 cm
Sample collection box
Contents:
2 liter
Sample bucket
Contents:
1.2 liter
Magnitude of rain simulation
18 mm
Duration of rain simulation
3 min.
Intensity of rain simulation
6 mm/min
Fall height of drops
average 400 mm
Diameter of drops
5.9 mm
Mass of drops
0.106 g
Number of capillary tubes
49
Kinetic energy of rain
4 J m
-2
mm
-1
Kinetic energy of rain shower
72 J m
-2
Surface area of test plot
0.0625 m
2
Slope of test plot
Max. 40%
3
Safety instructions
Adjustment of the adjustable support has to be done before placing the sprinkler.
Only use the water storage tank (21) for transporting clean water.
4 Calibration
To gain representative measurements the required discharge rate is 375 ml per minute. The discharge rate is
related to the water-temperature. Therefore and because of possible clogged capillaries it’s necessary to check
if all capillaries are clear and to calibrate the sprinkler before use on the plot field. Follow the next procedure:
A plot can only be used once. Therefore do not calibrate or test the sprinkler on the plot.
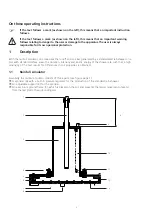
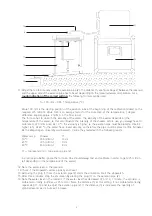
1. Install the ground frame (C) using the four nails.
2. Install the adjustable support (B) on the ground frame (C). Use the two levels (16) and four knobs (18) to
level the support (B).
3. Close the aeration pipe (2) with a plug (1).
4. The sprinkler is placed upside down on the support.
5. Remove the plug (8) out of the filling opening.
6. Use the water storage tank (21) to fill the sprinkler with water. Connect the water storage tank tube (15) to
the water storage tank (21). Install the water storage tank (21) uphill on top of the transport case (22),
above the sprinkler.
7. Connect the tube (15) to the sprinklers’ filling opening as soon as the water starts to flow. If the water
doesn’t flow, suck the tube while holding the end of the tube below the water storage tanks till water starts
to flow.
8. The tube can be disconnected, as the sprinkler is filled and all the air has escaped through the capillaries.
The waterflow can be stopped by moving the tube above the water storage tank (21).
9. After filling the sprinkler, note the water temperature and put the plug (8) in the filling opening.
10.Turn the sprinkler around to its sprinkling position on the support.
!
!

