D
GB
EIBENSTOCK
Vakuum Technik
Originalbetriebsanleitung……1 - 11
Original Instructions.............12 - 22
Diamantbohrständer
Diamond Drill Rigs
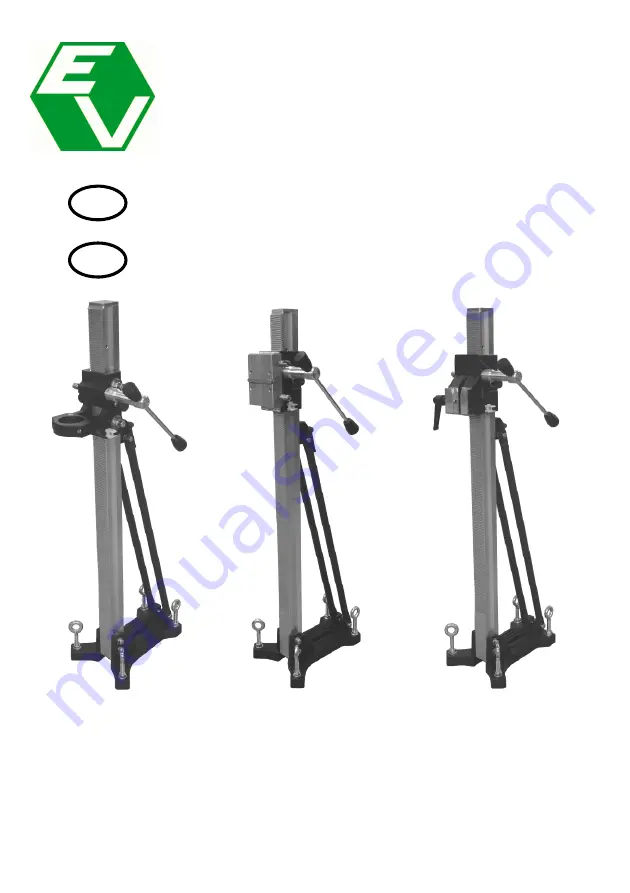
BST 152 / 53
BST 152
BST 152 S
BST 152 / 60
Page 1: ...D GB EIBENSTOCK Vakuum Technik Originalbetriebsanleitung 1 11 Original Instructions 12 22 Diamantbohrst nder Diamond Drill Rigs BST 152 53 BST 152 BST 152 S BST 152 60...
Page 2: ...r hei er Oberfl che Maschine Bohrkrone und Bohrst nder sind schwer Vorsicht Quetschgefahr Rei bzw Schneidgefahr Zu Ihrem Schutz sollten Sie folgende Schutzma nahmen treffen Geh rschutz benutzen Augens...
Page 3: ...Schnellwechselplatte mit Passfeder und 4 Schrauben Aufnahme des Motors BST 152S Schwalbenschwanz Schnellverbindung Anpassung an Untergrund 4 Verstellschrauben 2 Libellen lieferbares Sonderzubeh r Art...
Page 4: ...bohrger te mit Befestigung mittels Montageplatte ausgelegt Der maximale Bohrdurchmesser darf 152 mm nicht berschreiten Bei falschem oder zweckentfremdetem Gebrauch bernimmt der Hersteller keinerlei Ha...
Page 5: ...F auf der Schnellspannschraube D Ziehen Sie die Mutter F mit einem Schl ssel SW 27 fest Vor und nach dem Festziehen der Mutter F sind die 4 Stellschrauben zur Anpassung an den Untergrund entsprechend...
Page 6: ...st Nicht korrekt befestigte Bohrst nder k nnen zur Verletzung des Bedieners und Besch digung der Bohreinheit f hren Bewegungen w hrend des Bohrens verursachen ein Schlagen der Bohrkrone gegen die Bohr...
Page 7: ...T 152 60 3 Fahren Sie den Maschinenhalter 2 soweit nach oben bis der Arretierbolzen 5 in der S ule einrastet Setzen Sie das Kernbohrger t M auf den Schlitten und schlie en Sie die Spannschelle 4 mit d...
Page 8: ...Montageplatte eine Passfeder 10 mm und 4 Innensechskantschrauben M8 x 30 Die Montageplatte wird mit der Passfeder auf die Maschine aufgesetzt und mit den vier Schrauben befestigt Achten Sie auf die Mo...
Page 9: ...auf den Arbeitsbereich haben und jederzeit alle erforderlichen Bedienungselemente und Sicherheitseinrichtungen erreichen k nnen Halten Sie andere Personen von Ihrem Arbeitsbereich fern um Unf lle zu...
Page 10: ...mit einem zu hohen Druck bohren kann die Krone verlaufen Zur Erreichung der vollen Bohrtiefe muss eventuell eine Verl ngerung f r die Bohrkrone verwendet werden Demontage der Kernbohreinheit Fahren Si...
Page 11: ...ulschl ssels SW 17 die Kontermutter auf der Innensechskantschraube Regulieren Sie mit Hilfe eines Sechskantstiftschl ssels SW 8 die Innensechskantschrauben und somit die Stellung der Druckst cke zur S...
Page 12: ...zerlegt an den Lieferer oder eine Eibenstock Vertragswerkstatt gesandt wird Konformit tserkl rung Es ist erforderlich dass die in diesem Bohrst nder betriebene Maschine z B EHD 2000 S EBM 162 3 P oder...
Page 13: ...s voltage Warning hot surface Tool drill bit and rig are heavy Caution risk of squashing Danger of tearing or cutting During work you should wear goggles ear protectors protective gloves and sturdy wo...
Page 14: ...uick change motor plate with fitting key and 4 screws Fixture of the motor BST 152 S dove tail quick change motor plate Adaptation to surface 4 positioning screws 2 bubble levels Available special acc...
Page 15: ...nd core drills witch are fixed by means of a mounting plate The max drilling diameter must not exceed 152 mm In case of wrong handling or misuse the producer does not assume any liability Use After ea...
Page 16: ...D Tighten the fastening nut F with a wrench SW 27 Before and after tightening the nut F the 4 adjustable screws have to be adjusted in order to adapt the rig to the surface Do check whether the drill...
Page 17: ...If not fixed correctly injuries to the operator or damages to the drilling unit may be caused Uncontrolled movements during drilling will cause the drill bit to hit the surface to be drilled which may...
Page 18: ...machine risk of squashing BST 152 53 BST 152 60 3 Move the machine holder 2 upwards until the locking pin 5 locks in the column Remove both Allen screws M8 3 and take off the clamp 4 Put the core dri...
Page 19: ...ing plate a 10 mm fitting key and 4 Allen screws M8x30 The mounting plate is put on the drill motor with the fitting key and fixed by means of the 4 screws Pay attention to the mounting direction BST...
Page 20: ...view and to be able to reach all necessary operating elements and safety installations Keep other persons away from your work area in order to avoid accidents Space requirements for operating and main...
Page 21: ...rill too fast or with too much pressure the drill bit could get jammed In order to reach the max drilling depth you probably have to use an extension for the drill bit Demounting the Core Drill Unit M...
Page 22: ...have changed it can be readjusted as follows Loosen the counter nut on the Allen screw by means of an jaw wrench SW 17 Adjust the Allen screws and the position of the thrust piece to the column by me...
Page 23: ...s returned in non dismantled condition to the manufacturer or an authorized Eibenstock service centre Konformit tserkl rung It is necessary that the machine f e EHD 2000 S EBM 162 3 P or ETN 152 3 P u...
Page 24: ...23 Ihr Fachh ndler Your distributor Vakuum Technik GmbH Am Steinb chel 3 08309 Eibenstock...