EGO POWER+ ST1200, Operating Manual
The EGO POWER+ ST1200 Operating Manual is a comprehensive guide for users to properly operate and maintain their product. You can easily download this manual for free from our website. Get all the necessary information on how to maximize the performance of your ST1200 with this user-friendly manual.
Share
Download


Reviews:
No comments
Related manuals for POWER+ ST1200

620
Brand: Patriot Pages: 88
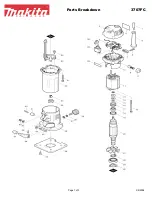
3707FC
Brand: Makita Pages: 3

AR3
Brand: Jacobsen Pages: 124

767r
Brand: Ryobi Pages: 28

RD-GBC08
Brand: Raider Pages: 92

EXPAND-IT RY15524
Brand: Ryobi Pages: 30

TCG 24EA2 SL
Brand: Tanaka Pages: 76

WEEDWACKER C944.511561
Brand: Craftsman Pages: 18

WEEDWACKER 358.799470
Brand: Craftsman Pages: 11

WEEDWACKER 358.799462
Brand: Craftsman Pages: 10

WEEDWACKER 358.799270
Brand: Craftsman Pages: 12

WEEDWACKER C944.514460
Brand: Craftsman Pages: 14

WEEDWACKER 358.799140
Brand: Craftsman Pages: 10

Weedwacker Cordless Trimmer 172.71816
Brand: Craftsman Pages: 15

WEEDWACKER C944.514360
Brand: Craftsman Pages: 14

WEEDWACKER Incredi-Pull 316.711471
Brand: Craftsman Pages: 21

WEEDWACKER C944.511110
Brand: Craftsman Pages: 21

WEEDWACKER 358.799250
Brand: Craftsman Pages: 25


