background image

8

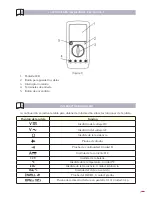
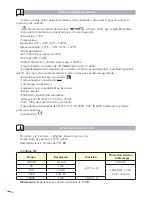
FUNCIONES DE LOS BOTONES

A continuación se indica la tabla para obtener información sobre las funciones de los botones.

Botón

Operación realizada

Gire el encendido y apagado.

HOLD

Pulse HOLD una vez que este en el modo hold

Presione HOLD de nuevo para salir del modo hold y se mostrará el 

valor actual.

En el modo Hold,    aparecerá.

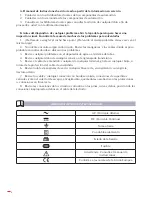
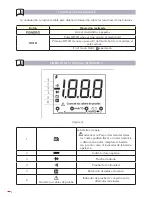
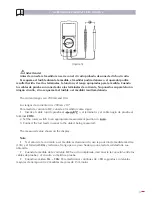
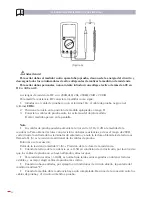
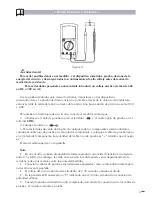
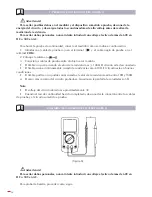
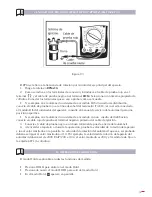
SÍMBOLOS DE LA PANTALLA (VER FIGURA 2)

(figura 2)

1

La batería esta baja.
 

Advertencia: Para evitar lecturas falsas 

las cuales podrían llevar a un electroshock 

o daños personales, remplace la batería 

tan  pronto como el indicador de la batería 

aparezca.

2

Indica lectura negativa

3

Prueba de diodo

4

Prueba de continuidad

5

Retención de datos esta activo

6

Conecte los cables de prueba

Indicador de prueba de conexión entre 

diferentes terminales.

Summary of Contents for egatronic 51259

Page 1: ...MULT METRO DIGITAL PARA AUTOM VILES AUTOMOTIVE DIGITAL MULTIMETER MANUAL DE INSTRUCCIONES OPERATING INSTRUCTIONS ESPA OL 2 ENGLISH 26 GARANTIA GUARANTEE 51 COD 51259...

Page 2: ...iente 11 D Prueba de resistencia 12 E Prueba de diodo 13 F Prueba de continuidad 14 G Medida de la bater a de 12V 14 H Medida de la temperatura 15 I Medida de frecuencia 16 J Medici n del ciclo de ser...

Page 3: ...de rango manual de 3 1 2 d gitos Posee un dise o nico con pantalla LCD extra grande pantalla con conexi n de prueba protecci n contra sobrecarga y dise o nico Por esta raz n surge como un medidor el c...

Page 4: ...ificaciones el ctricas antes de usar el medidor Cuando est usando la conexi n de prueba mantenga sus dedos detr s de las protecciones No aplicar m s voltaje del nominal indicado en el medidor entre lo...

Page 5: ...do por una reserva de energ a especial Para prevenir un accidente que cause cualquier da o personal o cualquier da o al autom vil o a cualquiera de sus medidores por favor lea las gu as de seguridad q...

Page 6: ...Revise cualquier problema con el depurador de agua o el sistema de tubos 4 Revise cualquier da o de cualquier sensor o el engranaje de transmisi n 5 Revise el cable de encendido cualquier de cualquier...

Page 7: ...maci n sobre las funciones de la ruleta Posici n de la ruleta Funci n Medici n del voltaje DC Medici n del voltaje AC Medida de la resistencia Prueba de diodos Prueba de continuidad Unidad Medida de l...

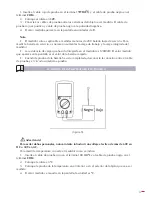
Page 8: ...rar el valor actual En el modo Hold aparecer S MBOLOS DE LA PANTALLA VER FIGURA 2 figura 2 1 La bater a esta baja Advertencia Para evitar lecturas falsas las cuales podr an llevar a un electroshock o...

Page 9: ...s cables de prueba entre los extremos del objeto medido El valor medido aparece en la pantalla Nota Si el valor del voltaje a ser medido es desconocido use la posici n de medida m xima 1000V y reduzca...

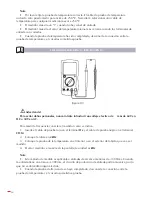
Page 10: ...jeto medido El valor medido aparece en la pantalla Es el valor efectivo de la onda sinusoide respuesta de valor medio Nota Si el valor de voltaje a ser medido es desconocido use la posici n de medida...

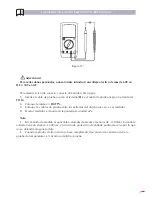
Page 11: ...r la corriente DC conecte el medidor como sigue 1 Inserte el cable rojo de prueba al o al terminal A y el cable negro de prueba al terminal COM 2 Set the rotary switch to an appropriate measurement po...

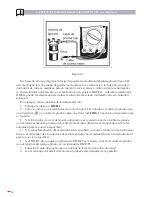
Page 12: ...de prueba pueden aumentar el error entre 0 1 y 0 2 a la medida de la resistencia Para obtener lecturas con precisi n con bajas resistencias este es el rango de 200 cortocircuite la entrada de los term...

Page 13: ...M 2 Coloque la ruleta en 3 Para las lecturas de ca da de tensi n en cualquiera de los componentes semiconductores coloque el cable rojo de prueba en el nodo del componente y coloque el cable de prueba...

Page 14: ...eba entre el objeto a ser medido El timbre no suena cuando el valor de la resistencia es 100 El circuito esta desconectado El timbre suena continuamente cuando la resistencia vale 10 El circuito est e...

Page 15: ...que ha sido integrada en el medidor es 120 2W El valor medido que aparece en la pantalla es el valor de la bater a cargada Cuando la prueba de la bater a ha sido completada desconecte la conexi n entr...

Page 16: ...r da os personales nunca intente introducir un voltaje efectivo de m s de 60V en DC o 30V en AC Para medir la frecuencia conectar el medidor como se indica 1 Inserte el cable de prueba rojo en el term...

Page 17: ...erminal COM 6 Coloque la ruleta en DUTY 7 Coloque Los cables de prueba entre los extremos del objeto que van a ser medidos 8 El valor medido se muestra en la pantalla la unidad es Nota Este m todo de...

Page 18: ...r el cable de prueba rojo en el terminal y en cable de prueba negro en el terminal COM Conectar los terminales como se muestra Si el interruptor de corte del sistema de ignici n es revisado conecte el...

Page 19: ...posici n espec fica Si se emplea en el autom vil un sistema de encendido con un cuadro de distribuci n conecte el cable rojo de prueba al terminal negativo primario del cable de ignici n 3 Conecte el...

Page 20: ...de rango en un radio de m s de 1 V m no hay una exactitud especificada Cuando hay bater a baja visualizado Lectura negativa visualizado Sobrecarga visualizado 1 Equipado con una pantalla llena de icon...

Page 21: ...gas 200mA 0 1 mA 0 8 5 Fusible 315mA 250V tipo r pido 5x20mm 10A 10 mA 1 2 5 Fusible 10mA 250V tipo r pido 5x20mm Observaci n Para medidas continuas 10 segundos e intervalos de tiempo entre 2 medidas...

Page 22: ...Precisi n Protecci n frente a sobrecargas 20V 10mV 3 5 Fusible 315mA 250V tipo r pido 5x20mm Observaci n El medidor tiene integrado una resistencia de carga de 120 2W el valor medido que se muestra en...

Page 23: ...nda 0 5mS L PRUEBA DE TACH VELOCIDAD DE ROTACI N Rango Resoluci n Precisi n Protecci n frente a sobrecargas 4CYL 10 RPM 3 5 600 Vp 6CYL 8CYL Observaciones Alcance de entrada 10v en forma de impulso an...

Page 24: ...tricas o lesiones o da os al medidor utilice los fusibles especificados S LO de acuerdo con el siguiente procedimiento Para cambiar el fusible del medidor 1 Apague el medidor y quite todas las conexio...

Page 25: ...arcasa y reinstale el tornillo y la funda NOTAS IMPORTANTE El fabricante no se responsabiliza de los da os o mal funcionamiento del aparato en caso de que no se use correctamente o se haya utilizado p...

Page 26: ...C Current Testing 35 D Resistance Testing 36 E Diode Testing 37 F Continuity Testing 38 G 12V Battery Measurement 38 H Temperature Measurement 39 I Frequency Measurement 40 J Measuring Duty Cycle 41 K...

Page 27: ...emerges as an electric meter with more outstanding performance for safer operation than other meters In addition to the Dwell Tach and Data Hold feature the Meter can be used to test the AC voltage D...

Page 28: ...ould be placed in the right position and no any changeover of range shall be made during measurement is conducted to prevent damage of the Meter Disconnect circuit power and discharge all highvoltage...

Page 29: ...transmission and be sure that it is equipped with brakes and the wheels have been locked Do not place any tool on the automotive battery which will cause a short circuit of the electrodes and in turn...

Page 30: ...eakage of any terminal crack on any spark plug or breakage at the insulation of the ignition lead 6 Check all the vacuum hoses any right line shrinkage bend crack fracture or damage 7 Check the leads...

Page 31: ...positions Rotary Switch Position Function DC Voltage Measurement AC Voltage Measurement Resistance Measurement Diode Test Continuity Test Unit DC Current Measurement 12V Battery Measurement C Tempera...

Page 32: ...present value is shown In Hold mode is displayed DISPLAY SYMBOLS SEE FIGURE 2 figure 2 1 The battery is low Warning To avoid false readings which could lead to possible electric shock or personal inju...

Page 33: ...3 Connect the test leads across with the object being measured The measured value shows on the display Note If the value of voltage to be measured is unknown use the maximum measurement position 1000V...

Page 34: ...ject beingmeasured The measured value shows on the display It is theeffective value of sine wave mean value response Note If the value of voltage to be measured is unknown use the maximum measurement...

Page 35: ...nnect the Meter as follows 1 Insert the red test lead into the terminal and the black test lead into the COM terminal 2 Set the rotary switch to an appropriate measurement position in 3 Connect the te...

Page 36: ...e shows on the display Note The test leads can add 0 1 to 0 2 of error to theresistance measurement To obtain precision readingsin low resistance that is the range of 200 short circuit the input termi...

Page 37: ...k test lead into the COM terminal 2 Set the rotary switch to 3 For forward voltage drop readings on any semiconductor component place the red test lead on the component s anode and place the black tes...

Page 38: ...e buzzer does not sound when the resistance value is 100 The buzzer sounds continuously when the resistance value is 10 The circuit is in good condition The buzzer may or may not sound when the resist...

Page 39: ...avoid harm to yourselves never attempt to input an effective voltage over 60V in DC or 30V in AC The temperature measurement range is 40 C 1000 C To measure temperature connect the Meter as below 1 I...

Page 40: ...nd theblack test lead into the COM terminal 2 Set the rotary switch to 2kHz 3 Connect the test leads across with the object being measured 4 The measured value shows on the display the unit is kHz Not...

Page 41: ...est lead into the COM terminal 2 Set the rotary switch to Duty 3 Connect the test leads across with the object being measured 4 The measured value shows on the display the unit is Note This measuremen...

Page 42: ...into the COM terminal Connect the ends to be tested as illustrated If the cut off switch of an ignition system is tested connect the red test lead probe to the primary negative end of the ignition co...

Page 43: ...on system with a distributor board is used in the automobile connect the red test lead probe to the primary negative end of the ignition coil Refer to the automotive servicing manual for the specific...

Page 44: ...of 1V m Overall Accuracy Specified Accuracy 5 of Range in a radio field of more than 1 V m no assigned accuracy is specified Battery Deficiency Display Negative reading Display Overloading Display 1...

Page 45: ...nse C DC Current Range Resolution Accuracy Overload Protection 200mA 0 1 mA 0 8 5 Fuse 315mA 250V fast type 5x20mm 10A 10 mA 1 2 5 Fuse 10A 250V fast type 5x20mm Remark When measuring 5 to 10A For con...

Page 46: ...it is in good condition The buzzer may or may not sound when the resistance value is between 10 100 G 12V Battery Range Resolution Accuracy Overload Protection 20V 10mV 3 5 Fuse 315mA 250V fast type 5...

Page 47: ...emark Input Scope 10V in forward impulse Bandwidth 0 5mS L TACH ROTATION SPEED TESTING Range Resolution Accuracy Overload Protection 4CYL 10 RPM 3 5 600 Vp 6CYL 8CYL Remark Input Scope 10V in forward...

Page 48: ...blast or personalinjury or damage to the Meter use specified fuses ONLY in accordance with the following procedure To replace the Meter s fuse 1 Turn the Meter off and remove all connections fromthe t...

Page 49: ...and reinstall the screw and the holster NOTES IMPORTANT The maker will not take responsibility for damage or malfunction as a result of the device being incorrectly used or applied for a purpose for...

Page 50: ...50...

Page 51: ...A PARTIR DE LA DATE D ACHAT EJEMPLAR PARA EGA MASTER COPY FOR EGA MASTER EXEMPLAIRE POUR EGA MASTER ARTICULO ITEM ARTICLE N DE SERIE SERIE N N SERIE DISTRIBUIDOR DISTRIBUTOR DISTRIBUTEUR PAIS COUNTRY...

Page 52: ...C ZORROLLETA 11 POL IND JUNDIZ 01015VITORIA SPAINP O B APTDO 5005 TEL 34 945 290 001 FAX 34 945 290 141 master egamaster com www egamaster com...

Reviews: